One of the main reasons why we can easily identify objects in our daily life is because we can tell the boundary of objects easily with our eyes. For example, whenever we see objects, we can tell the edge between the boundary of the object and the background behind it. Hence, there are some images can play tricks on our eyes and confuse our brain with edge optical illusion.
Sobel-Felman Operator in Computer Vision
Similarly, if a machine would like to understand what it sees, edge detection needs to be implemented in its computer vision. Edge detection, one of the image processing techniques, refers to an algorithm for detecting edges in an image when the image has sharp changes.
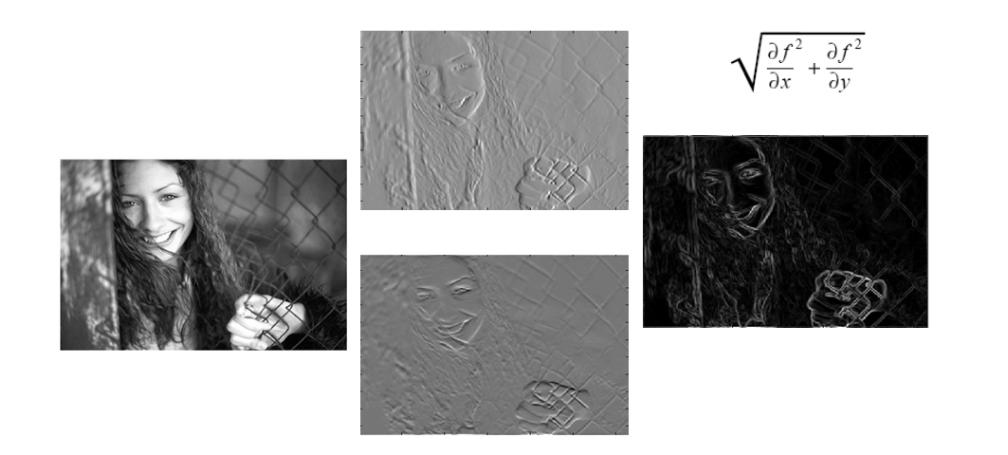
There are many methods for edge detection. One of the methods is using a derivative kernel known as the Sobel-Feldman Operator which can emphasise edges in a given digital image. The operator is based on convolving the image with filters in both horizontal and vertical directions to calculate approximations of the Image Derivatives which will tell us the strength of edges.
An example of how edge strength can be computed with Image Derivative with respect to x and y. (Image Credit: Chris McCormick)
The Kernels
The operator uses two 3×3 kernels which are convolved with the original image to calculate approximations of the derivatives for both horizontal and vertical changes.
We define the two 3×3 kernels as follows. Firstly, the one for calculating the horizontal changes.
Let’s say we have our image in a Bitmap variable sourceImage, then we can perform the following.
int width = sourceImage.Width;
int height = sourceImage.Height;
int bytes = srcData.Stride * srcData.Height;

//Lock source image bits into system memory
BitmapData srcData = sourceImage.LockBits(new Rectangle(0, 0, width, height), ImageLockMode.ReadOnly, PixelFormat.Format32bppArgb);

byte[] pixelBuffer = new byte[bytes];

//Get the address of the first pixel data
IntPtr srcScan0 = srcData.Scan0;

//Copy image data to one of the byte arrays
Marshal.Copy(srcScan0, pixelBuffer, 0, bytes);

//Unlock bits from system memory
sourceImage.UnlockBits(srcData);
Converting to Grayscale Image
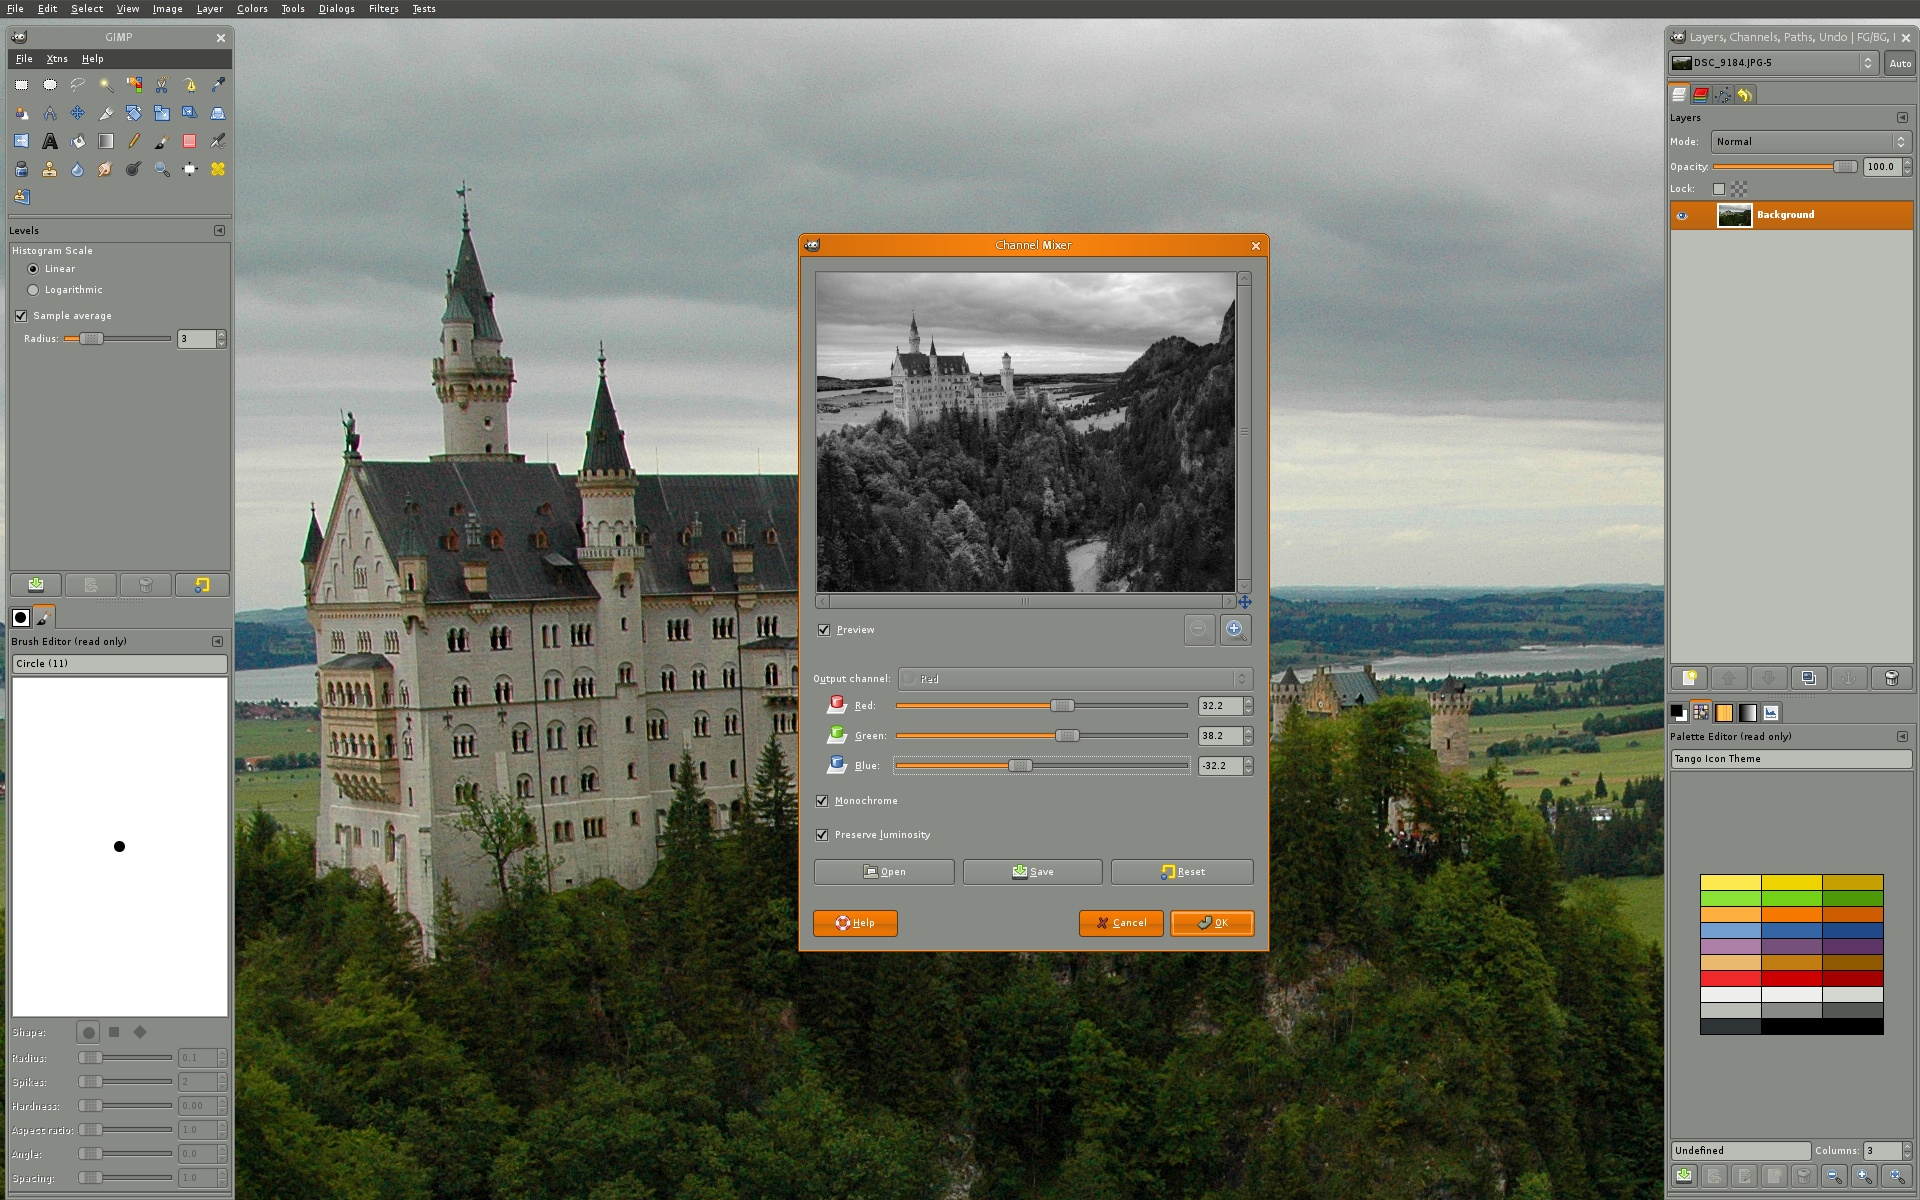
Since our purpose is to identify edges found on objects within the image, it is standard practice to take the original image and convert it to grayscale first so that we can simplifying our problem by ignoring the colours and other noise. Only then we perform the edge detection on this grayscale image.
However, how do we convert colour to grayscale?
GIMP is a cross-platform image editor available for GNU/Linux, macOS, Windows and more operating systems. (Credit: GIMP)
Now we can finally calculate the approximations of the derivatives. Given S as the grayscale of sourceImage, and Gx and Gy are two images which at each point containing the horizontal and vertical derivative approximations respectively, we have the following.
Given such estimates of the Image Derivatives, the gradient magnitude is then computed as follows.
Translating to C#, the formulae above will look like the following code. As we all know, S here is grayscale, so we will only focus on one colour channel instead of all RGB.
//Create variable for pixel data for each kernel
double xg = 0.0;
double yg = 0.0;
double gt = 0.0;

//This is how much our center pixel is offset from the border of our kernel
//Sobel is 3x3, so center is 1 pixel from the kernel border
int filterOffset = 1;
int calcOffset = 0;
int byteOffset = 0;

byte[] resultBuffer = new byte[bytes];

//Start with the pixel that is offset 1 from top and 1 from the left side
//this is so entire kernel is on our image
for (int offsetY = filterOffset; offsetY < height - filterOffset; offsetY++)
{
    for (int offsetX = filterOffset; offsetX < width - filterOffset; offsetX++)
    {
        //reset rgb values to 0
        xg = yg = 0;
        gt = 0.0;

        //position of the kernel center pixel
        byteOffset = offsetY * srcData.Stride + offsetX * 4;

        //kernel calculations
        for (int filterY = -filterOffset; filterY <= filterOffset; filterY++)
        {
            for (int filterX = -filterOffset; filterX <= filterOffset; filterX++)
            {
                calcOffset = byteOffset + filterX * 4 + filterY * srcData.Stride;
                xg += (double)(pixelBuffer[calcOffset + 1]) * xkernel[filterY + filterOffset, filterX + filterOffset];
                yg += (double)(pixelBuffer[calcOffset + 1]) * ykernel[filterY + filterOffset, filterX + filterOffset];
            }
        }

        //total rgb values for this pixel
        gt = Math.Sqrt((xg * xg) + (yg * yg));
        if (gt > 255) gt = 255;
        else if (gt < 0) gt = 0;

        //set new data in the other byte array for output image data
        resultBuffer[byteOffset] = (byte)(gt);
        resultBuffer[byteOffset + 1] = (byte)(gt);
        resultBuffer[byteOffset + 2] = (byte)(gt);
        resultBuffer[byteOffset + 3] = 255;
    }
}
Output Image
With the resultBuffer, we can now generate the output as an image using the following codes.
//Create new bitmap which will hold the processed data
Bitmap resultImage = new Bitmap(width, height);

//Lock bits into system memory
BitmapData resultData = resultImage.LockBits(new Rectangle(0, 0, width, height), ImageLockMode.WriteOnly, PixelFormat.Format32bppArgb);

//Copy from byte array that holds processed data to bitmap
Marshal.Copy(resultBuffer, 0, resultData.Scan0, resultBuffer.Length);

//Unlock bits from system memory
resultImage.UnlockBits(resultData);
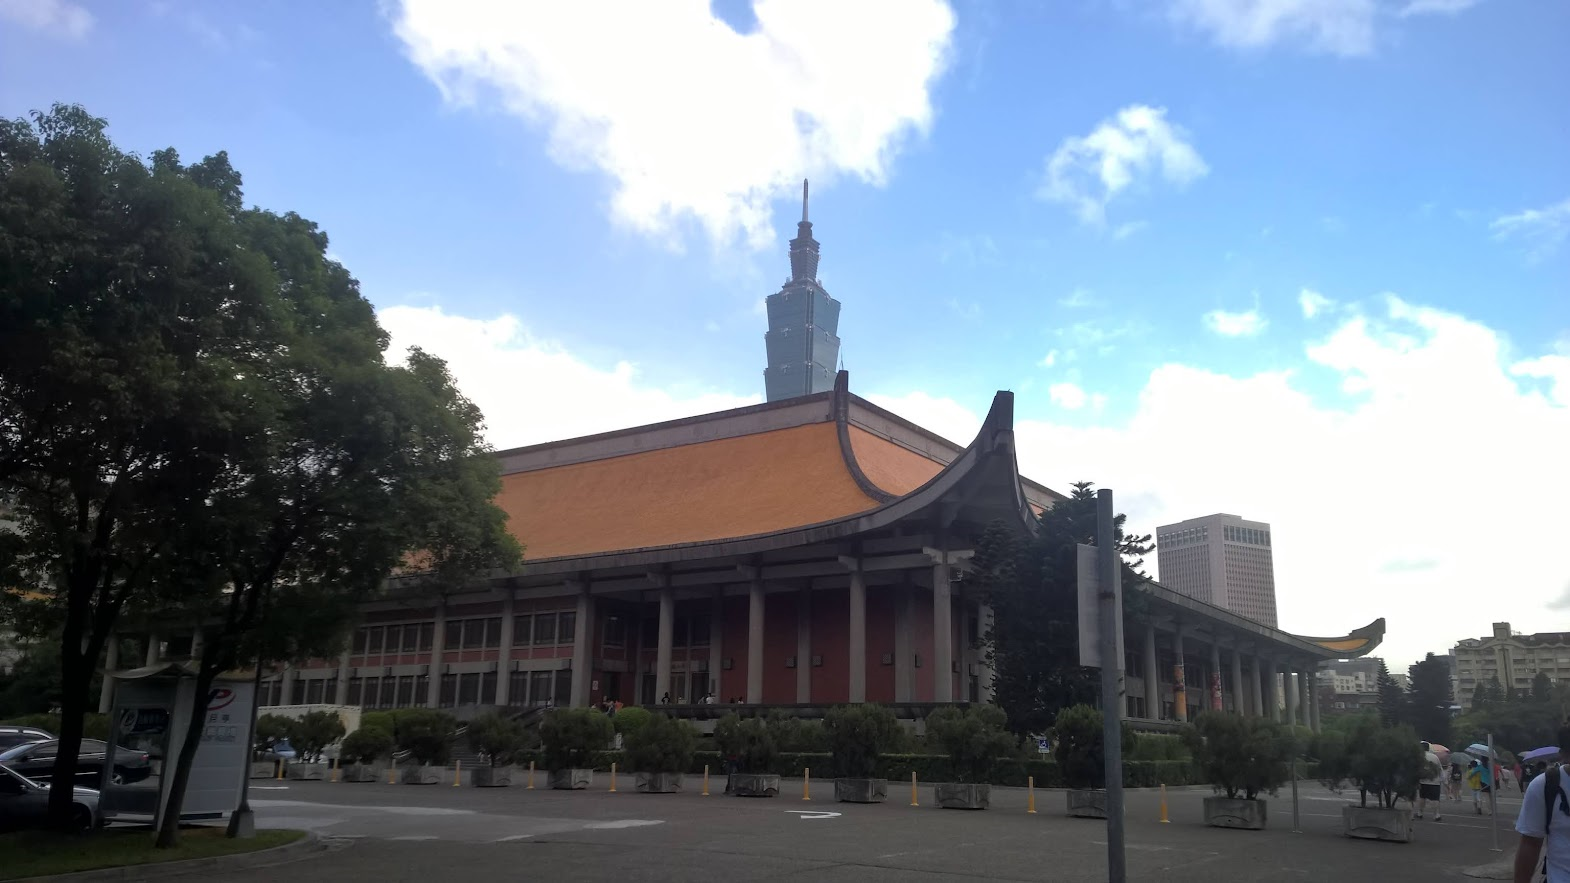
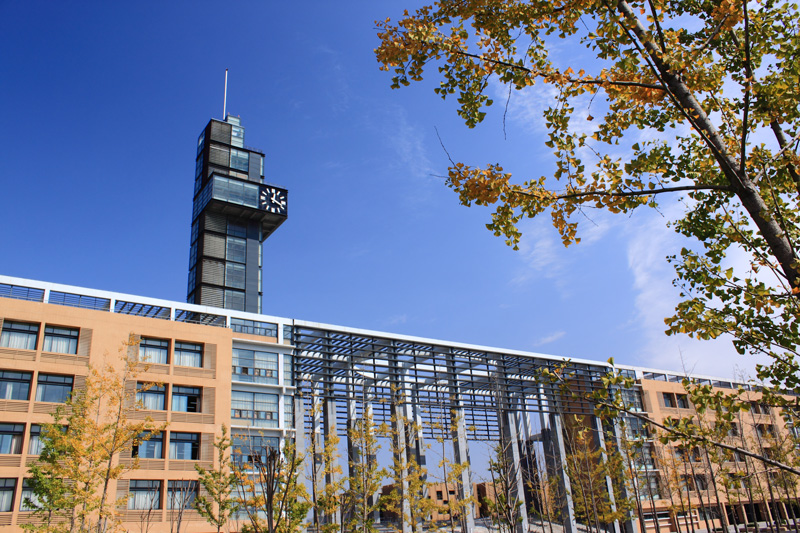
So, let’s say the image below is our sourceImage,
A photo of Taipei that I took when I was in Taiwan.
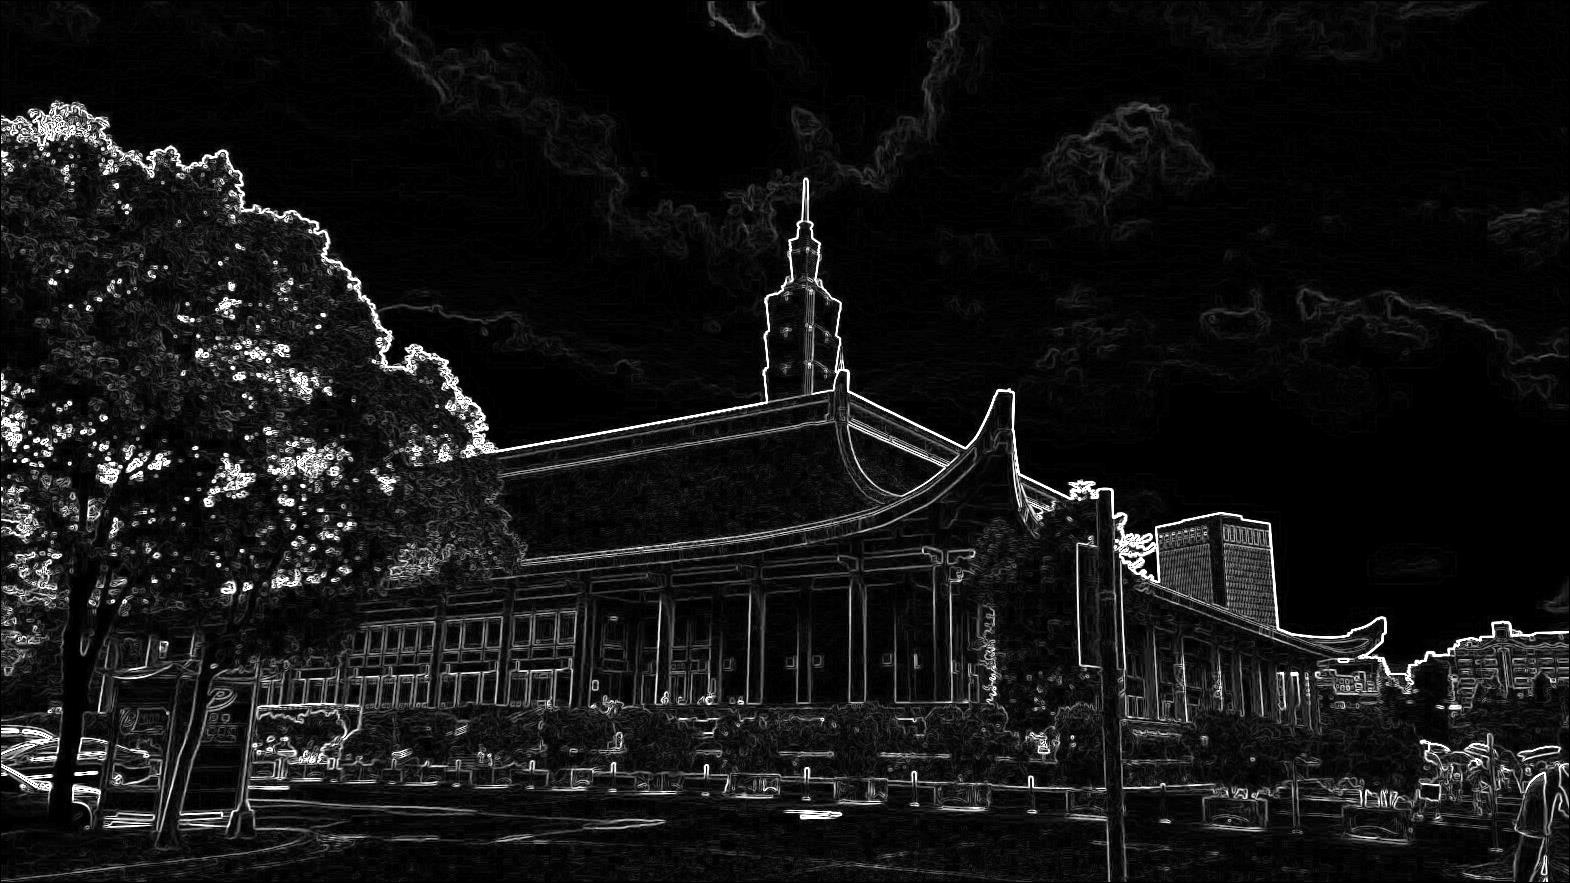
then the algorithm above should return us an image which contains only the detected edges as shown below.
Successful edge detection on the Taipei photo above.
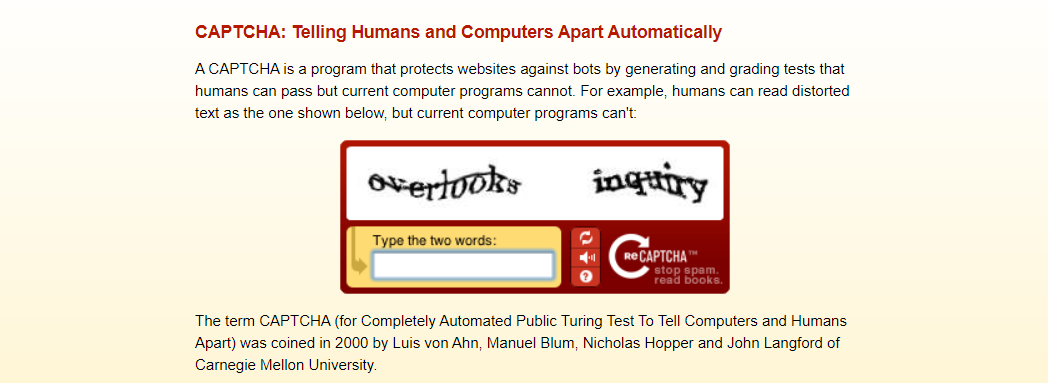
The words shown in reCAPTCHA come directly from old books that are being digitized. Hence, it does not only stop spam, but also help digitise books at the same time. (Source: reCAPTCHA)
A team led by Prof Gao Haichang from Xidian University realised that, with the development of automated computer vision techniques such as OCR, traditional text-based CAPTHCAs are not considered safe anymore for authentication. During the IEEE conference in 2010, they thus proposed a new way, i.e. using an image based CAPTCHA which involves in solving a jigsaw puzzle. Their experiments and security analysis further proved that human can complete the jigsaw puzzle CAPTCHA verification quickly and accurately which bots rarely can. Hence, jigsaw puzzle CAPTCHA can be a substitution to the text-based CAPTCHA.
Xidian University, one of the 211 Project universities and a high level scientific research innovation in China. (Image Source: Shulezetu)
In 2019, on CSDN (Chinese Software Developer Network), a developer 不写BUG的瑾大大 shared his implementation of jigsaw puzzle captcha in Java. It’s a very detailed blog post but there is still room for improvement in, for example, documenting the code and naming the variables. Hence, I’d like to take this opportunity to implement this jigsaw puzzle CAPTCHA in .NET 5 with C# and Blazor. I also host the demo web app on Azure Static Web App so that you all can access and play with the CAPTCHA: https://jpc.chunlinprojects.com/.
Today, jigsaw puzzle CAPTCHA is used in many places. (Image Credit: Hirabiki at HoYoLAB)
Jigsaw Puzzle CAPTCHA
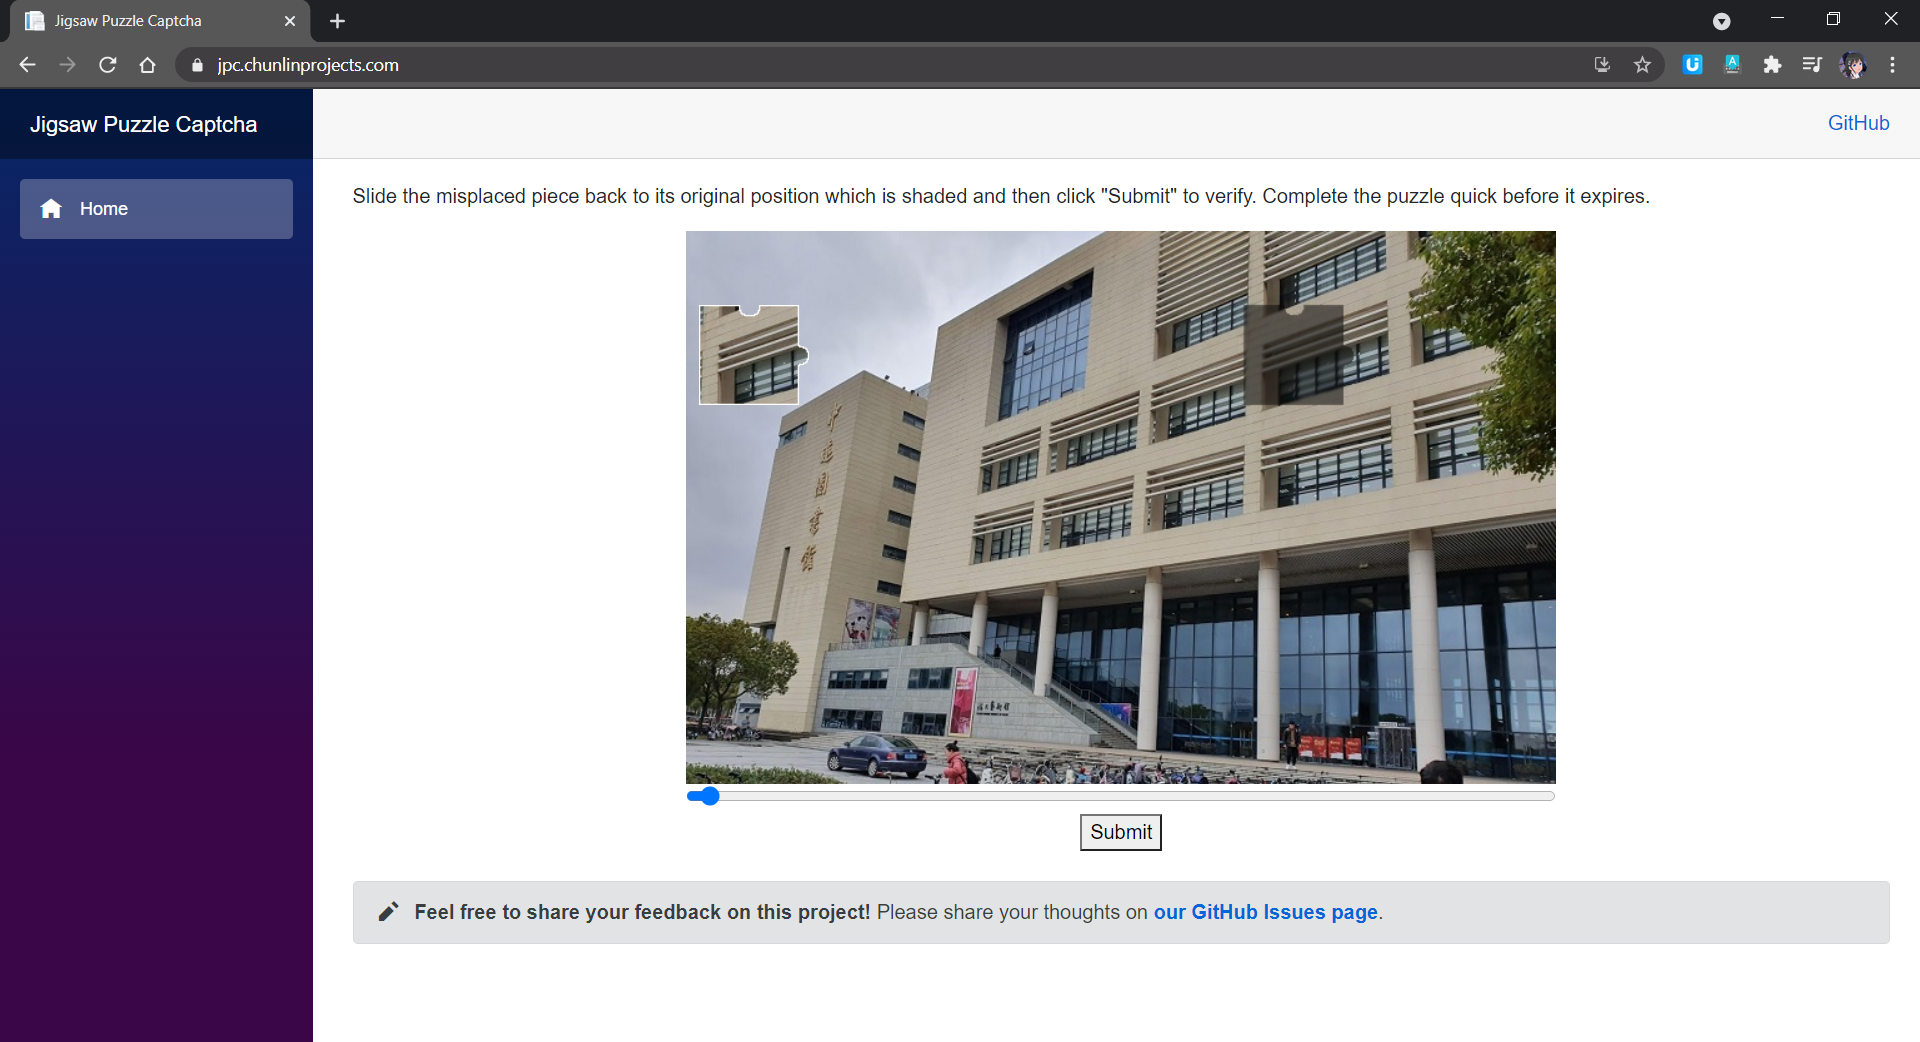
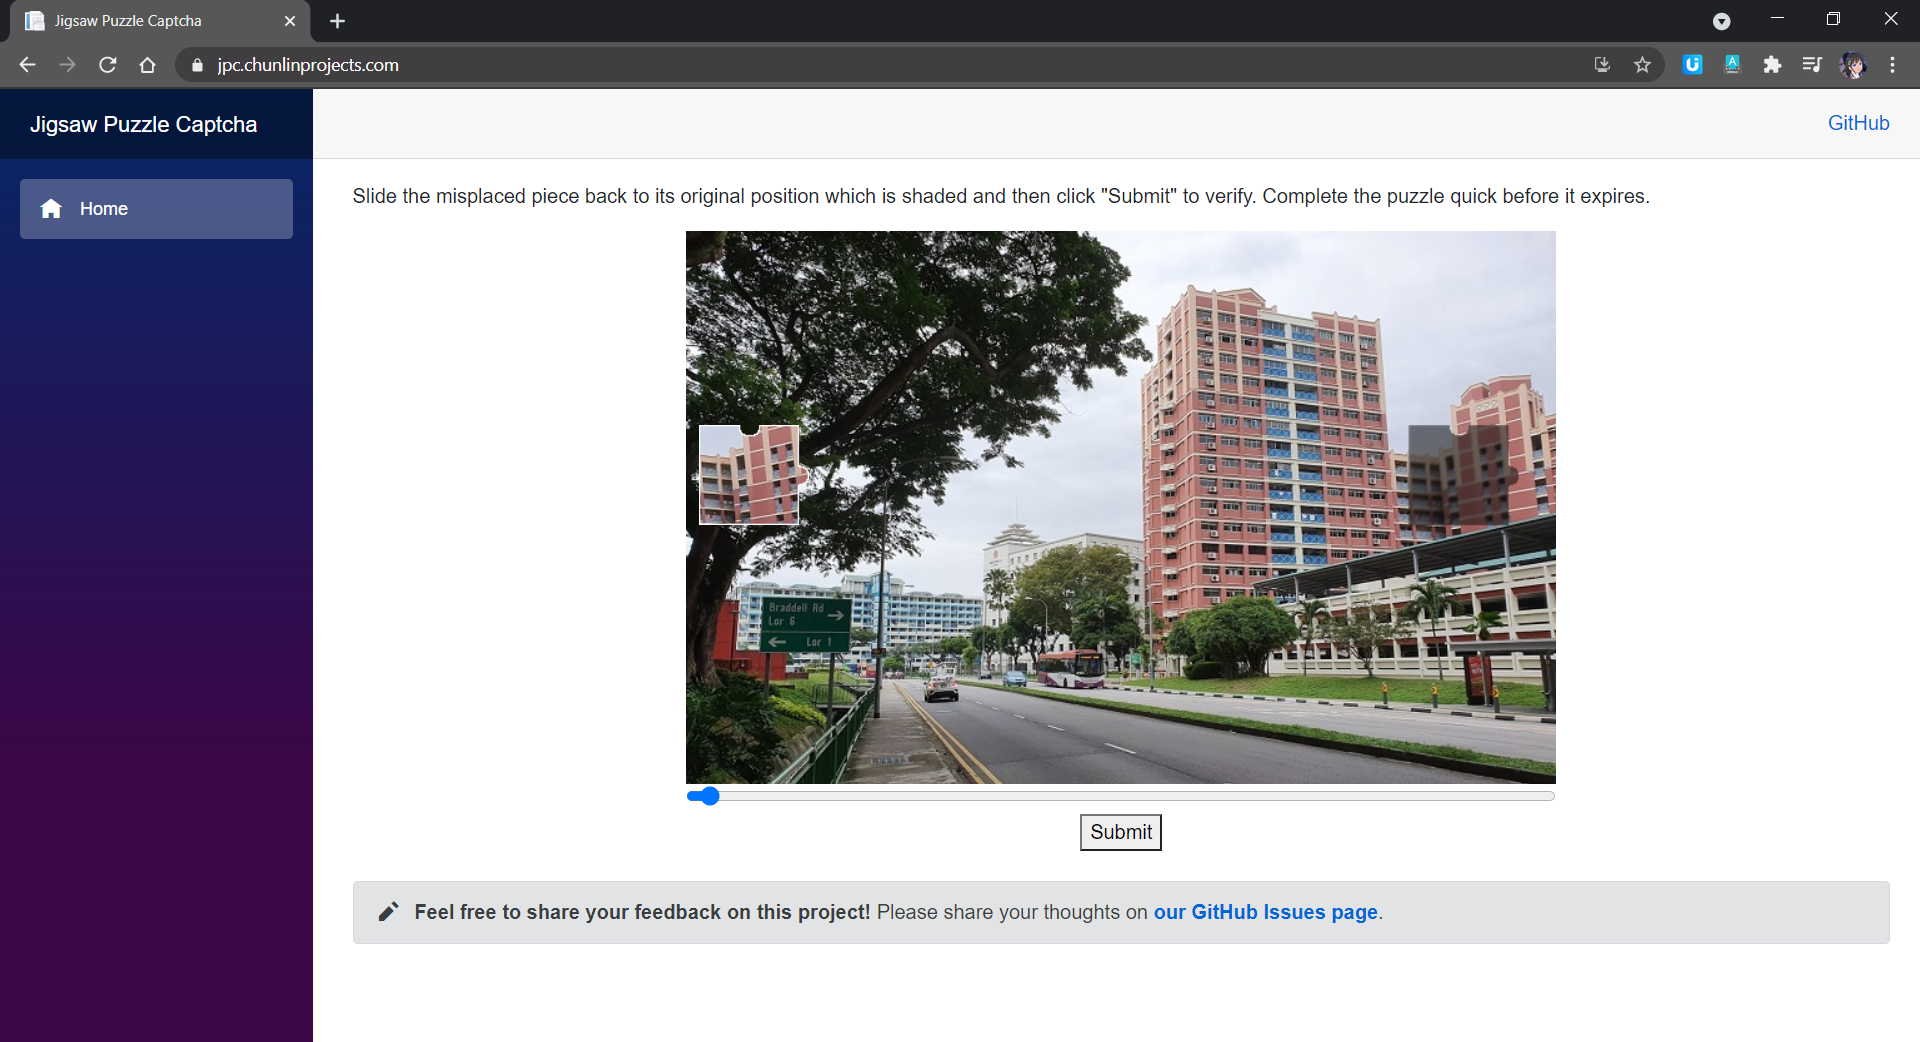
In a jigsaw puzzle CAPTCHA, there is usually a jigsaw puzzle with at least one misplaced piece where users need to move to the correct place to complete the puzzle. In my demo, I have only one misplaced piece that needs to be moved.
Jigsaw puzzle CAPTCHA implementation on Blazor. (Try it here)
As shown in the screenshot above, there are two necessary images in the CAPTCHA. One of them is a misplaced piece of the puzzle. Another image is the original image with a shaded area indicating where the misplaced piece should be dragged to. What users need to do is just dragging the slider to move the misplaced piece to the shaded area to complete the jigsaw puzzle within a time limit.
In addition, here the CAPTCHA only needs user to drag the missing piece horizontally. This is not only the popular implementation of the jigsaw puzzle CAPTCHA, but also not too challenging for users to pass the CAPTCHA.
Now, let’s see how we can implement this in C# and later deploy the codes to Azure.
Retrieve the Original Image
The first thing we need to do is getting an image for the puzzle. We can have a collection of images that make good jigsaw puzzle stored in our Azure Blob Storage. After that, each time before generating the jigsaw puzzle, we simply need to fetch all the images from the Blob Storage with the following codes and randomly pick one as the jigsaw puzzle image.
public async Task<List<string>> GetAllImageUrlsAsync()
{
    var output = new List<string>();

    var container = new BlobContainerClient(_storageConnectionString, _containerName);

    var blobItems = container.GetBlobsAsync();

    await foreach (var blob in blobItems)
    {
        var blobClient = container.GetBlobClient(blob.Name);
        output.Add(blobClient.Uri.ToString());
    }

    return output;
}
Define the Missing Piece Template
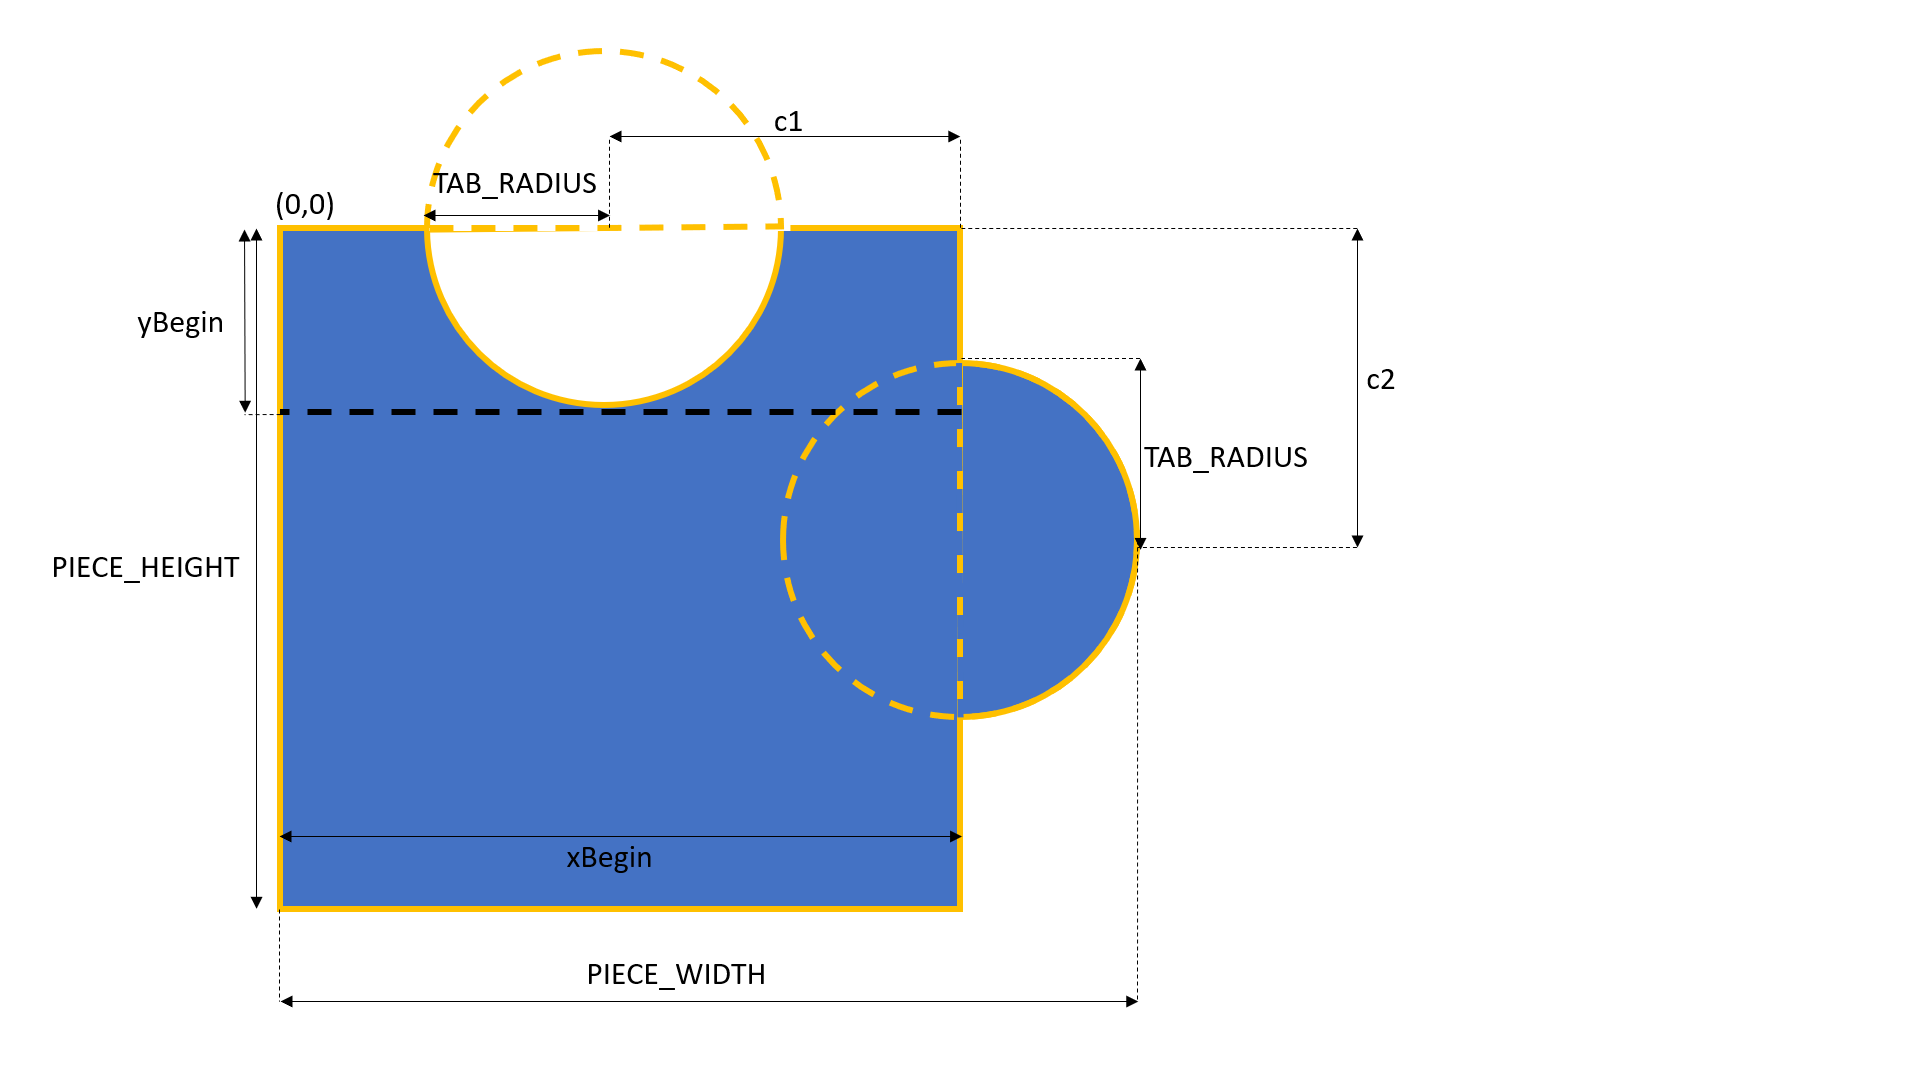
To increase the difficulty of the puzzle, we can have jigsaw pieces with different patterns, such as having tabs appearing on different sides of the pieces. In this demo, I will stick to just one pattern of missing piece, which has tabs on the top and right sides, as shown below.
The missing piece template.
The tabs are basically two circles with the same radius. Their centers are positioned at the middle point of the rectangle side. Hence, we can now build a 2D matrix for the pixels indicating the missing piece template with 1 means inside of the the piece and 0 means outside of the piece.
In addition, we know the general equation of a circle of radius r at origin (h,k) is as follows.
Hence, if there is a point (i,j) inside the circle above, then the following must be true.
If the point (i,j) is outside of the circle, then the following must be true.
With these information, we can build our missing piece 2D matrix as follows.
After that, we can determine the border of the missing piece easily too from just the template data above. We then can draw the border of the missing piece for better user experience when we display it on screen.
Next, we need to tell the user where the missing piece should be dragged to. We will use the template data above and apply it to the original image we get from the Azure Blob Storage.
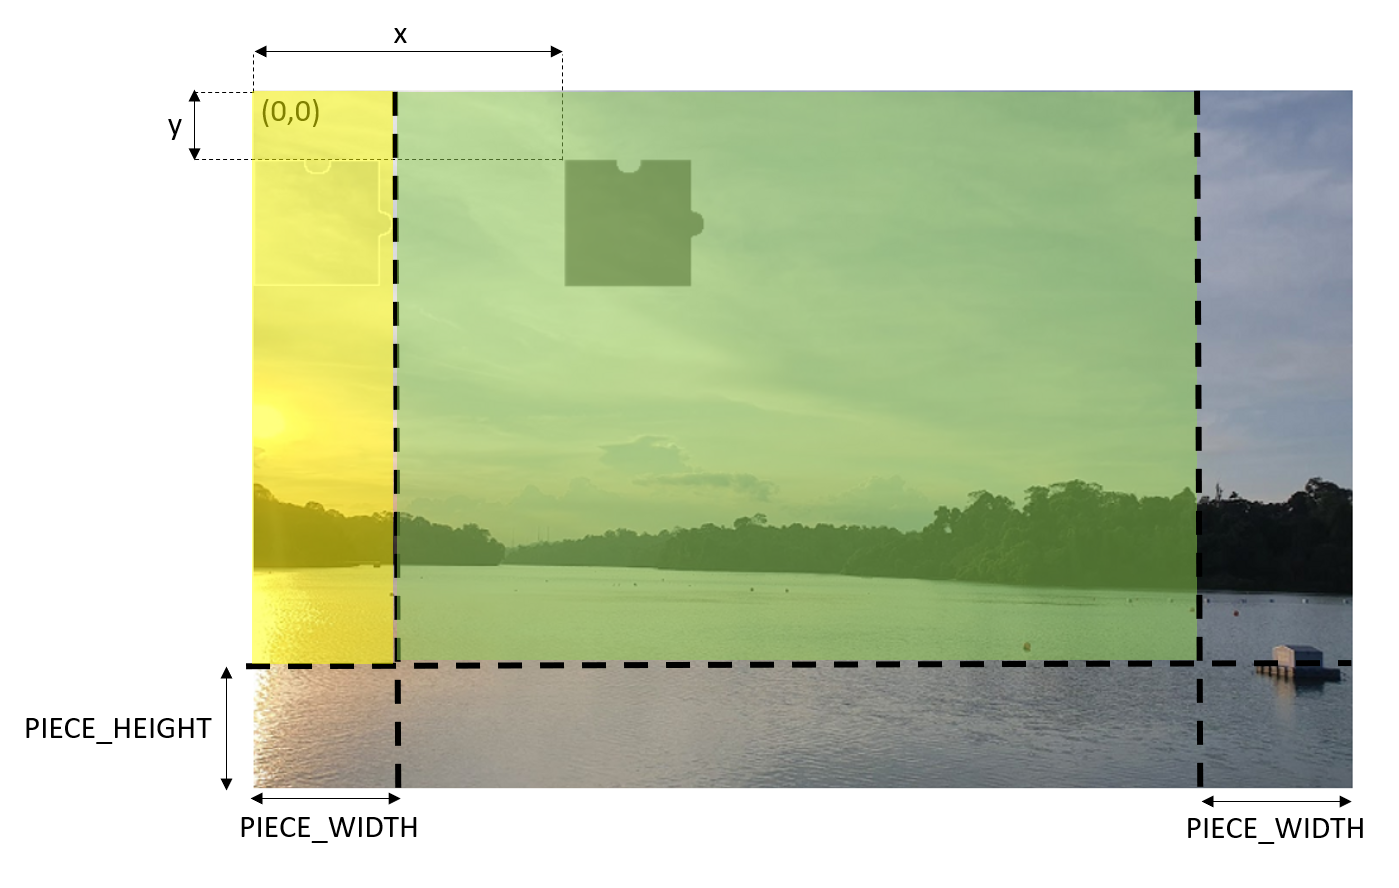
Due to the shape of the missing piece, the proper area to have the shaded area needs to be in the region highlighted in green colour below. Otherwise, the shaded area will not be shown completely and thus give users a bad user experience. The yellow area is okay too but we don’t allow the shaded area to be there to avoid cases where the missing piece covers the shaded area when the images first load and thus confuses the users.
Random random = new Random();

int x = random.Next(originalImage.Width - 2 * PIECE_WIDTH) + PIECE_WIDTH;
int y = random.Next(originalImage.Height - PIECE_HEIGHT);
Green area is where the top left of the shaded area should be positioned at.
Let’s assume the shaded area is at the point (x,y) of the original image, then given the original image in a Bitmap variable called originalImage, we can then have the following code to traverse the area and process the pixels in that area.
...
int[,] missingPiecePattern = GetMissingPieceData();

for (int i = 0; i < PIECE_WIDTH; i++)
{
    for (int j = 0; j < PIECE_HEIGHT; j++)
    {
        int templatePattern = missingPiecePattern[i, j];
        int originalArgb = originalImage.GetPixel(x + i, y + j).ToArgb();

        if (templatePattern == 1)
        {
            ...
            originalImage.SetPixel(x + i, y + j, FilterPixel(originalImage, x + i, y + j));
        }
        else
        {
            missingPiece.SetPixel(i, j, Color.Transparent);
        }
    }
}
...
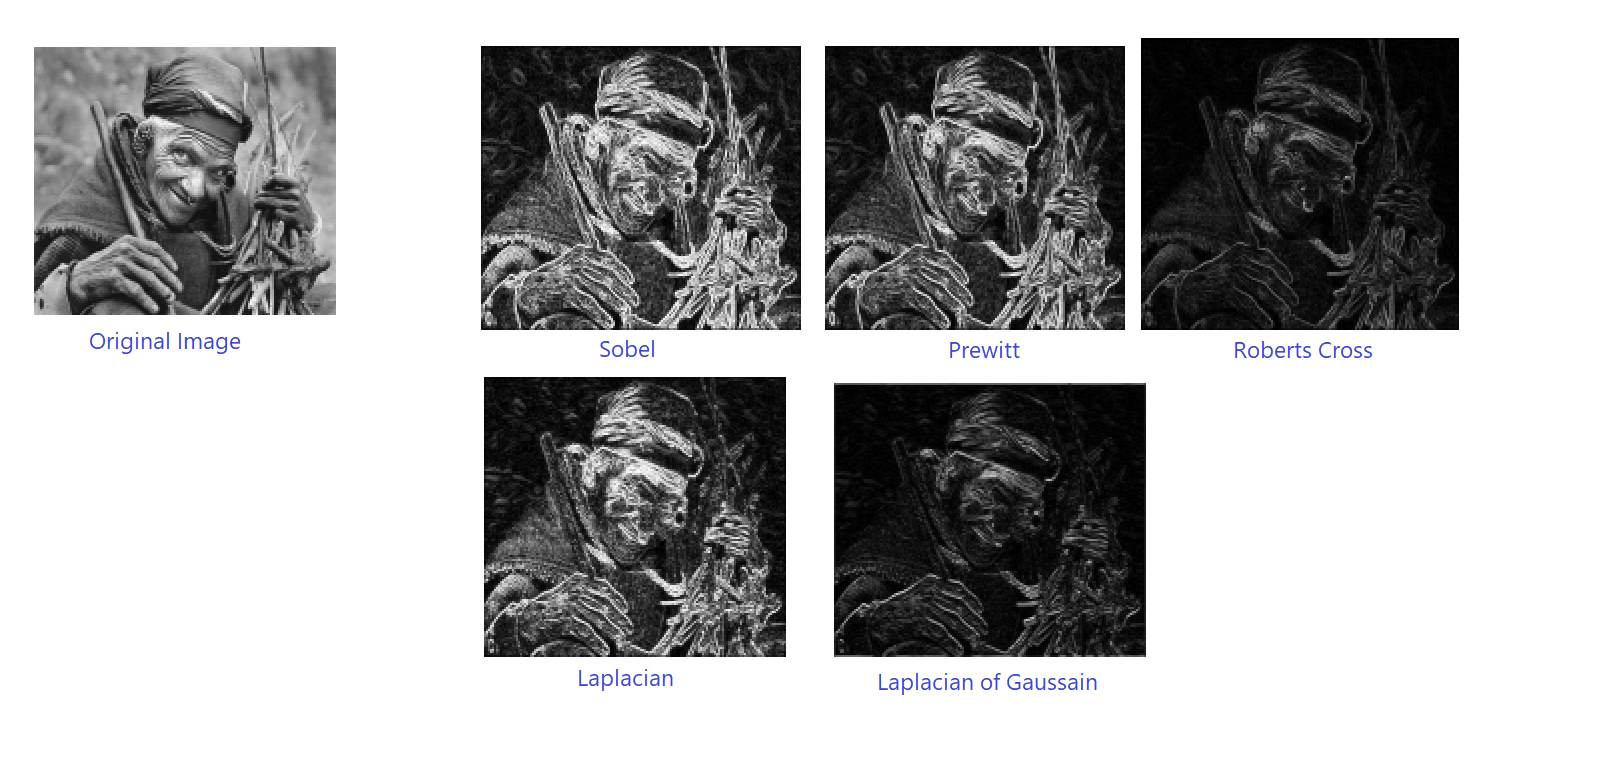
Kernels used in different types of image processing.
For the kernel, I don’t really follow the official Box Blur kernel or Gaussian Blur kernel. Instead, I dim the generated colour by forcing three pixel to be always black (when i = j). This is to make sure the shaded area is not only blurred but darkened.
private Color FilterPixel(Bitmap img, int x, int y)
{
    const int KERNEL_SIZE = 3;
    int[,] kernel = new int[KERNEL_SIZE, KERNEL_SIZE];

    ...

    int r = 0;
    int g = 0;
    int b = 0;
    int count = KERNEL_SIZE * KERNEL_SIZE;
    for (int i = 0; i < kernel.GetLength(0); i++)
    {
        for (int j = 0; j < kernel.GetLength(1); j++)
        {
            Color c = (i == j) ? Color.Black : Color.FromArgb(kernel[i, j]);
            r += c.R;
            g += c.G;
            b += c.B;
        }
    }

return Color.FromArgb(r / count, g / count, b / count);
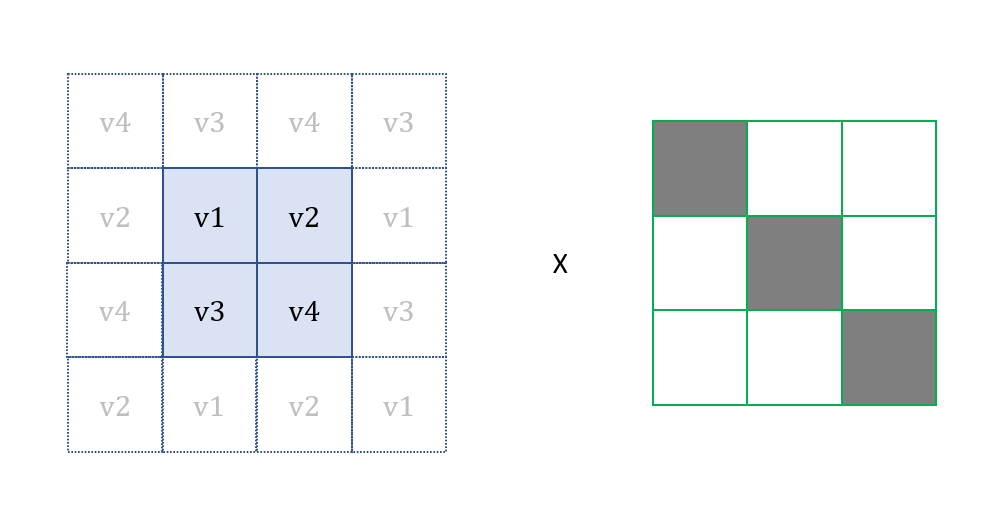
What will happen when we are processing pixel without all 8 neighbouring pixels? To handle this, we will take the value of the pixel at the opposite position which is describe in the following diagram.
Applying kernel on edge pixels.
Since we have two images ready, i.e. an image for the missing piece and another image which shows where the missing piece needs to be, we can convert them into base 64 string and send the string values to the web page.
Now, the next step will be displaying these two images on the Blazor web app.
The purpose of API in this project is to retrieve the jigsaw puzzle images and verify user submissions. We don’t need a full server for our API because Azure Static Web Apps hosts our API in Azure Functions. So we need to implement our API as Azure Functions here.
We will have two API methods here. The first one is to retrieve the jigsaw puzzle images, as shown below.
[FunctionName("JigsawPuzzleGet")]
public async Task<IActionResult> Run(
    [HttpTrigger(AuthorizationLevel.Anonymous, "get", Route = "jigsaw-puzzle")] HttpRequest req,
    ILogger log)
{
    log.LogInformation("C# HTTP trigger function processed a request.");

    var availablePuzzleImageUrls = await _puzzleImageService.GetAllImageUrlsAsync();

    var random = new Random();
    string selectedPuzzleImageUrl = availablePuzzleImageUrls[random.Next(availablePuzzleImageUrls.Count)];

    var jigsawPuzzle = _puzzleService.CreateJigsawPuzzle(selectedPuzzleImageUrl);
    _captchaStorageService.Save(jigsawPuzzle);

    return new OkObjectResult(jigsawPuzzle);
}
The Azure Function first retrieve all the images from the Azure Blob Storage and then randomly pick one to use in the jigsaw puzzle generation.
Before it returns the puzzle images back in a jigsawPuzzle object, it also saves it into Azure Table Storage so that later when users submit their answer back, we can have another Azure Function to verify whether the users solve the puzzle correctly.
In the Azure Table Storage, we generate a GUID and then store it together with the location of the shaded area, which is randomly generated, as well as an expiry date and time so that users must solve the puzzle within a limited time.
...
var tableClient = new TableClient(...);

...

var entity = new JigsawPuzzleEntity
{
    PartitionKey = ...,
    RowKey = id,
    Id = id,
    X = x,
    Y = y,
    CreatedAt = createdAt,
    ExpiredAt = expiredAt
};

tableClient.AddEntity(entity);
...
Here, GUID is used as the RowKey of the Table Storage. Hence, later when user submits his/her answer, the GUID will be sent back to the Azure Function to help locate back the corresponding record in the Table Storage.
[FunctionName("JigsawPuzzlePost")]
public async Task<IActionResult> Run(
    [HttpTrigger(AuthorizationLevel.Anonymous, "post", Route = "jigsaw-puzzle")] HttpRequest req,
    ILogger log)
{
    log.LogInformation("C# HTTP trigger function processed a request.");

    var body = await new StreamReader(req.Body).ReadToEndAsync();
    var puzzleSubmission = JsonSerializer.Deserialize<PuzzleSubmissionViewModel>(body, new JsonSerializerOptions { PropertyNamingPolicy = JsonNamingPolicy.CamelCase });

    var correspondingRecord = await _captchaStorageService.LoadAsync(puzzleSubmission.Id);

    ...

    bool isPuzzleSolved = _puzzleService.IsPuzzleSolved(...);

    var response = new Response
    {
        IsSuccessful = isPuzzleSolved,
        Message = isPuzzleSolved ? "The puzzle is solved" : "Sorry, time runs out or you didn't solve the puzzle"
    };

    return new OkObjectResult(response);
}
Since our API is hosted as Azure Function in Consumption Plan, as shown in the screenshot below, we need to note that our code in the Function will be in the serverless mode, i.e. it effectively scales out to meet whatever load it is seeing and scales down when code isn’t running.
The Azure Function managed by the Static Web App will be in Consumption Plan.
Latency will be there when Function is cold. (Image Source: Microsoft Azure Blog)
In this project, my friend feedbacked to me that he had encountered at least 15 seconds of latency to have the jigsaw puzzle loaded.
Blazor Frontend
Now we can move on to the frontend.
To show the jigsaw puzzle images when the page is loaded, we have the following code.
protected override async Task OnInitializedAsync()
{
    var jigsawPuzzle = await http.GetFromJsonAsync("api/jigsaw-puzzle");
    id = jigsawPuzzle.Id;
    backgroundImage = "data:image/png;base64, " + jigsawPuzzle.BackgroundImage;
    missingPieceImage = jigsawPuzzle.MissingPieceImage;
    y = jigsawPuzzle.Y;
}
Take note that we don’t only get the two images but also the GUID of the jigsaw puzzle record in the Azure Table Storage so that later we can send back this information to the Azure Function for submission verification.
Here, we only return the y-axis value of the shaded area location because users are only allowed to drag the missing puzzle horizontally as discussed earlier. If you would like to increase the difficulty of the CAPTCHA by allowing users to drag the missing piece vertically as well, you can choose not to return the y-axis value.
We then have the following HTML to display the two images.
The Submit method is as follows which will feedback to users whether they solve the jigsaw puzzle correctly or not. Here I use a toast library for Blazor done by Chris Sainty, a Microsoft MVP.
private async Task Submit()
{
    var submission = new PuzzleSubmissionViewModel
    {
        Id = id,
        X = x
    };

    var response = await http.PostAsJsonAsync("api/jigsaw-puzzle", submission);

    var responseMessage = await response.Content.ReadFromJsonAsync<Response>();

    if (responseMessage.IsSuccessful)
    {
        toastService.ShowSuccess(responseMessage.Message);
    }
    else
    {
        toastService.ShowError(responseMessage.Message);
    }

}
Now we can test how our app works!
Testing Locally
Before we can test locally, we need to provide the secrets and relevant settings to access Azure Blob Storage and Table Storage.
In addition, please remember to exclude local.settings.json from the source control.
In the Client project, since we are going to run our Api at port 7071, we shall let the Client know too. To do so, we first need to specify the base address for local in the Program.cs of the Client project.
builder.Services.AddScoped(sp => new HttpClient { BaseAddress = new Uri(builder.Configuration["API_Prefix"] ?? builder.HostEnvironment.BaseAddress) });
Then we can specify the value for API_Prefix in the appsettings.Development.json in the wwwroot folder.
{
    "API_Prefix": "http://localhost:7071"
}
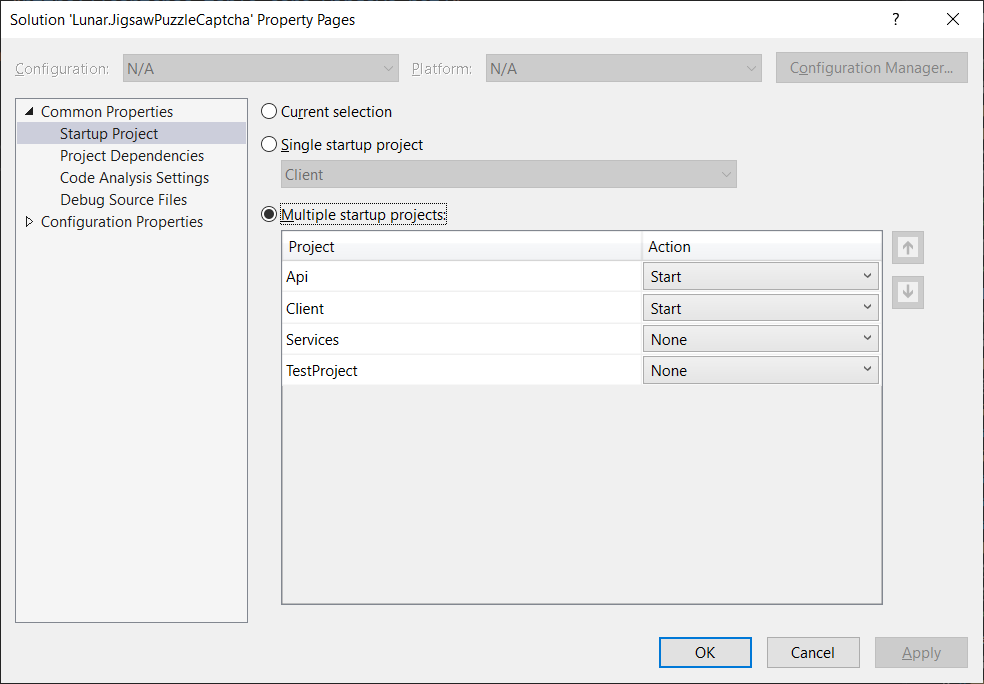
Finally, please also set both Api and Client projects as the Startup Project in the Visual Studio.
Setting multiple startup projects in Visual Studio.
Deploy to Azure Static Web App
After we have created an Azure Static Web Apps resource and bound it with a GitHub Actions which monitors our GitHub repository, the workflow will automatically build and deploy our app and its API to Azure every time we commit or create pull requests into the watched branch. The steps have been described in my previous blog post about Blazor on Azure Static Web App, so I won’t repeat it here.
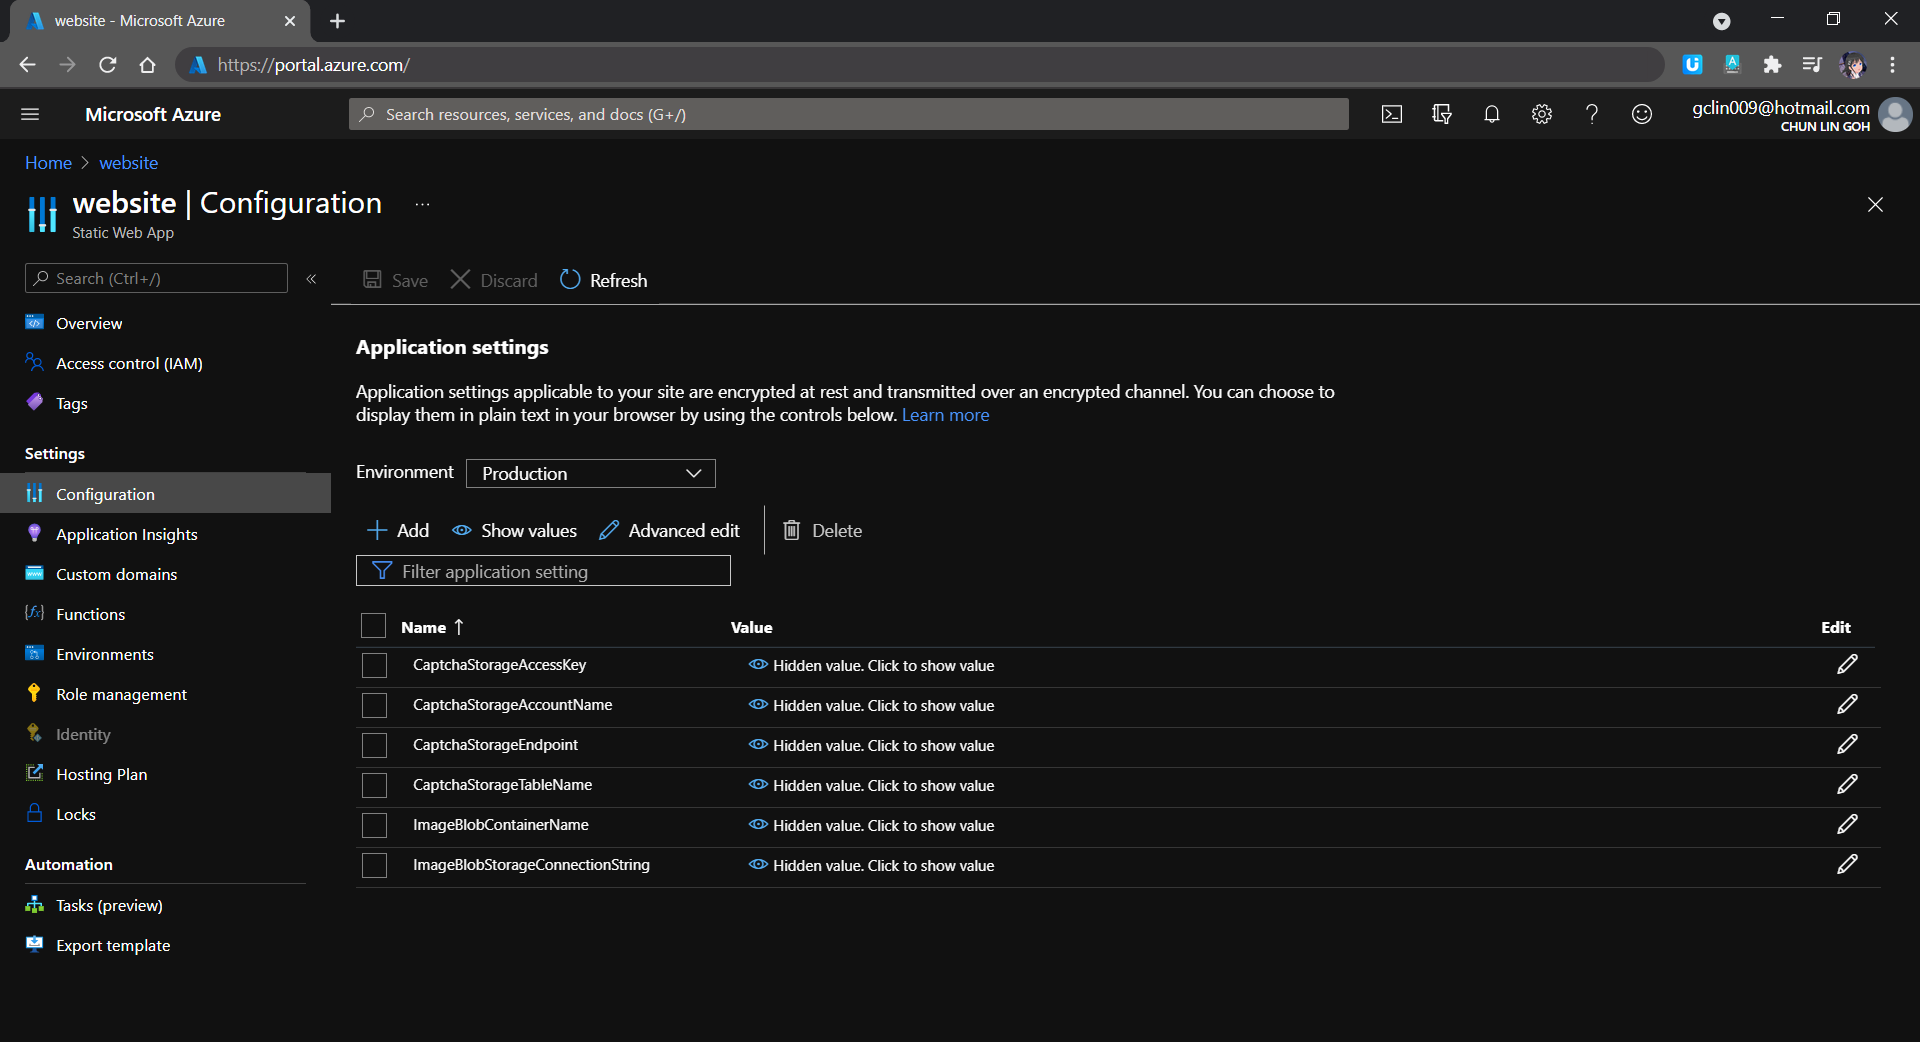
Since our API needs to have the information of secrets and connection settings to the Azure Storage, we need to specify them under Application Settings of the Azure Static Web App as well. The values will be accessible by API methods in the Azure Functions.
Managing the secrets in Application Settings.
Yup, that’s all for implementing a jigsaw puzzle CAPTCHA in .NET. Feel free to try it out on my Azure Static Web App and let me know your thoughts about it. Thank you!
Jigsaw puzzle CAPTCHA implementation on Blazor. (Try it here)
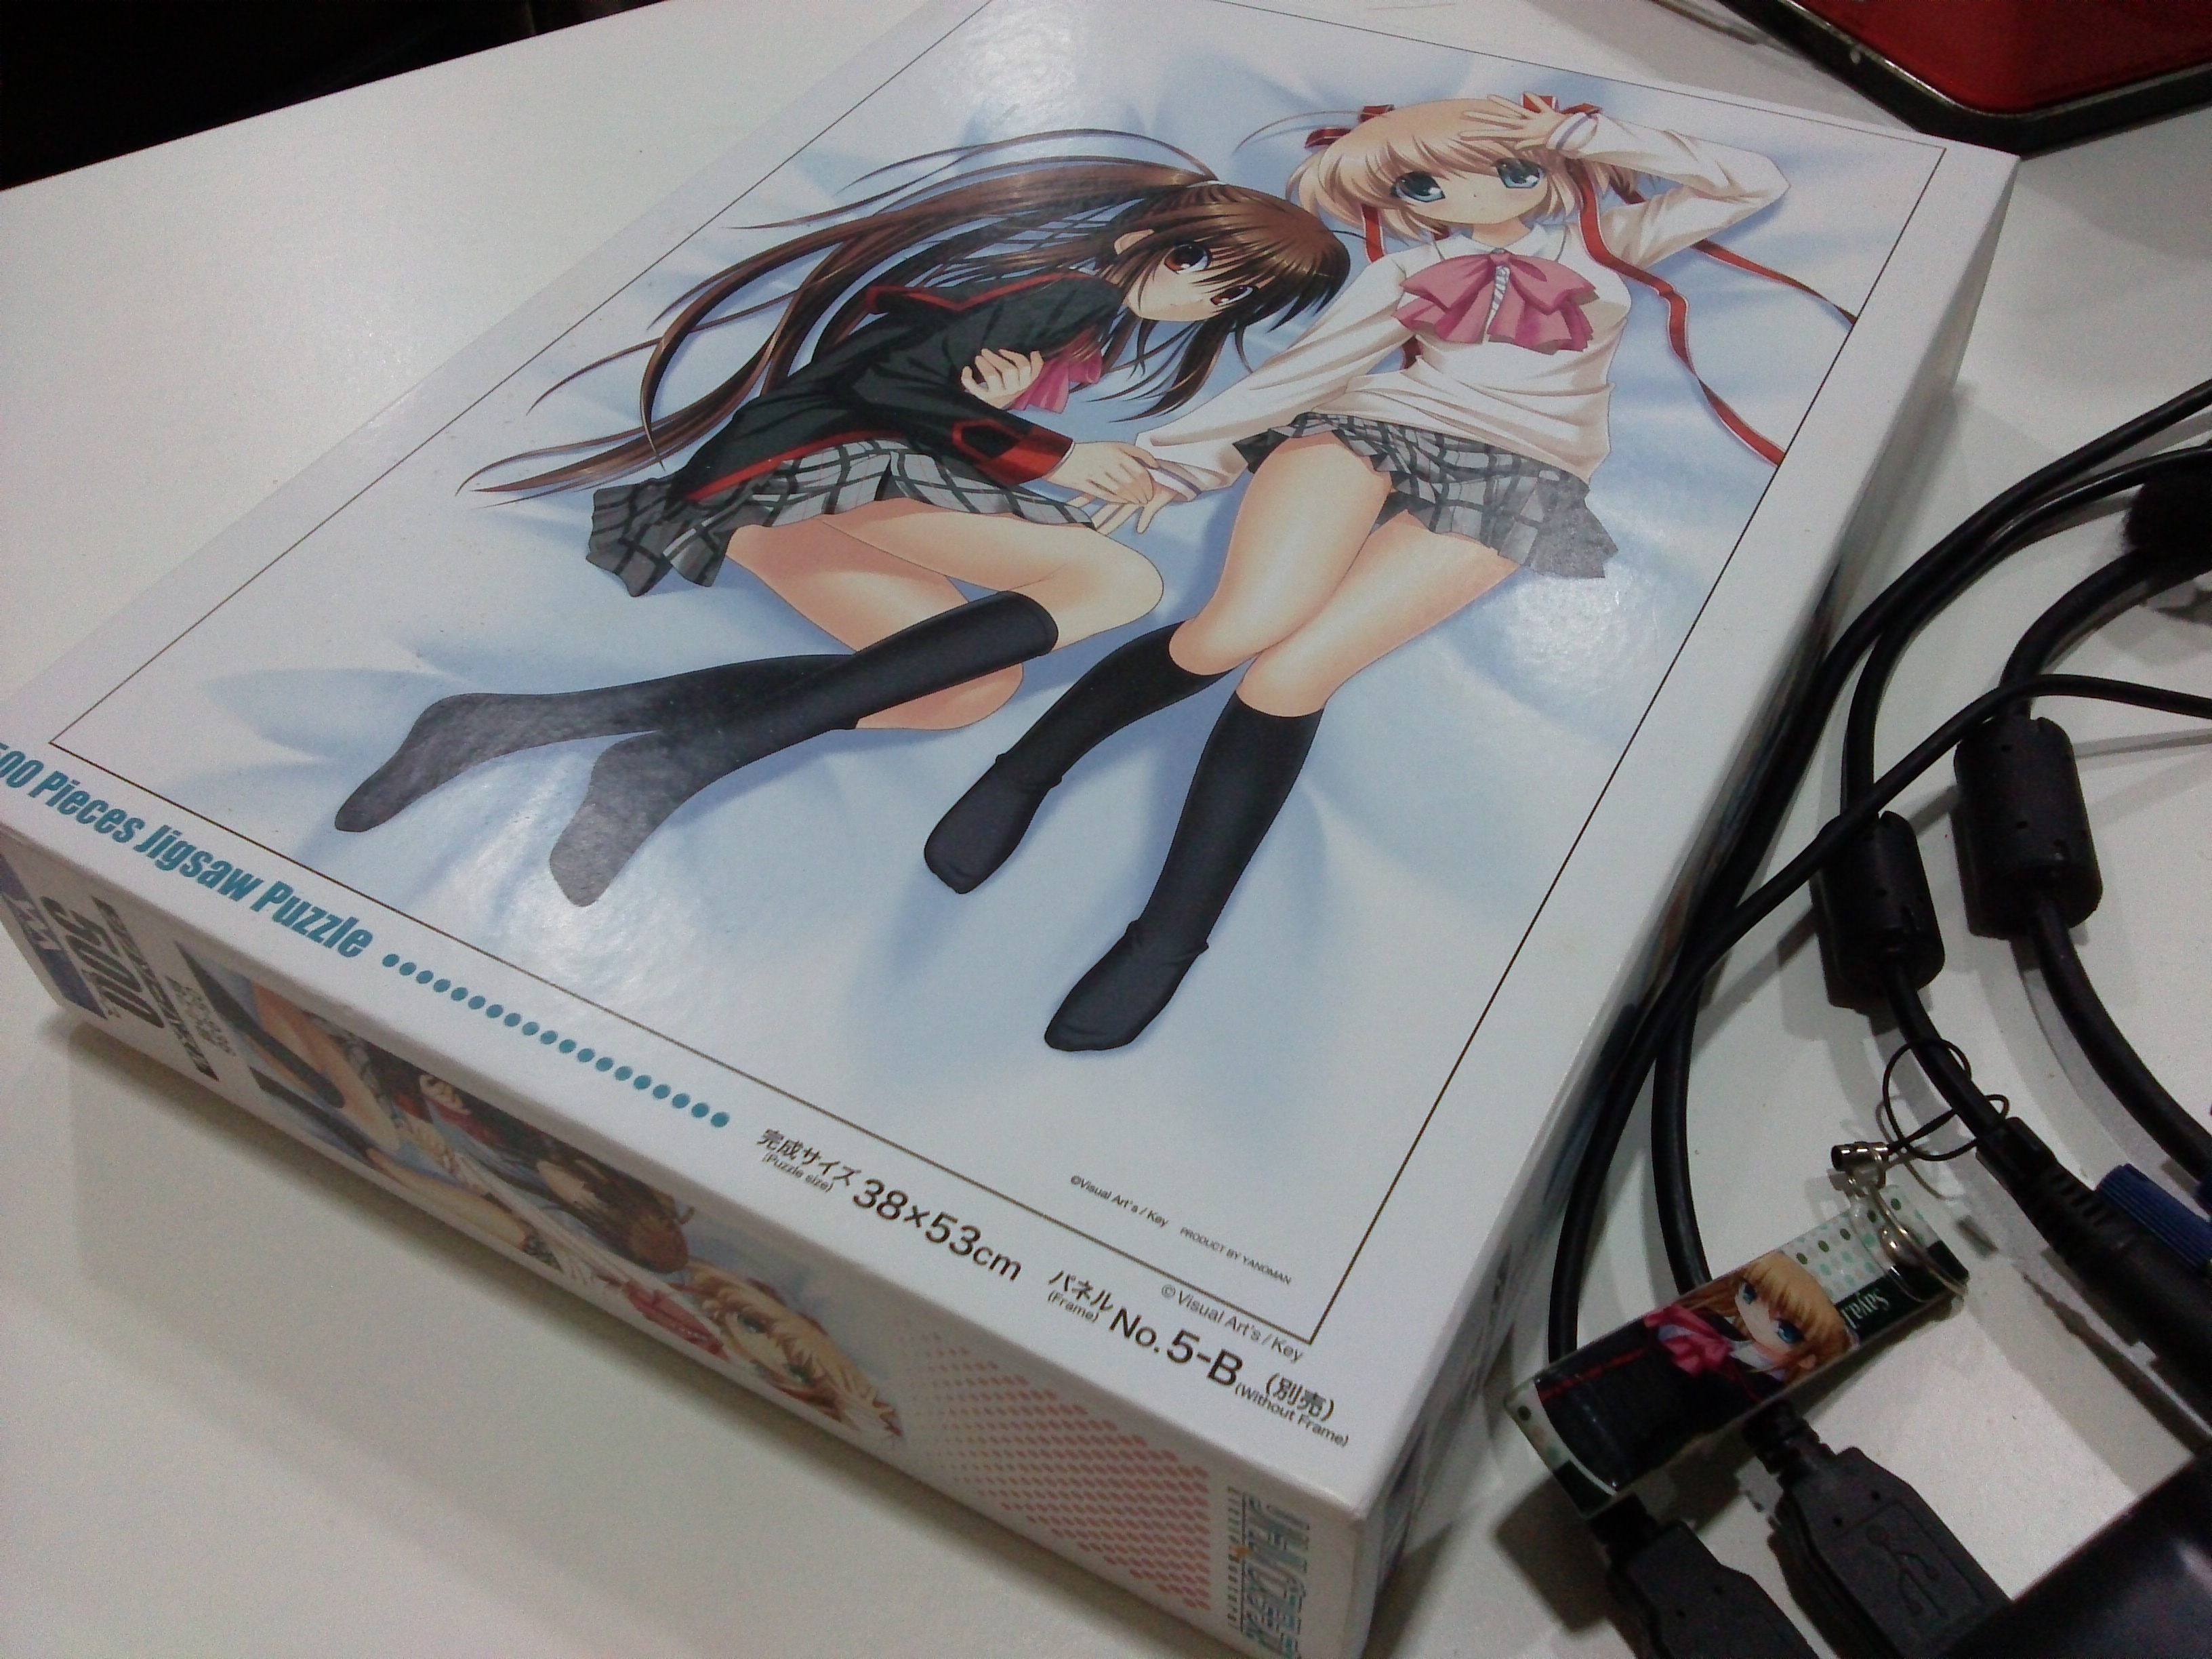
Recently, I got a Little Busters! (リトルバスターズ!) jigsaw puzzle of 500 pieces. According to the description printed on the box, the size of the puzzle is 38 x 53 cm. The estimated time to complete the whole puzzle will be 15 hours. So, I decided to build a tool to help me complete the task by identifying the location of each piece of the jigsaw puzzle.
Little Busters! (Rin and Komari) 500 Pieces Jigsaw Puzzle
The first thing I need is a webcam. Most of the modern laptops have a webcam, even Chromebook has one. So, the next problem will be capturing image using the webcam. Therefore, I built a simple project to do that using Silverlight because it is very easy to achieve simple webcam image capturing in Silverlight.
After that, since the Silverlight project is web based, I can embed it in another my Windows Form C# application with the WebBrowser control easily. So now what I have is a image capturing app without the saving function yet.
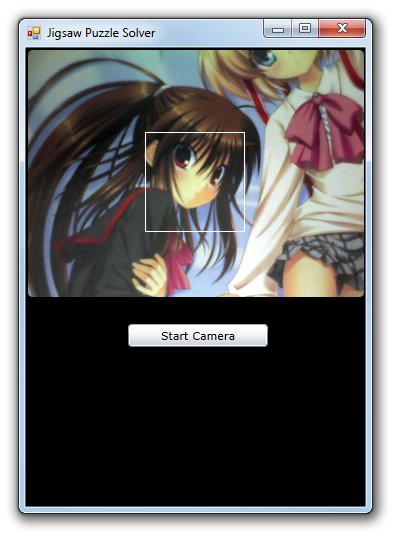
Successfully capture the image from webcam.
The main task of the C# application is to save the captured image and then compare it with a target image to identify the matching pieces in the jigsaw puzzle. The square with white border is the area where the image will be saved as an image for the use of image comparison later. The templates that the captured image will be compared with are the 500 squares from the original complete image. To save only the captured image inside the square (100×100 pixels), I do the following.
Rectangle bounds = this.Bounds;
int widthOfCaptureArea = 100;
int heightOfCaptureArea = 100;
int captureAreaX = 120;
int captureAreaY = 85;
Size captureArea = new Size(widthOfCaptureArea, heightOfCaptureArea);
Point webBrowserLocation = webBrowser1.PointToClient(new Point(bounds.Left, bounds.Top));
using (Bitmap bitmap = new Bitmap(widthOfCaptureArea, heightOfCaptureArea))
{
    using (Graphics g = Graphics.FromImage(bitmap))
    {
        g.CopyFromScreen(
        new Point(bounds.Left + captureAreaX + webBrowserLocation.X * -1, bounds.Top + captureAreaY + webBrowserLocation.Y * -1), Point.Empty, captureArea);
    }
    bitmap.Save("D://.../source.jpg", ImageFormat.Jpeg);
    bitmap.Dispose();
 }
private float CheckSimilarity(Bitmap sourceImage, Bitmap targetImage)
{
   // create template matching algorithm's instance
   ExhaustiveTemplateMatching tm = new ExhaustiveTemplateMatching(0.8f);
   // find all matchings with specified above similarity
   TemplateMatch[] matchings = tm.ProcessImage(sourceImage, targetImage);
   float similarity = 0;
   foreach (TemplateMatch m in matchings)
   {
       similarity = m.Similarity;
   }
   return similarity;
}
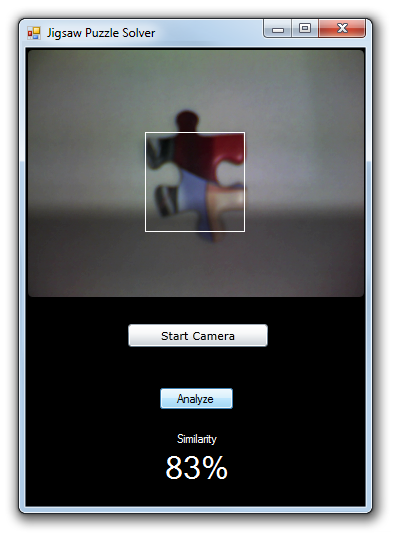
When comparing the images, I perform rotation three times because the direction of the piece is uncertain. So, I will just need to rotate the source image three times and compare the source and the template for each of the time to get the highest similarity value.
float similarity = CheckSimilarity(sourceImage, targetImage);
// Rotate the source image 90 degrees
for (int i = 1; i <= 3; i++)
{
    sourceImage.RotateFlip(RotateFlipType.Rotate90FlipNone);
    if (CheckSimilarity(sourceImage, targetImage) > similarity)
    {
        similarity = CheckSimilarity(sourceImage, targetImage);
    }
}
Similarity of 83% between this particular piece with one of the template images from the original complete image
Yup, now it is done and I can thus use it to complete my 500-piece jigsaw puzzle. However, in the whole project, I actually assume each piece to be a perfect square. So the similarity value is not that accurate as well. This can be improved in the next version to take the pattern of each piece into consideration.