Processing S3 Data before Returning It with Object Lambda (version 2024)

We use Amazon S3 to store data for easy sharing among various applications. However, each application has its unique requirements and might require a different perspective on the data. To solve this problem, at times, we store additional customised datasets of the same data, ensuring that each application has its own unique dataset. This sometimes creates another set of problems because we now need to maintain additional datasets.

In March 2021, a new feature known as S3 Object Lambda was introduced. Similar to the idea of setting up a proxy layer in front of S3 to intercept and process data as it is requested, Object Lambda uses AWS Lambda functions to automatically process and transform your data as it is being retrieved from S3. With Object Lambda, we only need to change our apps to use the new S3 Object Lambda Access Point instead of the actual bucket name to retrieve data from S3.

Simplified architecture diagram showing how S3 Object Lambda works.

Example: Turning JSON to Web Page with S3 Object Lambda

I have been keeping details of my visits to medical centres as well as the treatments and medicines I received in a JSON file. So, I would like to take this opportunity to show how S3 Object Lambda can help in doing data processing.

The JSON file looks something as follows.

{
"visits": [
{
"medicalCentreName": "Tan Tock Seng Hospital",
"centreType": "hospital",
"visitStartDate": {
"year": 2024,
"month": 3,
"day": 24
},
"visitEndDate": {
"year": 2024,
"month": 4,
"day": 19
},
"purpose": "",
"treatments": [
{
"name": "Antibiotic Meixam(R) 500 Cloxacillin Sodium",
"type": "medicine",
"amount": "100ml per doese every 4 hours",
"startDate": {
"year": 2024,
"month": 3,
"day": 26
},
"endDate": {
"year": 2024,
"month": 4,
"day": 19
}
},
...
]
},
...
]
}

In this article, I will show the steps I took to setup the S3 Object Lambda architecture for this use case.

Step 1: Building the Lambda Function

Before we begin, we need to take note that the maximum duration for a Lambda function used by S3 Object Lambda is 60 seconds.

We need a Lambda Function to do the data format transformation from JSON to HTML. To keep things simple, we will be developing the Function using Python 3.12.

Object Lambda does not need any API Gateway since it should be accessed via the S3 Object Lambda Access Point.

In the beginning, we can have the code as follows. The code basically does two things. Firstly, it performs some logging. Secondly, it reads the JSON file from S3 Bucket.

import json
import os
import logging
import boto3
from urllib import request
from urllib.error import HTTPError
from types import SimpleNamespace

logger = logging.getLogger()
logger.addHandler(logging.StreamHandler())
logger.setLevel(getattr(logging, os.getenv('LOG_LEVEL', 'INFO')))

s3_client = boto3.client('s3')

def lambda_handler(event, context):
object_context = event["getObjectContext"]
# Get the presigned URL to fetch the requested original object from S3
s3_url = object_context["inputS3Url"]
# Extract the route and request token from the input context
request_route = object_context["outputRoute"]
request_token = object_context["outputToken"]

# Get the original S3 object using the presigned URL
req = request.Request(s3_url)
try:
response = request.urlopen(req)
responded_json = response.read().decode()
except Exception as err:
logger.error(f'Exception reading S3 content: {err}')
return {'status_code': 500}

json_object = json.loads(responded_json, object_hook=lambda d: SimpleNamespace(**d))

visits = json_object.visits

html = ''

s3_client.write_get_object_response(
Body = html,
ContentType = 'text/html',
RequestRoute = request_route,
RequestToken = request_token)

return {'status_code': 200}
Step 1.1: Getting the JSON File with Presigned URL

In the event that an Object Lambda receives, there is a property known as the getObjectContext, which contains useful information for us to figure out the inputS3Url, which is the presigned URL of the object in S3.

By default, all S3 objects are private and thus for a Lambda Function to access the S3 objects, we need to configure the Function to have S3 read permissions to retrieve the objects. However, with the presigned URL, the Function can get the object without the S3 read permissions.

In the code above, we can retrieve the JSON file from the S3 using its presigned URL. After that we parse the JSON file content with json.loads() method and convert it into a JSON object with SimpleNamespace. Thus the variable visits now should have all the visits data from the original JSON file.

Step 1.2: Call WriteGetObjectResponse

Since the purpose of Object Lambda is to process and transform our data as it is being retrieved from S3, we need to pass transformed object to a GetObject operation in the Function via the method write_get_object_response. Without this method, there will be an error from the Lambda complaining that it is missing.

Error: The Lambda exited without successfully calling WriteGetObjectResponse.

The method write_get_object_response requires two compulsory parameters, i.e. RequestRoute and RequestToken. Both of them are available from the property getObjectContext under the name outputRoute and outputToken.

Step 1.3: Get the HTML Template from S3

To make our Lambda code cleaner, we will not write the entire HTML there. Instead, we keep a template of the web page in another S3 bucket.

Now, the architecture above will be improved to include second S3 bucket which will provide web page template and other necessary static assets.

Introducing second S3 bucket for storing HTML template and other assets.

Now, we will replace the line html = '' earlier with the Python code below.

    template_response = s3_client.get_object(
Bucket = 'lunar.medicalrecords.static',
Key = 'medical-records.html'
)

template_object_data = template_response['Body'].read()
template_content = template_object_data.decode('utf-8')

dynamic_table = f"""
<table class="table accordion">
<thead>
<tr>
<th scope="col">#</th>
<th scope="col">Medical Centre</th>
<th scope="col">From</th>
<th scope="col">To</th>
<th scope="col">Purpose</th>
</tr>
</thead>

<tbody>
...
</tbody>
</table>"""

html = template_content.replace('{{DYNAMIC_TABLE}}', dynamic_table)

Step 2: Give Lambda Function Necessary Permissions

With the setup we have gone through above, we understand that our Lambda Function needs to have the following permissions.

  • s3-object-lambda:WriteGetObjectResponse
  • s3:GetObject

Step 3: Create S3 Access Point

Next, we will need to create a S3 Access Point. It will be used to support the creation of the S3 Object Lambda Access Point later.

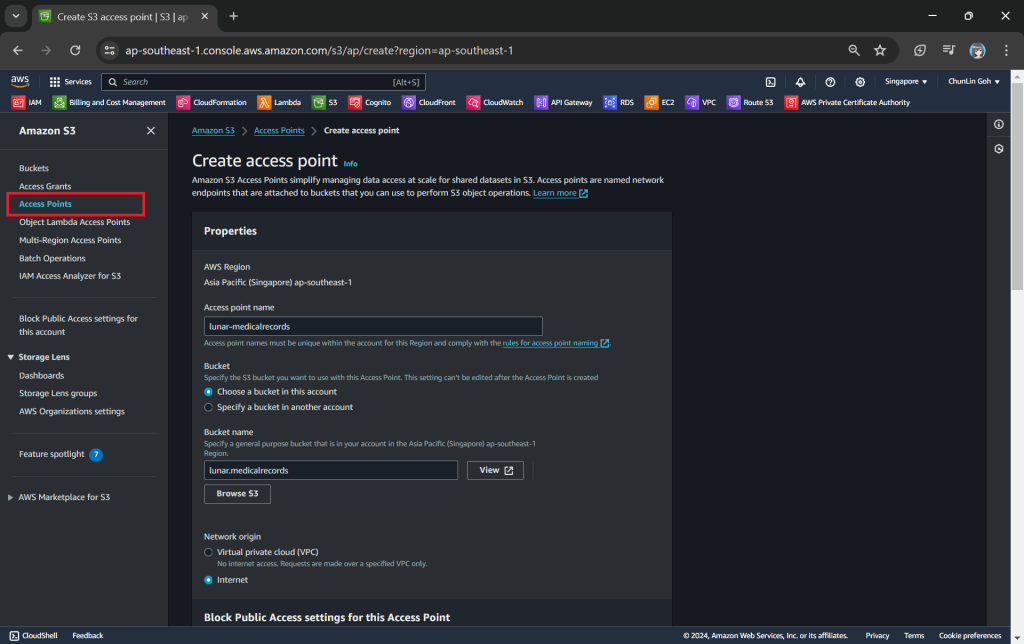
One of the features that S3 Access Point offers is that we can specify any name that is unique within the account and region. For example, as shown in the screenshot below, we can actually have a “lunar-medicalrecords” access point in every account and region.

Creating an access point from the navigation pane of S3.

When we are creating the access point, we need to specify the bucket which resides in the same region that we want to use with this Access Point. In addition, since we are not restricting the access of it to only a specific VPC in our case, we will be choosing “Internet” for the “Network origin” field.

After that, we keep all other defaults as is. We can directly proceed to choose the “Create access point” button.

Our S3 Access Point is successfully created.

Step 4: Create S3 Object Lambda Access Point

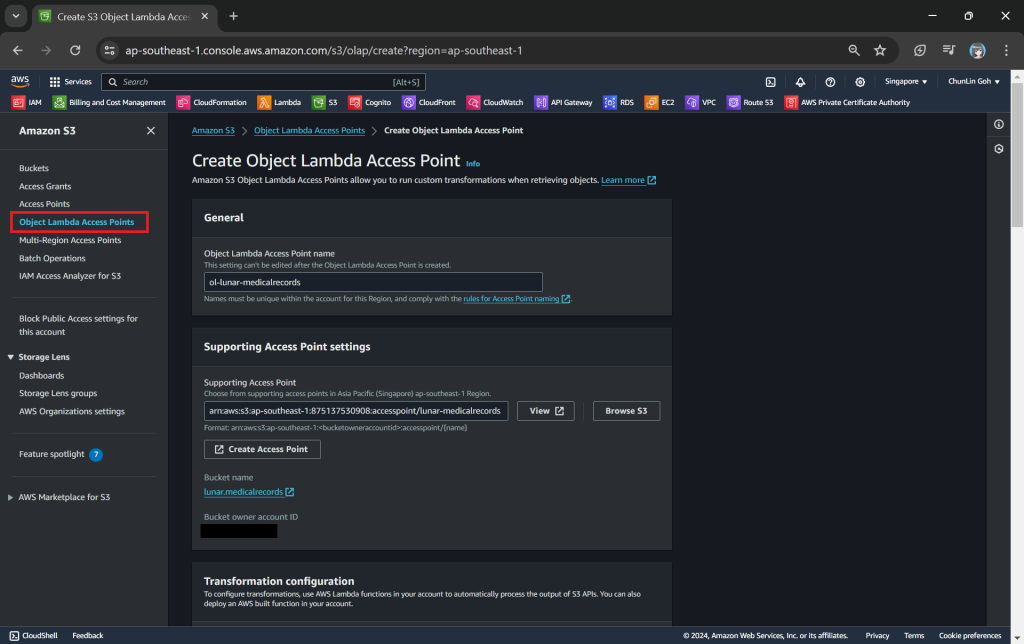
After getting our S3 Access Point set up, we can then move on to create our S3 Object Lambda Access Point. This is the actual access point that our app will be using to access the JSON file in our S3 bucket. It then should return a HTML document generated by the Object Lambda that we built in Step 1.

Creating an object lambda access point from the navigation pane of S3.

In the Object Lambda Access Point creation page, after we give it a name, we need to provide the Supporting Access Point. This access point is the Amazon Resource Name (ARN) of the S3 Access Point that we created in Step 3. Please take note that both the Object Lambda Access Point and Supporting Access Point must be in the same region.

Next we need to setup the transformation configuration. In our case, we will be retrieving the JSON file from the S3 bucket to perform the data transformation via our Lambda Function, so we will be choosing GetObject as the S3 API we will be using, as shown in the screenshot below.
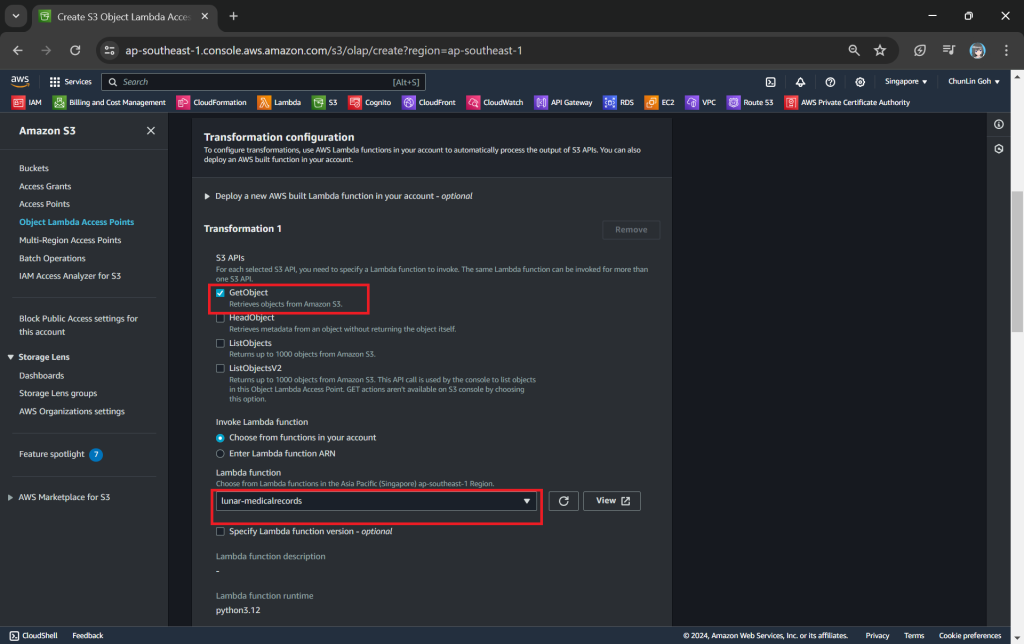
Configuring the S3 API that will be used in the data transformation and the Lambda Function to invoke.

Once all these fields are keyed in, we can proceed to create the Object Lambda Access Point.

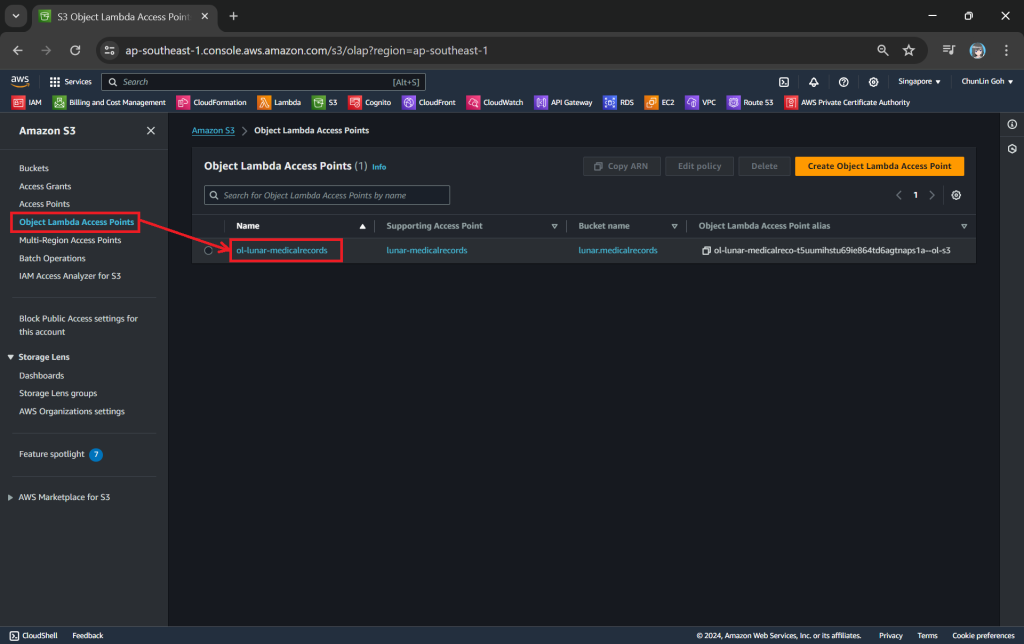
Now, we will access the JSON file via the Object Lambda Access Point to verify that the file is really transformed into a web page during the request. To do so, firstly, we need to select the newly create Object Lambda Access Point as shown in the following screenshot.

Locate the Object Lambda Access Point we just created in the S3 console.

Secondly, we will be searching for our JSON file, for example chunlin.json in my case. Then, we will click on the “Open” button to view it. The reason why I name the JSON file containing my medical records is because later I will be adding authentication and authorisation to only allow users retrieving their own JSON file based on their login user name.
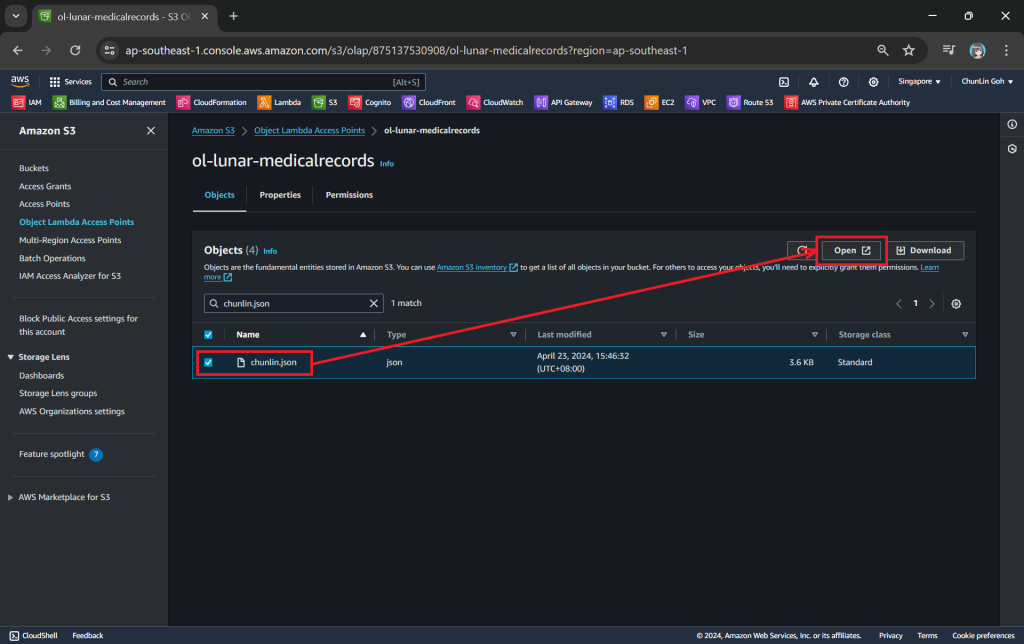
This page looks very similar to the usual S3 objects listing page. So please make sure you are doing this under the “Object Lambda Access Point”.

There will be new tab opened showing the web page as demonstrated in the screenshot below. As you have noticed in the URL, it is still pointing to the JSON file but the returned content is a HTML web page.
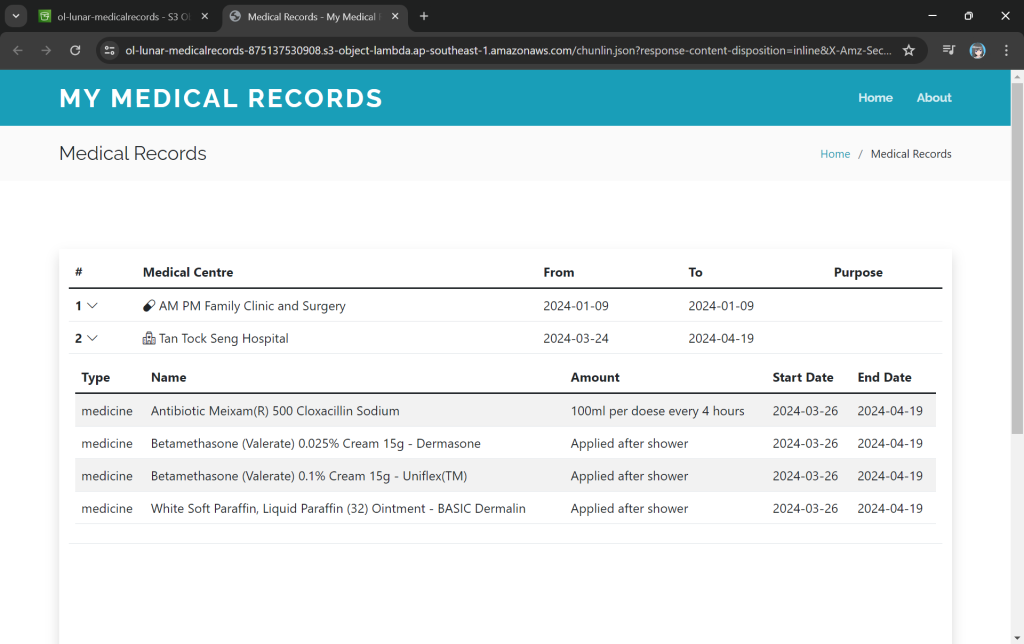
The domain name is actually no longer the usual S3 domain name but it is our Object Lambda Access Point.

Using the Object Lambda Access Point from Our App

With the Object Lambda Access Point successfully setup, we will show how we can use it. To not overcomplicate things, for the purposes of this article, I will host a serverless web app on Lambda which will be serving the medical record website above.

In addition, since Lambda Functions are by default not accessible from the Internet, we will be using API Gateway so that we can have a custom REST endpoint in the AWS and thus we can map this endpoint to the invokation of our Lambda Function. Technically speaking, the architecture diagram now looks as follows.

This architecture allows public to view the medical record website which is hosted as a serverless web app.

In the newly created Lambda, we will still be developing it with Python 3.12. We name this Lambda lunar-medicalrecords-frontend. We will be using the following code which will retrieve the HTML content from the Object Lambda Access Point.

import json
import os
import logging
import boto3

logger = logging.getLogger()
logger.addHandler(logging.StreamHandler())
logger.setLevel(getattr(logging, os.getenv('LOG_LEVEL', 'INFO')))

s3_client = boto3.client('s3')

def lambda_handler(event, context):
try:
bucket_name = 'ol-lunar-medicalreco-t5uumihstu69ie864td6agtnaps1a--ol-s3'
object_key = 'chunlin.json'

response = s3_client.get_object(
Bucket=bucket_name,
Key=object_key
)

object_data = response['Body'].read()
object_string = object_data.decode('utf-8')

return {
'statusCode': 200,
'body': object_string,
'headers': {
'Content-Type': 'text/html'
}
}

except Exception as err:
return {
'statusCode': 500,
'body': json.dumps(str(err))
}

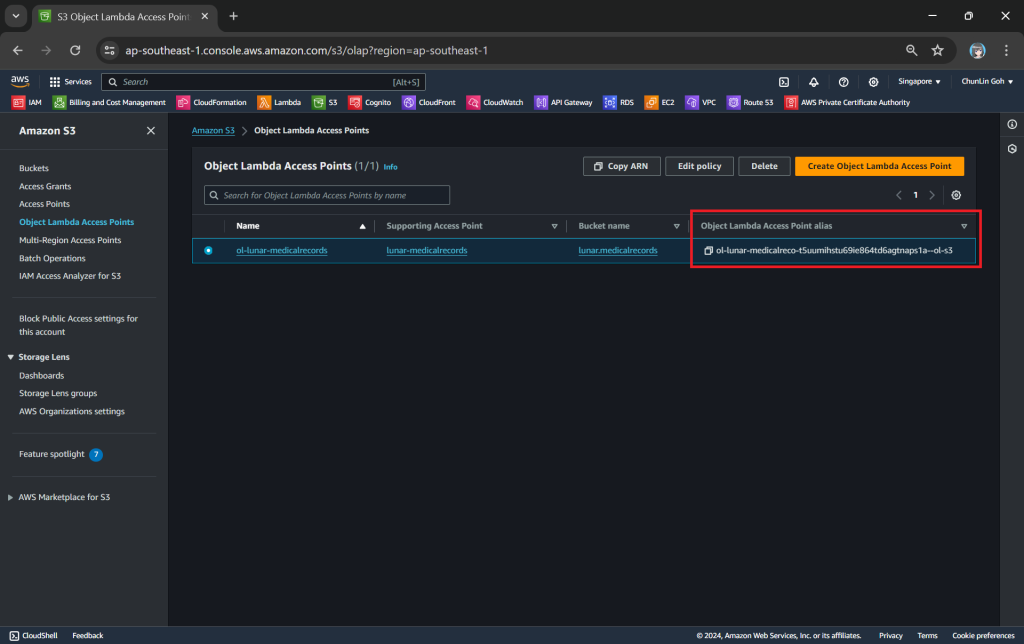
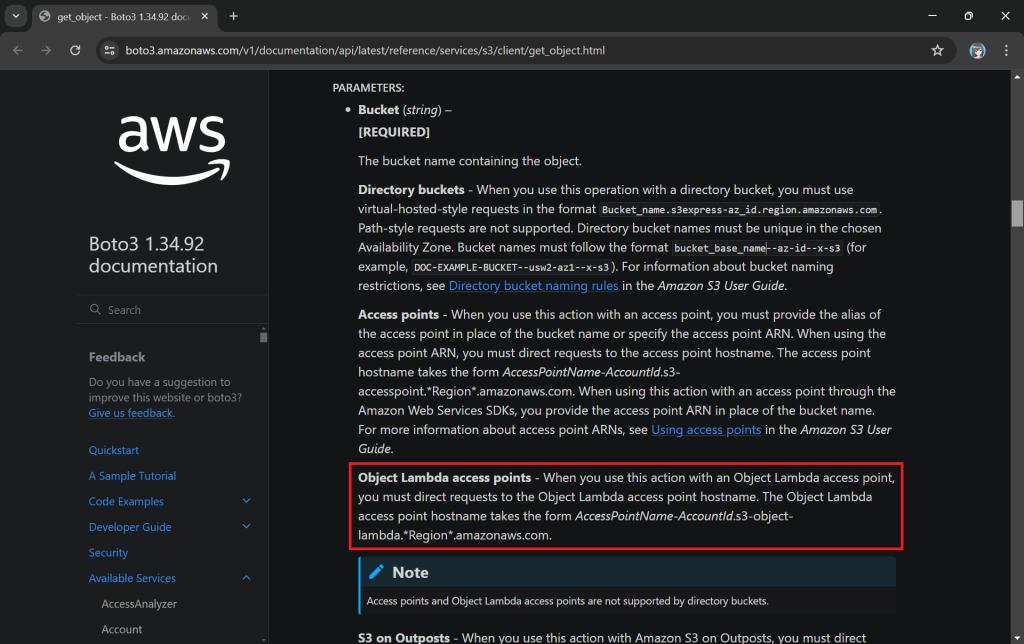
As shown in the code above, we are still using the same function get_object from the S3 client to retrieve the JSON file, chunlin.json. However, instead of providing the bucket name, we will be using the Object Lambda Access Point Alias, which is located at the S3 Object Lambda Access Points listing page.

This is where we can find the Object Lambda Access Point Alias.

You can read more about the Boto3 get_object documentation to understand more about its Bucket parameter.

The Boto3 documentation highlights the use of Object Lambda Access Point in get_object.

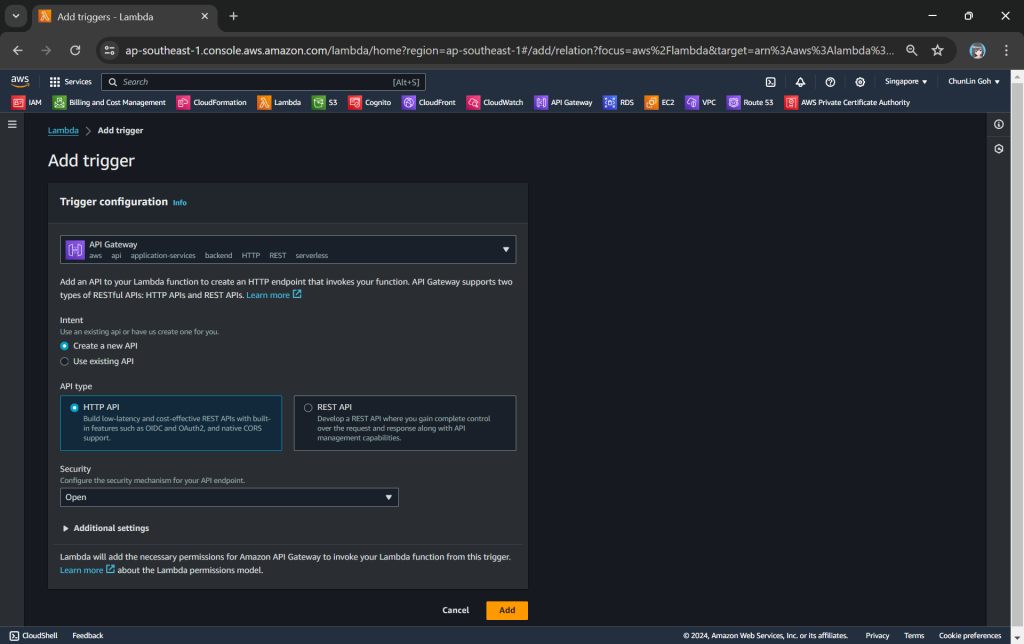
The API Gateway for the Lambda Function is created with HTTP API through the “Add Trigger” function (which is located at the Function overview page). For the Security field, we will be choosing “Open” for now. We will add the login functionality later.

Adding API Gateway as a trigger to our Lambda.

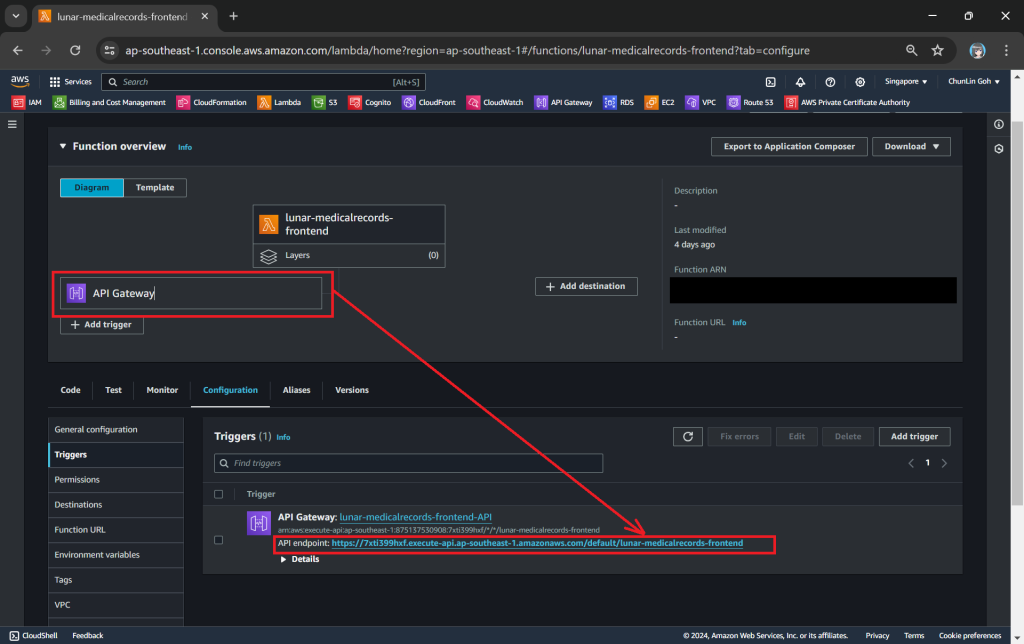
Once this is done, we will be provided an API Gateway endpoint, as shown in the screenshot below. Visiting the endpoint should be rendering the same web page listing the medical records as we have seen above.

Getting the API endpoint of the API Gateway.

Finally, for the Lambda Function permission, we only need to grand it the following.

  • s3:GetObject.

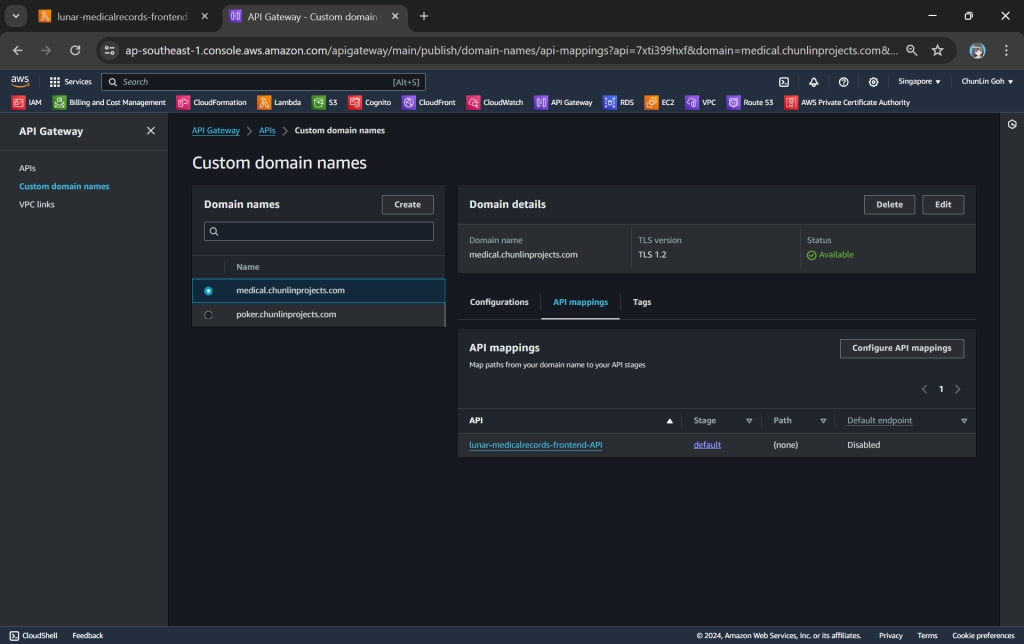
To make the API Gateway endpoint looks more user friendly, we can also introduce Custom Domain to the API Gateway, following the guide in one of our earlier posts.

Assigned medical.chunlinprojects.com to our API Gateway.

Protecting Data with Cognito

In order to ensure that only authenticated and authorised users can access their own medical records, we need to securely control access to our the app with the help from Amazon Cognito. Cognito is a service that enables us to add user sign-in and access control to our apps quickly and easily. Hence it helps authenticate and authorise users before they can access the medical records.

Step 1: Setup Amazon Cognito

To setup Cognito, firstly, we need to configure the User Pool by specifying sign-in options. User pool is a managed user directory service that provides authentication and user management capabilities for our apps. It enables us to offload the complexity of user authentication and management to AWS.

Configuring sign-in options and user name requirements.

Please take note that Cognito user pool sign-in options cannot be changed after the user pool has been created. Hence, kindly think carefully during the configuration.

Configuring password policy.

Secondly, we need to configure password policy and choose whether to enable Multi-Factor Authentication (MFA).

By default, Cognito comes with a password policy that ensures our users maintain a password with a minimum length and complexity. For password reset, it will also generate a temporary password to the user which will expire in 7 days, by default.

MFA adds an extra layer of security to the authentication process by requiring users to provide additional verification factors to gain access to their accounts. This reduces the risk of unauthorised access due to compromised passwords.

Enabling MFA in our Cognito user pool.

As shown in the screenshot above, one of the methods is called TOTP. TOTP stands for Time-Based One-Time Password. It is a form of multi-factor authentication (MFA) where a temporary passcode is generated by the authenticator app, adding a layer of security beyond the typical username and password.

Thirdly, we will be configuring Cognito to allow user account recovery as well as new user registration. Both of these by default require email delivery. For example, when users request an account recovery code, an email with the code should be sent to the user. Also, when there is a new user signing up, there should be emails sent to verify and confirm the new account of the user. So, how do we handle the email delivery?

We can choose to send email with Cognito in our development environment.

Ideally, we should be setting up another service known as Amazon SES (Simple Email Service), an email sending service provided by AWS, to deliver the emails. However, for testing purpose, we can choose to use Cognito default email address as well. This approach is normally only suitable for development purpose because we can only use it to send up to 50 emails a day.

Finally, we will be using the hosted authentication pages for user sign-in and sign-up, as demonstrated below.

Using hosted UI so that we can have a simple frontend ready for sign-in and sign-up.

Step 2: Register Our Web App in Cognito

To integrate our app with Cognito, we still need to setup the app client. An App Client is a configuration entity that allows our app to interact with the user pool. It is essentially an application-specific configuration that defines how users will authenticate and interact with our user pool. For example, we have setup a new app client for our medical records app as shown in the following screenshot.

We customise the hosetd UI with our logo and CSS.

As shown in the screenshot above, we are able to to specify customisation settings for the built-in hosted UI experience. Please take note that we are only able to customise the look-and-feel of the default “login box”, so we cannot modify the layout of the entire hosted UI web page, as demonstrated below.

The part with gray background cannot be customised with the CSS.

In the setup of the app client above, we have configured the callback URL to /authy-callback. So where does this lead to? It actually points to a new Lambda function which is in charge of the authentication.

Step 3: Retrieve Access Token from Cognito Token Endpoint

Here, Cognito uses the OAuth 2.0 authorization code grant flow. Hence, after successful authentication, Cognito redirects the user back to the specified callback URL with an authorisation code included in the query string with the name code. Our authentication Lambda function thus needs to makes a back-end request to the Cognito token endpoint, including the authorisation code, client ID, and redirect URI to exchange the authorisation code for an access token, refresh token, and ID token.

Client ID can be found under the “App client information” section.
auth_code = event['queryStringParameters']['code']

token_url = "https://lunar-corewebsite.auth.ap-southeast-1.amazoncognito.com/oauth2/token"
client_id = "<client ID to be found in AWS Console>"
callback_url = "https://medical.chunlinprojects.com/authy-callback"

params = {
"grant_type": "authorization_code",
"client_id": client_id,
"code": auth_code,
"redirect_uri": callback_url
}

http = urllib3.PoolManager()
tokens_response = http.request_encode_body(
"POST",
token_url,
encode_multipart = False,
fields = params,
headers = {'Content-Type': 'application/x-www-form-urlencoded'})

token_data = tokens_response.data
tokens = json.loads(token_data)

As shown in the code above, the token endpoint URL for a Cognito user pool generally follows the following structure.

https://<your-domain>.auth.<region>.amazoncognito.com/oauth2/token

A successful response from the token endpoint typically is a JSON object which includes:

  • access_token: Used to access protected resources;
  • id_token: Contains identity information about the user;
  • refresh_token: Used to obtain new access tokens;
  • expires_in: Lifetime of the access token in seconds.

Hence we can retrieve the medical records if there is an access_token but return an “HTTP 401 Unauthorized” response if there is no access_token returned.

if 'access_token' not in tokens:
return {
'statusCode': 401,
'body': get_401_web_content(),
'headers': {
'Content-Type': 'text/html'
}
}

else:
access_token = tokens['access_token']

return {
'statusCode': 200,
'body': get_web_content(access_token),
'headers': {
'Content-Type': 'text/html'
}
}

The function get_401_web_content is responsible to retrieve a static web page showing 401 error message from the S3 bucket and return it to the frontend, as shown in the code below.

def get_401_web_content():
bucket_name = 'lunar.medicalrecords.static'
object_key = '401.html'

response = s3_client.get_object(
Bucket=bucket_name,
Key=object_key
)

object_data = response['Body'].read()
content = object_data.decode('utf-8')

return content

Step 4: Retrieve Content Based on Username

For the get_web_content function, we will be passing the access token to the Lambda that we developed earlier to retrieve the HTML content from the Object Lambda Access Point. As shown in the following code, we invoke the Lambda function synchronously and wait for the response.

def get_web_content(access_token):
useful_tokens = {
'access_token': access_token
}

lambda_response = lambda_client.invoke(
FunctionName='lunar-medicalrecords-frontend',
InvocationType='RequestResponse',
Payload=json.dumps(useful_tokens)
)

lambda_response_payload = lambda_response['Payload'].read().decode('utf-8')

web_content = (json.loads(lambda_response_payload))['body']

return web_content

In the Lambda function lunar-medicalrecords-frontend, we will no longer need to hardcode the object key as chunlin.json. Instead, we can just retrieve the user name from the Cognito using the access token, as highlighted in bold in the code below.

...
import boto3

cognito_idp_client = boto3.client('cognito-idp')

def lambda_handler(event, context):
if 'access_token' not in event:
return {
'statusCode': 200,
'body': get_homepage_web_content(),
'headers': {
'Content-Type': 'text/html'
}
}

else:
cognitio_response = cognito_idp_client.get_user(AccessToken = event['access_token'])

username = cognitio_response['Username']

try:
bucket_name = 'ol-lunar-medicalreco-t5uumihstu69ie864td6agtnaps1a--ol-s3'
object_key = f'{username}.json'

...

except Exception as err:
return {
'statusCode': 500,
'body': json.dumps(str(err))
}

The get_homepage_web_content function above basically is to retrieve a static homepage from the S3 bucket. It is similar to how the get_401_web_content function above works.

The homepage comes with a Login button redirecting users to Hosted UI of our Cognito app client.

Step 5: Store Access Token in Cookies

We need to take note that the auth_code above in the OAuth 2.0 authorisation code grant flow can only be used once. This is because single-use auth_code prevents replay attacks where an attacker could intercept the authorisation code and try to use it multiple times to obtain tokens. Hence, our implementation above will break if we refresh our web page after logging in.

To solve this issue, we will be saving the access token in a cookie when the user first signs in. After that, as long as we detect that there is a valid access token in the cookie, we will not use the auth_code.

In order to save an access token in a cookie, there are several important considerations to ensure security and proper functionality:

  • Set the Secure attribute to ensure the cookie is only sent over HTTPS connections. This helps protect the token from being intercepted during transmission;
  • Use the HttpOnly attribute to prevent client-side scripts from accessing the cookie. This helps mitigate the risk of cross-site scripting (XSS) attacks;
  • Set an appropriate expiration time for the cookie. Since access tokens typically have a short lifespan, ensure the cookie does not outlive the token’s validity.

Thus the code at Step 3 above can be improved as follows.

def lambda_handler(event, context):
now = datetime.now(timezone.utc)

if 'cookies' in event:
for cookie in event['cookies']:
if cookie.startswith('access_token='):
access_token = cookie.replace("access_token=", "")
break

if 'access_token' in locals():

returned_html = get_web_content(access_token)

return {
'statusCode': 200,
'headers': {
'Content-Type': 'text/html'
},
'body': returned_html
}

return {
'statusCode': 401,
'body': get_401_web_content(),
'headers': {
'Content-Type': 'text/html'
}
}

else:
...
if 'access_token' not in tokens:
...

else:
access_token = tokens['access_token']

cookies_expiry = now + timedelta(seconds=tokens['expires_in'])

return {
'statusCode': 200,
'headers': {
'Content-Type': 'text/html',
'Set-Cookie': f'access_token={access_token}; path=/; secure; httponly; expires={cookies_expiry.strftime("%a, %d %b %Y %H:%M:%S")} GMT'
},
'body': get_web_content(access_token)
}

With this, now we can safely refresh our web page and there should be no case of reusing the same auth_code repeatedly.

Wrap-Up

In summary, we can conclude the infrastructure that we have gone through above in the following diagram.

References

Publish a Blazor Web App as Azure Static Web App

In 2018, the web framework, Blazor, was introduced. With Blazor, we can work on web UI with C# instead of JavaScript. Blazor can run the client-side C# code directly in the browser, using WebAssembly.

When server-side rendering is not required, we can then deploy our web app on platforms such as Azure Static Web App, a service that automatically builds and deploys full stack web apps to Azure from a code repository, such as GitHub.

In this article, I will share how the website for Singapore .NET Developers Community and Azure Community is re-built as a Blazor web app and deployed to Azure.

PROJECT GITHUB REPOSITORY

The complete source code of this project can be found at https://github.com/sg-dotnet/website.

Blazor Web UI

The community website is very simple. It is merely a single-page website with some descriptions and photos about the community. Then it also has a section showing list of meetup videos from the community YouTube channels.

We will build the website as Blazor WebAssembly App.

Firstly, we will have the index.html defined as follows. Please take note that the code snippet below uses CSS file which is not shown in this post. The complete and updated project can be viewed on the GitHub repo.

<!DOCTYPE html>
<html>

<head>
    <title>Singapore .NET Developers Community + Azure Community</title>
    <meta charset="utf-8" />
    <meta name="viewport" content="width=device-width, initial-scale=1.0, maximum-scale=1.0, user-scalable=no" />

    ...

    <link rel="icon" href="images/favicon.png" type="image/png">
    <link rel="stylesheet" href="css/main.css" />

    <base href="/" />
    http://_framework/blazor.webassembly.js
</head>

<body>
    <div id="app">
        <div style="position:absolute; top:30vh; width:100%; text-align:center">
            <h2>Welcome to dotnet.sg</h2>
            <div style="width: 50%; display: inline-block; height: 20px;">
                <div class="progress-line"></div>
            </div>
            
            <p>
                The website is loading...
            </p>
        </div>
    </div>

    <div id="blazor-error-ui">
        An unhandled error has occurred.
        <a href="" class="reload">Reload</a>
        <a class="dismiss">🗙</a>
    </div>

    <!-- Scripts -->
    http://javascript/jquery.min.js
</body>

</html>

Secondly, if we hope to have a similar UI template across all the web pages in the website, then we can define the HTML template under, for example, MainLayout.razor, as shown below. This template means that the header and footer sections can be shared across different web pages.

@inherits LayoutComponentBase

<!-- Header -->
<header id="header" class="alt">
    <div class="logo"><a href="/">SG <span>.NET + Azure Dev</span></a></div>
</header>

@Body

<!-- Footer -->
<footer id="footer">
    <div class="container">
        <ul class="icons">
           ...
        </ul>
    </div>
    <div class="copyright">
        &copy; ...
    </div>
</footer>

Finally, we simply need to define the @Body of each web page in their own Razor file, for example the Index.razor for the homepage.

In the Index.razor, we will fetch the data from a JSON file hosted on Azure Storage. The JSON file is periodically updated by Azure Function to fetch the latest video list from the YouTube channel of the community. Instead of using JavaScript, here we can simply write a C# code to do that directly on the Razor file of the homepage.

@code {
    private List<VideoFeed> videoFeeds = new List<VideoFeed>();

    protected override async Task OnInitializedAsync()
    {
        var allVideoFeeds = await Http.GetFromJsonAsync<VideoFeed[]>("...");

        videoFeeds = allVideoFeeds.ToList();
    }

    public class VideoFeed
    {
        public string VideoId { get; set; }

        public Channel Channel { get; set; }

        public string Title { get; set; }

        public string Description { get; set; }

        public DateTimeOffset PublishedAt { get; set; }
    }

    public class Channel
    {
        public string Name { get; set; }        
    }
}

Publish to Azure Static Web App from GitHub

We will have our codes ready in a GitHub repo with the following structure.

  • .github/workflows
  • DotNetCommunity.Singapore
    • Client
      • (Blazor client project here)

Next, we can proceed to create a new Azure Static Web App where we will host our website at. In the first step, we can easily link it up with our GitHub account.

We need to specify the deployment details for the Azure Static Web App.

After that, we will need to provide the Build details so that a GitHub workflow will be automatically generated. That is a GitHub Actions workflow that builds and publishes our Blazor web app. Hence, we must specify the corresponding folder paths within our GitHub repo, as shown in the screenshot below.

In the Build Details, we must setup the folder path correctly.

The “App location” is to point to the location of the source code for our Blazor web app. For the “Api location”, although we are not using it in our Blazor project now, we can still set it as follows so that in the future when we can easily setup the Api folder.

With this setup ready, whenever we update the codes in our GitHub repo via commits or pull requests, our Blazor web app will be built and deployed.

Our Blazor web app is being built in GitHub Actions.

Custom Domains

For the free version of the Azure Static web app, we are only allowed to have 2 custom domains per app. Another good news is that Azure Static Web Apps automatically provides a free SSL/TLS certificate for the auto-generated domain name and any custom domains we add.

CNAME record validation is the recommended way to add a custom domain, however, it only works for subdomains, such as “www.dotnet.sg” in our case.

For root domain, which is “dotnet.sg” in our case, by right we can do it in Azure Static Web App by using TXT record validation and an ALIAS record.

Take note that we can only create an ALIAS record if our domain provider supports it.

However, since there is currently no support of ALIAS or ANAME records in the domain provider that I am using, I have no choice but to have another Azure Function for binding “dotnet.sg”. This is because currently there is no IP address given in Azure Static Web App but there are IP address and Custom Domain Verification ID available in Azure Function. With these two information, we can easily map an A Record to our root domain, i.e. “dotnet.sg”.

Please take note that A Records are not supported for Consumption-based Function Apps. We must pay for the “App Service Plan” instead.

IP address and Custom Domain Verification ID on Azure Function. The root domain here is also SSL enabled.

After having the Azure Function ready, we need to perform URL redirect from “dotnet.sg” to “www.dotnet.sg”. With just a Proxy, we can create a Response Override with Status Code=302 and add a Header of Location=https://www.dotnet.sg, as shown in the following screenshot.

HTTP 302 on Azure Function Proxy.

With all these ready, we can finally get our community website up and running at dotnet.sg.

Welcome to the Singapore .NET/Azure Developer Community at dotnet.sg.

Export SSL Certificate For Azure Function

This step is optional. I need to go through this step because I have a Azure App Service managed certificate in one subscription but Azure Function in another subscription. Hence, I need to export the SSL certificate out and then import it back to another subscription.

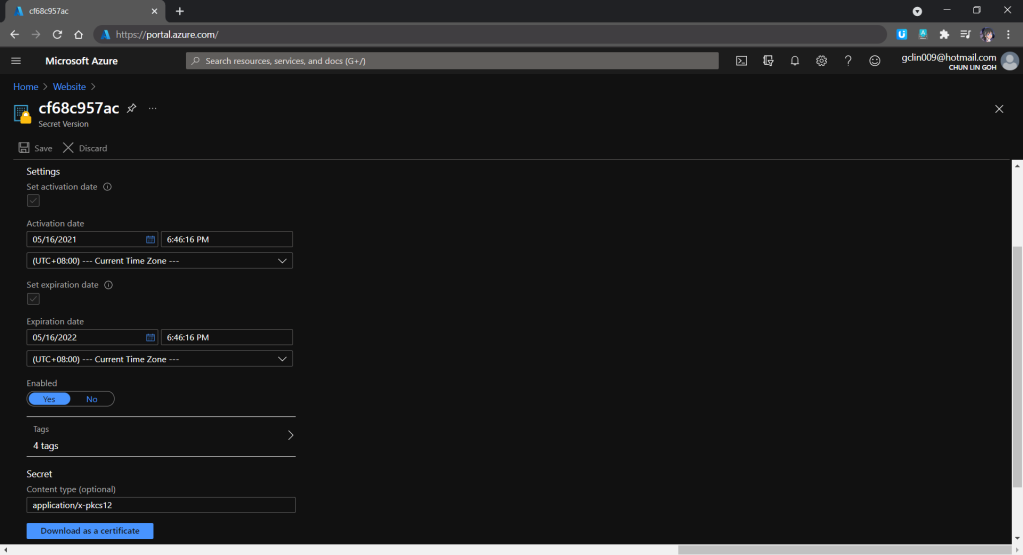
We can export certificate from the Key Vault Secret.

In the Key Vault Secret screen, we then need to choose the correct secret version and download the certificate, as shown in the following screenshot.

Downloading the certificate as pfx.

After that, as mentioned in an online discussion about exporting and importing Azure App Service Certificate which has no password, we shall use tool such as OpenSSL to regenerate a pfx certificate with password that Azure Function can accept with the following commands.

> openssl pkcs12 -in .\old.pfx -out old.pem -nodes

> openssl pkcs12 -export -out .\new.pfx -in old.pem

We will be prompted for a password after executing the first command. We simply press enter to proceed because the certificate, as mentioned above, has no password.

OpenSSL command prompt.

With this step done, I finally can import the cert to the Azure Function in another subscription.

Yup, that’s all for hosting our community website as a Blazor web app on Azure Static Web App!

References

The code of this Blazor project described in this article can be found in our community GitHub repository: https://github.com/sg-dotnet/website.

Personal OneDrive Music Player on Raspberry Pi with a Web-based Remote Control (Part 2)

There are so much things that we can build with a Raspberry Pi. It’s always my small little dream to have a personal music player that sits on my desk. In the Part 1, we already setup the music player programme which is written in Golang on Raspberry Pi successfully.

Now we need to have a web app as a remote control which will send command to the music player to play the selected song. In this article, we will talk about the web portal and how we access the OneDrive with Microsoft Graph and go-onedrive client.

[Image Caption: System design of this music player together with its web portal.]

Project GitHub Repository

The complete source code of this web-based music player remote control can be found at https://github.com/goh-chunlin/Lunar.Music.Web.

Gin Web Framework

I had a discussion with Shaun Chong, the Ninja Van CTO, and I was told that they’re using Gin web framework. Hence, now I decide to try the framework out in this project as well.

Gin offers a fast router that’s easy to configure and use. For example, to serve static files, we simply need to have a folder static_files, for example, in the root of the programme together with the following one line.

router.StaticFS("/static", http.Dir("static_files"))

However, due to the fact that later I need to host this web app on Azure Function, I will not go this route. Hence, currently the following are the main handlers in the main function.

router.LoadHTMLGlob("templates/*.tmpl.html")

router.GET("/api/HttpTrigger/login-url", getLoginURL)
router.GET("/api/HttpTrigger/auth/logout", showLogoutPage)
router.GET("/api/HttpTrigger/auth/callback", showLoginCallbackPage)

router.GET("/api/HttpTrigger/", showMusicListPage)

router.POST("/api/HttpTrigger/send-command-to-raspberrypi", sendCommandToRaspberryPi)

The first line is to load all the HTML template files (*.tmpl.html) located in the templates folder. The templates we have include some reusable templates such as the following footer template in the file footer.tmpl.html.

<!-- Footer -->
<footer id="footer">
    <div class="container">
        ...
    </div>
</footer>

We can then import such reusable templates into other HTML files as shown below.

<!DOCTYPE html>
<html>
    ...
    <body>
        ...
        {{ template "footer.tmpl.html" . }}
        ...
    </body>
</html>

After importing the templates, we have five routes defined. All of the routes start with /api/HttpTrigger is because this web app is designed to be hosted on Azure Function with a HTTP-triggered function called HttpTrigger.

The first three routes are for authentication. Then after that is one route for loading the web pages, and one handler for sending RabbitMQ message to the Raspberry Pi.

The showMusicListPage handler function will check whether the user is logged in to Microsoft account with access to OneDrive or not. It will display the homepage if the user is not logged in yet. Otherwise, if the user has logged in, it will list the music items in the user’s OneDrive Music folder.

func showMusicListPage(context *gin.Context) {
    ...
    defaultDrive, err := client.Drives.Default(context)
    if err == nil && defaultDrive.Id != "" {
        ...
        context.HTML(http.StatusOK, "music-list.tmpl.html", gin.H{ ... })
        
        return
    }

    context.HTML(http.StatusOK, "index.tmpl.html", gin.H{ ... })
}

Hosting Golang Application on Azure Function

There are many ways to host Golang web application on Microsoft Azure. The place we will be using in this project is Azure Function, the serverless service from Microsoft Azure.

Currently, Azure Function offers first-class support for only a limited number of programming languages, such as JavaScript, C#, Python, Java, etc. Golang is not one of them. Fortunately, in March 2020, Azure Function custom handler is announced officially even though it’s still in preview now.

The custom handler provides a lightweight HTTP server written in any language which then enables developers to bring applications, such as those written in Golang, into Azure Function.

Azure Functions custom handler overview
[Image Caption: The relationship between the Functions host and a web server implemented as a custom handler. (Image Source: Microsoft Docs – Azure)]

What is even more impressive is that for HTTP-triggered functions with no additional bindings or outputs, we can enable HTTP Request Forwarding. With this configuration, the handler in our Golang application can work directly with the HTTP requests and responses. This is all configured in the host.json of the Azure Function as shown below.

{
    "version": "2.0",
    "extensionBundle": {
        "id": "Microsoft.Azure.Functions.ExtensionBundle",
"version": "[1.*, 2.0.0)"
    },
    "customHandler": {
        "description": {
            "defaultExecutablePath": "lunar-music-webapp.exe"
        },
        "enableForwardingHttpRequest": true
    }
}

The defaultExecutablePath is pointing to the our Golang web app binary executable which is output by go build command.

So, in the wwwroot folder of the Azure Function, we should have the following items, as shown in the screenshot below.

[Image Caption: The wwwroot folder of the Azure Function.]

Since we have already enabled the HTTP Request Forwarding, we don’t have to worry about the HttpTrigger directory. Also, we don’t have to upload our web app source codes because the executable is there already. What we need to upload is just the static resources, such as our HTML template files in the templates folder.

The reason why I don’t upload other static files, such as CSS JavaScript, and image files, is that those static files can be structured to have multiple directory levels. We will encounter a challenge when we are trying to define the Route Template of the Function, as shown in the screenshot below. There is currently no way to define route template without knowing the maximum number of directory level we can have in our web app.

[Image Caption: Defining the route template in the HTTP Trigger of a function.]

Hence, I move all the CSS, JS, and image files to Azure Storage instead.

From the Route Template in the screenshot above, we can also understand why the routes in our Golang web app needs to start with /api/HttpTrigger.

Golang Client Library for OneDrive API

In this project, users will first store the music files online at their personal OneDrive Music folder. I restrict it to only the Music folder is to make the management of the music to be more organised. So it is not because there is technical challenge in getting files from other folders in OneDrive.

Referring to the Google project where they build a Golang client library for accessing the GitHub API, I have also come up with go-onedrive, a Golang client library, which is still in progress, to access the Microsoft OneDrive.

Currently, the go-onedrive only support simple API methods such as getting Drives and DriveItems. These two are the most important API methods for our web app in this project. I will continue to enhance the go-onedrive library in the future.

[Image Caption: OneDrive can access the metadata of a music file as well, so we can use API to get more info about the music.]

The go-onedrive library does not directly handle authentication. Instead, when creating a new client, we need to pass an http.Client that can handle authentication. The easiest and recommended way to do this is using the oauth2 library.

So the next thing we need to do is adding user authentication feature to our web app.

Microsoft Graph and Microsoft Identity platform

Before our web app can make requests to OneDrive, it needs users to authenticate and authorise the application to have access to their data. Currently, the official recommended way of doing so is to use Microsoft Graph, a set of REST APIs which enable us to access data on Microsoft cloud services, such as OneDrive, User, Calendar, People, etc. For more information, please refer to the YouTube video below.

So we can send HTTP GET requests to endpoints to retrieve information from OneDrive, for example /me/drives will return the default drive of the currently authenticated user.

Generally, to access OneDrive API, developers are recommend to use the standard OAuth 2.0 authorisation framework with the Azure AD v2.0 endpoint. This is where we will talk about the new Microsoft Identity Platform, which is the recommended way for accessing Microsoft Graph APIs.  Microsoft Identity Platform allows developers to build applications that sign in users, get tokens to call the APIs, as shown in the diagram below.

Microsoft identity platform today
[Image Caption: Microsoft Identity Platform experience. (Image Source: Microsoft Docs – Azure)]

By the way, according to Microsoft, the support for ADAL will come to an end in June 2022. So it’s better to do the necessary migration if you are still using the v1.0. Currently, the Golang oauth2 package is already using the Microsoft Identity Platform endpoints.

[Image Caption: Microsoft Identity Platform endpoints are used in the Golang OAuth2 package since December 2017.]

Now the first step we need to do is to register an Application with Microsoft on the Azure Portal. From there, we can get both the Client ID and the Client Secret (secret is now available under the “Certificates & secrets” section of the Application).

After that, we need to find out the authentication scopes to use so that the correct access type is granted when the user is signed in from our web app.

With those information available, we can define the OAuth2 configuration as follows in our web app.

var oauthConfig = &oauth2.Config{
    RedirectURL:  AzureADCallbackURL,
    ClientID:     AzureADClientID,
    ClientSecret: AzureADClientSecret,
    Scopes:       []string{"files.read offline_access"},
    Endpoint:     microsoft.AzureADEndpoint("common"),
}

The “file.read” scope is to grant read-only permission to all OneDrive files of the logged in user. By the way, to check the Applications that you are given access to so far in Microsoft Account, you can refer to the consent management page of Microsoft Account.

Access Token, Refresh Token, and Cookie

The “offline_access” scope is used here because we need a refresh token that can be used to generate additional access tokens as necessary. However, please take note that this “offline_access” scope is not available for the Token Flow. Hence, what we can only use is the Code Flow, which is described in the following diagram.

Authorization Code Flow Diagram
[Image Caption: The Code Flow. (Image Source: Microsoft Docs – OneDrive Developer)]

Hence, this explains why we have the following codes in the /auth/callback, which is the Redirect URL of our registered Application. What the codes do is to get the access token and refresh token from the /token endpoint using the auth code returned from the /authorize endpoint.

r := context.Request
code := r.FormValue("code")

response, err := http.PostForm(
    microsoft.AzureADEndpoint("common").TokenURL,
    url.Values{
        "client_id":     {AzureADClientID},
        "redirect_uri":  {AzureADCallbackURL},
        "client_secret": {AzureADClientSecret},
        "code":          {code},
        "grant_type":    {"authorization_code"}
    }
)

Here, we cannot simply decode the response body into the oauth2.Token yet. This is because the JSON in the response body from the Azure AD token endpoint only has expires_in but not expiry. So it does not have any field that can map to the Expiry field in oauth2.Token. Without Expiry, the refresh_token will never be used, as highlighted in the following screenshot.

[Image Caption: Even though the Expiry is optional but without it, refresh token will not be used.]

Hence, we must have our own struct tokenJSON defined so that we can first decode the response body to tokenJSON and then convert it to oauth2.Token with value in the Expiry field before passing the token to the go-onedrive client. By doing so, the access token will be automatically refreshed as necessary.

Finally, we just need to store the token in cookies using gorilla/securecookie which will encode authenticated and encrypted cookie as shown below.

encoded, err := s.Encode(ACCESS_AND_REFRESH_TOKENS_COOKIE_NAME, token)
if err == nil {
    cookie := &http.Cookie{
        Name: ACCESS_AND_REFRESH_TOKENS_COOKIE_NAME,
        Value: encoded,
        Path: "/",
        Secure: true,
        HttpOnly: true,
        SameSite: http.SameSiteStrictMode,
    }
    http.SetCookie(context.Writer, cookie)
}

Besides encryption, we also enable both Secure and HttpOnly attributes so that the cookie is sent securely and is not accessed by unintended parties or JavaScript Document.cookie API. The SameSite attribute also makes sure the cookie above not to be sent with cross-origin requests and thus provides some protection against Cross-Site Request Forgery (CSRF) attacks.

Microsoft Graph Explorer

For testing purposes, there is an official tool known as the Graph Explorer. It’s a tool that lets us make requests and see responses against the Microsoft Graph. From the Graph Explorer, we can also retrieve the Access Token and use it on other tools such as Postman to do further testing.

[Image Caption: Checking the response returned from calling the get DriveItems API.]

Azure Front door

In additional, Azure Front Door is added between the web app and the user in order to give us convenience in managing the global routing for the traffic to our web app.

The very first reason why I use Azure Front Door is also because I want to hide the /api/HttpTrigger part from the URL. This can be done by setting the custom forwarding path which points to the /api/HttpTrigger/ with URL rewrite enabled, as shown in the screenshot below.

[Image Caption: Setting the route details for the Rules Engine in Azure Front Door.]

In the screenshot above, we also notice a field called Backend Pool. A backend pool is a set of equivalent backends to which Front Door load balances your client requests. In our project, this will be the Azure Function that we’ve created above. Hence, in the future, when we have deployed the same web app to multiple Azure Functions so that Azure Front Door can help us to do load balancing.

Finally, Azure Front Door also provides a feature called Session Affinity which enables direct subsequent traffic from a user session to the same application backend for processing using Front Door generated cookies. This feature can be useful if we are building a stateful applications.

Final Product

Let’s take a look what it looks like after we’ve deployed the web app above and uploaded some music to the OneDrive. The web app is accessible through the Azure Front Door URL now at https://lunar-music.azurefd.net/.

[Image Caption: My playlist based on my personal OneDrive Music folder.]

Yup, that’s all. I finally have a personal music entertainment system on Raspberry Pi. =)

References

The code of the music player described in this article can be found in my GitHub repository: https://github.com/goh-chunlin/Lunar.Music.Web.

If you would like to find out more about Microsoft Identity Platform, you can also refer to the talk below given by Christos Matskas, Microsoft Senior Program Manager. Enjoy!

Azure Blob Storage and File API

Azure Blob Storage - Azure SDK - ASP .NET MVC - Entity Framework - HTML5

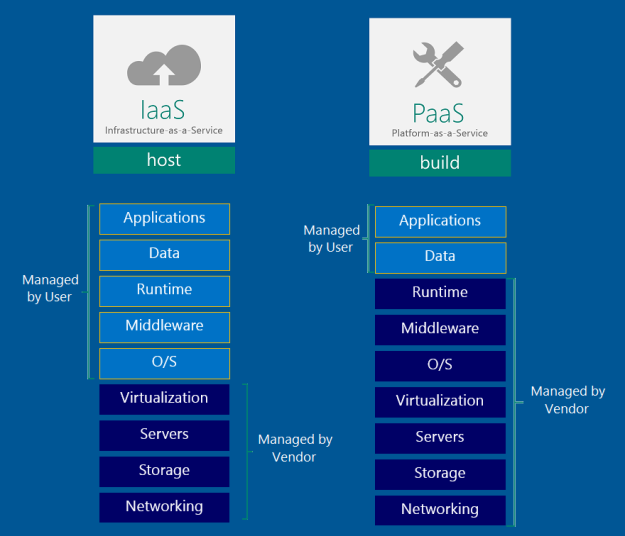
When my applications were hosted on Windows Azure Virtual Machines (VM), we stored the images uploaded via our web applications in the hard disks of the VMs (except the temporary disk). However, when we started load balancing, we soon encountered a problem that the uploaded images were only found in one of the VMs. So we needed to find a centralized storage for those images.

Recently, when we are using Azure PaaS (aka Cloud Service), even without load balancing, we already encounter the same issue. That is simply because the hard drives used in Cloud Service instances are not persistent. Hence, a persistent file storage on the cloud is needed.

IaaS vs. PaaS
IaaS vs. PaaS

Blob Storage

Azure Blob Storage, according to Azure Documentation, is a service for storing large amount of unstructured data that can be accessed everywhere via HTTP or HTTPS. Hence, it is an ideal tool that we can use as the persistent image cloud storage.

There are two types of blob, Page Blob and Block Blob. Page Blob is commonly used for storing VHD files for VMs because it is optimized for random read and write operations.

For most of the files uploaded, it’s recommended to store as Block Blobs because large files will be split into smaller blocks and then uploaded concurrently. Hence, Block Blob is designed to give us faster upload and better throughput, which is great for image upload.

The maximum size for a Block Blob is 64 MB. Hence, if the uploaded file is more than 64 MB, we must upload it as a set of blocks; otherwise, we will receive status code 413 (Request Entity Too Large). For my web applications, there is no need for uploading an image which is more than 5MB most of the time. Hence, I can just limit the size of images before the user uploads them.

HttpPostedFileBase imageUpload;
...
if (imageUpload.ContentLength > 0 && imageUpload.ContentLength <= 5242880)
{
    //warn the user to resize the image
}

Let’s Try Uploading Images

I’m going to share how to upload more than one image to the Azure Blob Storage from an ASP .NET MVC 5 application. If you are going to upload just one image, simply remove the for loop and change List to just DBPhoto in the codes below.

First of all, I create a class to handle upload to Azure Storage operation.

public class AzureStorage
{
    public static async Task UploadAndSaveBlobAsync(
        HttpPostedFileBase imageFile, CloudBlobContainer container)
    {
        string blobName = Guid.NewGuid().ToString() + 
            Path.GetExtension(imageFile.FileName);

        CloudBlockBlob imageBlob = container.GetBlockBlobReference(blobName);
        using (var fileStream = imageFile.InputStream) 
        {
            await imageBlob.UploadFromStreamAsync(fileStream);
        }

        return imageBlob;
    }
}

So, in my controller, I have the following piece of code which will be called when an image is submitted via web page.

[HttpPost]
[ValidateAntiForgeryToken]
public async Task Create(
    [Bind(Include = "ImageUpload")] PhotoViewModel model)
{
    var validImageTypes = new string[] { "image/jpeg", "image/pjpeg", "image/png" };
    
    if (ModelState.IsValid) 
    {
        if (model.ImageUpload != null && model.ImageUpload.Count() > 0)
        {
            var storageAccount = CloudStorageAccount.Parse 
                (WebConfigurationManager.AppSettings["StorageConnectionString"]);

            var blobClient = storageAccount.CreateCloudBlobClient();
            blobClient.DefaultRequestOptions.RetryPolicy = 
                new LinearRetry(TimeSpan.FromSeconds(3), 3);  

            var imagesBlobContainer = blobClient.GetContainerReference("images");
            foreach (var item in model.ImageUpload) 
            { 
                if (item != null) {
                    continue;
                }
                
                if (validImageTypes.Contains(item.ContentType) && 
                    item.ContentLength > 0 && item.ContentLength <= 5242880)
                {
                    var blob = await AzureStorage.UploadAndSaveBlobAsync(item, imagesBlobContainer);
                    DBPhoto newPhoto = new DBPhoto(); 
                    newPhoto.URL = blob.Uri.ToString();
                    db.DBPhoto.Add(newPhoto); 
                } 
                else 
                {
                    // Show user error message 
                    return View(model); 
                }
            }
            db.SaveChanges();
            ... 
        } 
        else
        {
            // No image to upload
        } 
    }
    return View(model);
}

In the code above, there are many new cool things.

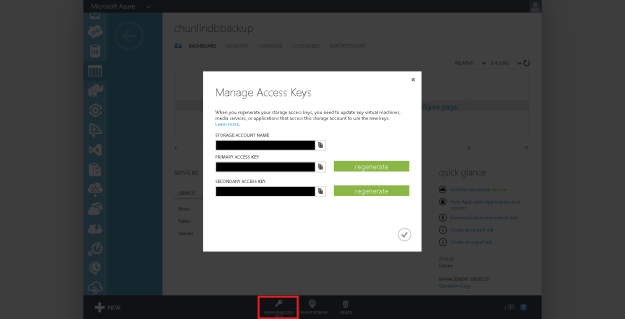
Firstly, it is the connection string to Azure Blob Storage, which I store in StorageConnectionString in web.config. The format for secure connection string is as follows.

DefaultEndpointsProtocol=https;AccountName=;AccountKey=;

Retrieve the access keys to the Storage Account.

Secondly, it’s LinearRetry. It is basically a retry policy which states how many times the program will retry and how much time needed between retries. In my case, it will only wait for 3 seconds after each try up to 3 tries.

Thirdly, I get the URL of the image on the Azure Blob Storage via blob.Uri.ToString() and store it into the database table. The URL will be used later for displaying the image as well as deleting the image.

Fourthly, I actually check to see if model.ImageUpload has null entries. This is because if I submit the form without any image to upload, model.ImageUpload has one entry. Not zero, but one. The only one entry is actually null. So if I don’t check to see whether the entry in model.ImageUpload is null, there will be an exception thrown.

The controller has such a long code. Luckily the code needed in the model and view is short and simple.

For the model PhotoViewModel, I have the following.

public class PhotoViewModel
{
    ...
    
    [Display(Name = "Current Images")]
    public List AvailablePhotos { get; set; }
}

For view, it is easy to allow selecting multiple files in the same view page. The “multiple = “true”” is to make sure more than one file can be selected in the File Explorer. You can omit this attribute if you only want at most one file being selected.

@Html.LabelFor(model => model.ImageUpload, new { style = "font-weight: bold;" })
@Html.TextBoxFor(model => model.ImageUpload, new { type = "file", multiple = "true" })
@Html.ValidationMessageFor(model => model.ImageUpload)

Image Size and HttpException

The image upload function looks fine. However, when images having size larger than a certain size is uploaded, HttpException will be thrown.

There is no way that having exception would be fun too! (Image Credit: Tari Tari)

In order to prevent DOS attacks which upload huge files to the server, IIS by default only allows files which have size less than 4MB to be uploaded. Hence, although I earlier put a check to prevent image larger than 5MB to be uploaded, the exception will still be thrown if an image of size between 4 to 5MB is uploaded.

What if we just change the if clause above to allow only at most 4MB of image being uploaded? This won’t work because the exception is already thrown before the if condition is reached.

Then, can we just increase the IIS limit from 4MB to, let’s say, 100MB or something bigger? Sure. This can work. However, it still doesn’t stop someone uploads something bigger than the limit. Also, it makes attackers easier to exhaust your server with big files. Hence, expanding the upload size restriction is not really a full solution.

If you are interested, there are many good articles online discussing about this problem. I highlight some interesting ones below.

  1. Use HttpModule to Handle File Uploads;
  2. Use RIA (Rich Internet Application) Services in Silverlight (Seriously, we are talking about Silverlight in year 2015?);
  3. SubStatusCode = 13 in IIS 7;
  4. Catch the Exception in Global.asax.

I don’t really like the methods listed above, especially the 3rd and 4th options. It’s already too late to inform the user when the exception is thrown. Could we do something at client side before the images are being uploaded?

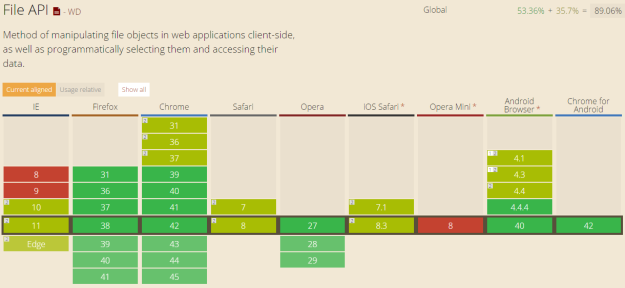
Luckily, we have File API in HTML 5. It allows to loop through the files in JavaScript to check their size. So, after the submit button is clicked, I will call a JavaScript method to check for the size of the images before they are being uploaded.

function IsFileSizeAcceptable() {
    if (typeof FileReader !== "undefined") {
        var filesBeingUploaded = document.getElementById('ImageUpload').files;
        for (var i = 0; i < filesBeingUploaded.length; i++) {
            if (filesBeingUploaded[i].size >= 4194304) { // Less than 4MB only
                alert('The file ' + filesBeingUploaded[i].name + ' is too large. Please remove it from your selection.');
                return false;
            }
        }
    }
    return true;
}

File API is currently supported in major modern browsers. (Image Credit: http://caniuse.com/#feat=fileapi)

Remove from Azure Blob Storage

It’s normal that files uploaded to storage will be removed later. So how are we going to implement this feature in our ASP .NET MVC 5 application?

First of all, I added the following code to my AzureStorage.cs.

public static async Task DeleteBlobAsync(Uri blobUri, CloudBlobContainer container)
{
    string blobName = blobUri.Segments[blobUri.Segments.Length - 1];
    CloudBlockBlob blobToDelete = container.GetBlockBlobReference(blobName);

    await blobToDelete.DeleteAsync(); 
}

Secondly, I just pass in the Azure Storage URL of the image that I would like to remove and then call the DeleteBlobAsync method.

Uri blobUri = new Uri();
await AzureStorage.DeleteBlobAsync(blobUri, imagesBlobContainer);

Then the image will be deleted from the Azure Storage successfully.

Global.asax.cs and Blob Container

In order to have my application to create a blob container automatically if it doesn’t already exist, I add a few lines in Global.asax.cs as follows.

var storageAccount = CloudStorageAccount.Parse(
    WebConfigurationManager.AppSettings["StorageConnectionString"]);
var blobClient = storageAccount.CreateCloudBlobClient();
var imagesBlobContainer = blobClient.GetContainerReference("images");
if (imagesBlobContainer.CreateIfNotExists())
{
    imagesBlobContainer.SetPermissions(new BlobContainerPermissions
        {
            PublicAccess = BlobContainerPublicAccessType.Blob
        });
}

Write a Console Program to Upload File to Azure Storage

So, how is it done if we are developing a console application, instead of web application?

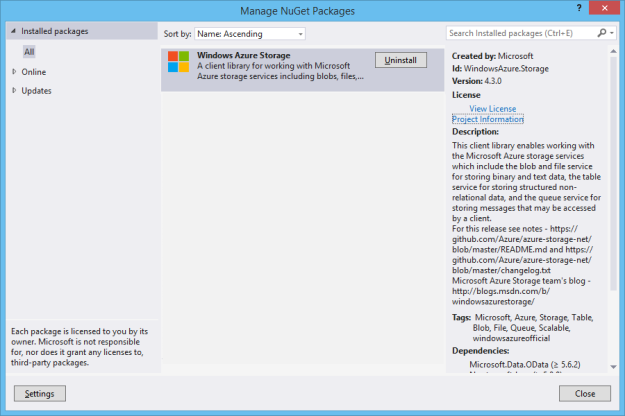
Windows Azure Storage NuGet Package needs to be installed first.

The codes below show how I upload an html file from my local hard disk to Azure Blob Storage. Then I can share the Azure Storage URL of the file to my friends so that they can read the web page.

Similar to what I do in web application, this is how I connect to the Storage account via https.

var azureStorageAccount = new CloudStorageAccount(
    new StorageCredentials("", ""), true);

This is how I access the container.

var blobClient = new CloudBlobClient(azureStorageAccount.BlobStorageUri, azureStorageAccount.Credentials);
var container = blobClient.GetContainerReference("myfiles");

Then the next thing I do is just upload the local file to Azure Storage by specifying the file name, content type, etc.

CloudBlockBlob blob = container.GetBlockBlobReference("mysimplepage.html");
using (Stream file = System.IO.File.OpenRead(@"C:\Users\ChunLin\Documents\mysimplepage.html")) 
{
    blob.Properties.ContentType = "text/html"; 
    blob.UploadFromStream(file); 
}

Yup, that’s all. =)

Pricing

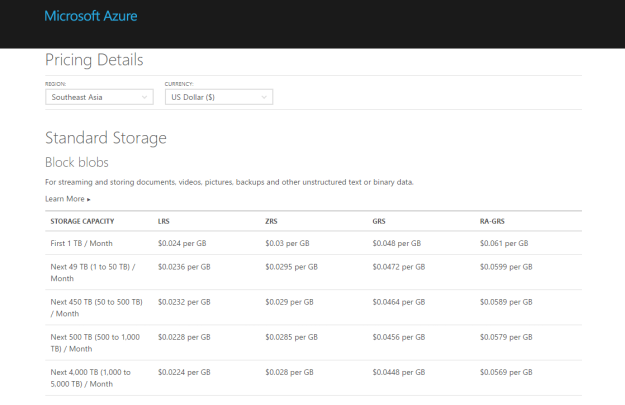
Hosting your files on cloud storage is sure convenience. However, Azure Blob Storage is not free. The following table shows the current pricing of Azure Block Blob Storage in South East Asia region. To get the latest pricing details, please visit Azure Storage Pricing page.

Azure Standard Block Blob Storage in SEA Pricing

Summer 2015 Self-Learning Project

This article is part of my Self-Learning in this summer. To read the other topics in this project, please click here to visit the project overview page.

Summer Self-Learning Banner