I was once asked how to build and maintain an open source project. A successful open source project not only solves a particular problem well, but also follows best practices in order to have a high code quality.
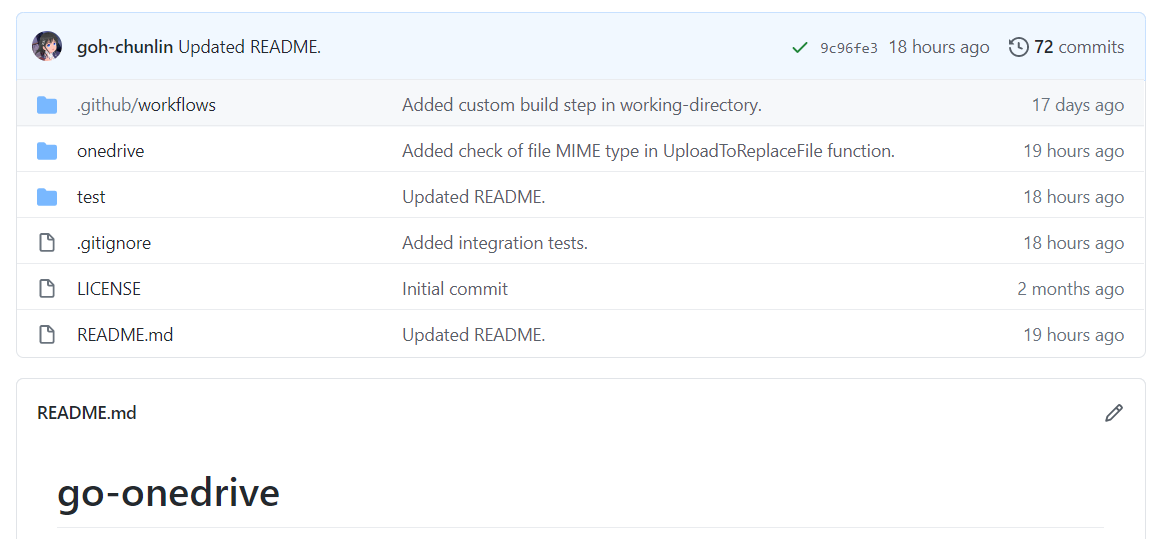
Last year December, I published my open source project, go-onedrive, a Golang client library for accessing the Microsoft OneDrive REST API.
Last month, go-onedrive successfully received 28 stars, which is the highest number of stars I received on GitHub. Also, there are new contributors joining the project. Meanwhile, I am also honoured to have received code review feedback about the go-onedrive project from Brian Ketelsen, Principal Cloud Advocate in Microsoft. Even though it’s not a great achievement, but I’m still satisfied because it’s the first time my projects on GitHub received so many eyeballs.
Hence, in this article, I will talk about maintaining this open source project, go-onedrive.
Changes Based on Feedback Received
Not all contributors will submit a pull request for their feedback. They may just submit an issue on GitHub and we have to work on that. Sometimes, they may simply message us to let us know their thoughts. Hence, we need to make the changes according to the valid feedback and comments.
Brian Ketelsen commented about the Golang file naming in the project. According to Brian, Golang source file names should be all lower case (same with package names and directory names) because some file systems are case-preserving. Hence, there will be cases where both myFile.go and myfile.go can be two different files in the same directory.
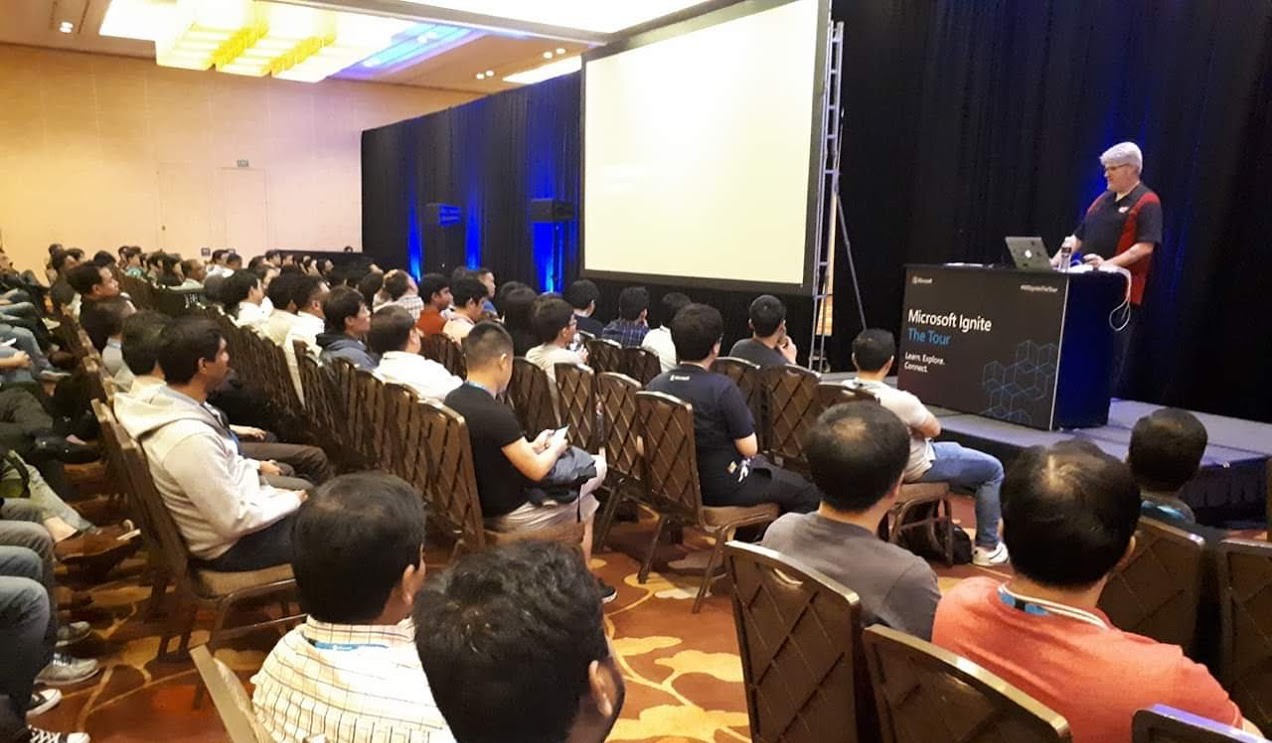
Brian Ketelsen talked about microservices and Golang in Singapore during a Microsoft event. (Photo Credit: Riza Marhaban)
I am glad to have two contributors, @nullaus and @ti55987, joining from another part of the world. They not only provided great improvement to the library by introducing new functionalities, but also followed the existing coding style in the project. So, I’d like to take this opportunity to thank them.
As the owner of the library, I’m aware that how contributors communicate can have a significant impact on the success of the Pull Request. I respect the time taken by the contributors to improve the codes. Hence, if sometimes they’re not able to correct the Pull Request based on the agreement, then I will try to make the changes on their behalf.
Three of us are helping each other to improve the codes in the same Pull Request whenever we can.
In the most recent change, one of the contributors submitted a new service for Shared Link in OneDrive. I noticed that hardcoded strings are used in the new code. This makes the client to be able to send any valid string and there will be no errors. Hence, I changed the code to use proper enums.
Publish Package with VS Code
Once all the necessary changes are done, it’s time to publish a new package for the users on Pkg.go.dev.
Firstly, we use the following command to tidy up the dependencies in go-onedrive library. This removes any dependencies the module might have accumulated that are no longer necessary.
go mod tidy
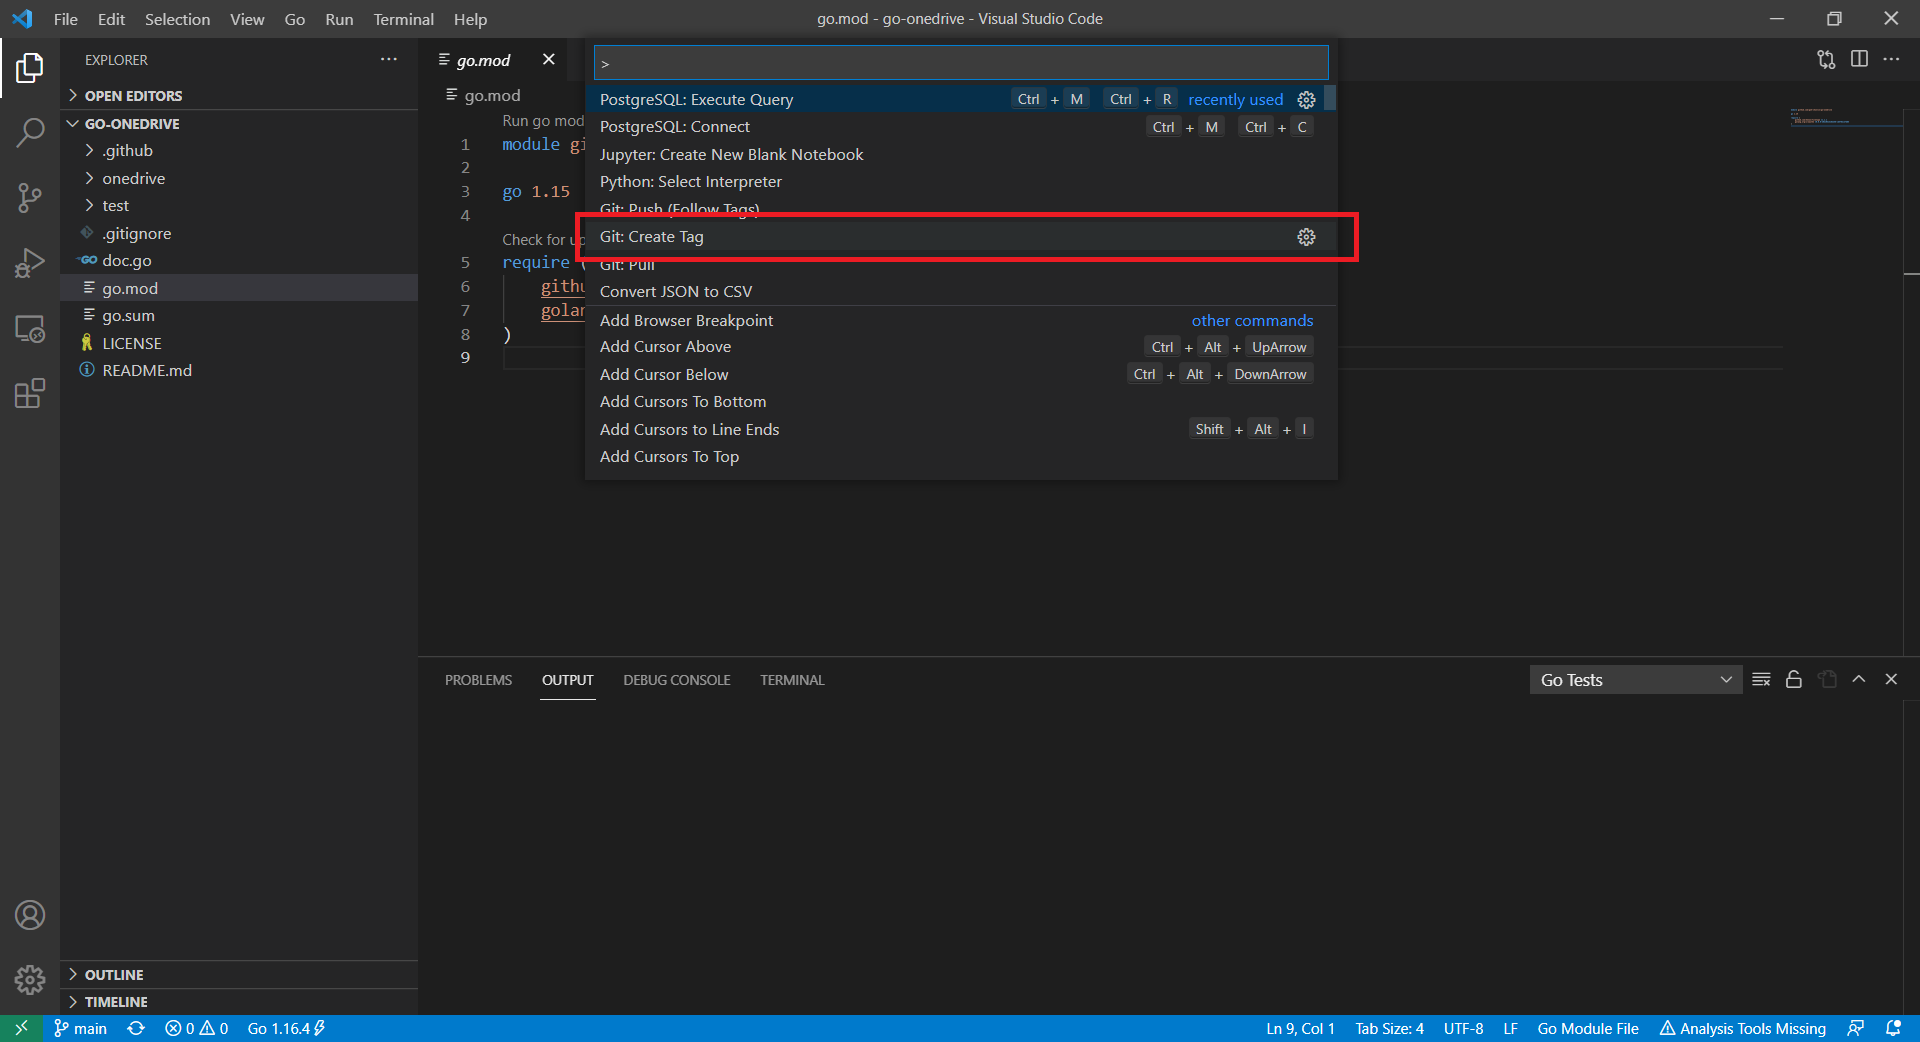
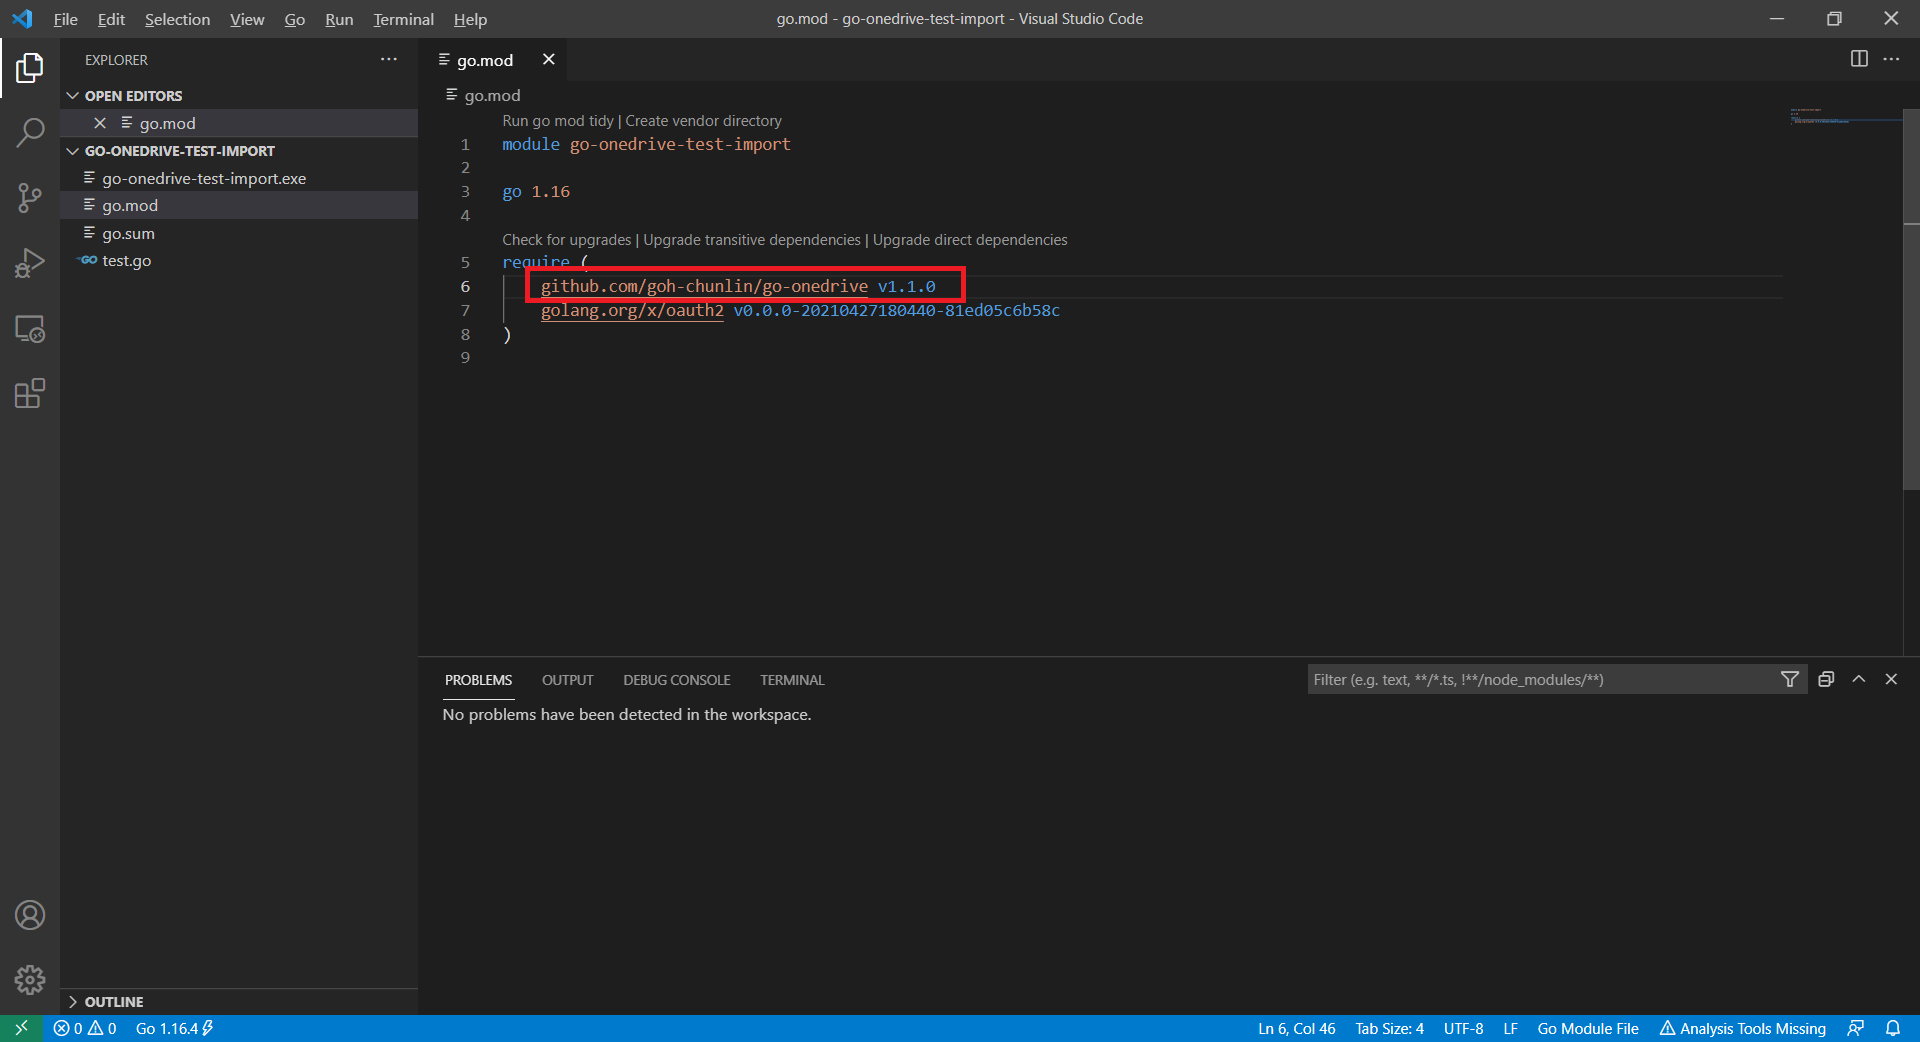
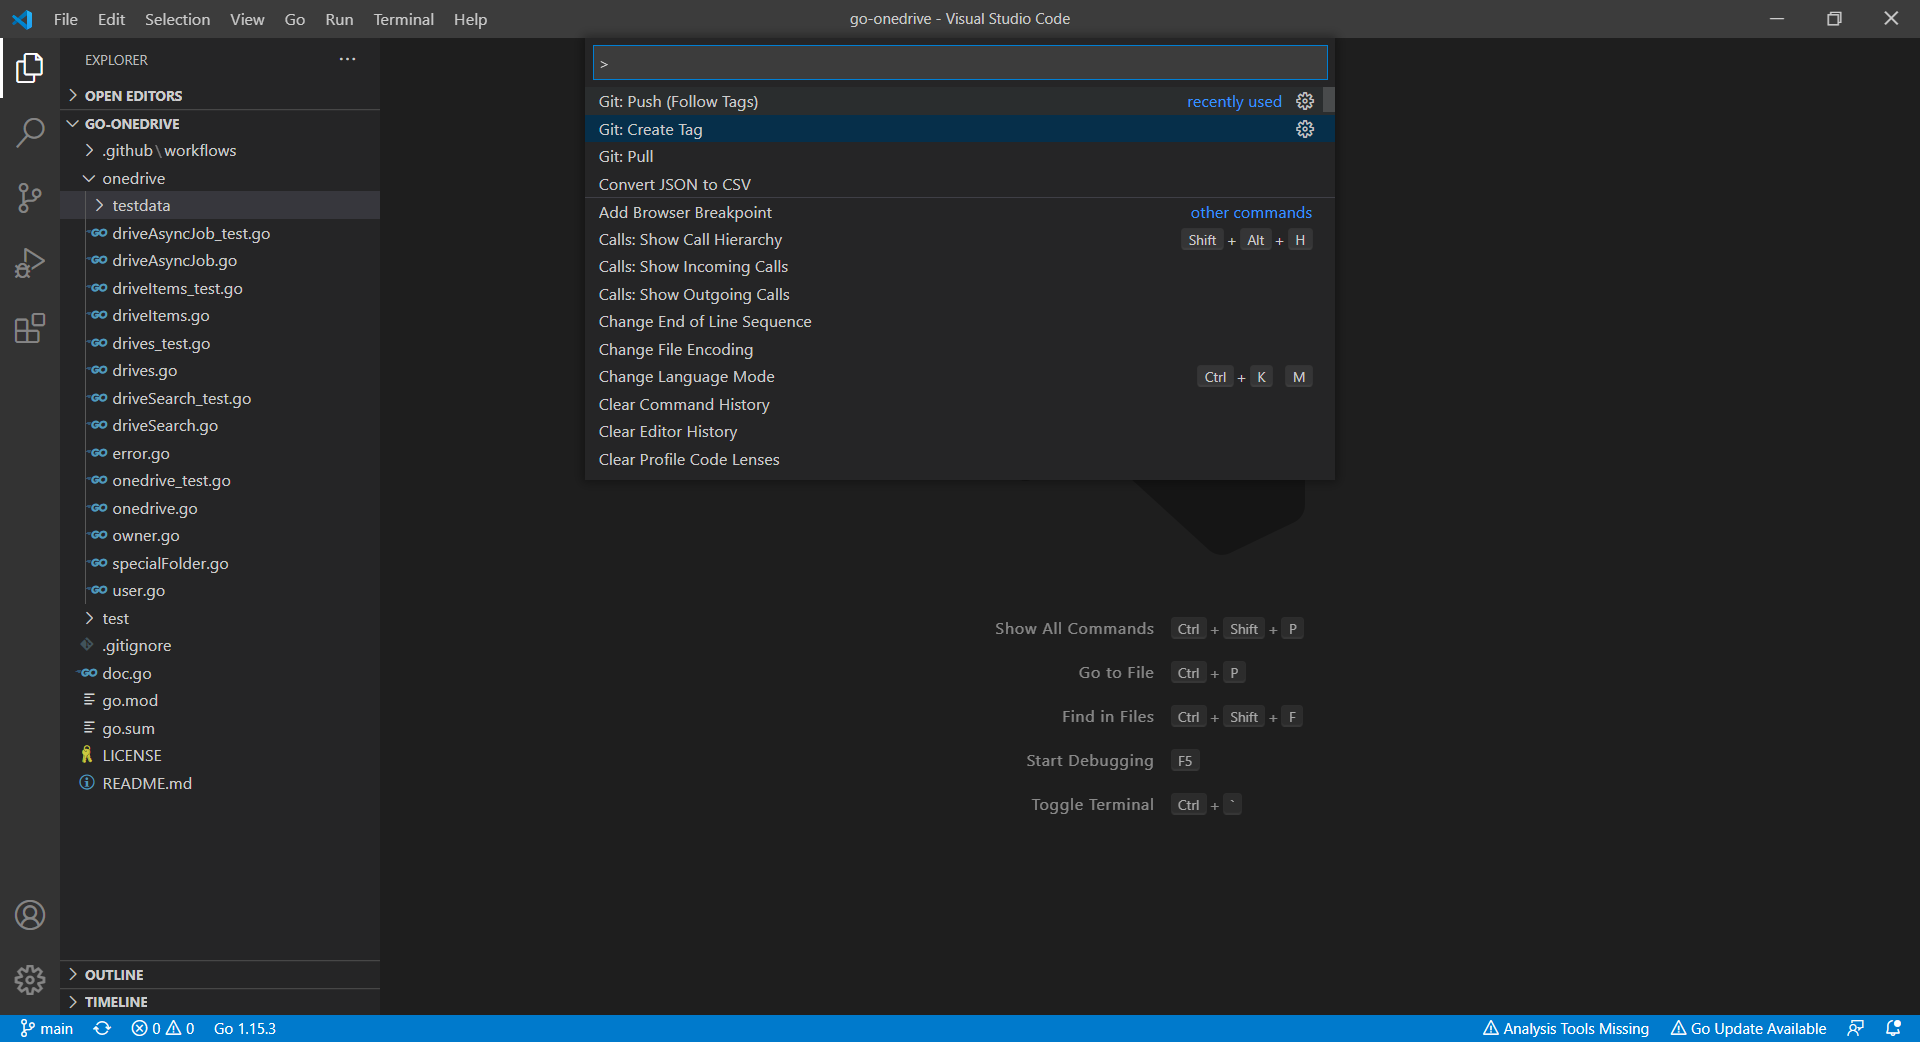
Now we can proceed to publish our module by first creating a Release of it on the GitHub. To do so, we open the Command Palette (Ctrl + Shift + P) and choose Git: Create Tag.
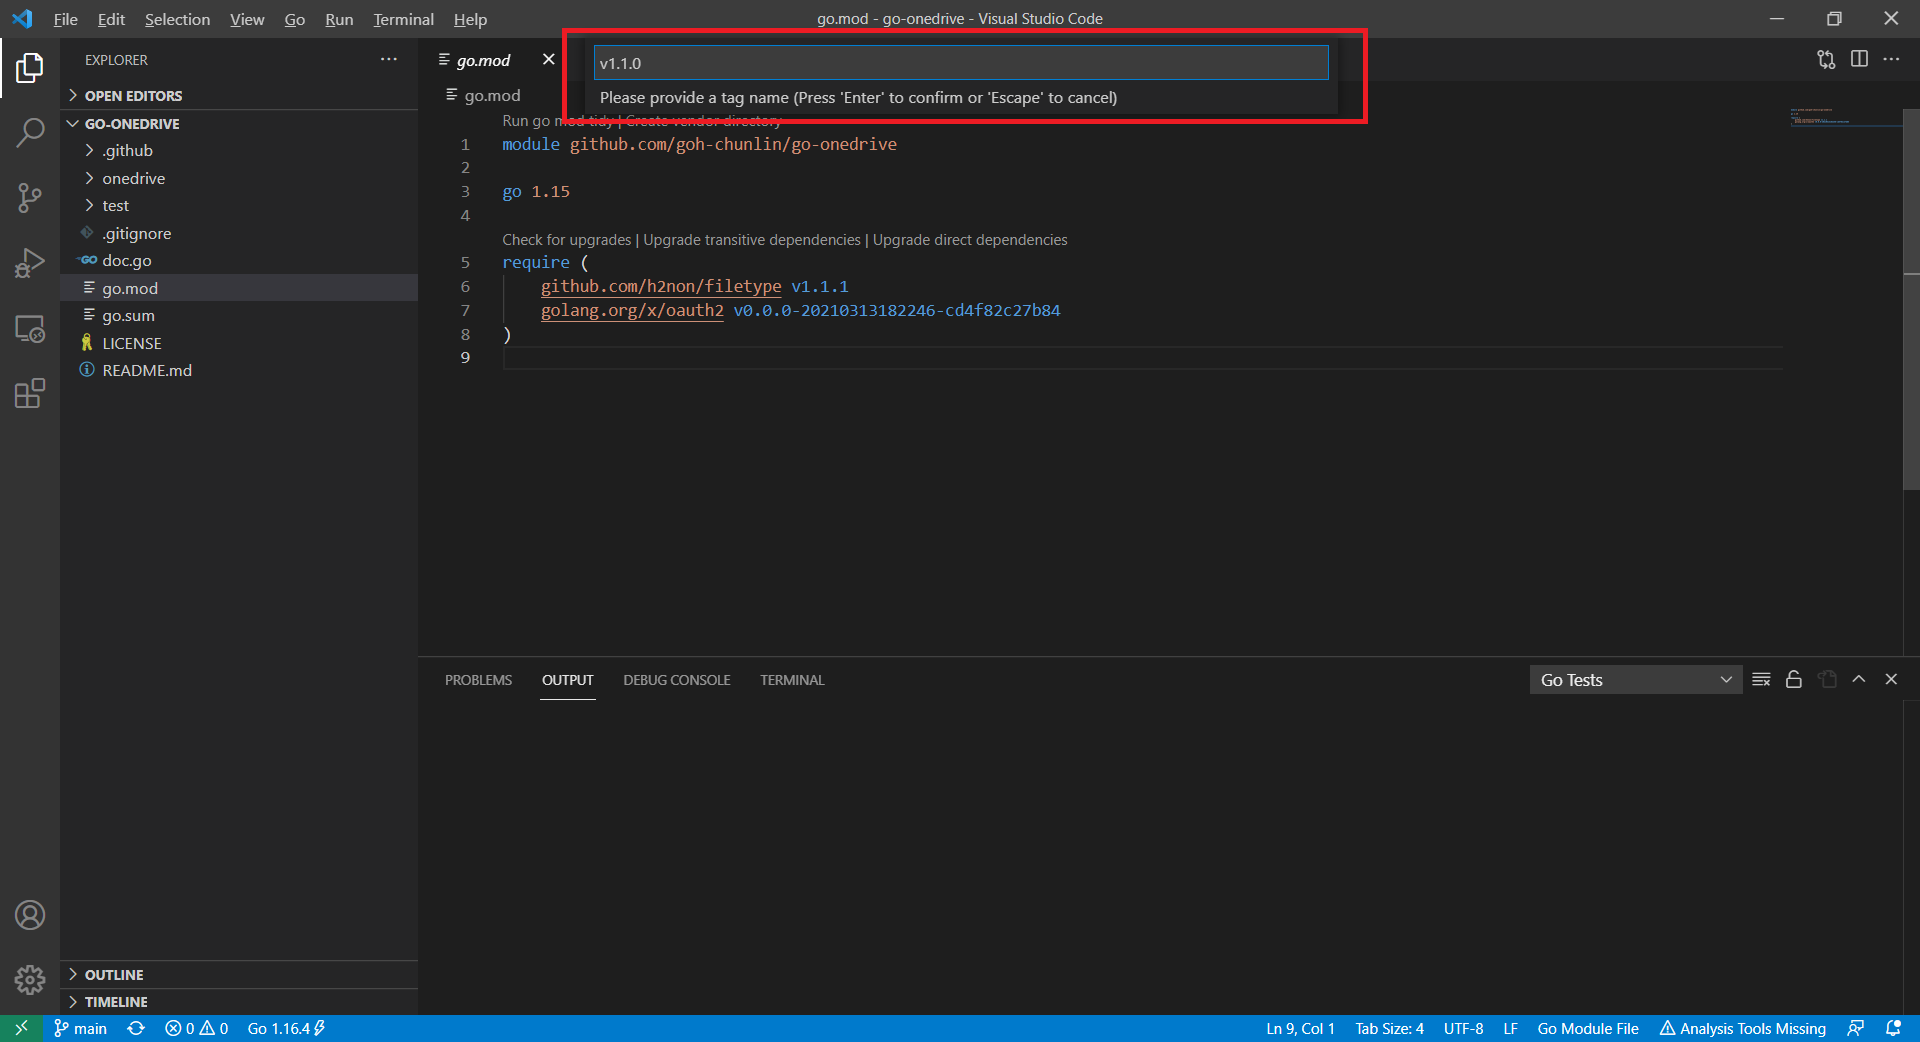
We will tag this release as v1.1.0 and provide a message to describe this release in the next step.
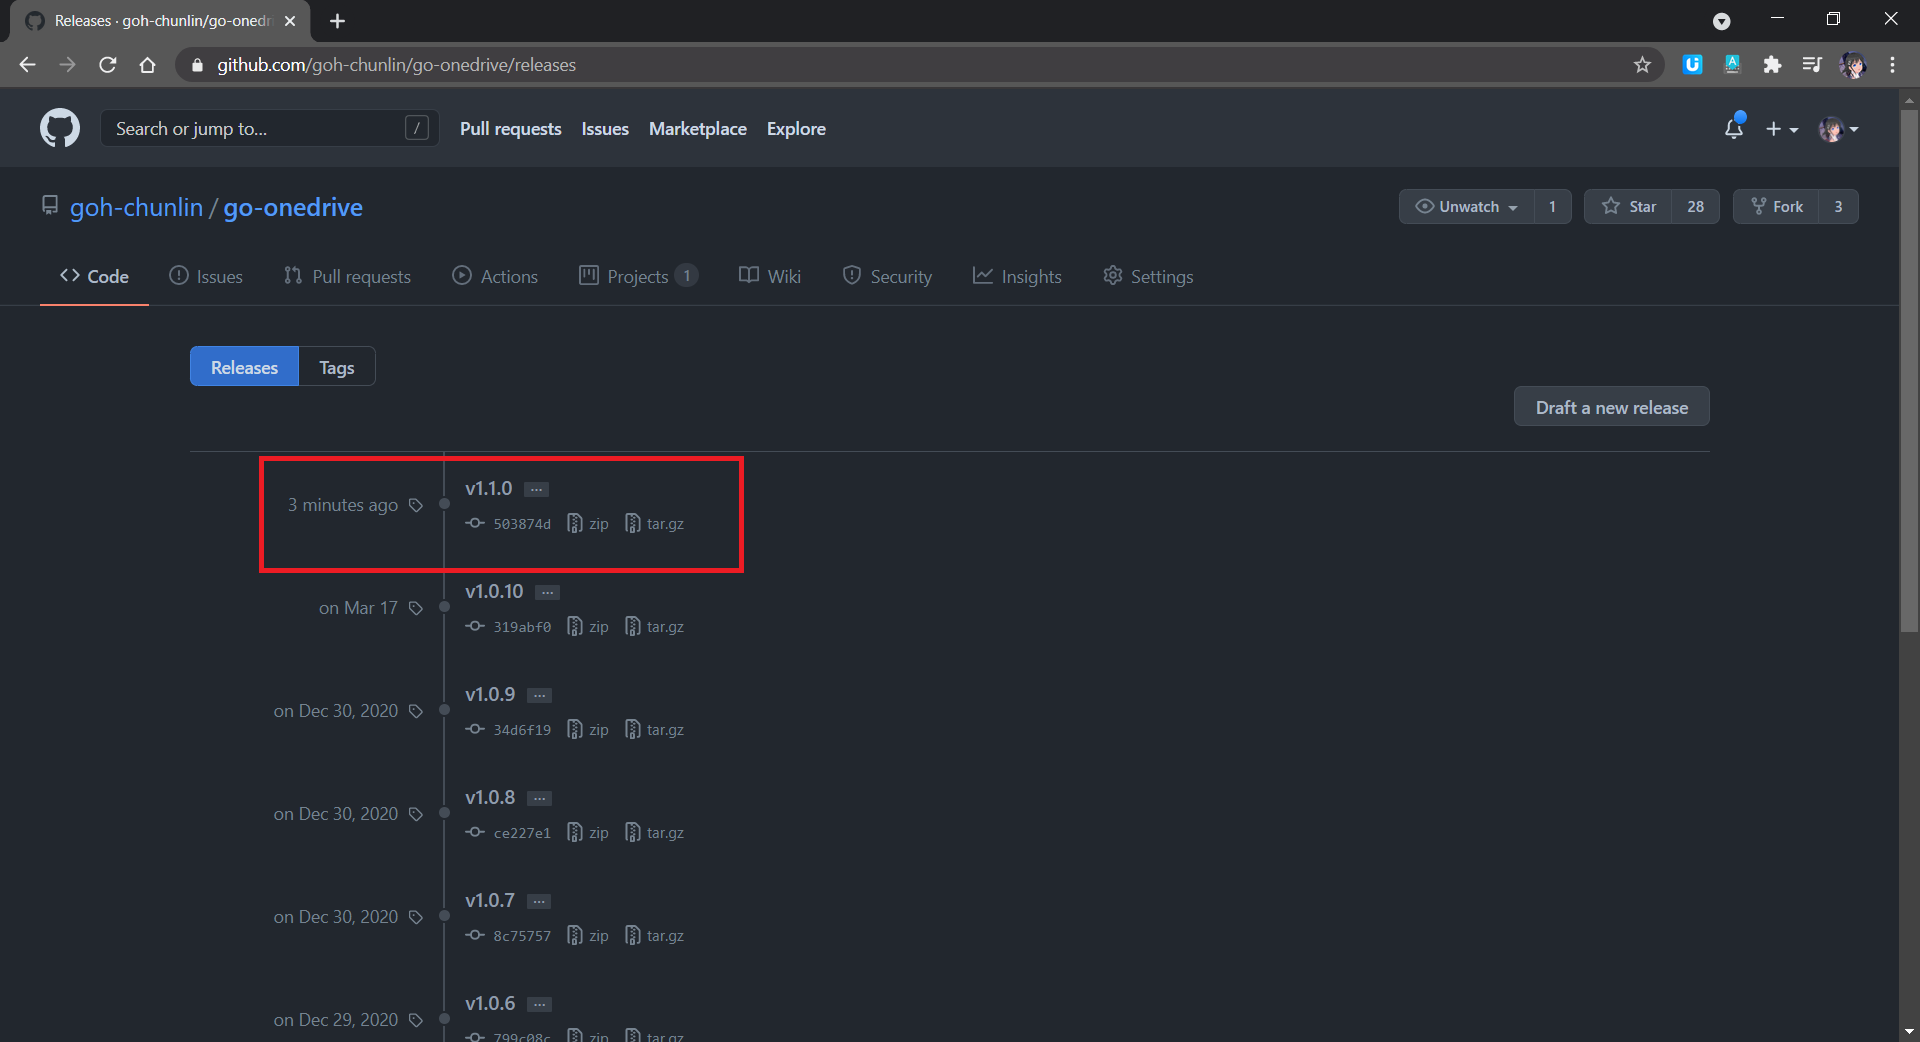
Finally, we need to push the tag to the remote server. To do so, we simply open the Command Palette again and choose Git: Push (Follow Tags). Then we shall see our new package now available on GitHub Releases page, as shown below.
Yay, this is our new package for go-onedrive.
Now, how to we update the Pkg.go.dev? Now if we navigate to the v.1.1.0 web page on Pkg.go.dev, we will be told that it cannot yet be found, as shown below.
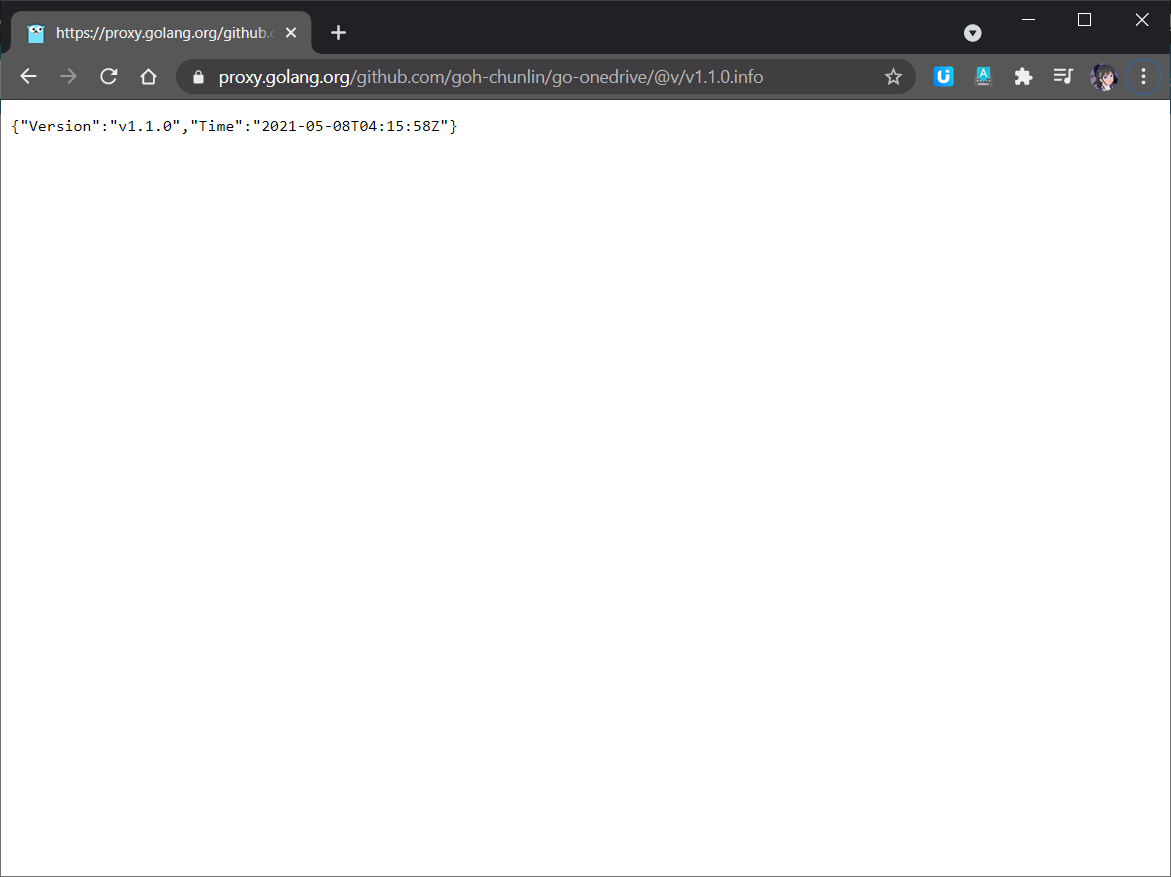
This is because new packages are added to Pkg.go.dev through the scheduled monitoring of the Go Module Index. Hence, if we don’t see our packages on the website, we can manually make a request to fetch our packages by following the instructions here. The following screenshot shows how I make a request to proxy.golang.org, where the data of the Pkg.go.dev is downloaded from. In my case, after doing that, in less than 10 minutes, the package will be made available on the Pkg.go.dev website.
Manually request proxy.golang.org for the module version to endpoint specified by the Module proxy protocol.
With this new release, the users can simply update to use the latest version of go-onedrive in the go.mod file of their projects. After running the go mod tidy command, then they are good to go to use the new go-onedrive library.
As I shared in my talk in Boston Golang Community early this month, I had been using OneDrive since its early days when it was still known as SkyDrive. At that time, there was no official API for accessing SkyDrive. After that, Microsoft rebranded the product to be part of Microsoft Live family and OneDrive finally could be accessible through the Live SDK.
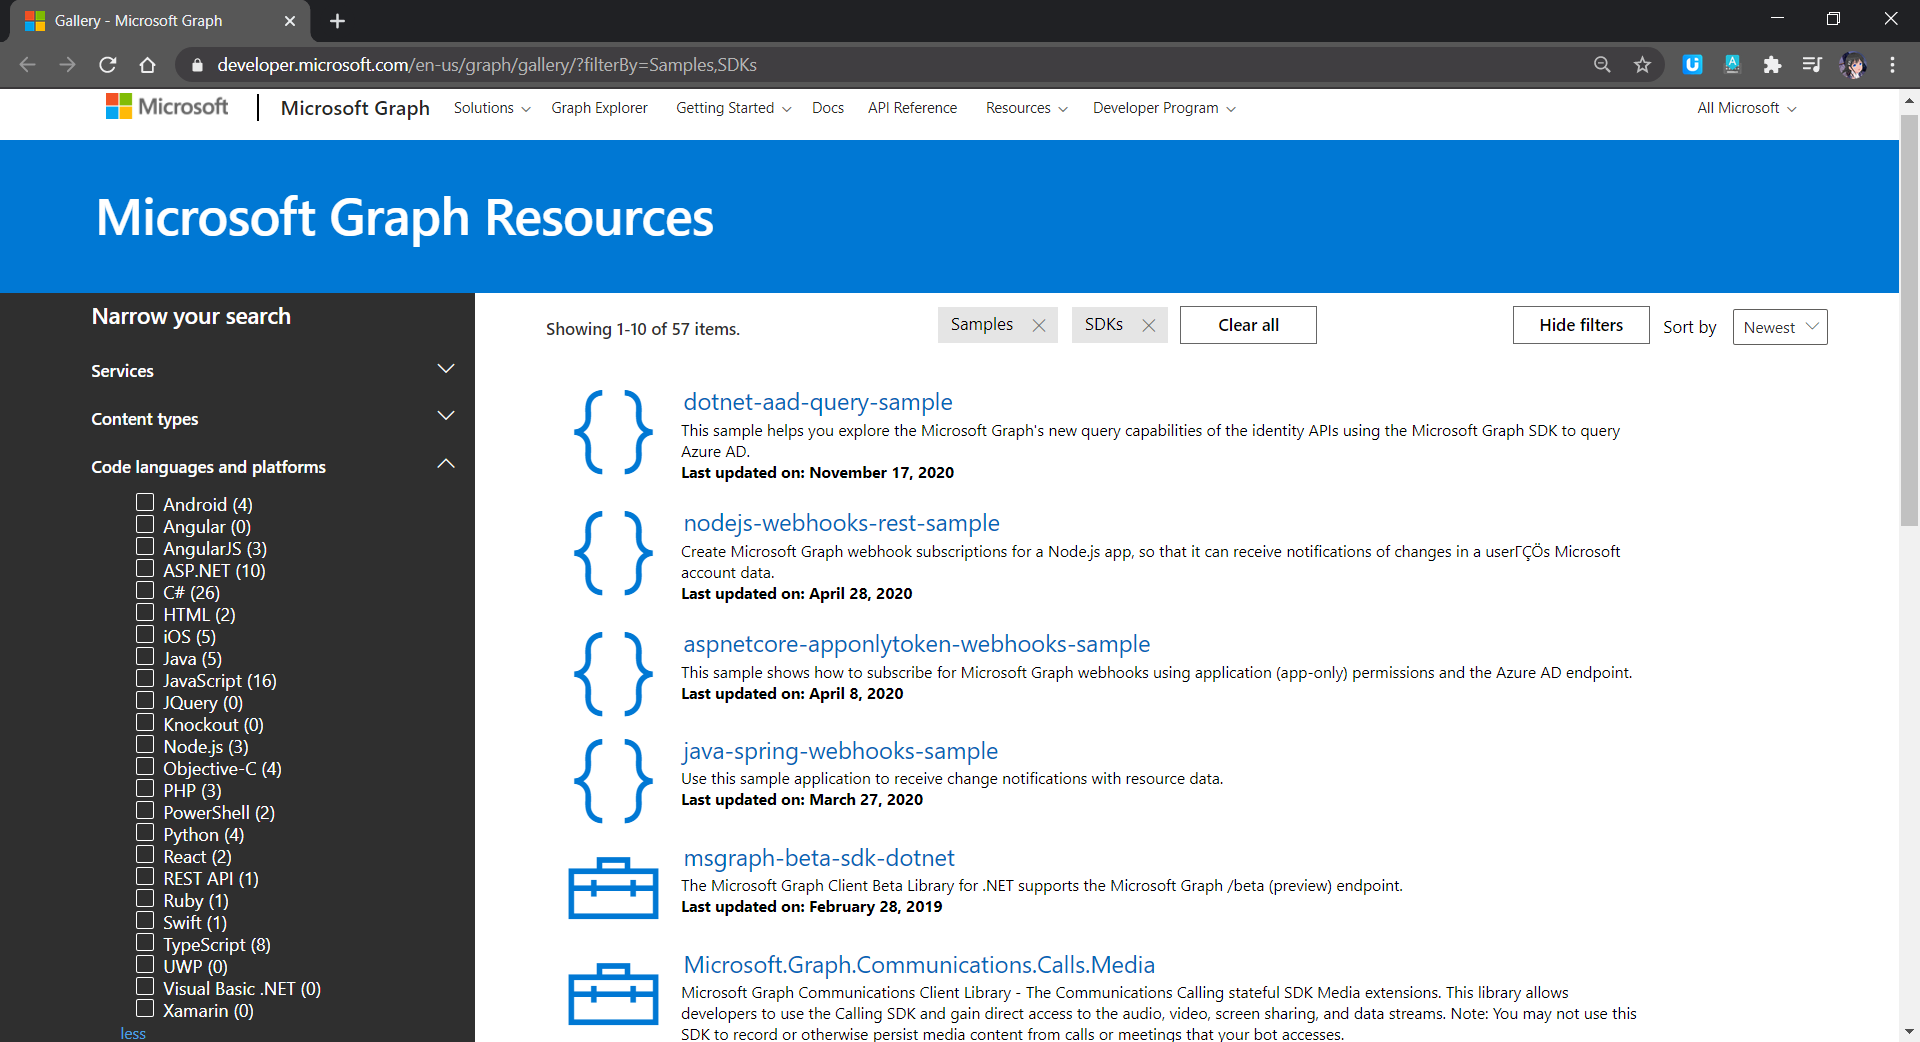
Code languages and platforms officially mentioned for Microsoft Graph.
Golang is not in the list. Since I need to access OneDrive in my other Golang applications, I decided to build a OneDrive Golang client library myself.
Project Structure
There is one project go-github from Google about building a Golang client library for accessing the GitHub API. It is similar to what I’d like to achieve so I use the project as a reference.
In the early stage of the project, the project structure is exactly the same as go-github, as shown in the screenshot below.
Project structure of the go-onedrive initially.
The onedrive folder consists of the main codes and unit tests for the library and test folder contains additional test suite which will talk to the actual OneDrive account over network and is beyond the unit tests.
Communication with Microsoft Graph
All the communication in the library is done via a client with Base URL pointing to graph.microsoft.com. I like how go-github designs its client so that while it has many services, it still can reuse one single struct for each service on the heap.
onedrive.Client manages communication with the Microsoft Graph.
The go-onedrive library does not directly handle authentication. Instead, when creating a new onedrive.Client, we need to pass an http.Client that can handle authentication. The easiest and recommended way to do so is using the oauth2 library.
For every request to the Microsoft Graph, we need to have a relative URL in which case it is resolved relative to the Base URL of the onedrive.Client.
This works for most of the cases in the OneDrive scenario. However, there is a moment when the client should not be reused, for example, monitoring the asynchronous job status on OneDrive. This is because of the following two reasons
Base URL for job monitoring API needs to use api.onedrive.com as domain instead of pointing to Microsoft Graph;
We should not pass the user authentication information to the job monitoring API because the request will be rejected.
To solve this problem, I introduce a flag, isUsingPlainHttpClient, to specify whether the is a need to use another new http.Client to send the API request, as shown in the screenshot below.
Checking whether to use the http.Client with authentication.
HTTP 202 and HTTP 204
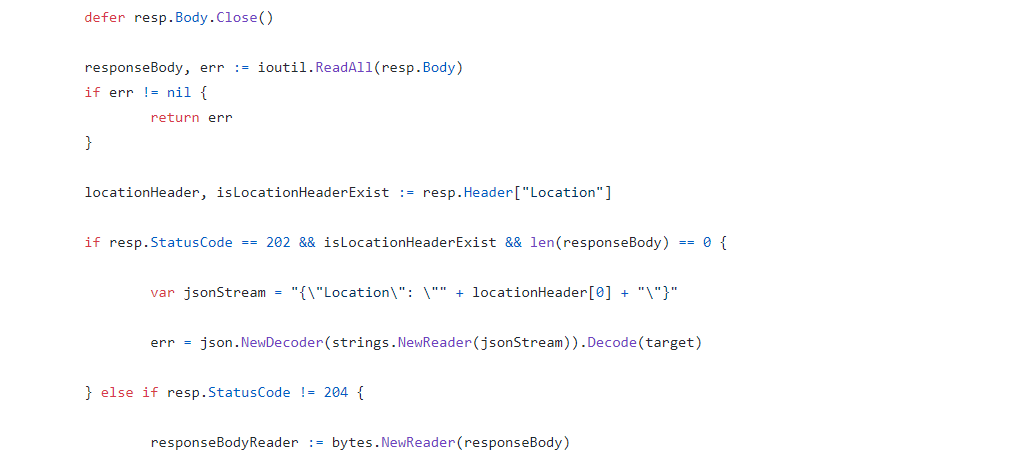
There are some operations on OneDrive, such as copying drive items, will take a while to complete. That’s where the asynchronous job, as discussed above, comes into picture. So, when we send an API request to copy-and-paste the drive items, the Microsoft Graph will return us HTTP 202 Accepted instead of HTTP 200 OK. The HTTP 202 status code means that our request has been accepted for processing, but the processing has not been completed.
In the example of copy-and-pasting drive items, the response body is empty. It only provides a job monitoring URL (which is pointing to the OneDrive endpoint instead of Microsoft Graph) in the Location response header. Hence, to get this information, I have added in the following piece of codes.
Return the Location header in JSON format.
By doing so, now I can easily retrieve the job monitoring URL from the JSON and pass it to the OneDrive API.
In the codes above, I also check for HTTP 204 No Content because this status code is intended to describe a response with no body. Hence, the onedrive.Client only needs to read the body content if the response code is not 204.
Error Handling
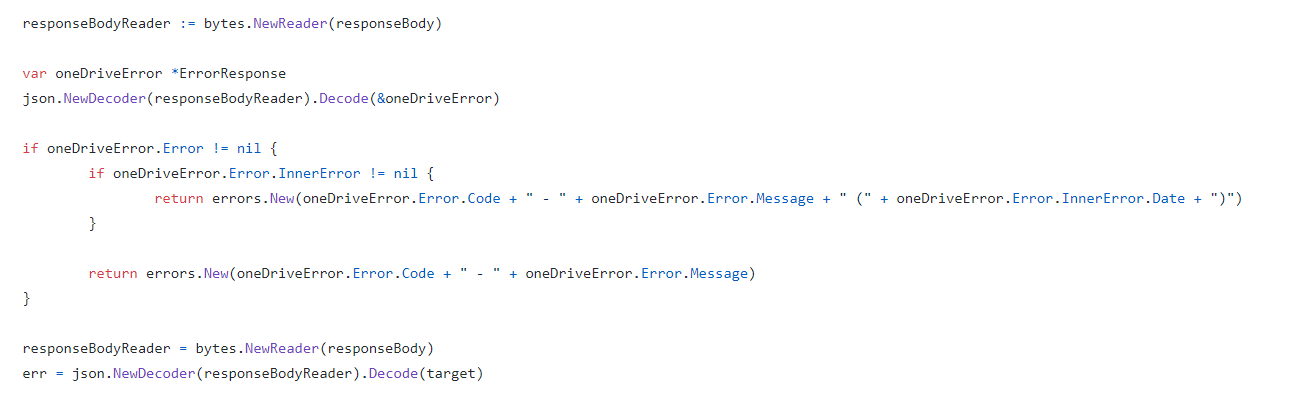
When there is an error, Microsoft Graph will return error information in JSON format. Hence, the onedrive.Client will first check whether the returned JSON object is an error. If yes, it will return the error accordingly. Otherwise, it will continue to decode the response body to a struct, as shown in the following screenshot.
Reading error and response body.
Unit Testing and Integration Testing
I also learned from go-github on how the unit test cases are written.
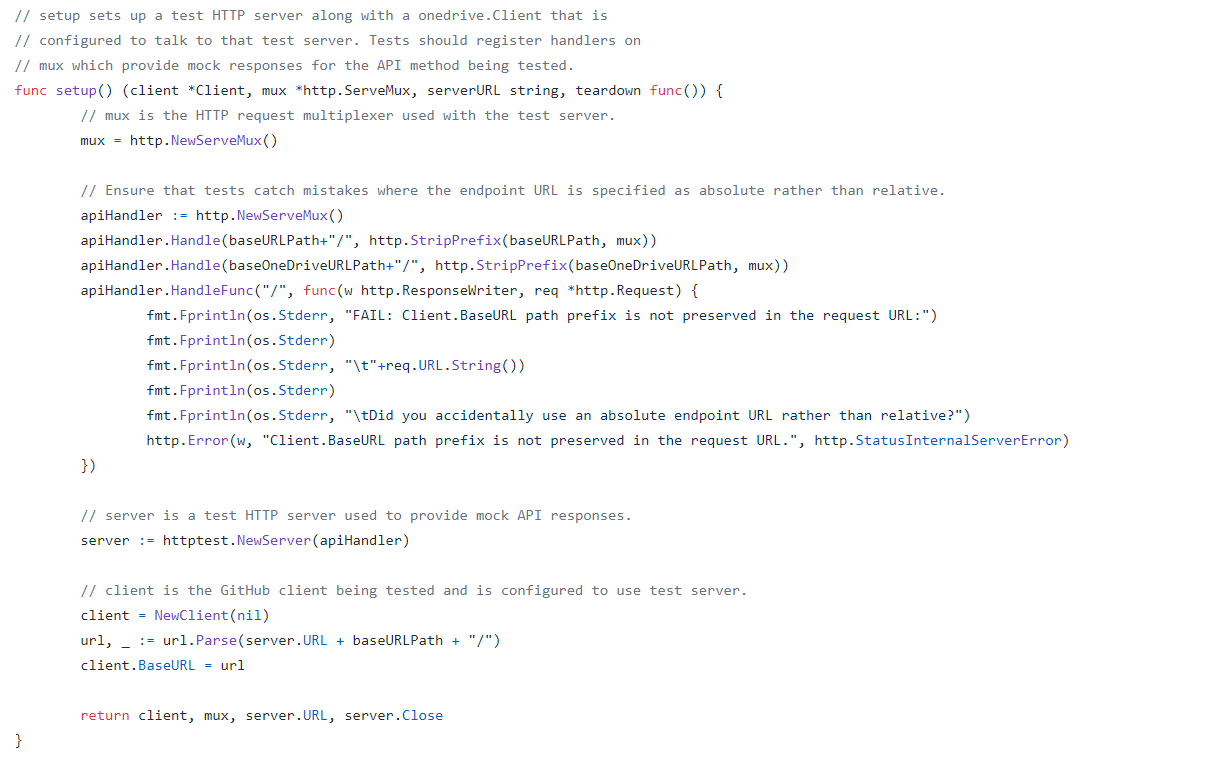
Firstly, we have a test HTTP server setup along with a onedrive.Client that is configured to talk to that test server.
Secondly, in the HTTP request multiplexer used in the test server, since we are providing relative URL for every request, we will also need to ensure tests catch mistakes where the endpoint URL is specified as absolute rather than relative.
Thirdly, we also need to have a HTTP handler in the test server to take care of OneDrive API test which is not based on the Microsoft Graph endpoint.
With all these requirement, we will have the following setup.
Setting up a test HTTP server.
Same as the go-github project, I have also prepared a set of integration tests.
The integration tests will exercise the entire go-onedrive library against the live Microsoft Graph and OneDrive API. These tests will verify that the library is properly coded against the actual behavior of the API, and will fail upon any incompatible change in the API.
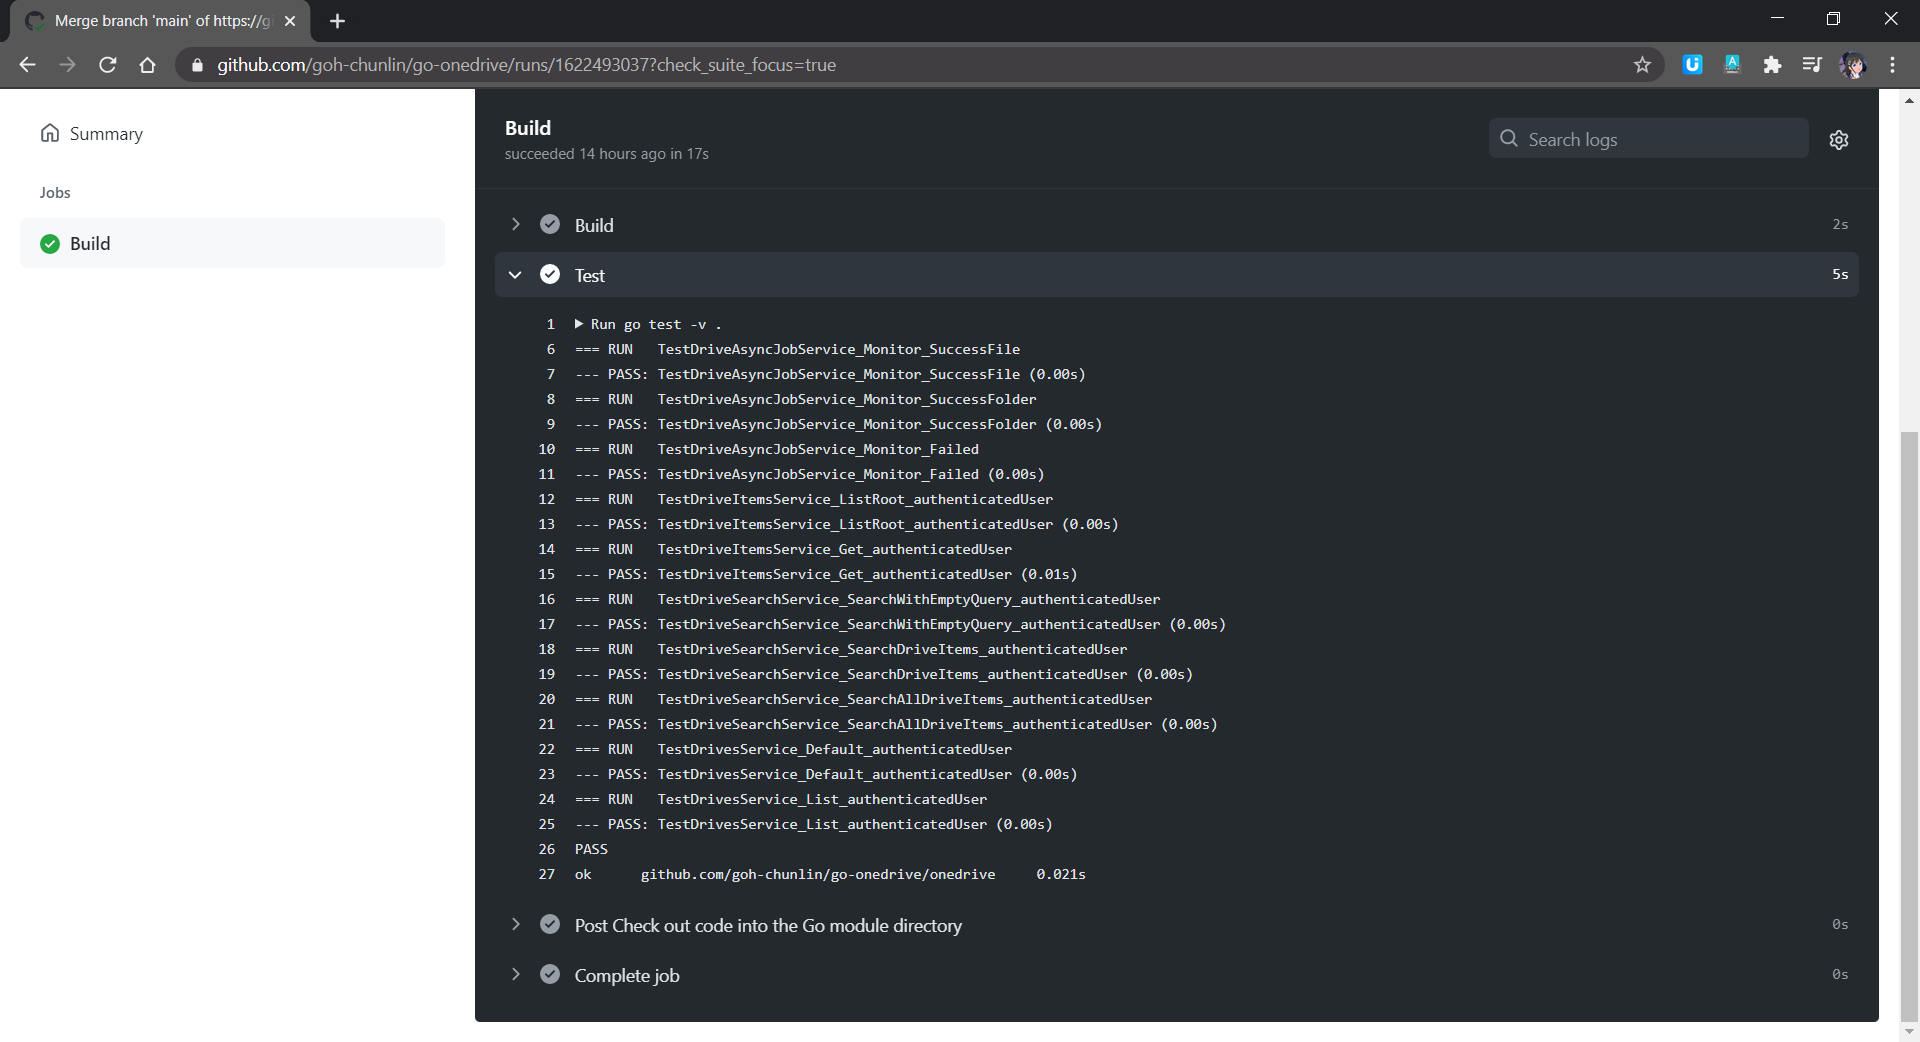
Unlike unit tests which will be run automatically on GitHub Actions, the integration tests are meant to be run manually because it will interact and change the actual OneDrive account.
Unit tests are run in GitHub Actions for every push or PR to the main branch.
Module AND Publishing
Starting from Go 1.11, a new concept called modules is introduced. Using modules, developers are not only no longer confined to working inside GOPATH, but also get to experience the new Go dependency management system that makes dependency version information explicit and easier to manage.
A module is basically a collection of Go packages stored in a file tree with a go.mod file at its root. Hence, if we want to transform our project to a module, we will need to make a small change to our project structure, as shown in the following screenshot.
Introducing go.mod, go.sum, and doc.go.
The approach I took is similar to how Google does for their Google API Go Client project. We need to have a new file called doc.go. This file contains only introductory documentation as comments and a package clause.
After that we make the root of project as the root of the new module with the following command.
go mod init github.com/goh-chunlin/go-onedrive
A go.mod file will be generated with the following content.
A new go.mod file being generated.
Next, we use the following command to tidy up the dependencies. A go.sum file will be also generated at the same time.
go mod tidy
Now we can proceed to publish our module by first creating a Release of it on the GitHub.
However, there is an important question that must be addressed first: subsequently after we upgrade our go-onedrive module, how do our users upgrade dependency of the go-onedrive module to the latest version?
Dependency UPGrade
Before we upgrade the dependencies, we first need to check available dependency upgrades using the following command.
The line above means that the v1.0.8 is being used in the application but there is now a v1.0.9 available. Now we can proceed to download the latest version of dependencies with the following command.
go get -u github.com/goh-chunlin/go-onedrive
Then it will show that the latest version is downloaded.
Interestingly, I also found out that the pkg.go.dev website doesn’t reflect the availability of new package immediately after the release of the new version. I waited for the v1.0.9 to be available on the pkg.go.dev website for around 15 minutes.
Another interesting finding is that the “go list” command above actually reflects the latest version about 5-minute faster than the pkg.go.dev website.
About doc.go
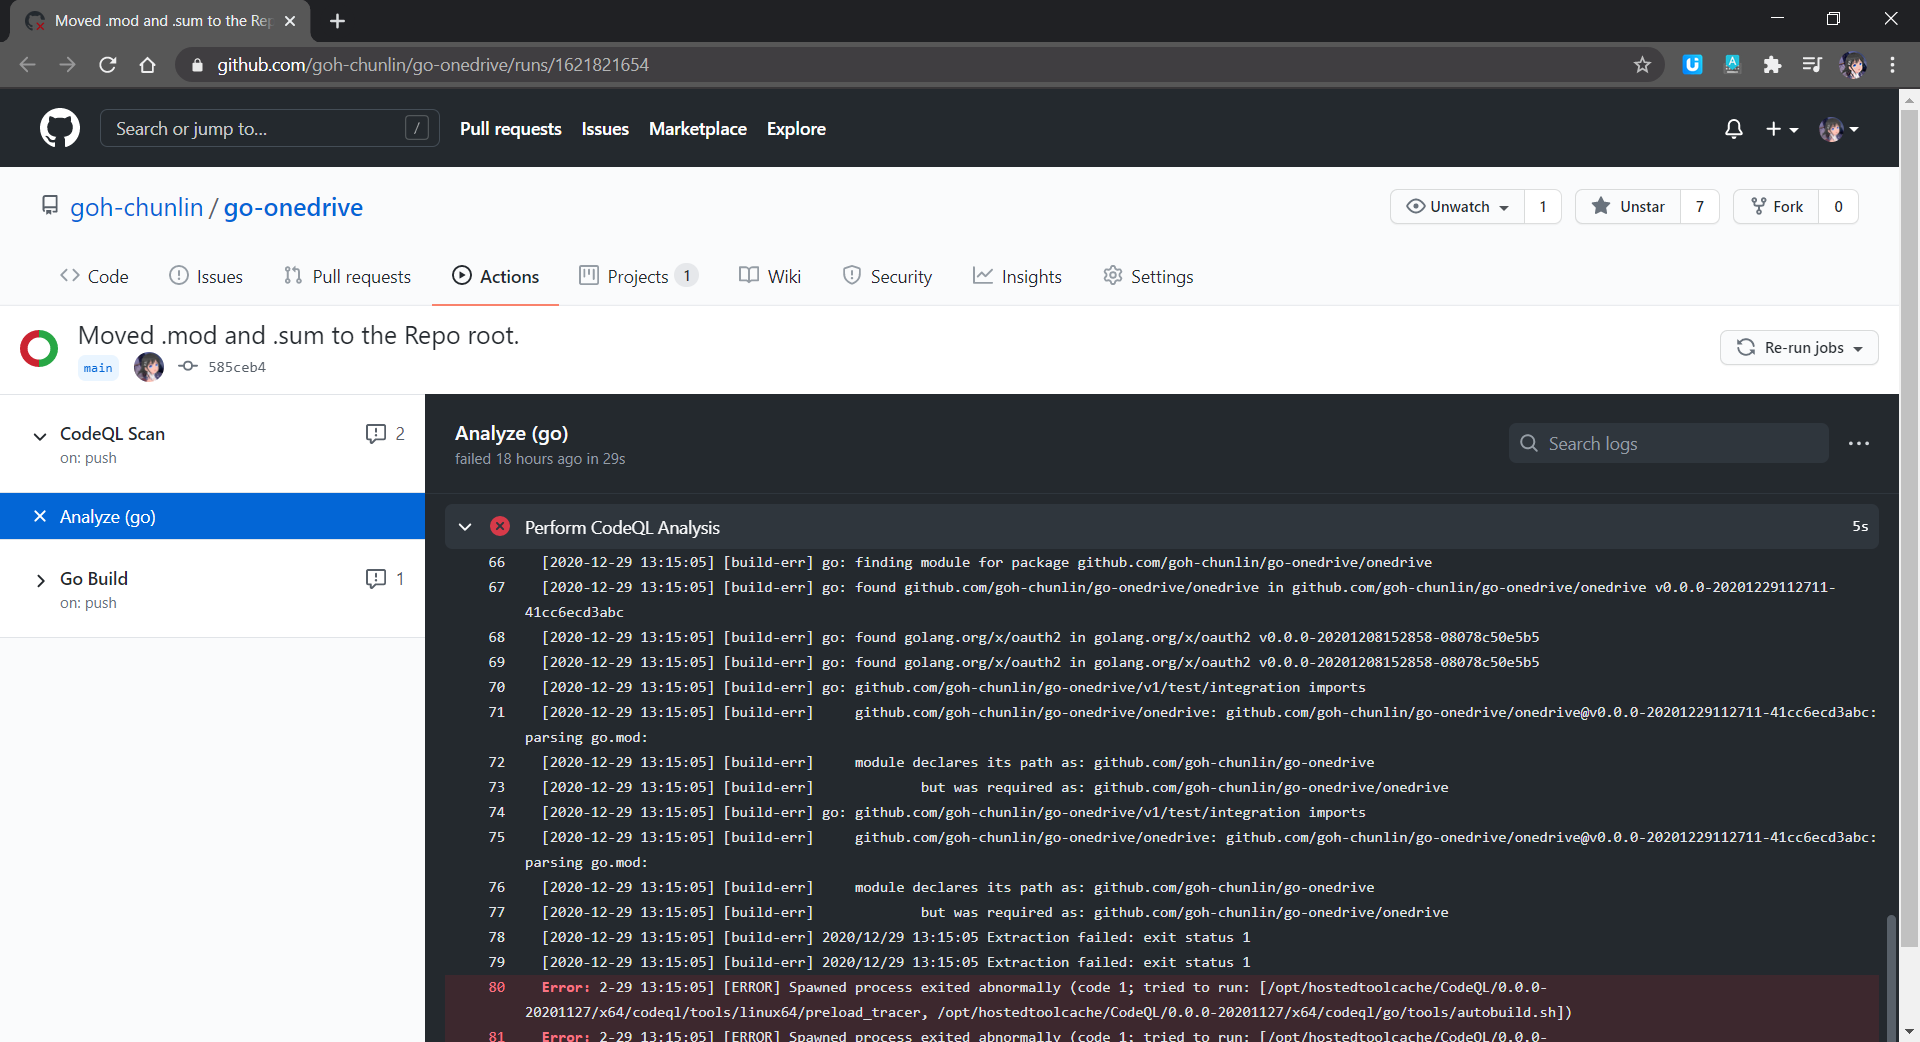
The way we structure our project also forces us to have a Go file like doc.go. This is because without doc.go, the only two places we have our codes are onedrive and test folders. Both of them are subdirectories. This will give us two troubles.
Firstly, somehow it could not work. The package onedrive which is in the subdirectory cannot be located, as shown in the screenshot below.
Error in CodeQL scan on GitHub.
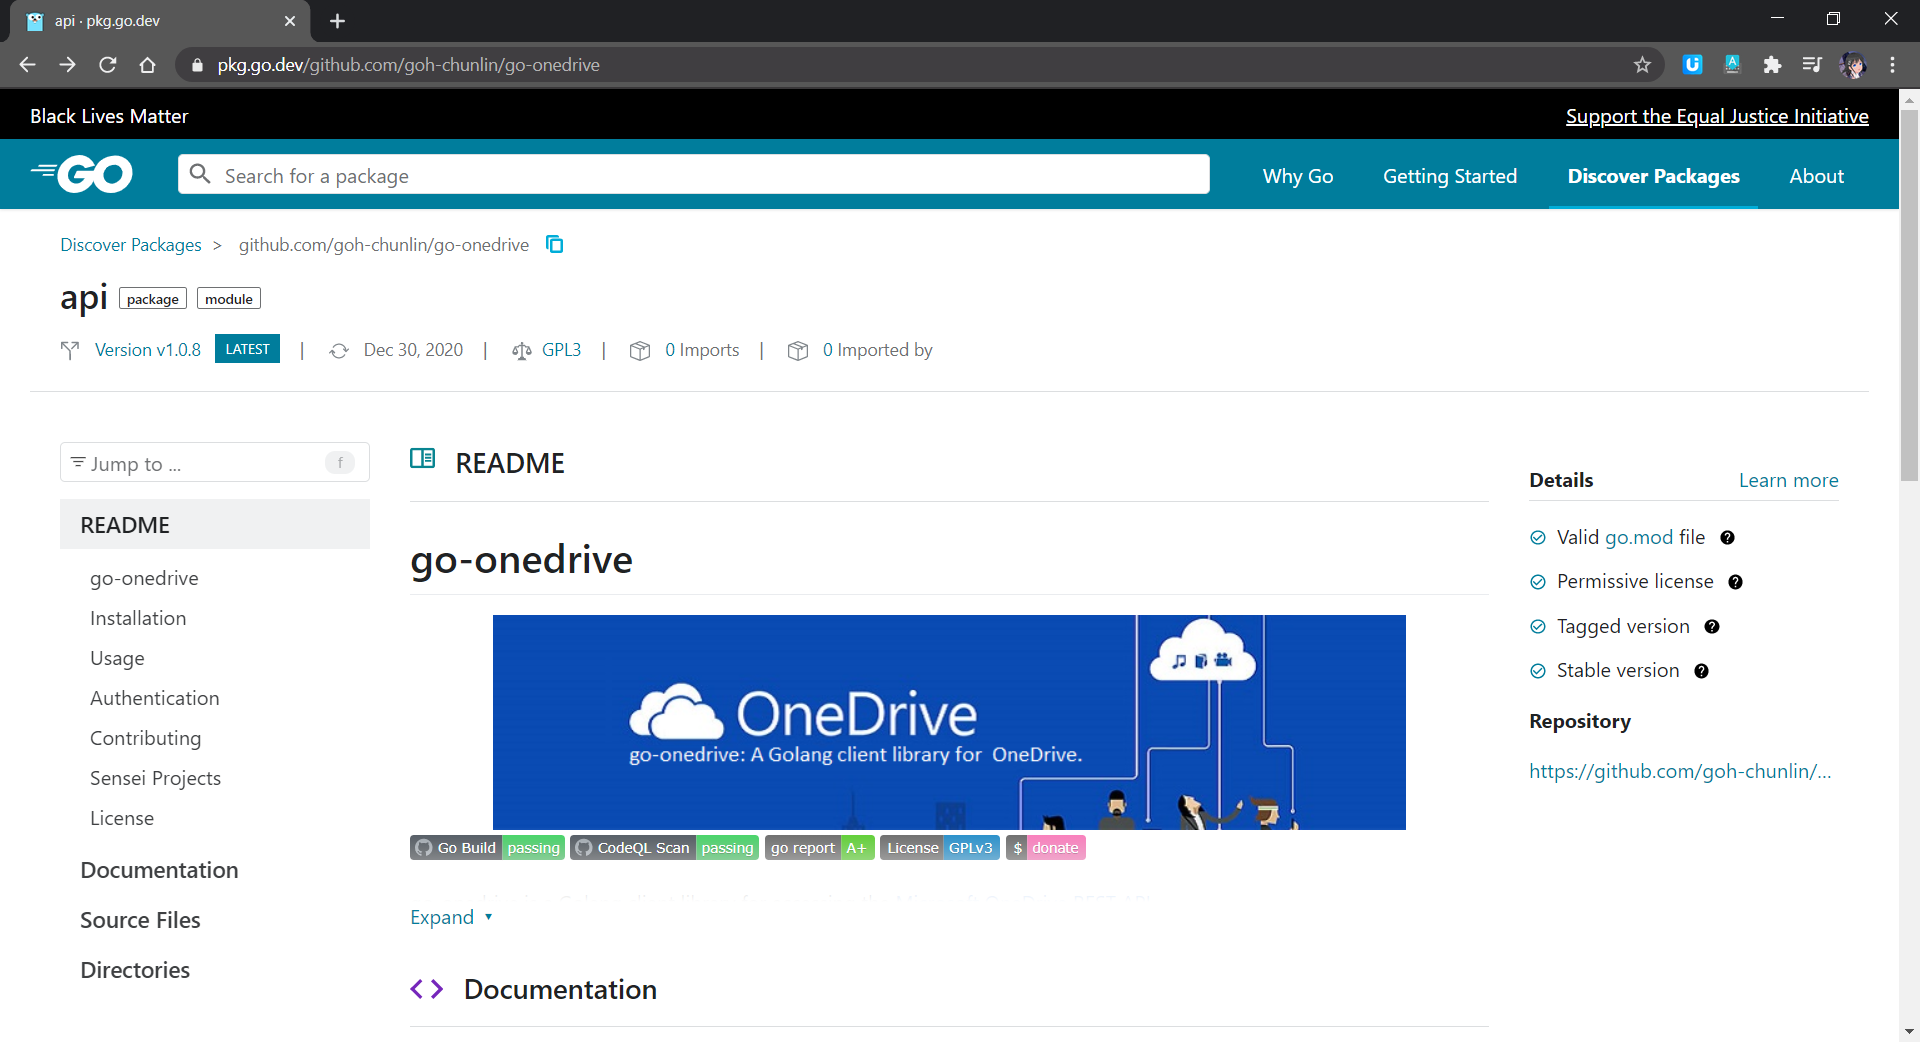
Secondly, when we tag the release with version number, only the version of go-onedrive as a module and test/integration as package is updated, but not the version of onedrive.
These two troubles went away only after I added in the doc.go in the root. The module of go-onedrive is now also nicely shown on the pkg.go.dev website with 4 checks, as shown in the screenshot below.
go-onedrive module page.
Conclusion
This is just the very first step of me writing a library in Golang and publish it as a module on the pkg.go.dev website. I started this project as one of my after-work projects in October 2020. I only successfully publish its first release in December 2020. This project has been a great learning journey for me. So, I hope my sharing in this article can be somewhat useful to you as well.
The learning is tough but fun at the same time! (Image Credit: Bilibili)
Feel free to let me know if there is a better alternative or improvement needed. I’m always happy to hear from you all.
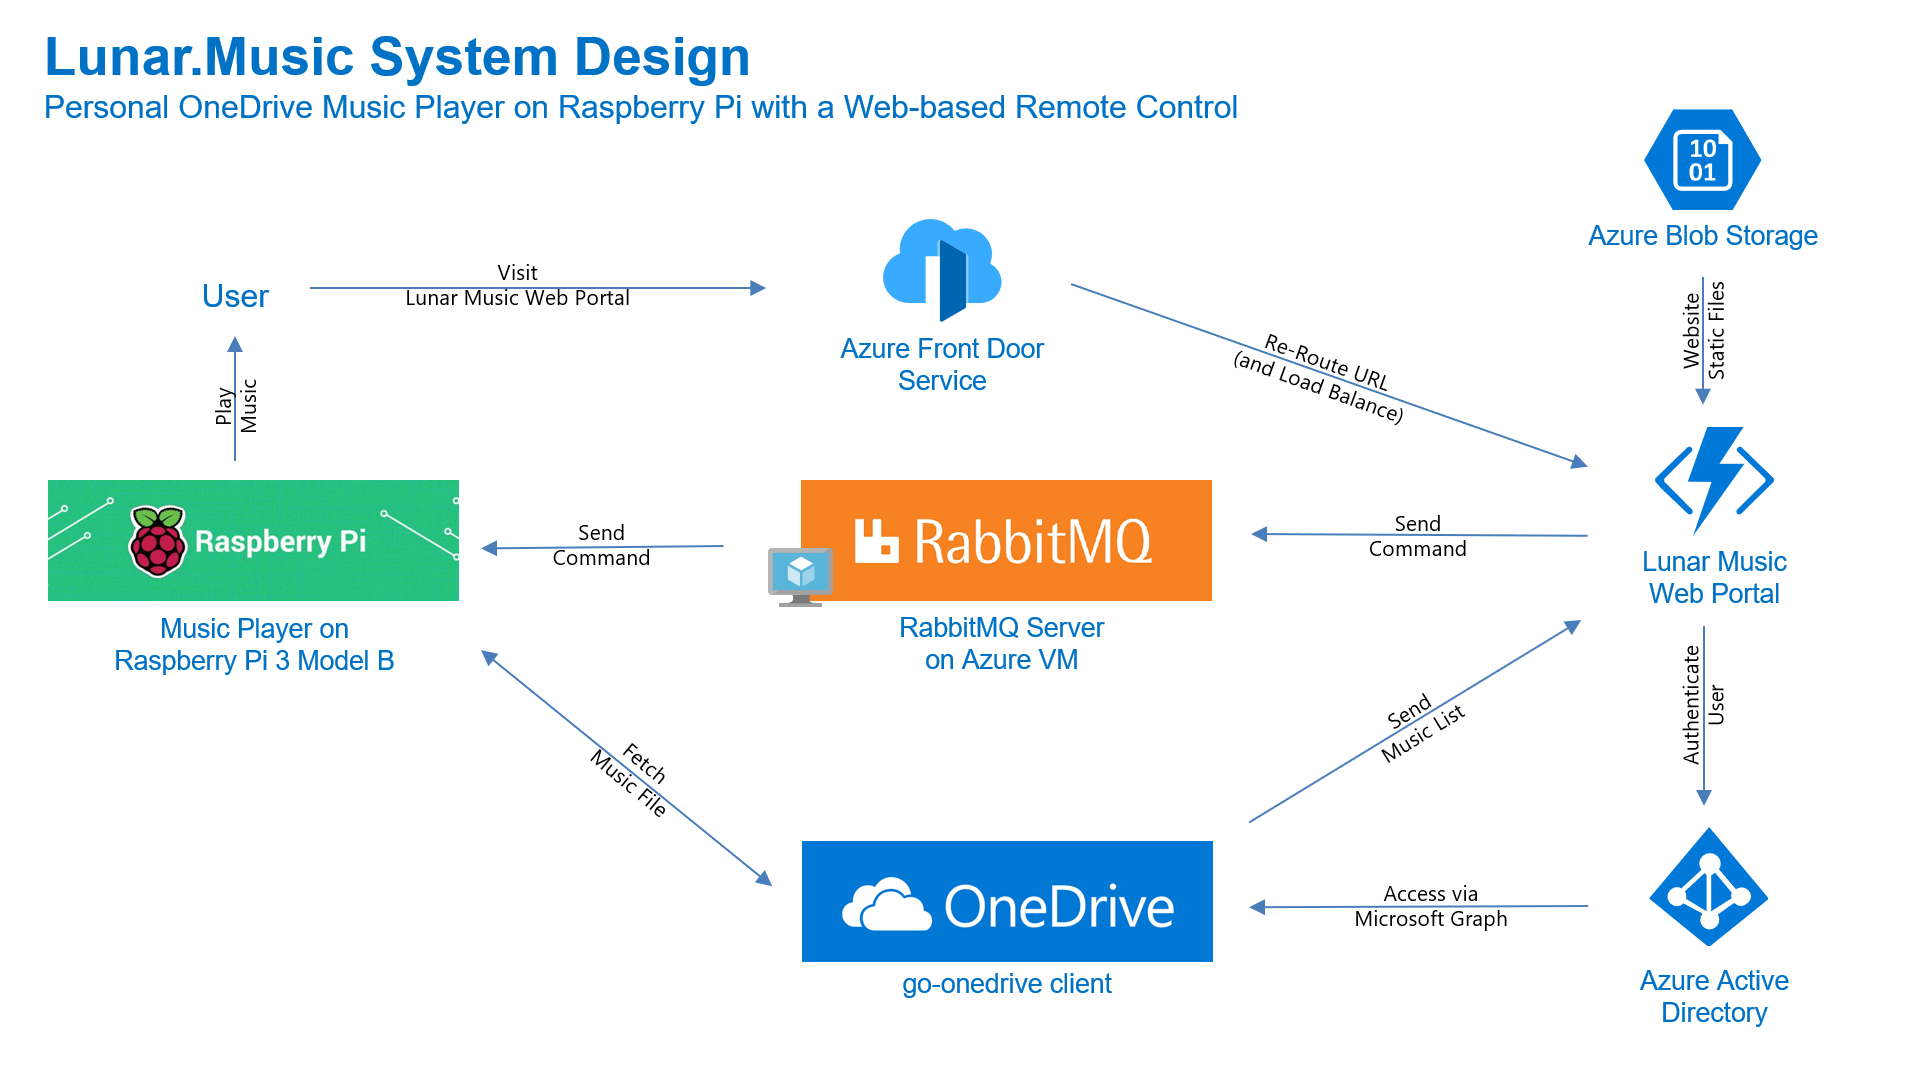
Now we need to have a web app as a remote control which will send command to the music player to play the selected song. In this article, we will talk about the web portal and how we access the OneDrive with Microsoft Graph and go-onedrive client.
[Image Caption: System design of this music player together with its web portal.]
I had a discussion with Shaun Chong, the Ninja Van CTO, and I was told that they’re using Gin web framework. Hence, now I decide to try the framework out in this project as well.
Gin offers a fast router that’s easy to configure and use. For example, to serve static files, we simply need to have a folder static_files, for example, in the root of the programme together with the following one line.
However, due to the fact that later I need to host this web app on Azure Function, I will not go this route. Hence, currently the following are the main handlers in the main function.
The first line is to load all the HTML template files (*.tmpl.html) located in the templates folder. The templates we have include some reusable templates such as the following footer template in the file footer.tmpl.html.
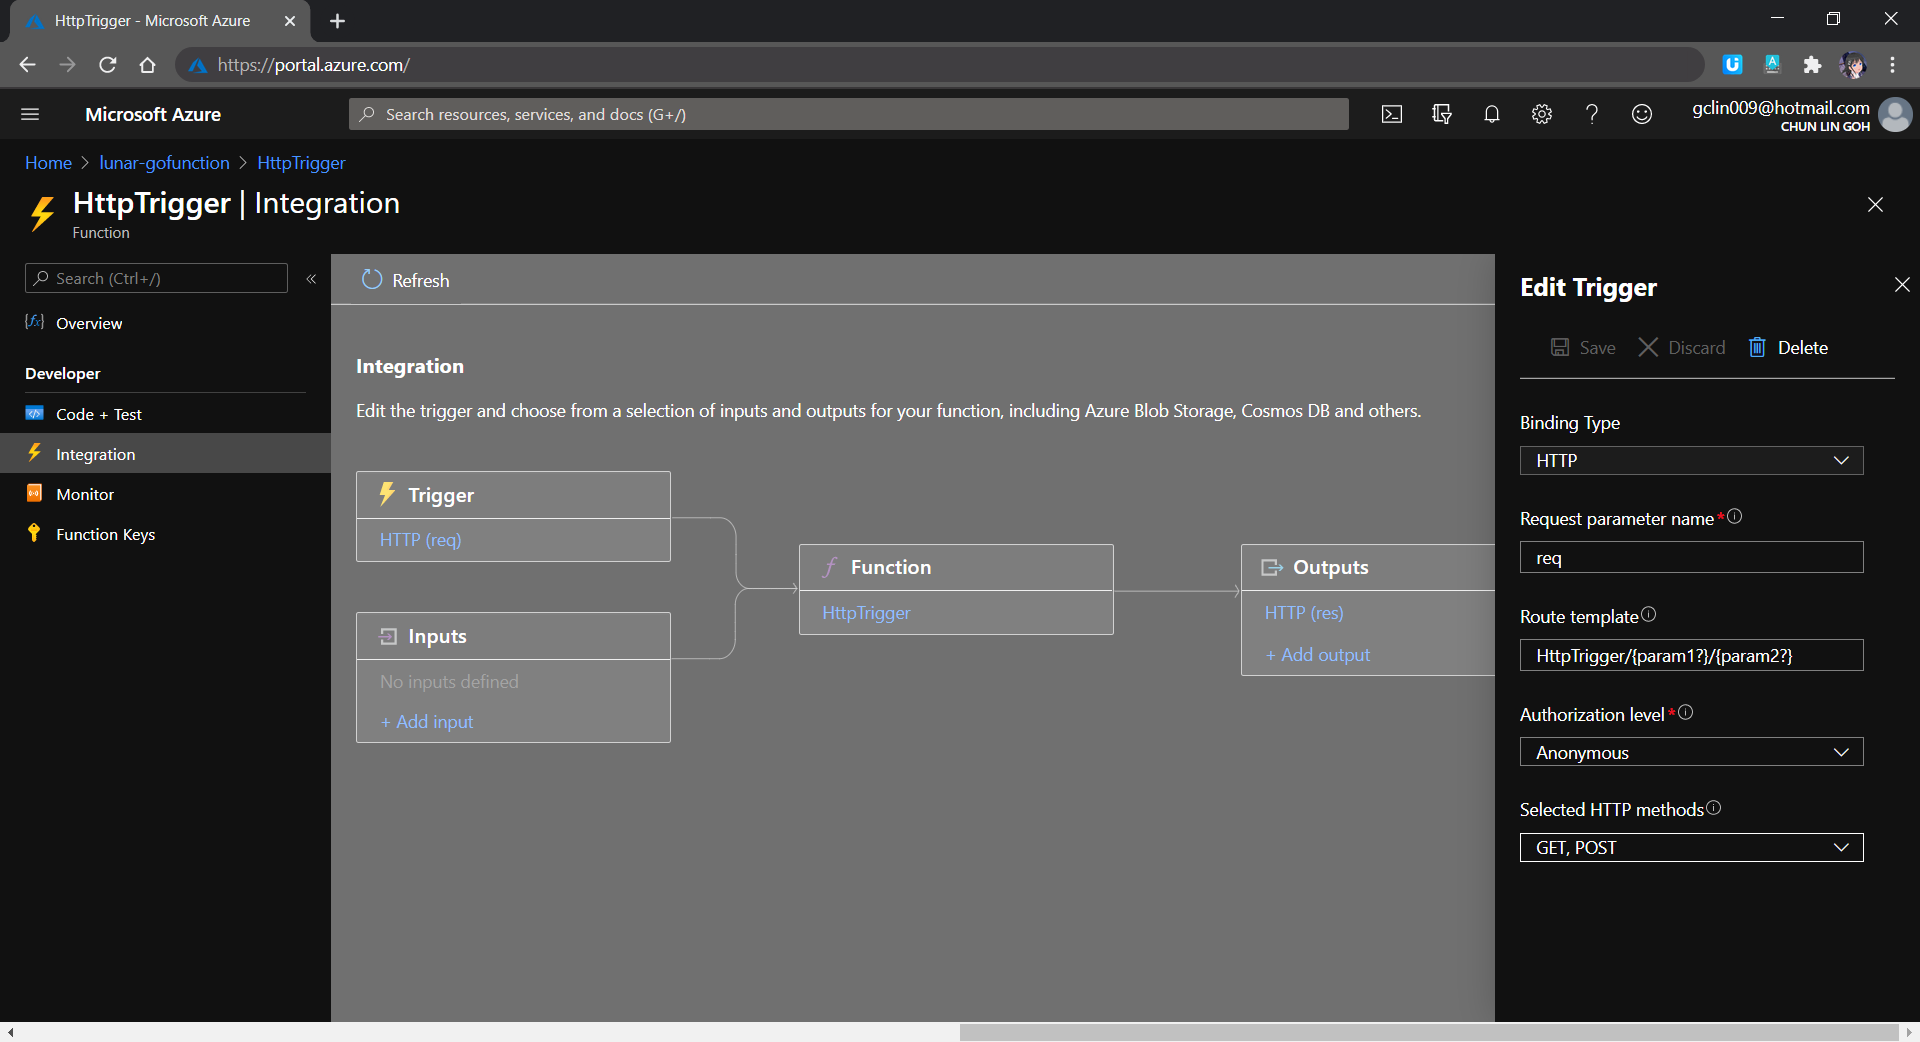
After importing the templates, we have five routes defined. All of the routes start with /api/HttpTrigger is because this web app is designed to be hosted on Azure Function with a HTTP-triggered function called HttpTrigger.
The first three routes are for authentication. Then after that is one route for loading the web pages, and one handler for sending RabbitMQ message to the Raspberry Pi.
The showMusicListPage handler function will check whether the user is logged in to Microsoft account with access to OneDrive or not. It will display the homepage if the user is not logged in yet. Otherwise, if the user has logged in, it will list the music items in the user’s OneDrive Music folder.
There are many ways to host Golang web application on Microsoft Azure. The place we will be using in this project is Azure Function, the serverless service from Microsoft Azure.
The custom handler provides a lightweight HTTP server written in any language which then enables developers to bring applications, such as those written in Golang, into Azure Function.
[Image Caption: The relationship between the Functions host and a web server implemented as a custom handler. (Image Source: Microsoft Docs – Azure)]
The defaultExecutablePath is pointing to the our Golang web app binary executable which is output by go build command.
So, in the wwwroot folder of the Azure Function, we should have the following items, as shown in the screenshot below.
[Image Caption: The wwwroot folder of the Azure Function.]
Since we have already enabled the HTTP Request Forwarding, we don’t have to worry about the HttpTrigger directory. Also, we don’t have to upload our web app source codes because the executable is there already. What we need to upload is just the static resources, such as our HTML template files in the templates folder.
The reason why I don’t upload other static files, such as CSS JavaScript, and image files, is that those static files can be structured to have multiple directory levels. We will encounter a challenge when we are trying to define the Route Template of the Function, as shown in the screenshot below. There is currently no way to define route template without knowing the maximum number of directory level we can have in our web app.
[Image Caption: Defining the route template in the HTTP Trigger of a function.]
Hence, I move all the CSS, JS, and image files to Azure Storage instead.
From the Route Template in the screenshot above, we can also understand why the routes in our Golang web app needs to start with /api/HttpTrigger.
Golang Client Library for OneDrive API
In this project, users will first store the music files online at their personal OneDrive Music folder. I restrict it to only the Music folder is to make the management of the music to be more organised. So it is not because there is technical challenge in getting files from other folders in OneDrive.
Currently, the go-onedrive only support simple API methods such as getting Drives and DriveItems. These two are the most important API methods for our web app in this project. I will continue to enhance the go-onedrive library in the future.
[Image Caption: OneDrive can access the metadata of a music file as well, so we can use API to get more info about the music.]
The go-onedrive library does not directly handle authentication. Instead, when creating a new client, we need to pass an http.Client that can handle authentication. The easiest and recommended way to do this is using the oauth2 library.
So the next thing we need to do is adding user authentication feature to our web app.
Microsoft Graph and Microsoft Identity platform
Before our web app can make requests to OneDrive, it needs users to authenticate and authorise the application to have access to their data. Currently, the official recommended way of doing so is to use Microsoft Graph, a set of REST APIs which enable us to access data on Microsoft cloud services, such as OneDrive, User, Calendar, People, etc. For more information, please refer to the YouTube video below.
So we can send HTTP GET requests to endpoints to retrieve information from OneDrive, for example /me/drives will return the default drive of the currently authenticated user.
Generally, to access OneDrive API, developers are recommend to use the standard OAuth 2.0 authorisation framework with the Azure AD v2.0 endpoint. This is where we will talk about the new Microsoft Identity Platform, which is the recommended way for accessing Microsoft Graph APIs. Microsoft Identity Platform allows developers to build applications that sign in users, get tokens to call the APIs, as shown in the diagram below.
[Image Caption: Microsoft Identity Platform experience. (Image Source: Microsoft Docs – Azure)]
[Image Caption: Microsoft Identity Platform endpoints are used in the Golang OAuth2 package since December 2017.]
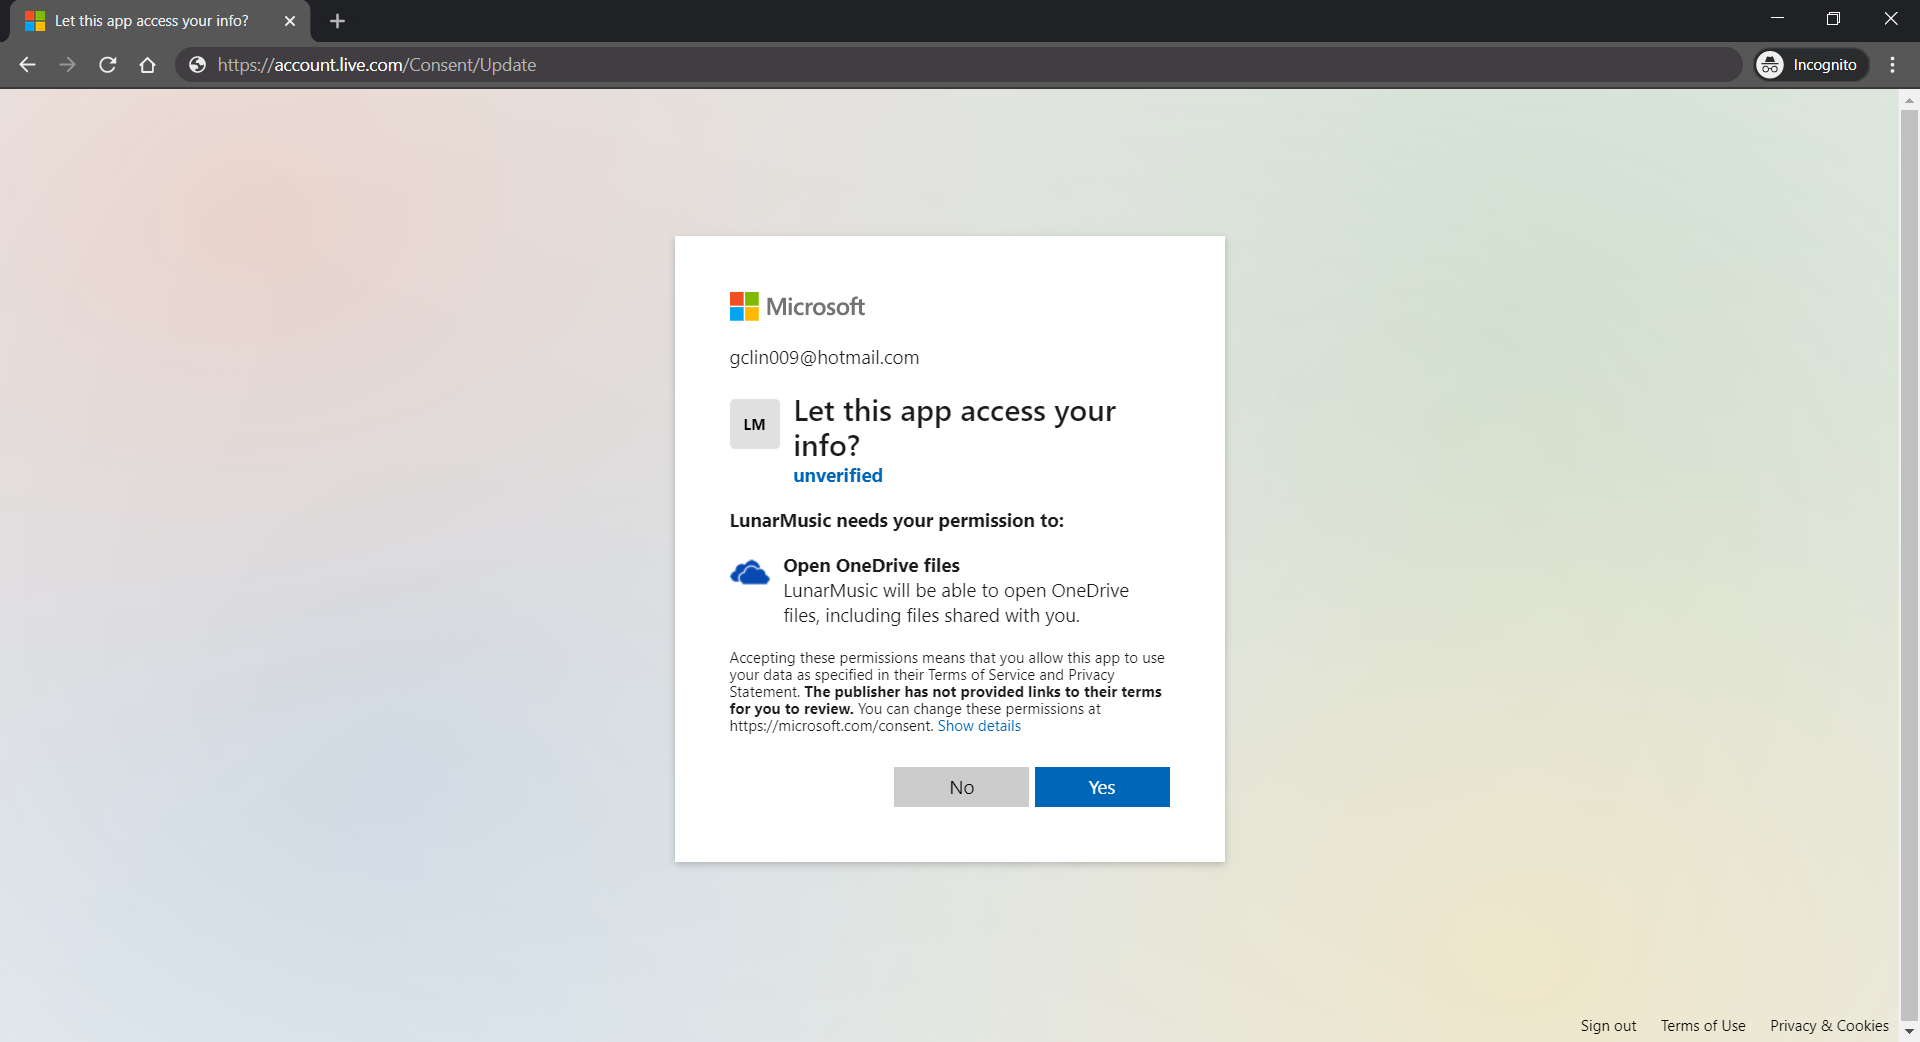
Now the first step we need to do is to register an Application with Microsoft on the Azure Portal. From there, we can get both the Client ID and the Client Secret (secret is now available under the “Certificates & secrets” section of the Application).
After that, we need to find out the authentication scopes to use so that the correct access type is granted when the user is signed in from our web app.
With those information available, we can define the OAuth2 configuration as follows in our web app.
The “file.read” scope is to grant read-only permission to all OneDrive files of the logged in user. By the way, to check the Applications that you are given access to so far in Microsoft Account, you can refer to the consent management page of Microsoft Account.
Access Token, Refresh Token, and Cookie
The “offline_access” scope is used here because we need a refresh token that can be used to generate additional access tokens as necessary. However, please take note that this “offline_access” scope is not available for the Token Flow. Hence, what we can only use is the Code Flow, which is described in the following diagram.
Hence, this explains why we have the following codes in the /auth/callback, which is the Redirect URL of our registered Application. What the codes do is to get the access token and refresh token from the /token endpoint using the auth code returned from the /authorize endpoint.
Here, we cannot simply decode the response body into the oauth2.Token yet. This is because the JSON in the response body from the Azure AD token endpoint only has expires_in but not expiry. So it does not have any field that can map to the Expiry field in oauth2.Token. Without Expiry, the refresh_token will never be used, as highlighted in the following screenshot.
[Image Caption: Even though the Expiry is optional but without it, refresh token will not be used.]
Hence, we must have our own struct tokenJSON defined so that we can first decode the response body to tokenJSON and then convert it to oauth2.Token with value in the Expiry field before passing the token to the go-onedrive client. By doing so, the access token will be automatically refreshed as necessary.
Finally, we just need to store the token in cookies using gorilla/securecookie which will encode authenticated and encrypted cookie as shown below.
Besides encryption, we also enable both Secure and HttpOnly attributes so that the cookie is sent securely and is not accessed by unintended parties or JavaScript Document.cookie API. The SameSite attribute also makes sure the cookie above not to be sent with cross-origin requests and thus provides some protection against Cross-Site Request Forgery (CSRF) attacks.
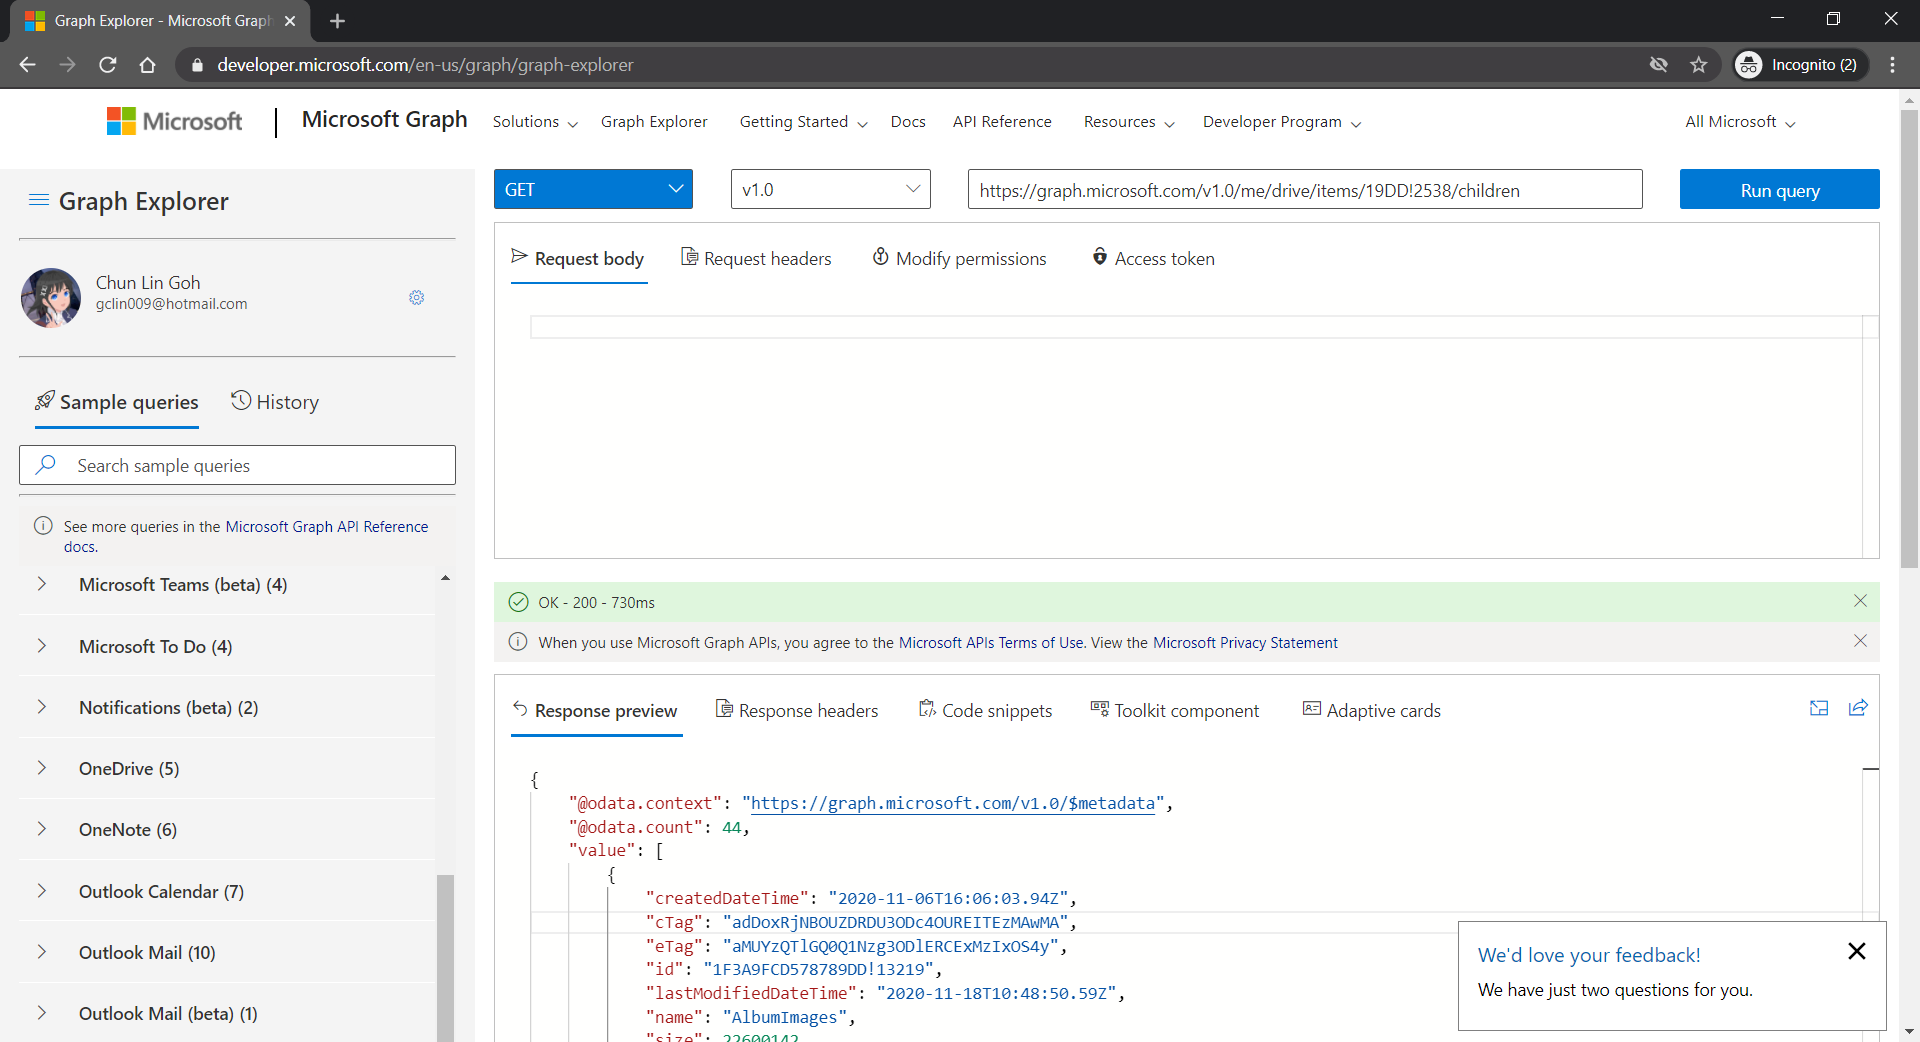
Microsoft Graph Explorer
For testing purposes, there is an official tool known as the Graph Explorer. It’s a tool that lets us make requests and see responses against the Microsoft Graph. From the Graph Explorer, we can also retrieve the Access Token and use it on other tools such as Postman to do further testing.
[Image Caption: Checking the response returned from calling the get DriveItems API.]
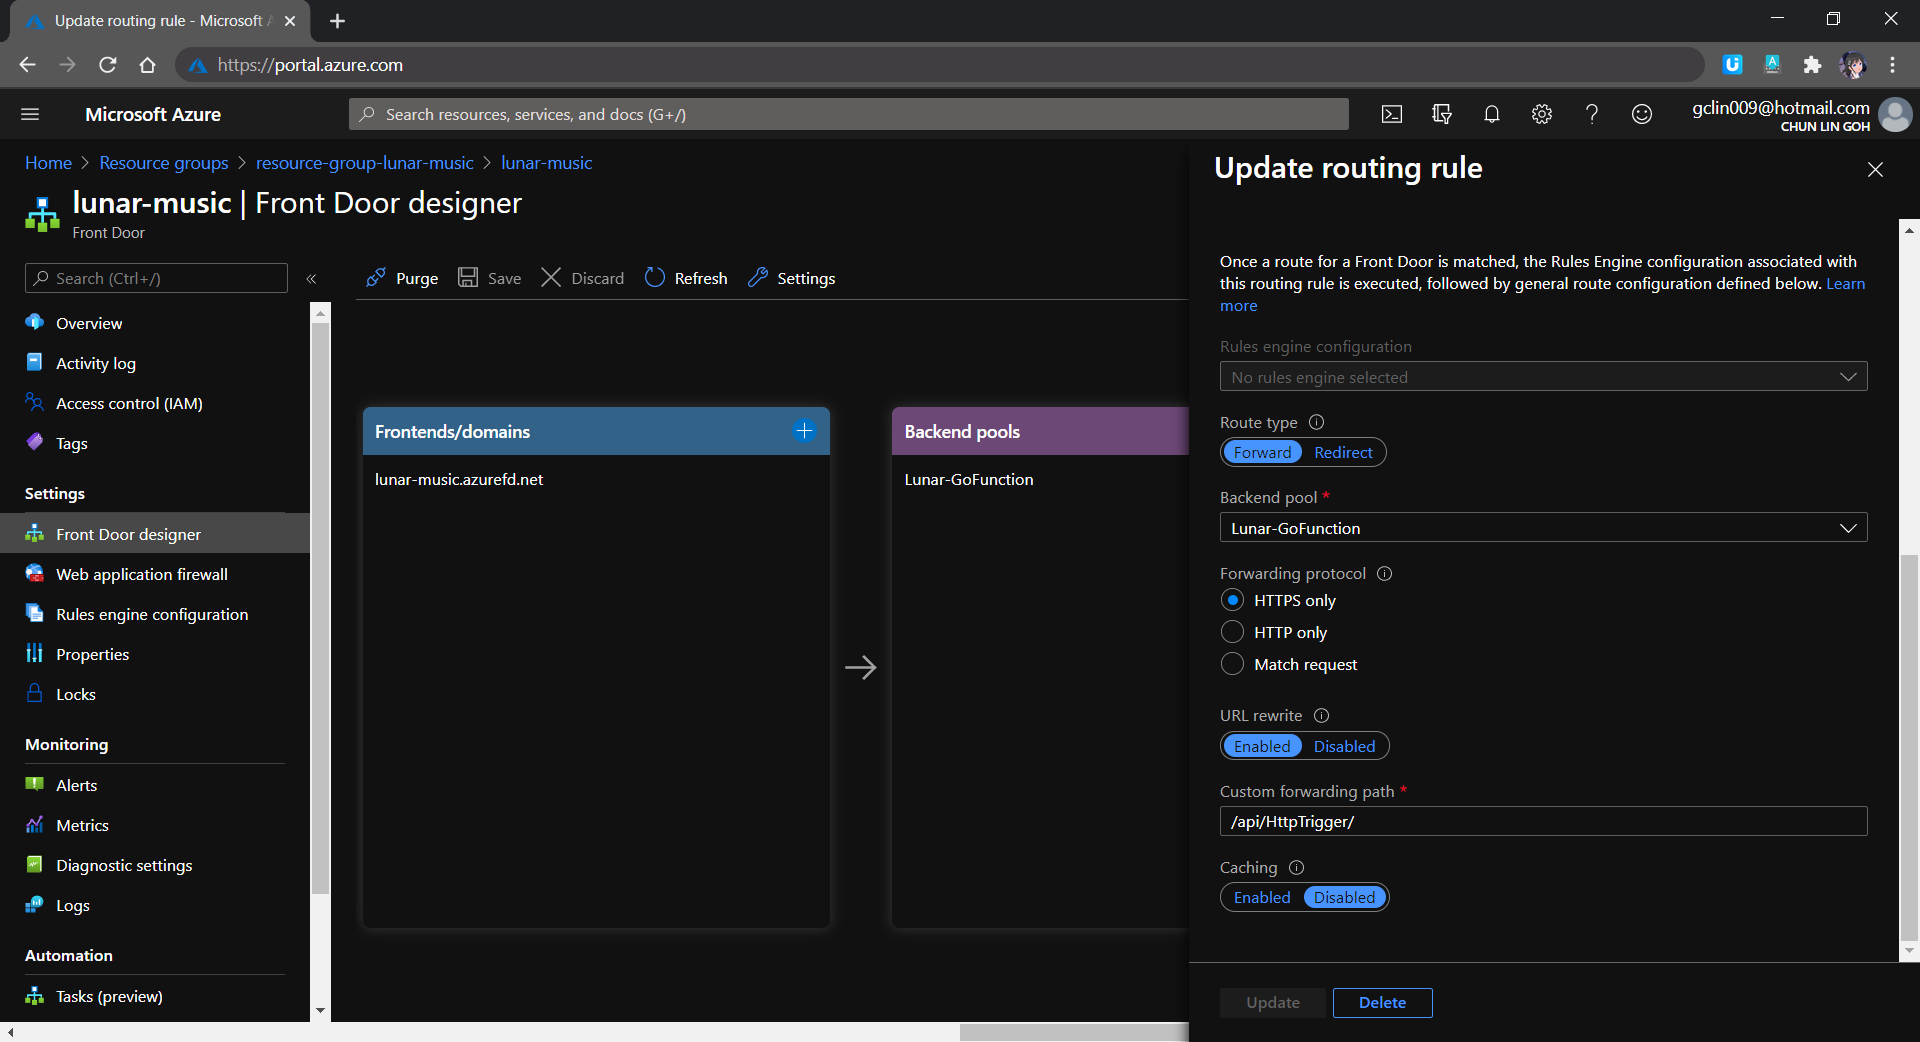
The very first reason why I use Azure Front Door is also because I want to hide the /api/HttpTrigger part from the URL. This can be done by setting the custom forwarding path which points to the /api/HttpTrigger/ with URL rewrite enabled, as shown in the screenshot below.
[Image Caption: Setting the route details for the Rules Engine in Azure Front Door.]
Let’s take a look what it looks like after we’ve deployed the web app above and uploaded some music to the OneDrive. The web app is accessible through the Azure Front Door URL now at https://lunar-music.azurefd.net/.
[Image Caption: My playlist based on my personal OneDrive Music folder.]
Yup, that’s all. I finally have a personal music entertainment system on Raspberry Pi. =)
If you would like to find out more about Microsoft Identity Platform, you can also refer to the talk below given by Christos Matskas, Microsoft Senior Program Manager. Enjoy!
There are so much things that we can build with a Raspberry Pi. It’s always my small little dream to have a personal music player that sits on my desk. With the successful setup of the Raspberry Pi 3 Model B few weeks ago, it’s time to realise that dream.
In this article and the next, I will be sharing with you the journey of building a personal music player on Raspberry Pi. The end product will just be like Spotify on Google Nest Hub where we can listen to our favourite music not on our computer or smart phone but on another standalone device, which is Raspberry Pi in this case.
In this project, there is no monitor or any other displays connected to my Raspberry Pi. So the output is simply music and songs. However, since there is no touch screen for user to interact with the Raspberry Pi like how Google Nest Hub does, we will need to use a web app which acts as the remote control of the Raspberry Pi music player. With the web app, user will be able to scan through the playlist and choose which music or song to play.
[Image Caption: Spotify on Google Nest Hub (Image Credit: Android Authority)]
In addition, while Google Nest Hub has its music streamed from Spotify, the music that our Raspberry Pi music player will use is available on our personal OneDrive Music folder. In the next article, I will talk more about how we can use Azure Active Directory and Microsoft Graph API to connect with our personal OneDrive service.
So with this introduction, we can confirm that the objective of this project is to build a music player on a Raspberry Pi which can be controlled remotely via a web app to play music from OneDrive.
[Image Caption: System design of this music player together with its web portal.]
We will only focus on the setup of Raspberry Pi and RabbitMQ server in this Part 1 of the article. In the Part 2, which can be found by clicking here, we will continue to talk about the web portal and how we access the OneDrive with Microsoft Graph and go-onedrive client.
Installing Golang on Raspberry Pi
The music player that we are going to build is using Golang. The reason of choosing Golang is because it’s easy to work with, especially integrating with the RabbitMQ server.
To install Golang on a Raspberry Pi, we can simply use the following command.
$ sudo apt-get install golang
However, please take note that the version of the Golang downloaded is not the latest one. So the alternative way of doing it is download the package from the Golang official website with the following commands.
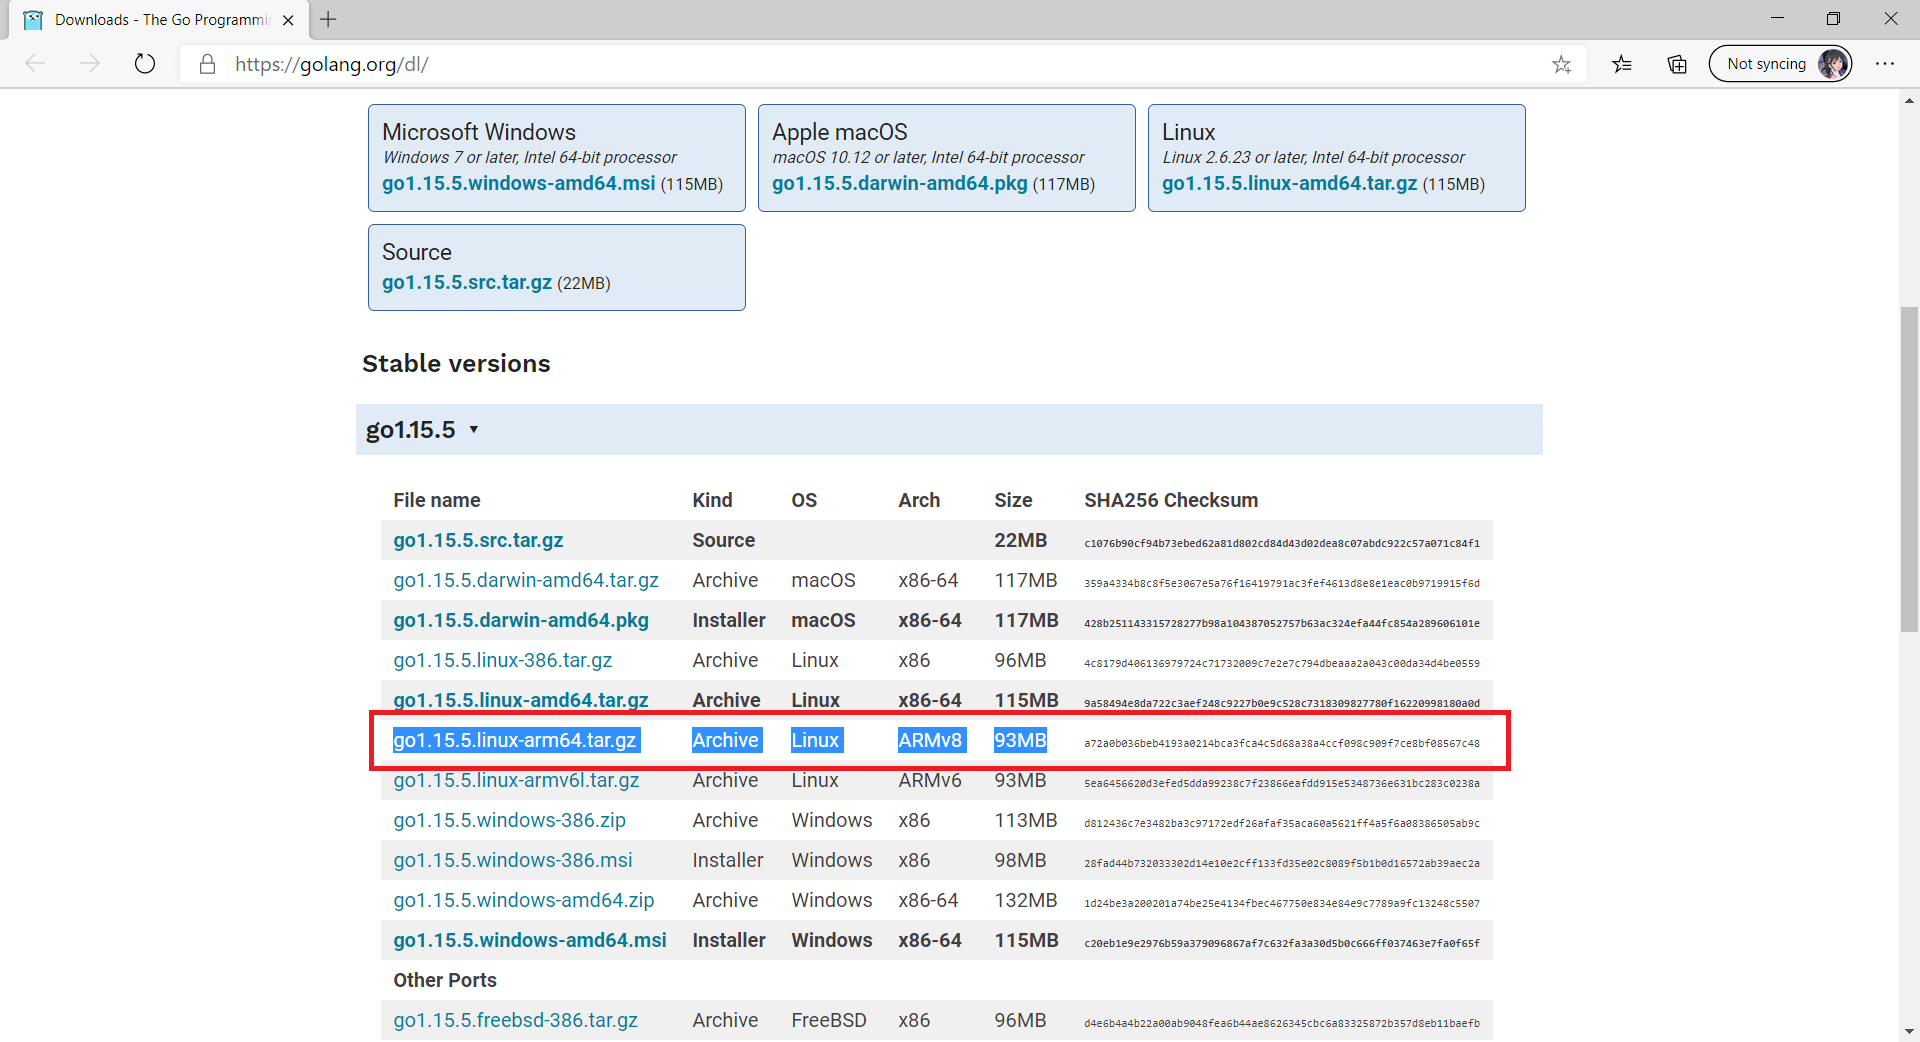
Since the Raspberry Pi 3 Model B is having a 64-bit ARMv8 CPU and the latest Golang version is 1.15.5, according to the Golang website, what we need to download is the highlighted one in the following screenshot. Hence, we can run the following commands.
[Image Caption: Finding the correct package to download for Raspberry Pi 3 Model B.]
Now we have Golang installed on our Raspberry Pi, we can proceed to build the music player.
Music Player on Raspberry Pi
The multimedia player used in this project is the VLC Media Player which is not only free and open-source but also cross-platform. The reason VLC Media Player is chosen is also because it has nvlc, a command-line ncurses interface to play an MP3. Hence, to play an MP3 with nvlc, we just need to run the following command.
$ nvlc <mp3_file> --play-and-exit
The –play-and-exit flag is added to make sure that the VLC will exit once the particular music is finished.
Also, we can use Go exec command to execute the command above. For example, if we have an MP3 file called song and it’s stored in the directory songFileRoot, then we can play the MP3 file with the following codes.
Messaging, RabbitMQ, and Remote Controlling Via Web App
Now we need a communication channel for our web app to tell the Golang programme above which MP3 file to play.
A common way is to use HTTP and REST to communicate. That will require us to design some RESTful HTTP APIs and turn our Raspberry Pi to be a web server so that the web app can invoke the APIs with HTTP request.
Using RESTful API sounds great and easy but what if the Raspberry Pi is not responding? Then our web app has to implement some sort of reconnection or failover logic. In addition, when our web app makes a call to the API, it will be blocked waiting for a response. Finally, due to the nature of RESTful API, there will always be some coupling of services.
This makes me turn to an alternative way, which is messaging which is loose coupling and asynchronous. Using messaging with message brokers like RabbitMQ helps a lot with scalability too.
Here RabbitMQ is used because is a popular light-weight message broker and it’s suitable for general-purpose messaging. Also, I like how RabbitMQ simply stores messages and passes them to consumers when ready.
It’s also simple to setup RabbitMQ on a cloud server too. For example, now on Microsoft Azure, we can just launch a VM running Ubuntu 18.04 LTS and follow the steps listed in the tutorials below to install RabbitMQ Server on Azure.
How about the message format? Basically, to RabbitMQ, all messages are just byte arrays. So, we can store our data in JSON and serialise the JSON object to byte array before sending the data via RabbitMQ. Hence, we have the two structs below.
type Command struct {
    Tasks []*Task `json:"tasks"`
}

type Task struct {
    Name    string   `json:"name"`
    Content []string `json:"content"`
}
With this, we then can publish the message via RabbitMQ as follows.
When the message is received at Raspberry Pi side, we simply need to de-serialise it accordingly to get the actual data.
Now, by connecting both the Raspberry Pi music player and the web app to the RabbitMQ server, both of them can communicate. We will then make our app web app as a sender to send the music filename over to the music player on the Raspberry Pi to instruct it to play the music.
Transferring OneDrive Music to Raspberry Pi
The music is stored on personal OneDrive Music folder online. Hence, it’s not a wise idea to always let our Raspberry Pi to stream the music from OneDrive every time the same music is chosen. Instead, we shall download only once to the Raspberry Pi right before the first time of a music is playing.
Hence, in our music player programme, we have a data file called playlist.data which keeps track of the OneDrive Item ID and its local file name on the Raspberry Pi. Once the music is successfully downloaded to the Raspberry Pi, a new line of record as shown below will be appended to the data file.
121235678##########music.mp3
Hence for the subsequent play of the same music, the music player programme will scan through the data file and play the local MP3 file instead of downloading it again from OneDrive.
With our music player ready, instead of having us to launch it manually, could we make it run on our Raspberry Pi at startup? Yes, there are five ways of doing so listed on the Dexter Industry article. I choose to modify the .bashrc file which will run the music player when we boot up the Raspberry Pi and log in to it.
$ sudo nano /home/pi/.bashrc
In the .bashrc file, we simply need to append the following lines where we will change directory to the root of the music player programme. We cannot simply just run the programme just yet. We need to make sure two things.
The following two lines in the file are the only lines we need to update to be as follows in the file. The reason we put “1” for both of them because the USB speaker is using card 1, as shown above. So the number may be different for your device. For more information about this change, please refer to the ALSA Project page about setting default device.
Since now we’ve already successfully setup the music player on the Raspberry Pi, it’s time to move on to see how we can control it from a website and how we can access our personal OneDrive Music folder with Azure AD and Microsoft Graph.