Multi-Container ASP .NET Core Web App with Docker Compose

Previously, we have seen how we could containerise our ASP .NET Core 6.0 web app and manage it with docker commands. However, docker commands are mainly for only one image/container. If our solution has multiple containers, we need to use docker-compose to manage them instead.

docker-compose makes things easier because it encompasses all our parameters and workflow into a configuration file in YAML. In this article, I will share my first experience with docker-compose to build mutli-container environments as well as to manage them with simple docker-compose commands.

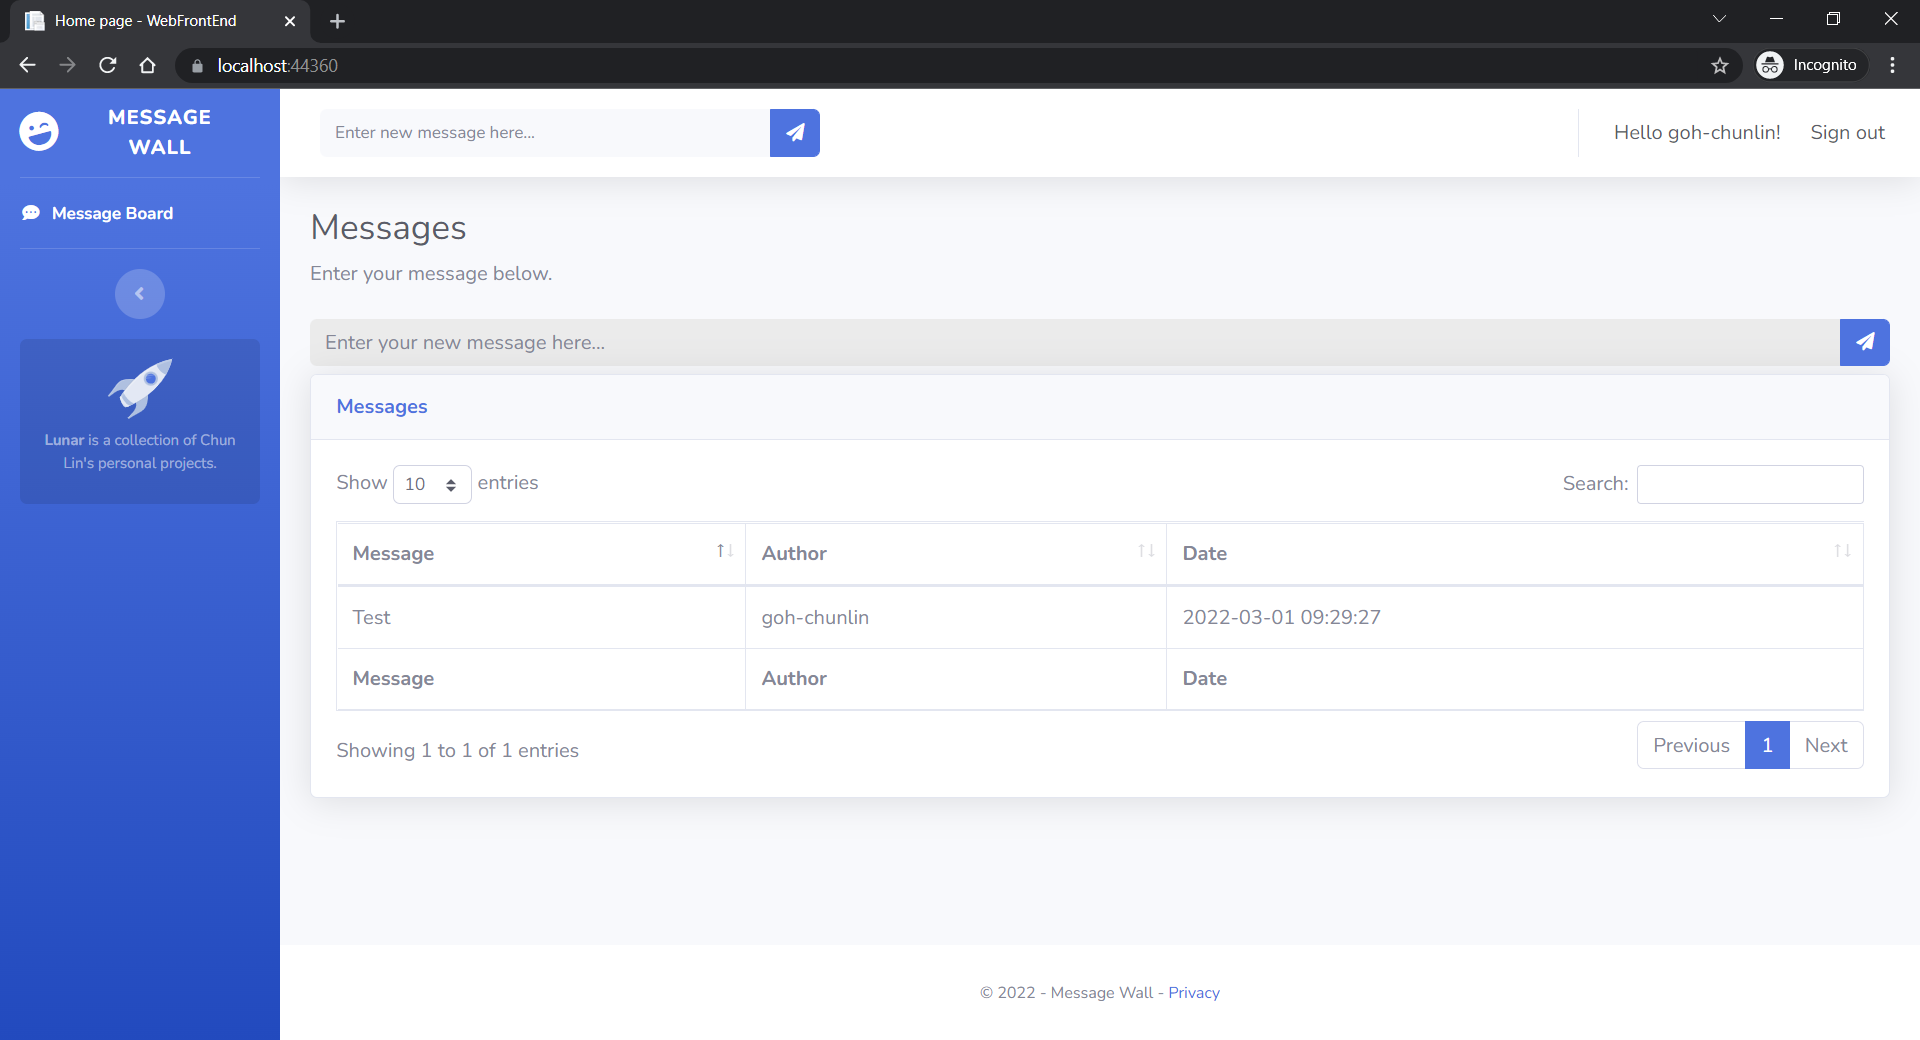
To help my learning, I will create a simple online message board where people can login with their GitHub account and post a message on the app.

PROJECT GITHUB REPOSITORY

The complete source code of this project can be found at https://github.com/goh-chunlin/Lunar.MessageWall.

Create Multi-container App

We will start with a solution in Visual Studio with two projects:

  • WebFrontEnd: A public-facing web application with Razor pages;
  • MessageWebAPI: A web API project.

By default, the web API project will have a simple GET method available, as shown in the Swagger UI below.

Default web API project created in Visual Studio will have this WeatherForecast API method available by default.

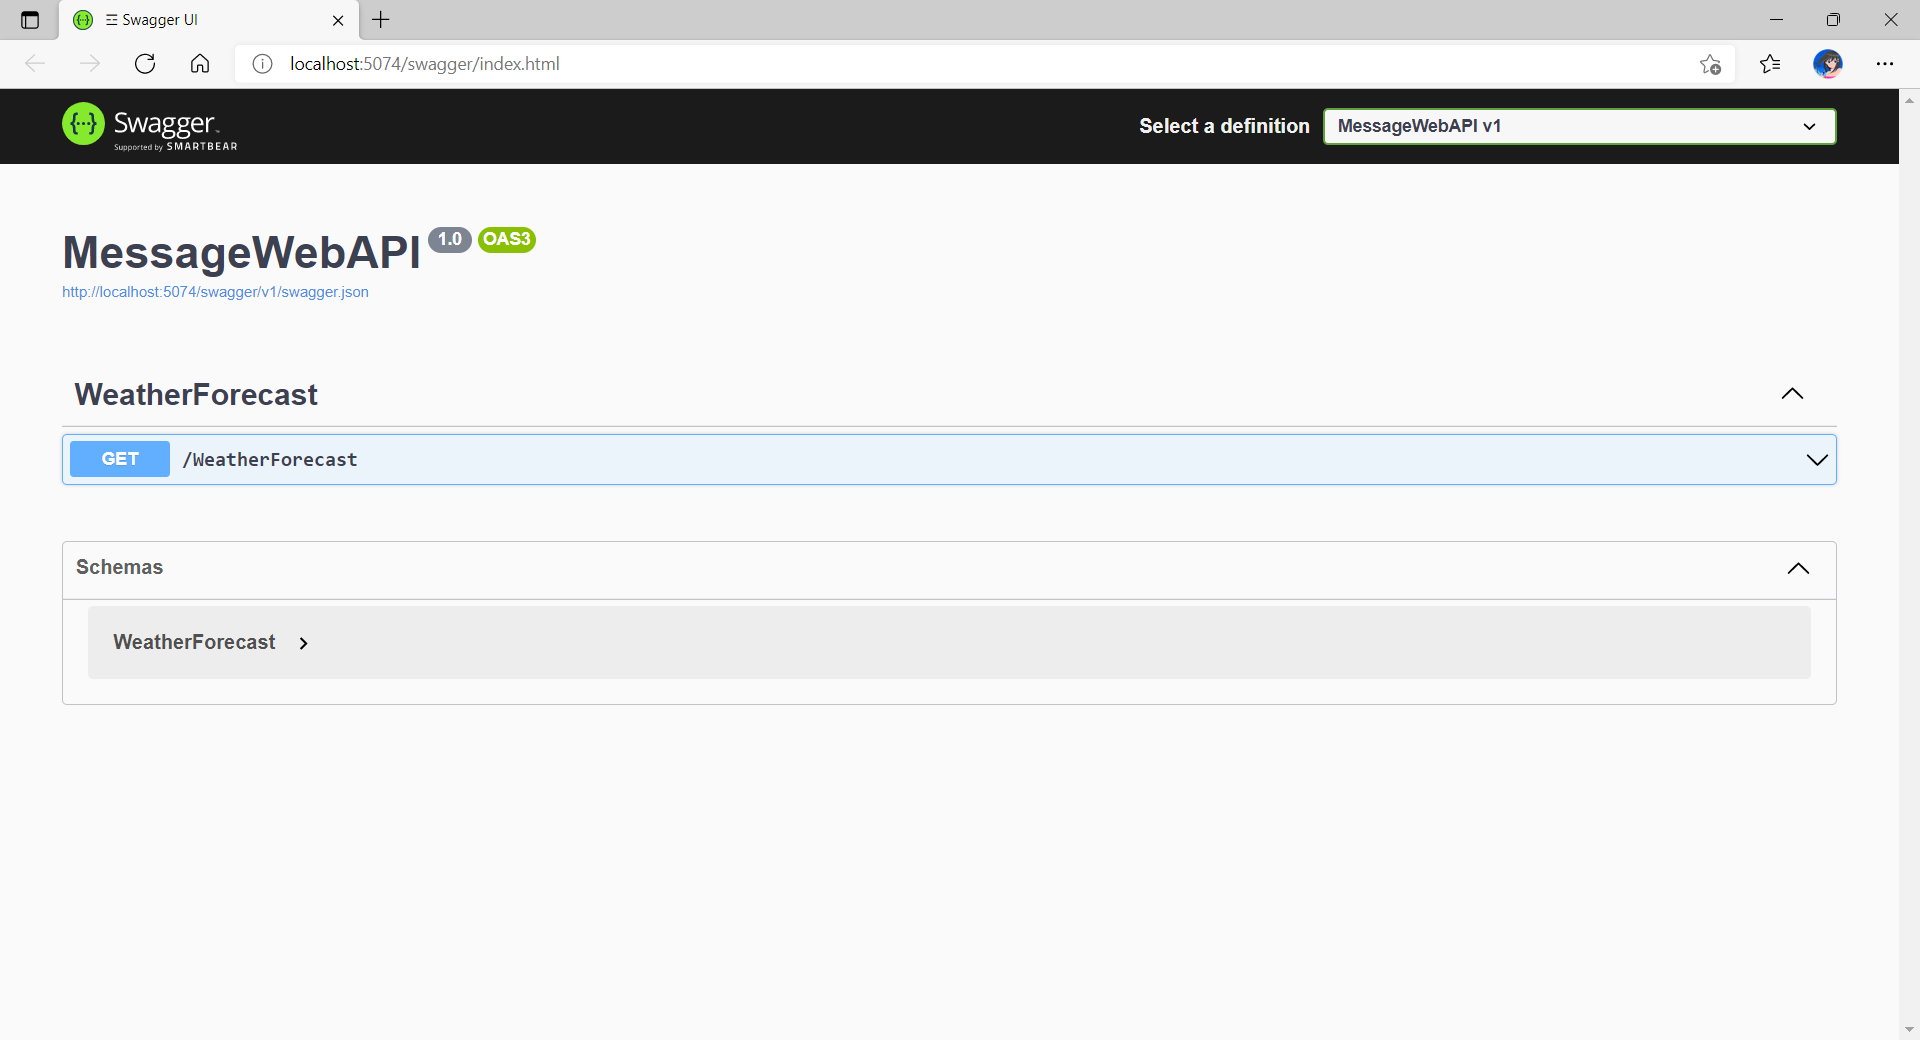
Now, we can make use of this method as a starting point. Let’s have the our client, WebFrontEnd, to call the API and output the result returned by the API to the web page.

var request = new System.Net.Http.HttpRequestMessage();
request.RequestUri = new Uri("http://messagewebapi/WeatherForecast");

var response = await client.SendAsync(request);

string output = await response.Content.ReadAsStringAsync();

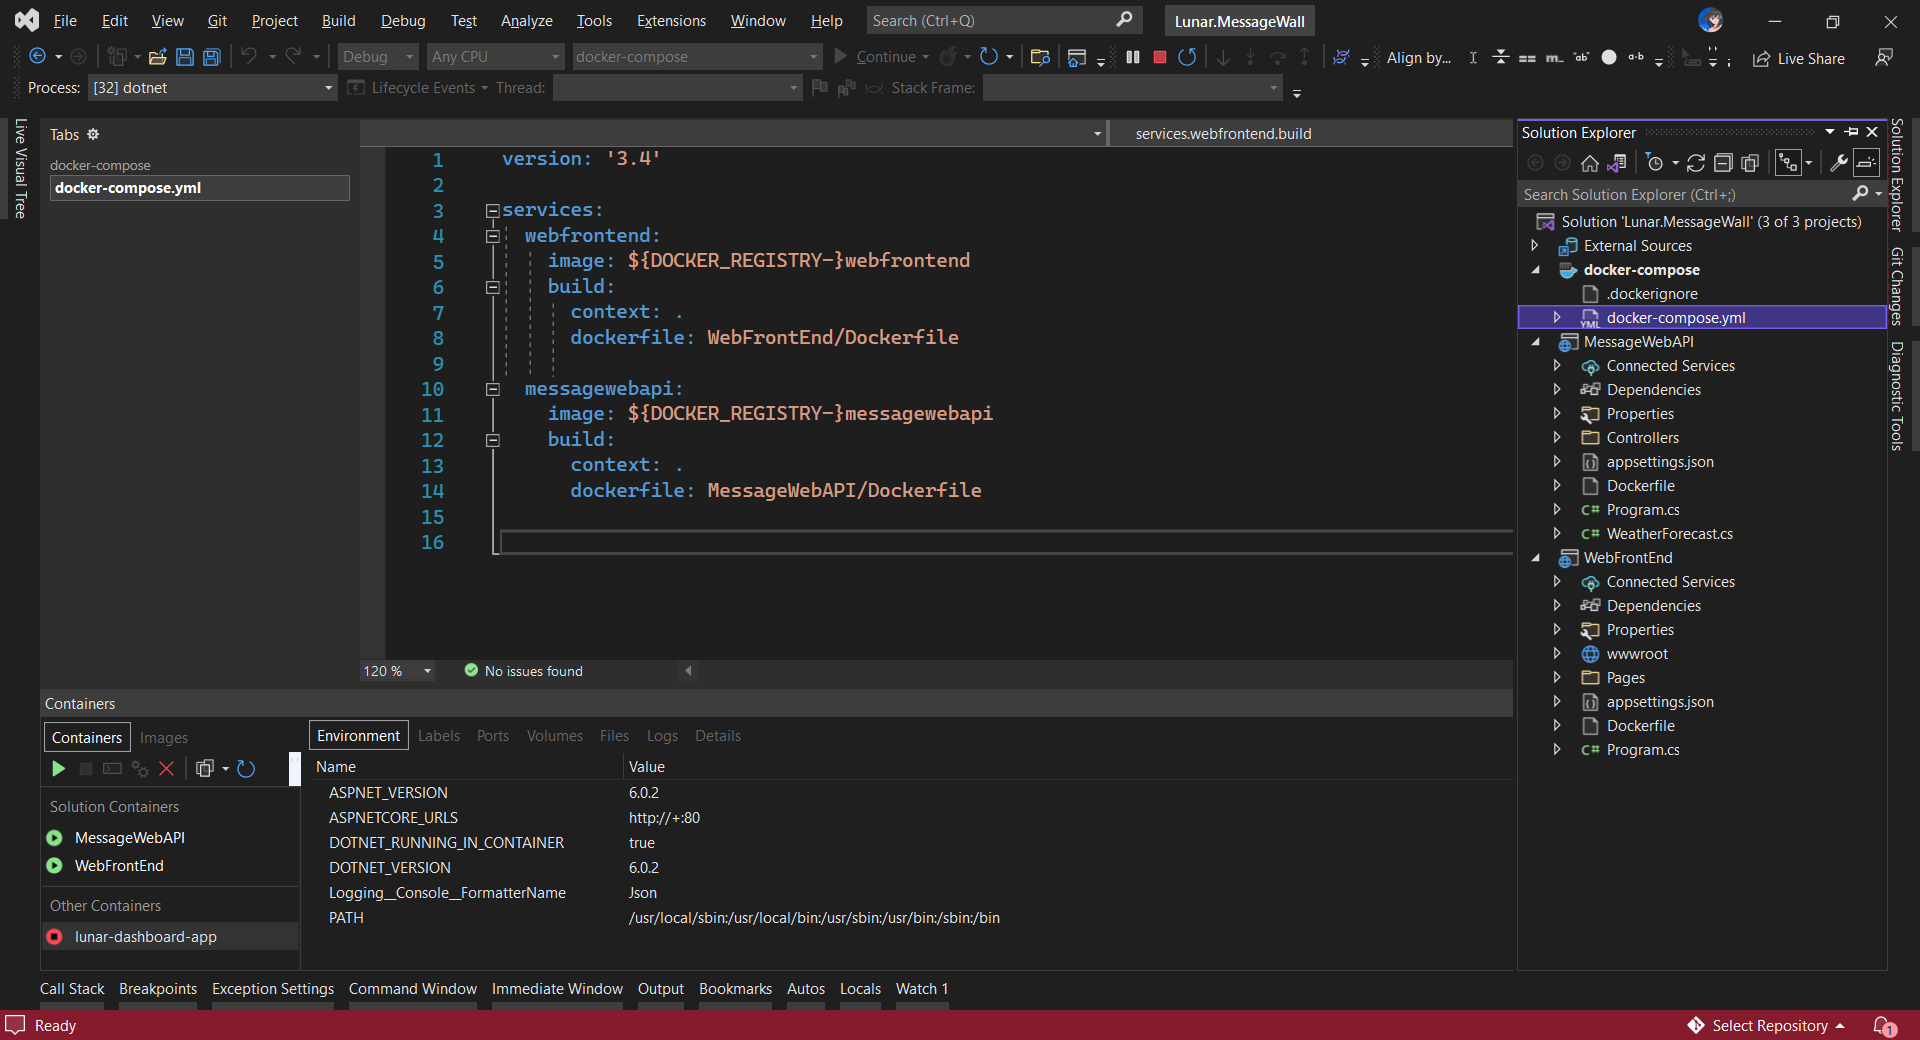
In both projects, we will add Container Orchestrator Support with Linux as the target OS. Once we have the docker-compose YAML file ready, we can directly run our docker compose application by simply pressing F5 in Visual Studio.

The docker-compose YAML file for our solution.

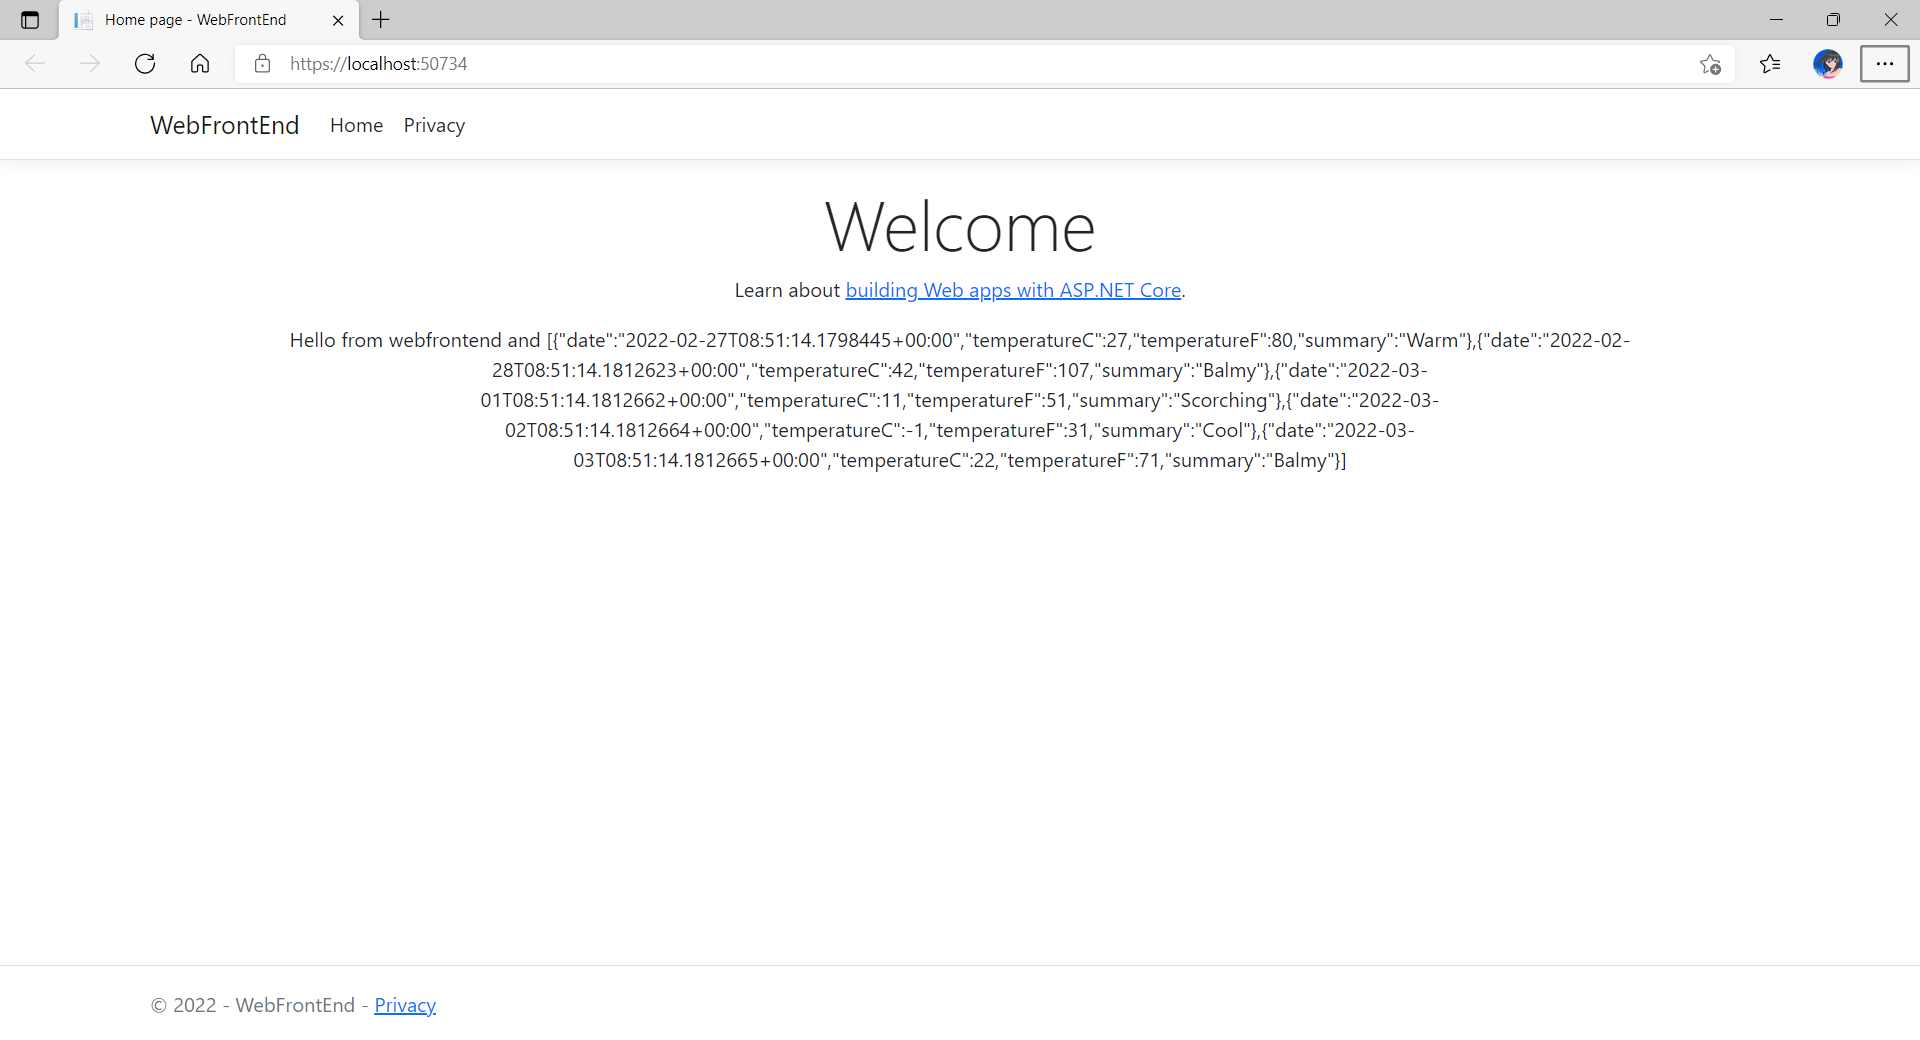
Now, we shall be able to see the website output some random weather data returned by the web API.

Congratulations, we’re running a docker compose application.

Configure Authentication in Web App

Our next step is to allow users to login to our web app first before they can post a message on the app.

It’s usually a good idea not to build our own identity management module because we need to deal with a lot more than just building a form to allow users to create an account and type their credentials. One example will be managing and protecting our user’s personal data and passwords. Instead, we should rely on Identity-as-a-Service solutions such as Azure Active Directory B2C.

Firstly, we will register our web app in our Azure AD B2C tenant.

Normally for first-timers, we will need to create a Azure AD B2C tenant first. However, there may be an error message saying that our subscription is not registered to use namespace ‘Microsoft.AzureActiveDirectory’. If you encounter this issue, you can refer to Adam Storr’s article on how to solve this with Azure CLI.

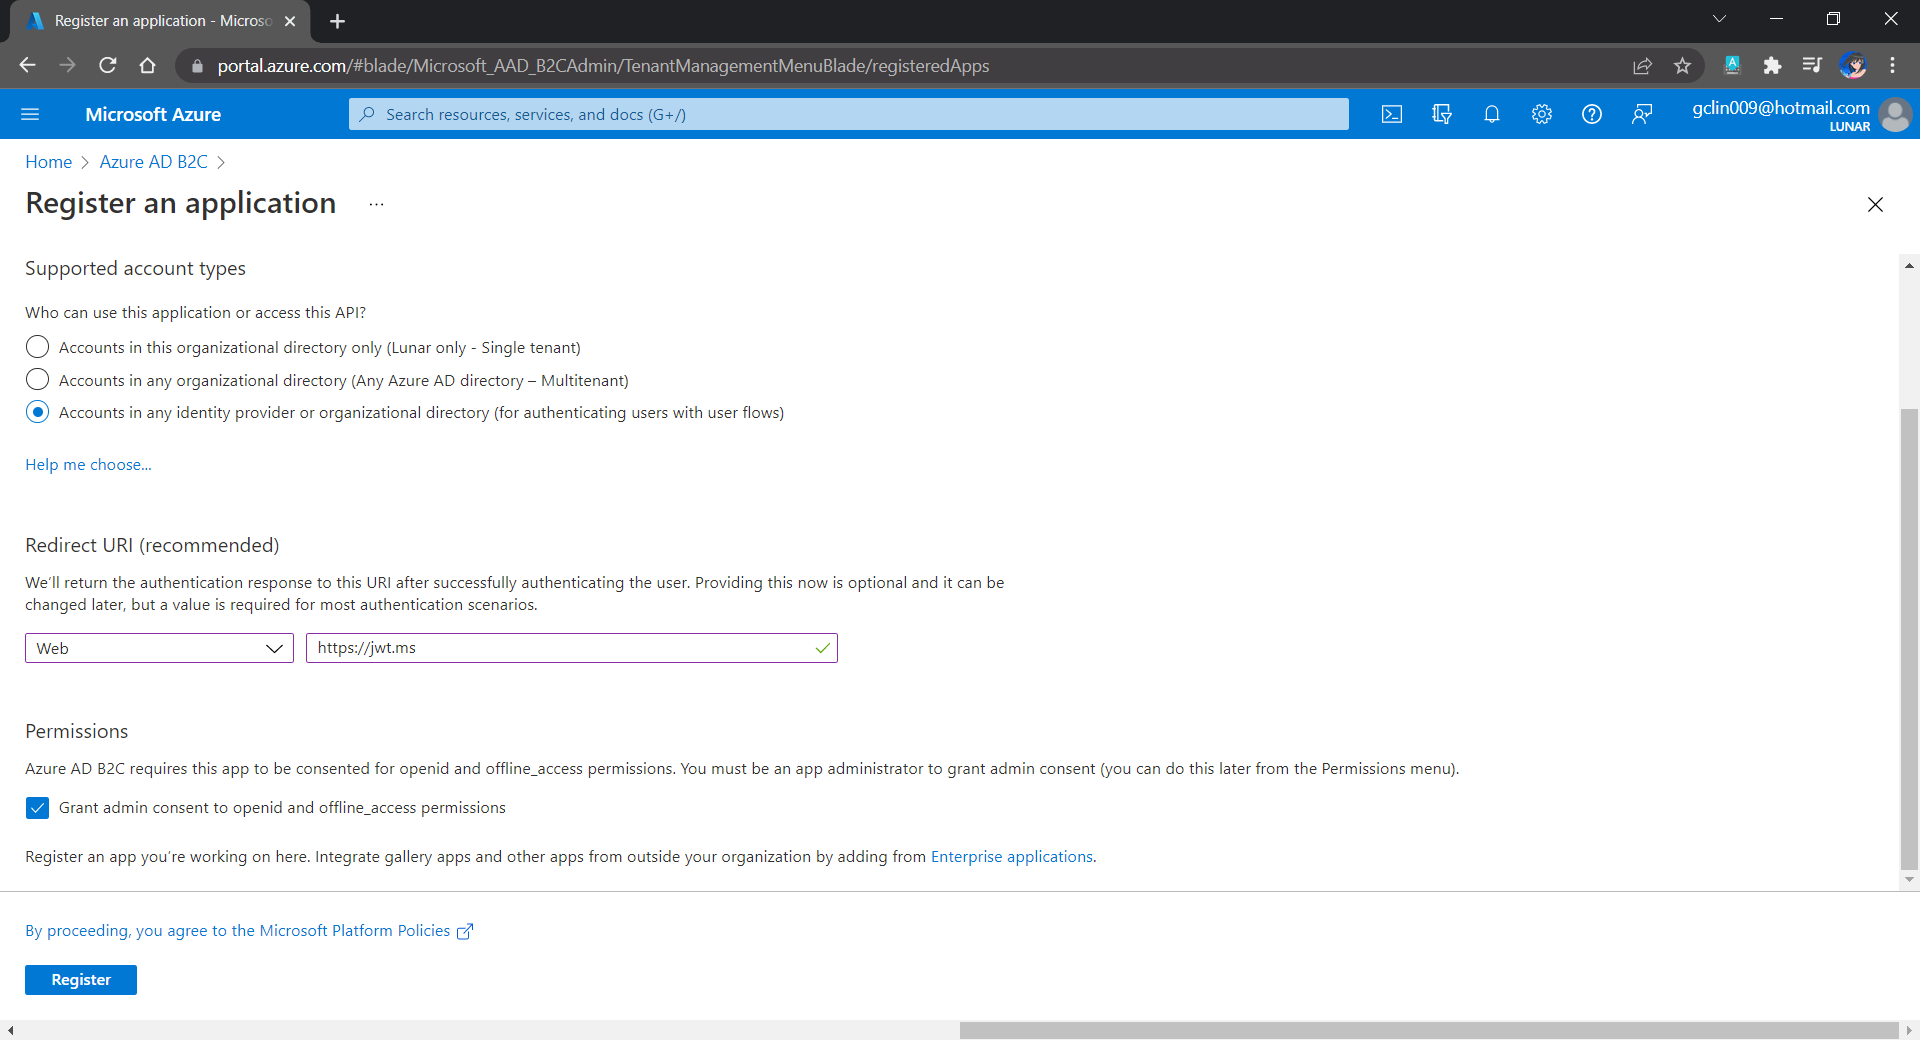
Once we have our Azure AD B2C tenant ready (which is Lunar in my example here), we can proceed to register our web app, as shown below. For testing purposes, we set the Redirect URI to https://jwt.ms, a Microsoft-owned web application that displays the decoded contents of a token. We will update this Redirect URL in the next section below when we link our web app with Azure AD B2C.

Registering a new app “Lunar Message Wall” under the Lunar Tenant.

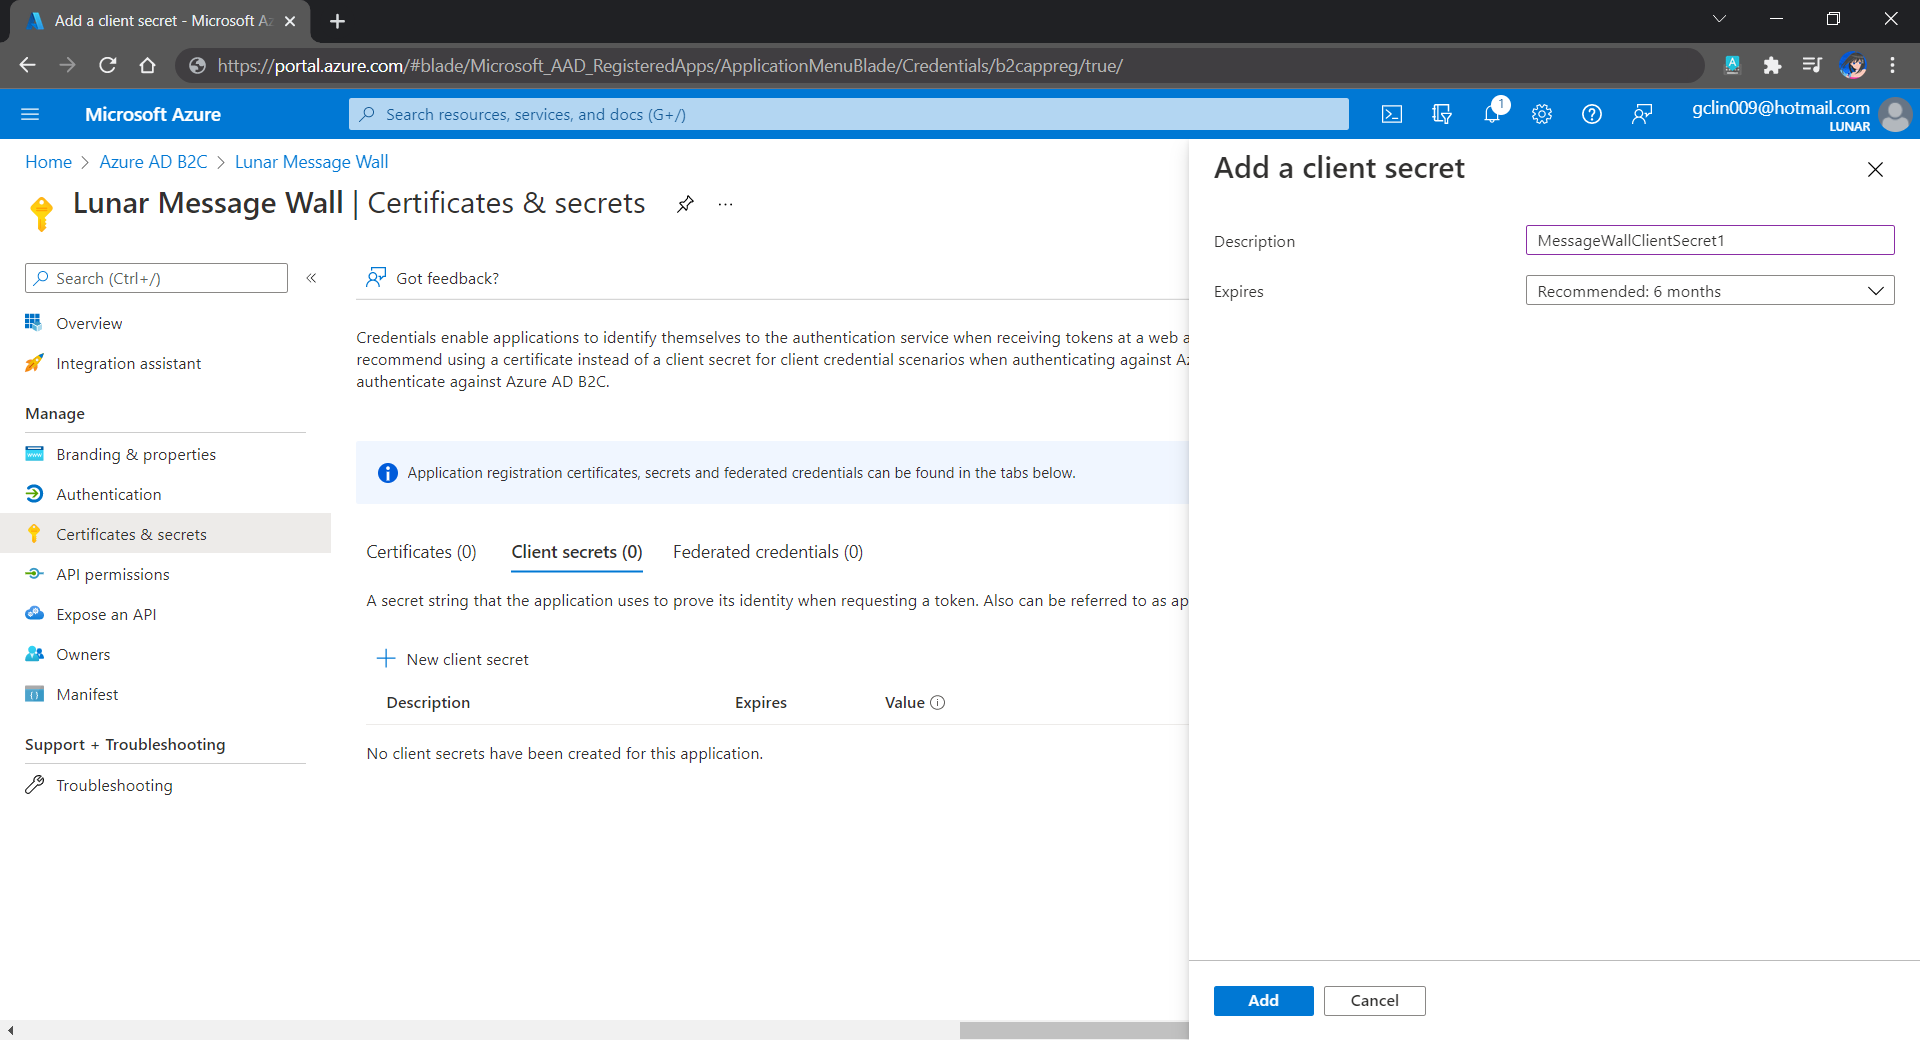
Secondly, once our web app is registered, we need to create a client secret, as shown below, for later use.

Secrets enable our web app to identify itself to the authentication service when receiving tokens. In addition, please take note that although certificate is recommended over client secret, currently certificates cannot be used to authenticate against Azure AD B2C.

Adding a new client secret which will expire after 6 months.

Thirdly, since we want to allow user authentication with GitHub, we need to create a GitHub OAuth app first.

The Homepage URL here is a temporary dummy data.

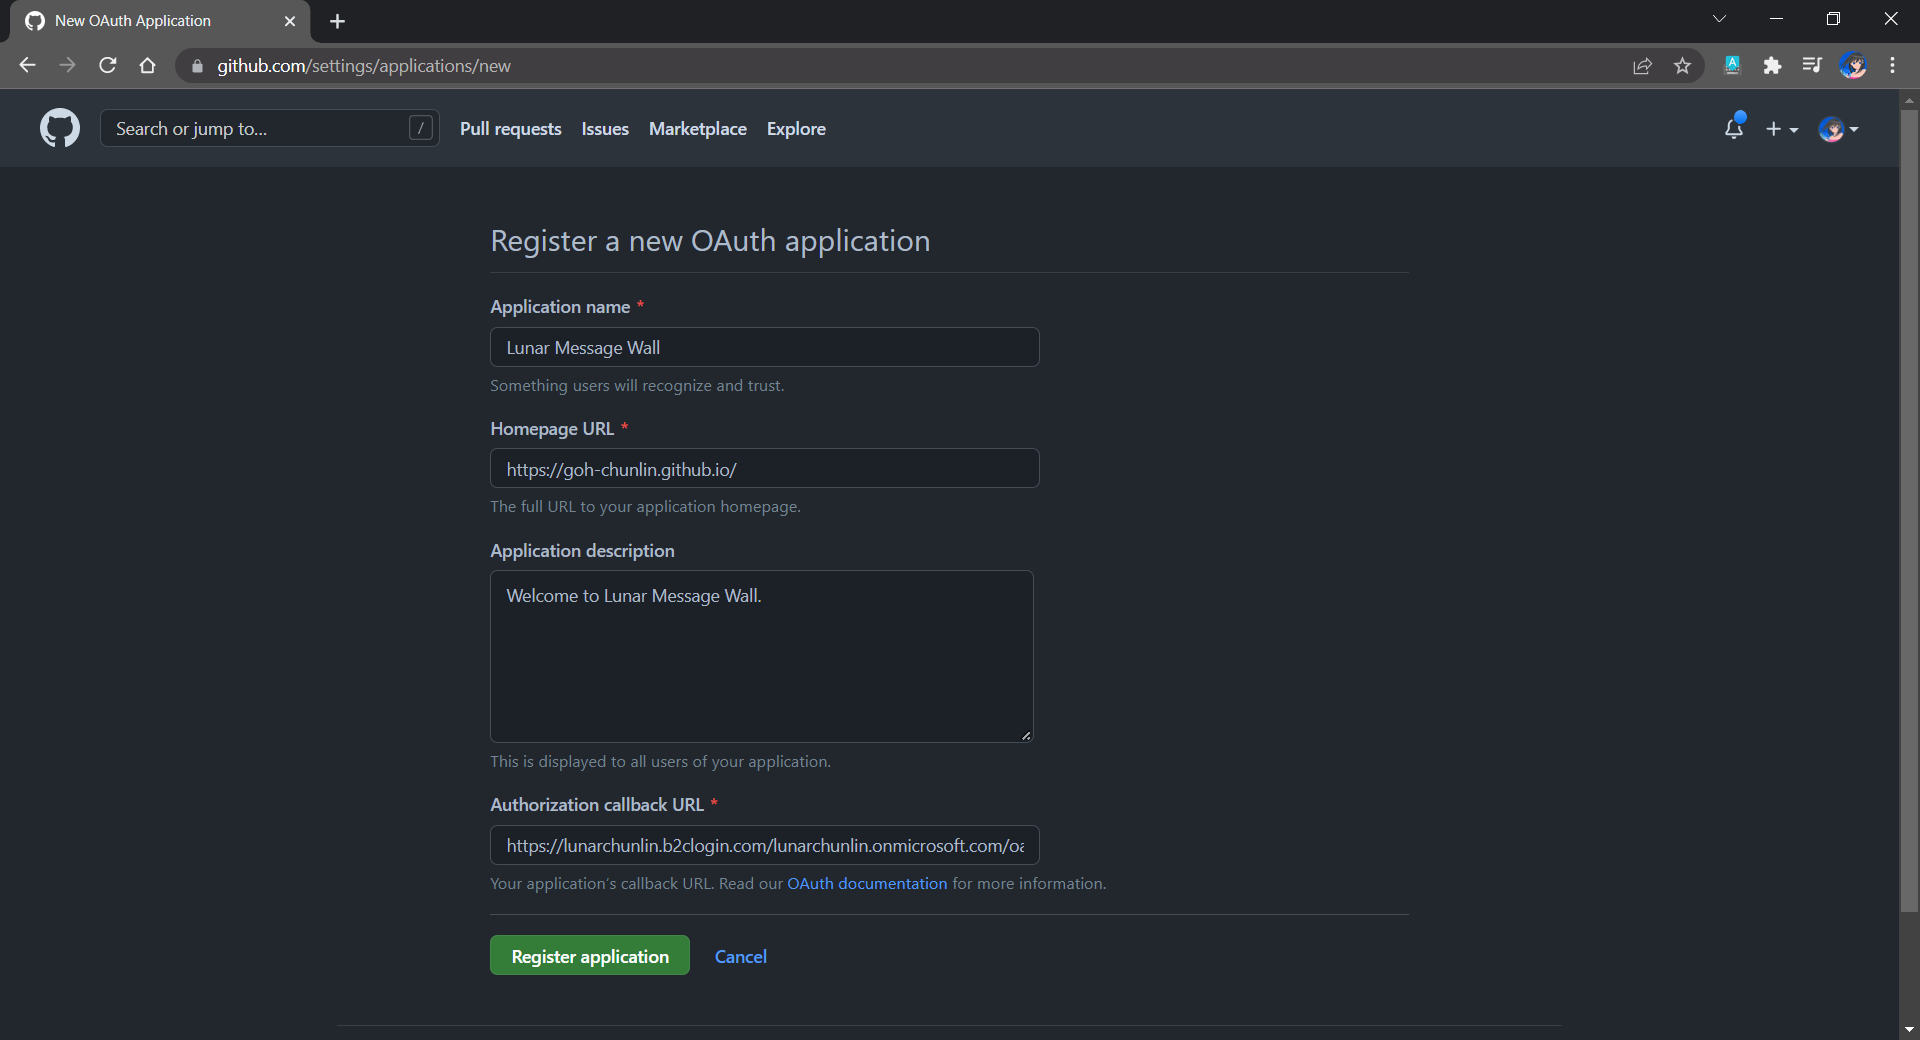
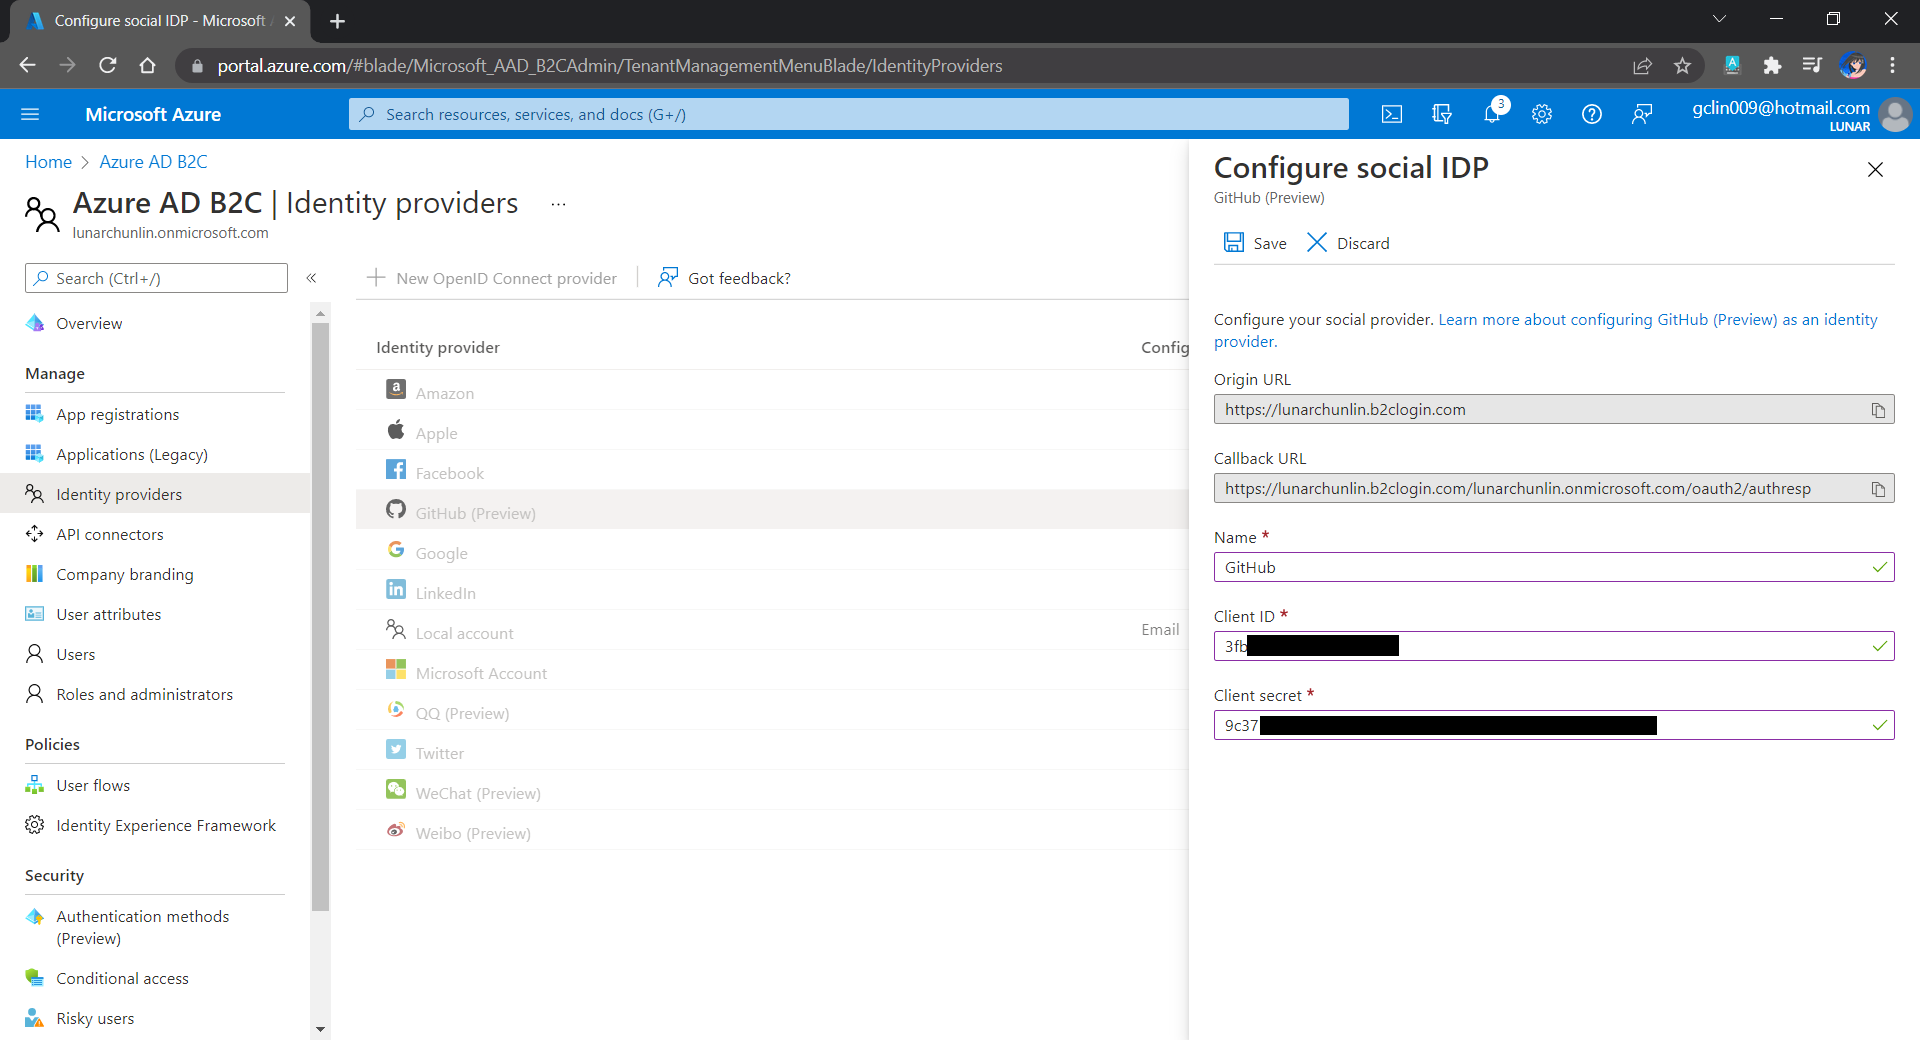
After we have registered the OAuth app on GitHub, we will be provided a client ID and client secret. These two information are needed when we configure GitHub as the social identity provider (IDP) on our Azure AD B2C, as shown below.

Configuring GitHub as an identity provider on Azure AD B2C.

Fourthly, we need to define how users interact with our web app for processes such as sign-up, sign-in, password reset, profile editing, etc. To keep thing simple, here we will be using the predefined user flows.

For simplicity, we allow only GitHub sign-in in our user flow.

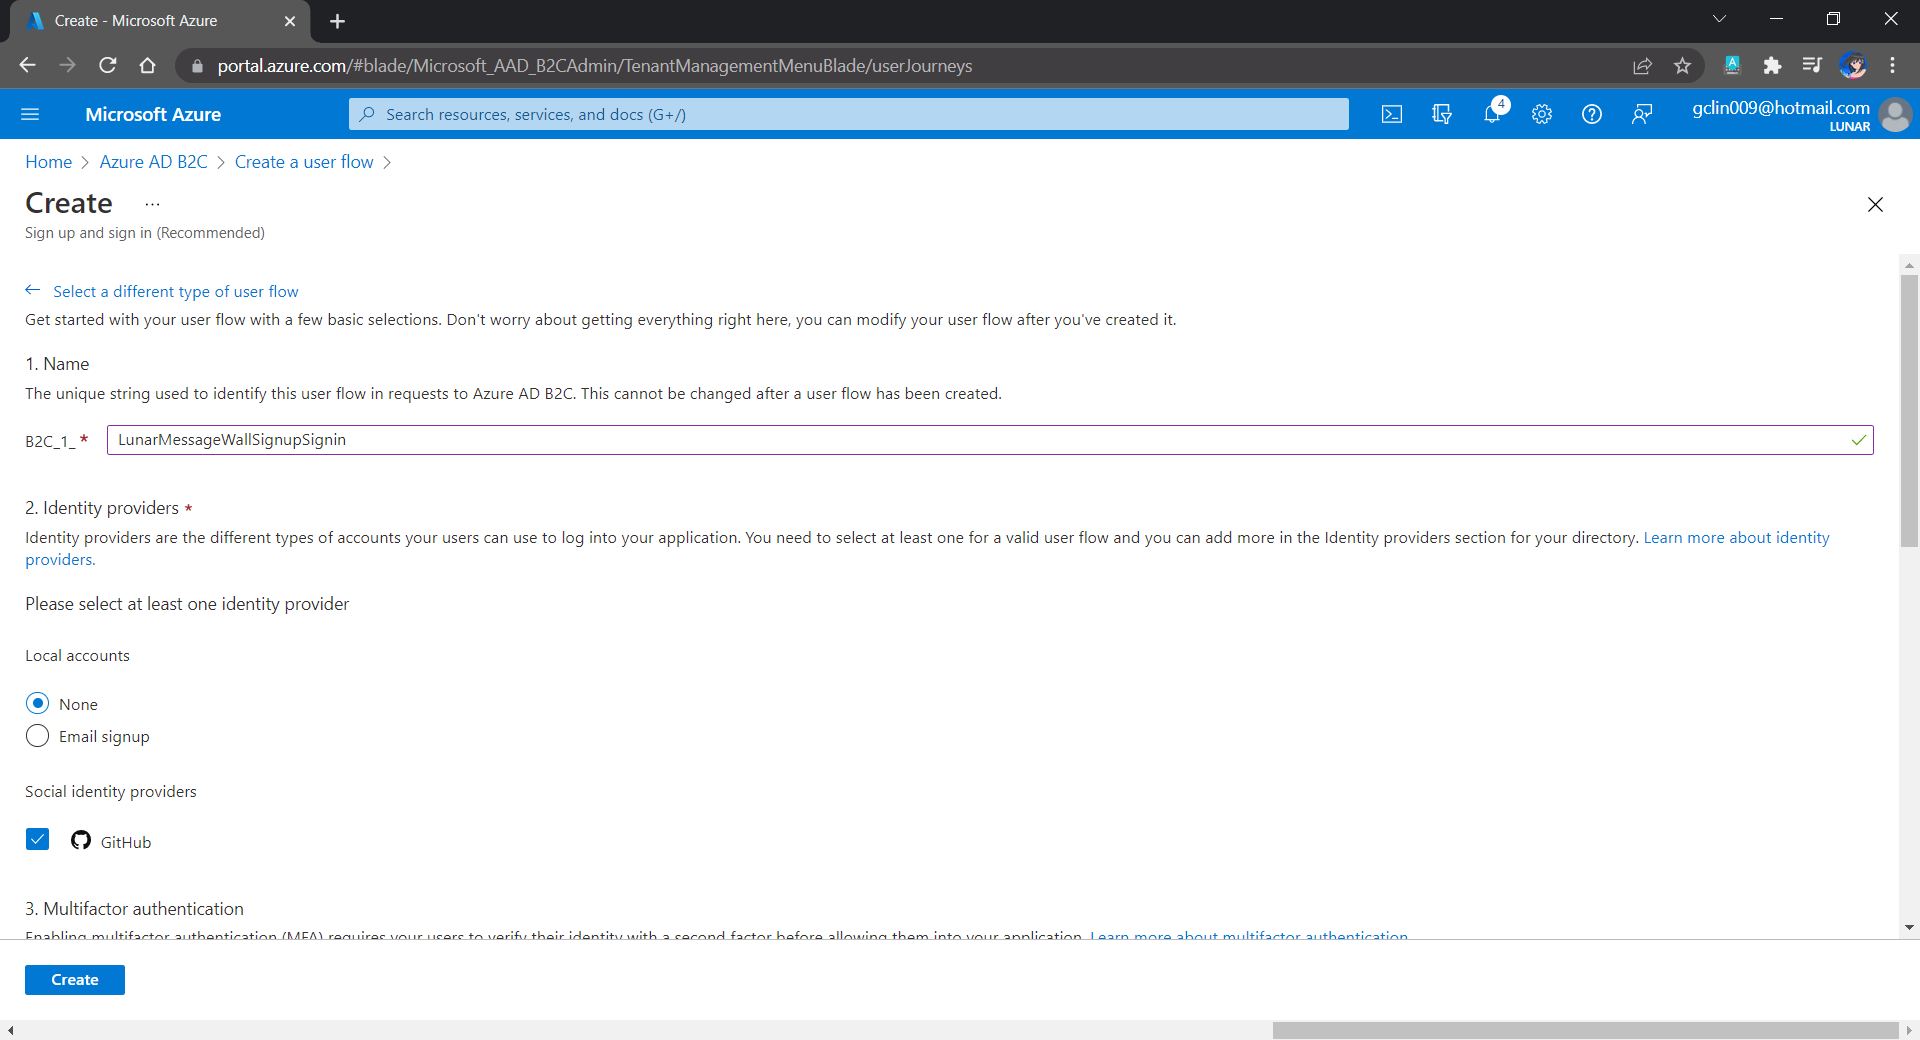
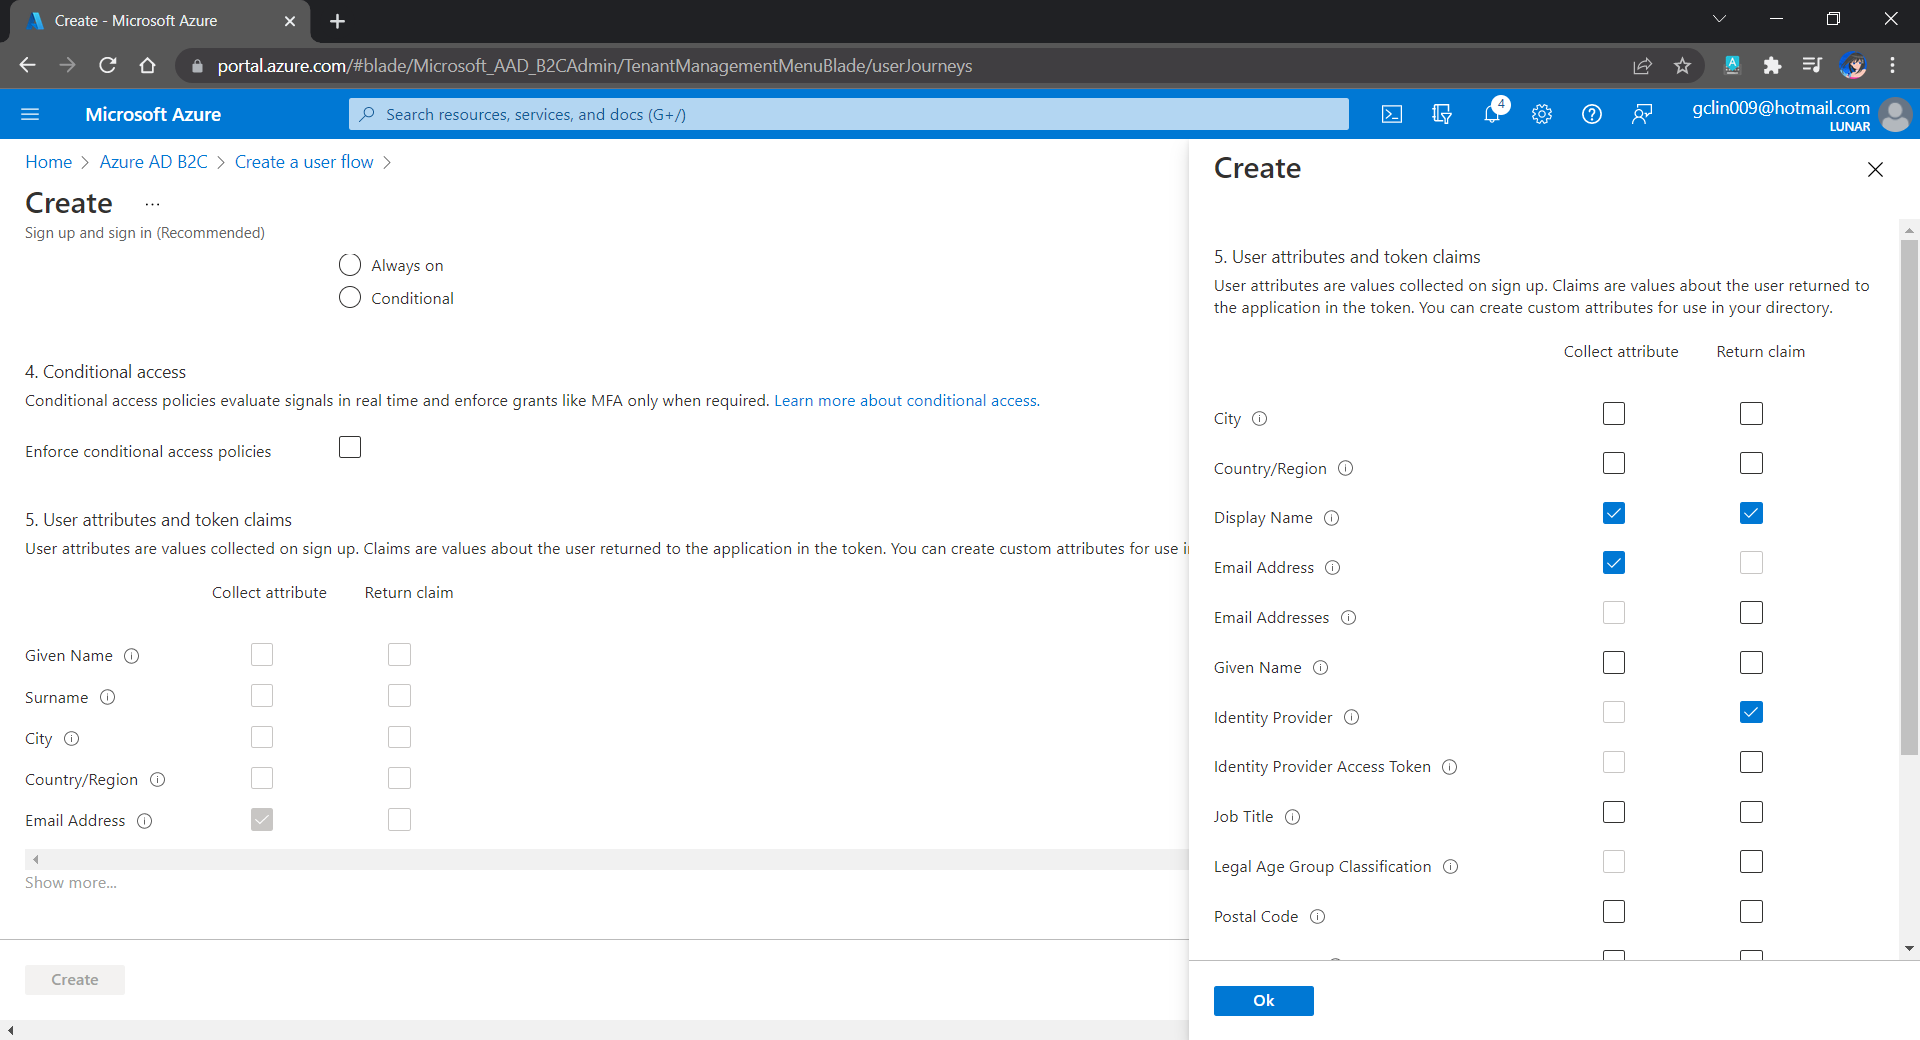
We can also choose the attributes we want to collect from the user during sign-up and the claims we want returned in the token.

User attributes and token claims.

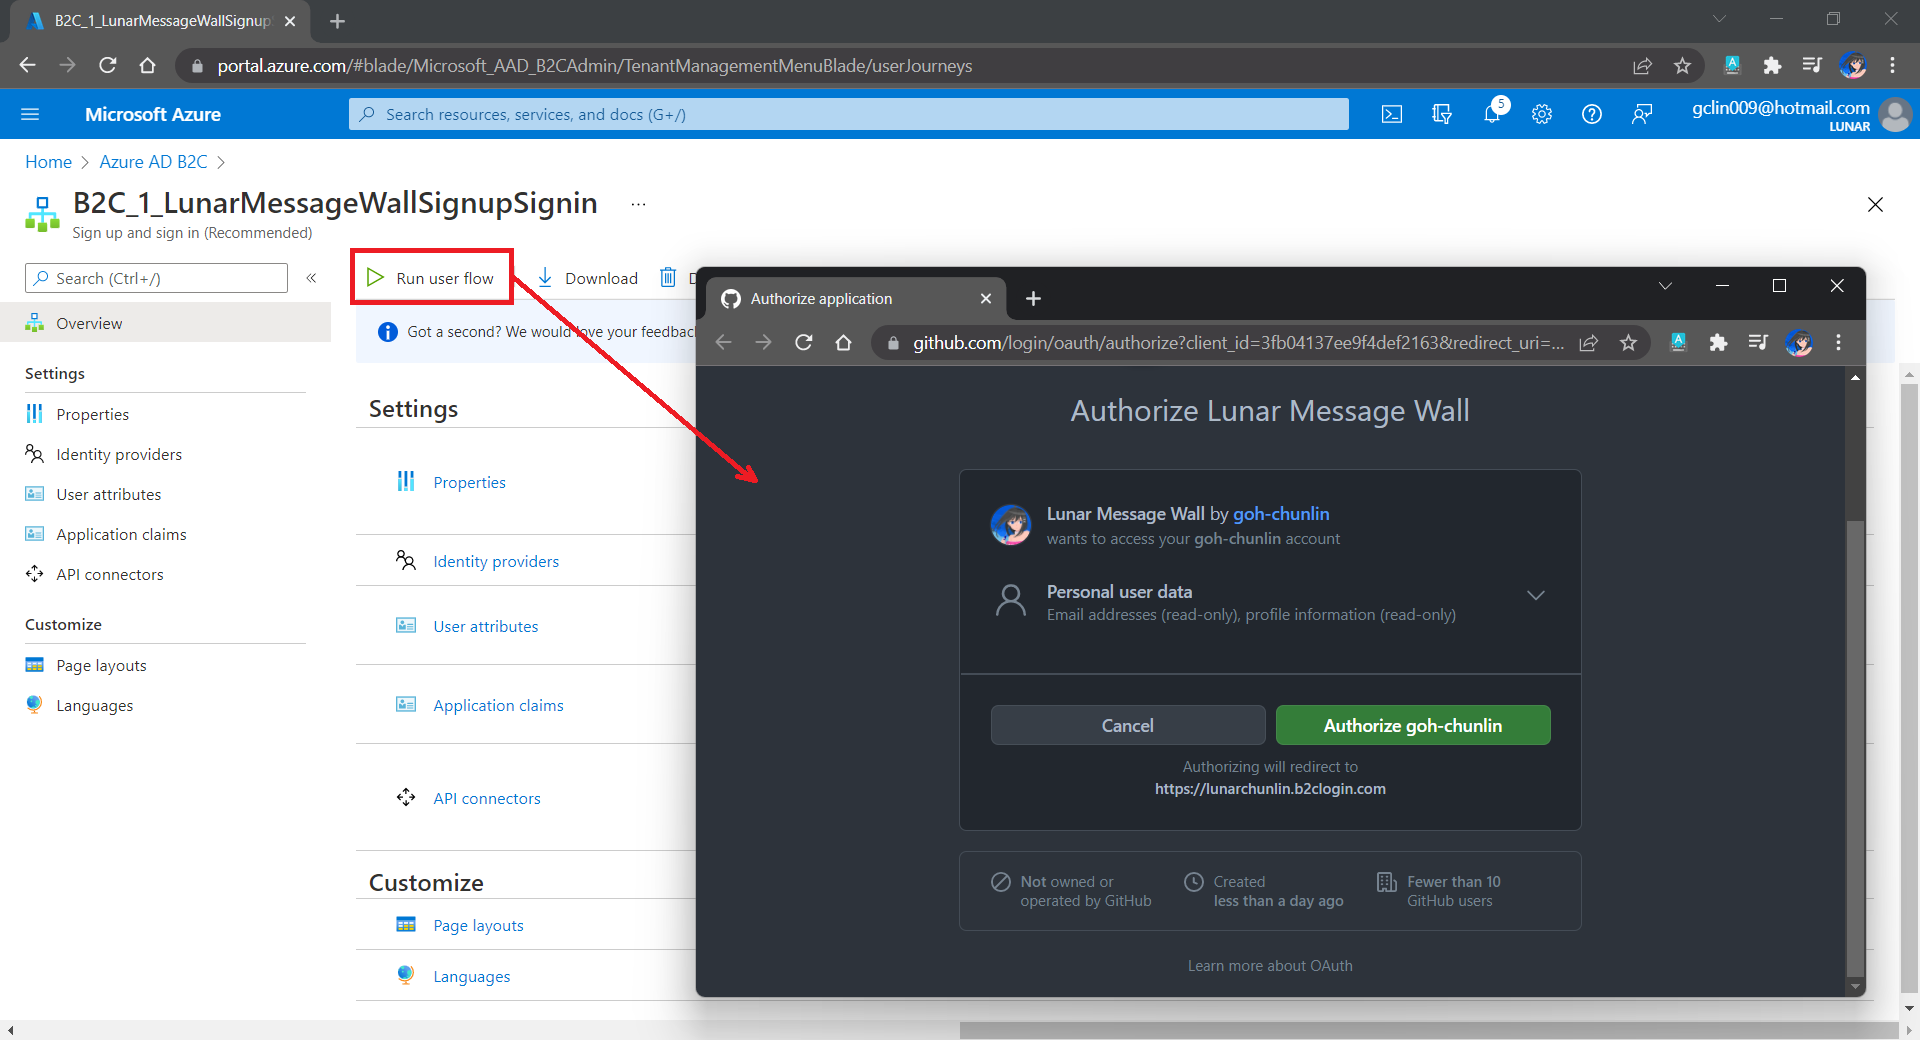
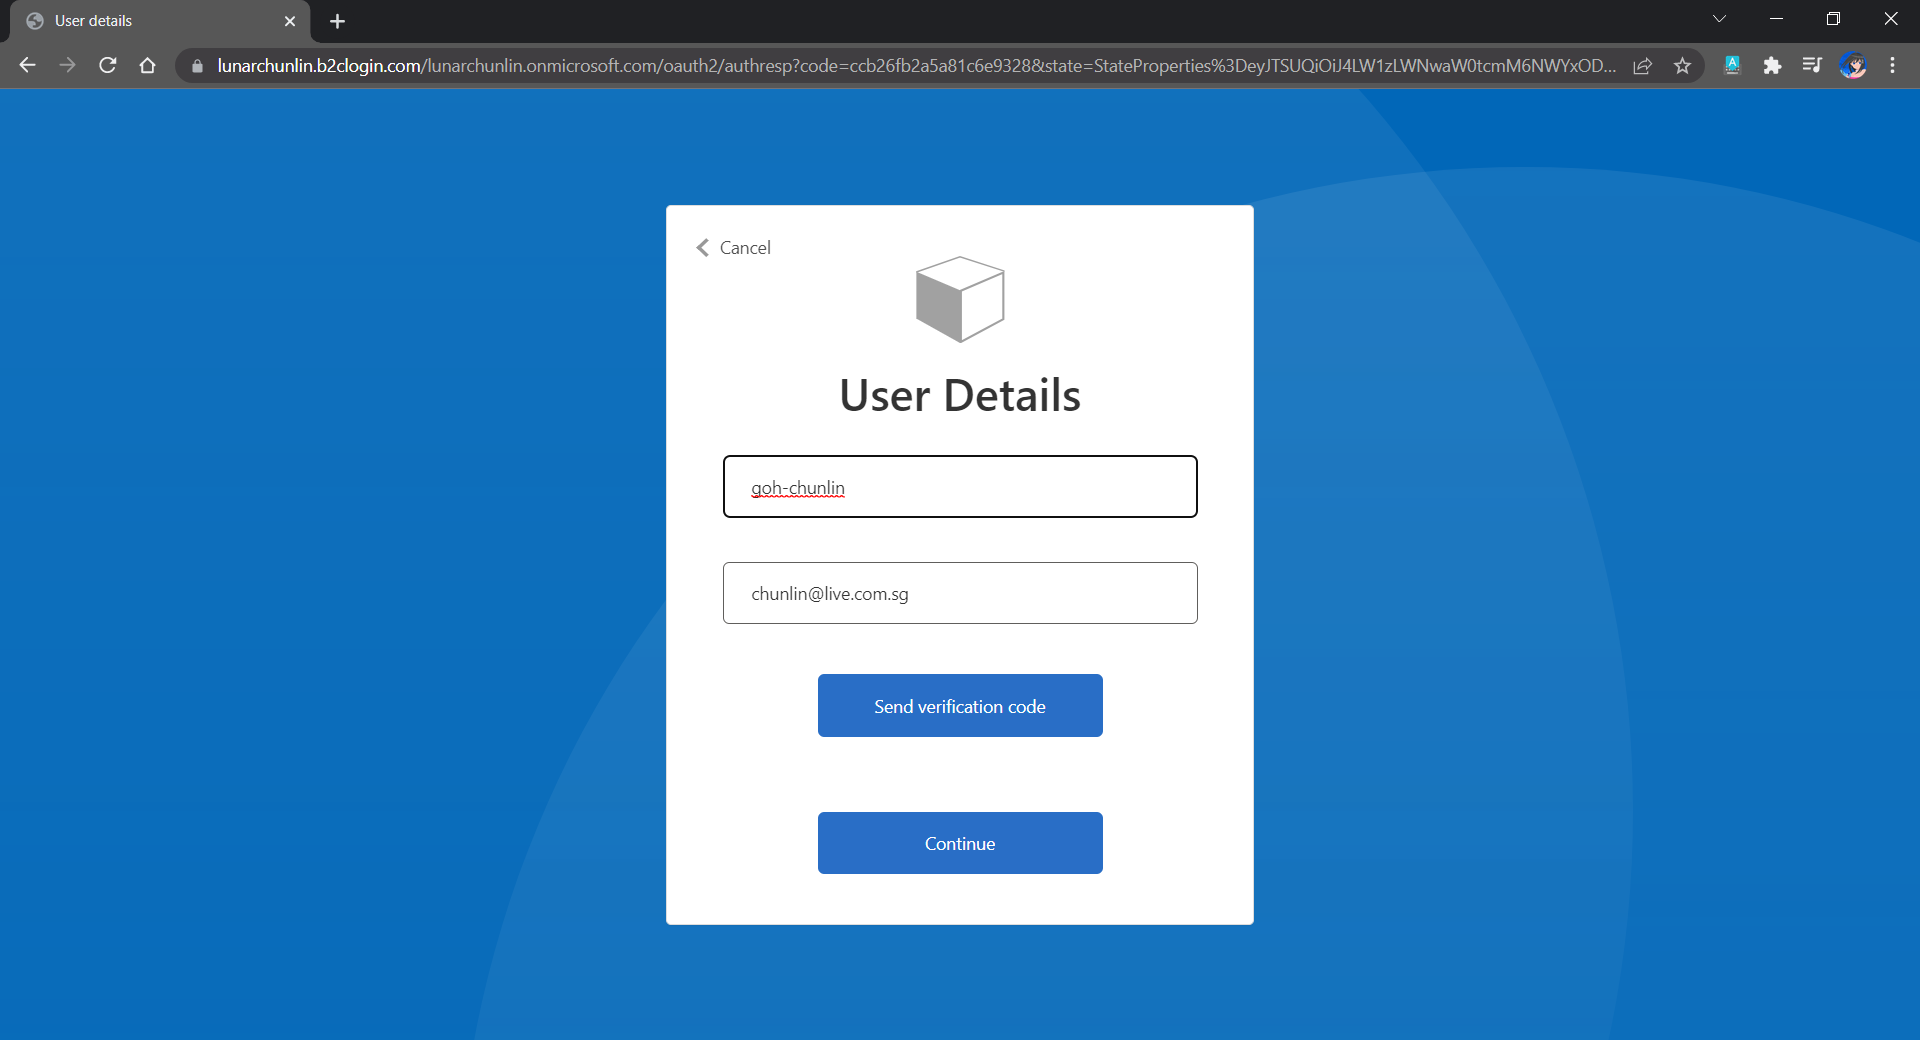
After we have created the user flow, we can proceed to test it.

In our example here, GitHub OAuth app will be displayed.

Since we specify in our user flow that we need to collect the user’s GitHub display name, there is a field here for the user to enter the display name.

The testing login page from running the user flow.

Setup the Authentication in Frontend and Web API Projects

Now, we can proceed to add Azure AD B2C authentication to our two ASP.NET Core projects.

We will be using the Microsoft Identity Web library, a set of ASP.NET Core libraries that simplify adding Azure AD B2C authentication and authorization support to our web apps.

dotnet add package Microsoft.Identity.Web

The library configures the authentication pipeline with cookie-based authentication. It takes care of sending and receiving HTTP authentication messages, token validation, claims extraction, etc.

For the frontend project, we will be using the following package to add GUI for the sign-in and an associated controller for web app.

dotnet add package Microsoft.Identity.Web.UI

After this, we need to add the configuration to sign in user with Azure AD B2C in our appsettings.json in both projects (The ClientSecret is not needed for the Web API project).

"AzureAdB2C": {
    "Instance": "https://lunarchunlin.b2clogin.com",
    "ClientId": "...",
    "ClientSecret": "...",
    "Domain": "lunarchunlin.onmicrosoft.com",
    "SignedOutCallbackPath": "/signout/B2C_1_LunarMessageWallSignupSignin",
    "SignUpSignInPolicyId": "B2C_1_LunarMessageWallSignupSignin"
}

We will use the configuration above to add the authentication service in Program.cs of both projects.

With the help of the Microsoft.Identity.Web.UI library, we can also easily build a sign-in button with the following code. Full code of it can be seen at _LoginPartial.cshtml.

<a class="nav-link text-dark" asp-area="MicrosoftIdentity" asp-controller="Account" asp-action="SignIn">Sign in</a>

Now, it is time to update the Redirect URI to the localhost. Thus, we need to make sure our WebFrontEnd container has a permanent host port. To do so, we first specify the ports we want to use in the launchsettings.json of the WebFrontEnd project.

"Docker": {
    ...
    "environmentVariables": {
      "ASPNETCORE_URLS": "https://+:443;http://+:80",
      "ASPNETCORE_HTTPS_PORT": "44360"
    },
    "httpPort": 51803,
    "sslPort": 44360
}

Then in the docker-compose, we will specify the same ports too.

services:
  webfrontend:
    image: ${DOCKER_REGISTRY-}webfrontend
    build:
      context: .
      dockerfile: WebFrontEnd/Dockerfile
    ports:
      - "51803:80"
      - "44360:443"

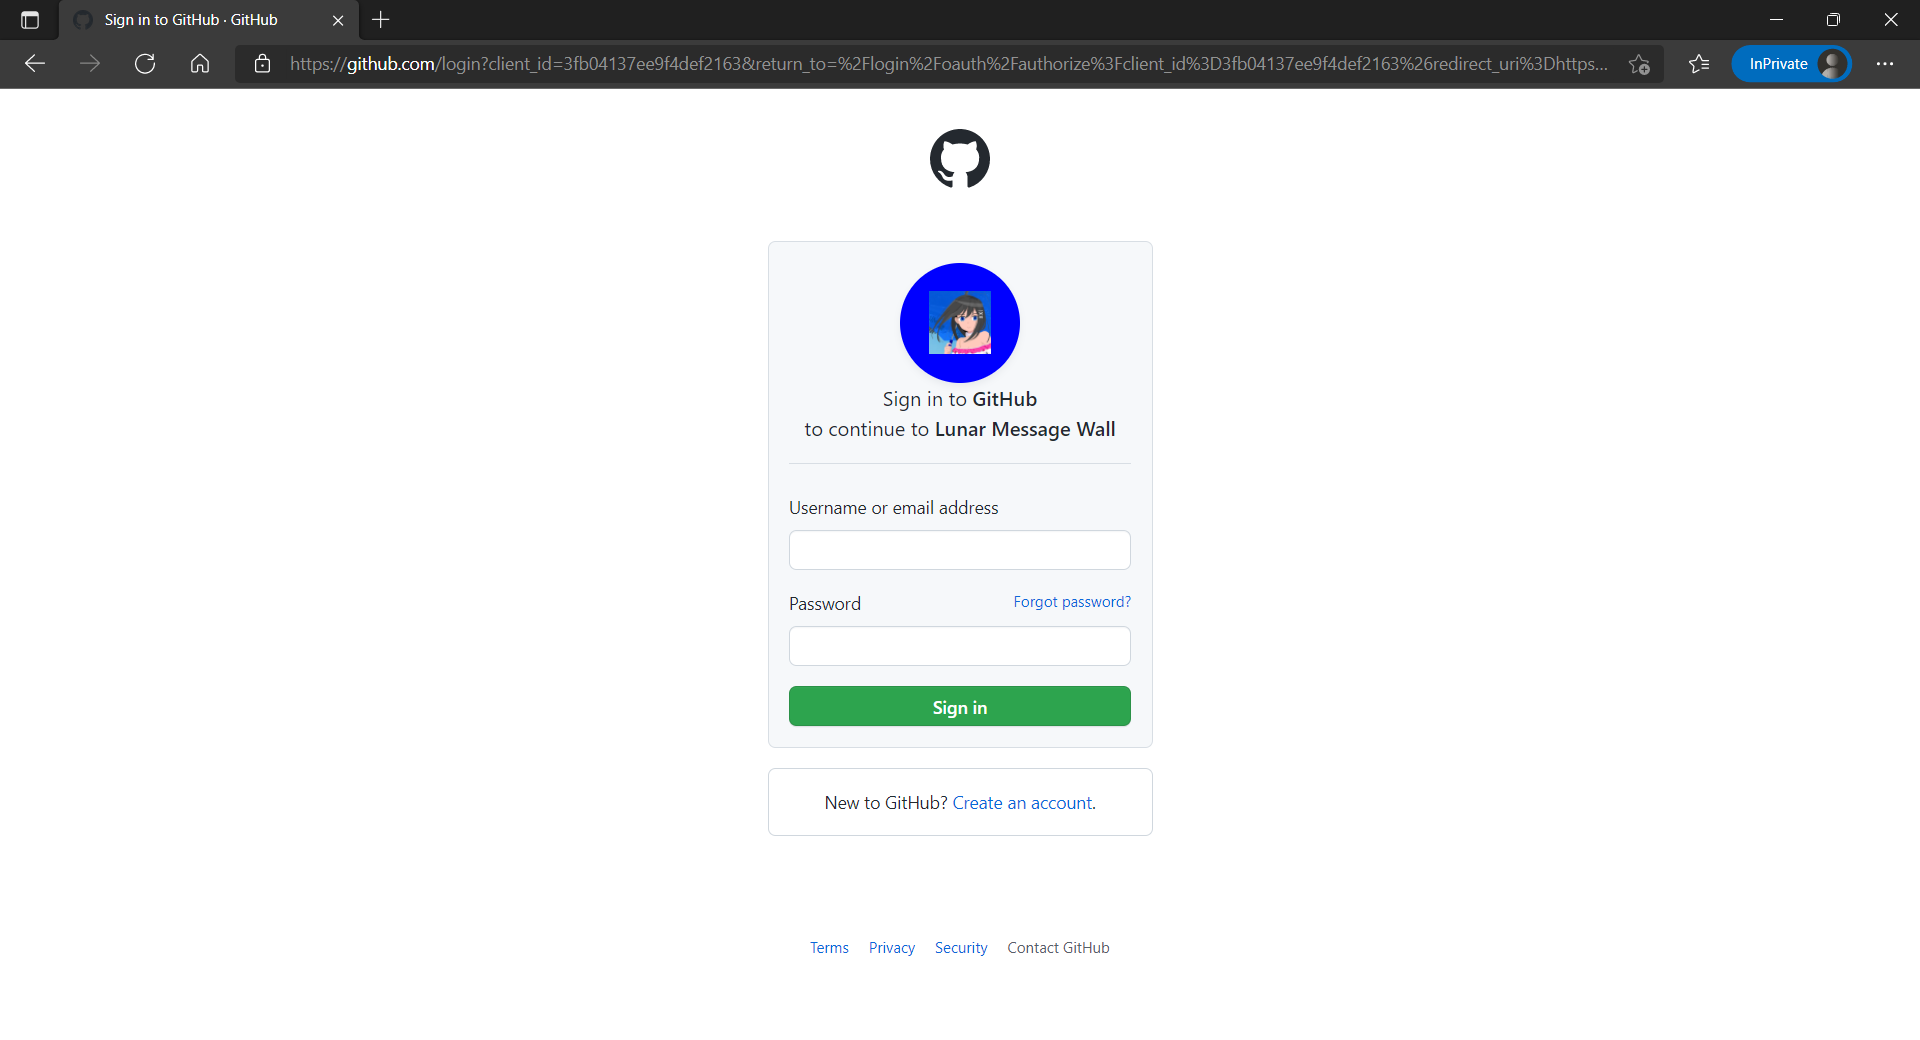
Finally, we will update the Redirect URI in Azure AD B2C according, as shown below.

Updated the Redirect URI to point to our WebFrontEnd container.

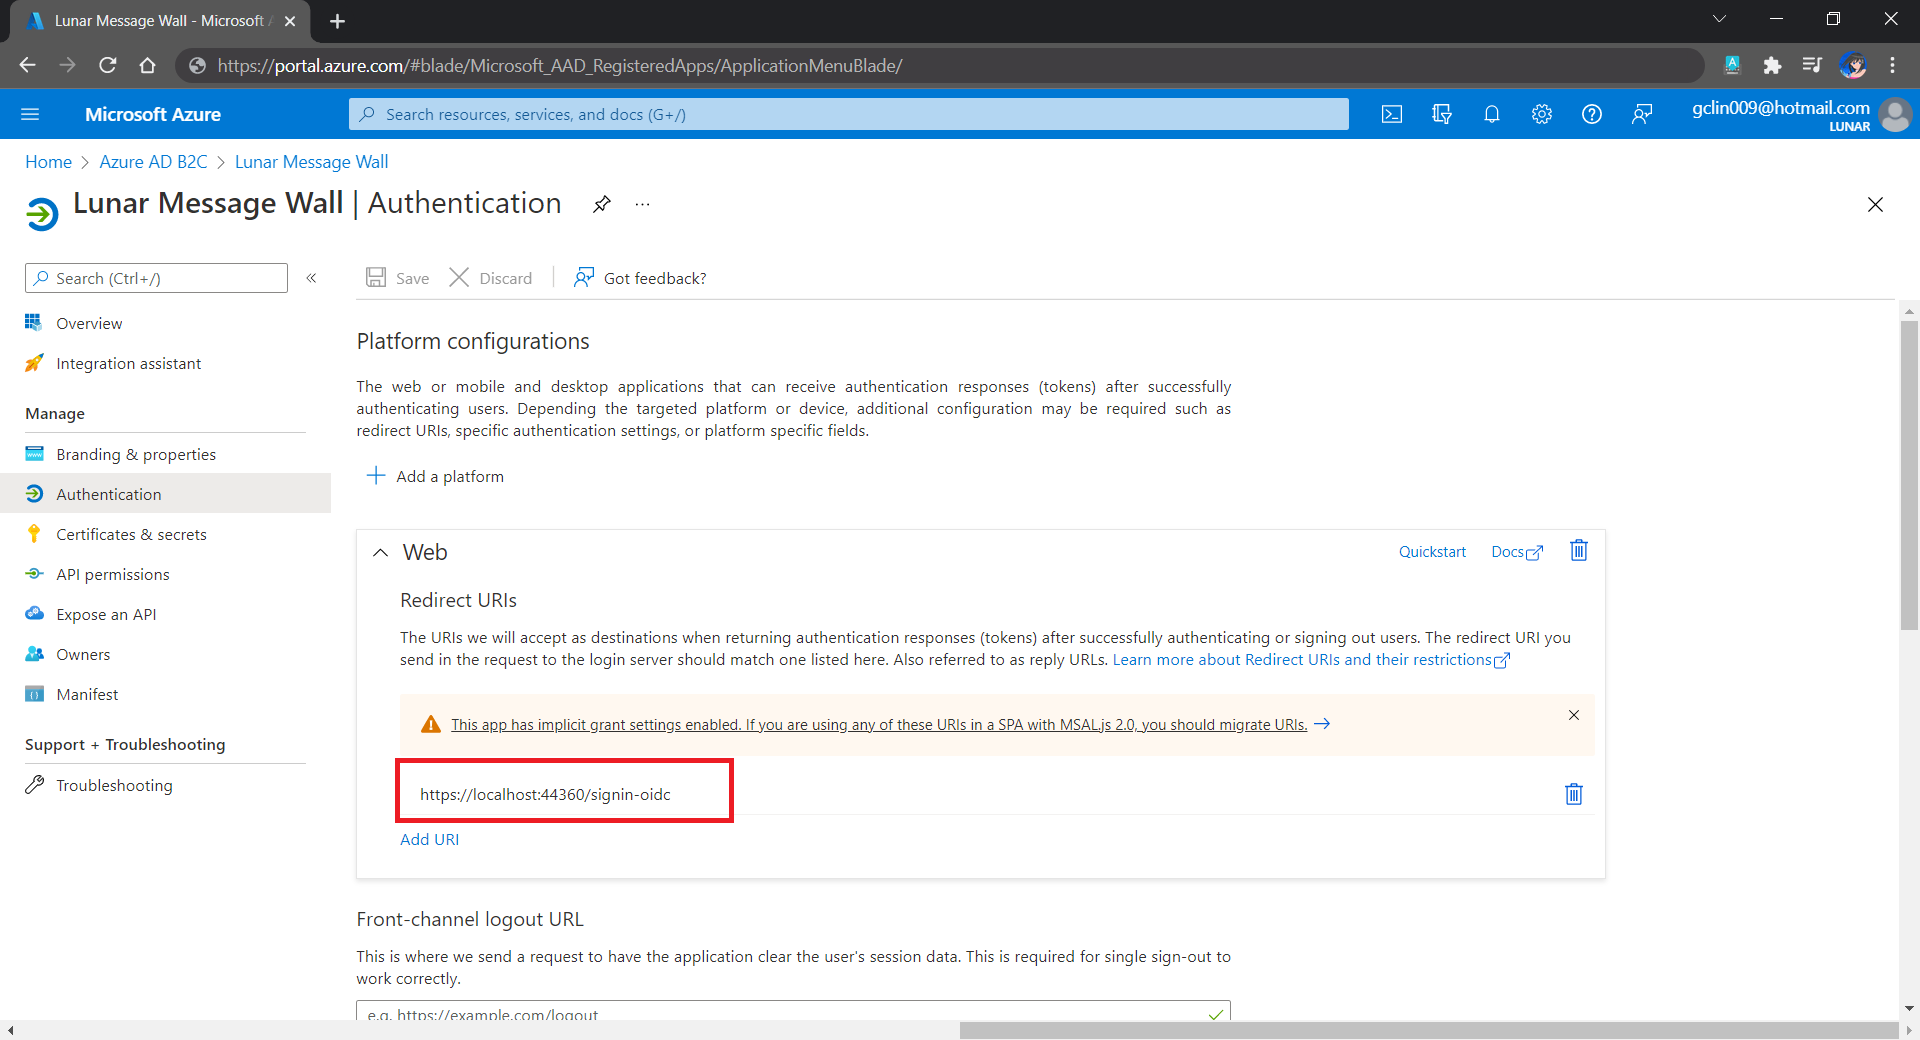
Now, right after we click on the Sign In button on our web app, we will be brought to a GitHub sign-in page, as shown below.

The GitHub sign-in page.

Currently, our Web API has only two methods which have different required scopes declared, as shown below.

[Authorize]
public class UserMessageController : ControllerBase
{
    ...
    [HttpGet]
    [RequiredScope("messages.read")]
    public async Task<IEnumerable<UserMessage>> GetAsync()
    {
        ...
    }

    [HttpPost]
    [RequiredScope("messages.write")]
    public async Task<IEnumerable<UserMessage>> PostAsync(...)
    {
        ...
    }
}

Hence, when the frontend needs to send the GET request to retrieve messages, we will first need to get a valid access token with the correct scope.

string accessToken = await _tokenAcquisition.GetAccessTokenForUserAsync(new[] { "https://lunarchunlin.onmicrosoft.com/message-api/messages.read" });

client.DefaultRequestHeaders.Authorization = new AuthenticationHeaderValue("Bearer", accessToken);

client.DefaultRequestHeaders.Accept.Add(new MediaTypeWithQualityHeaderValue("application/json"));

Database

Since we need to store the messages submitted by the users, we will need a database. Here, we use PostgresSQL, an open-source, standards-compliant, and object-relational database.

To run the PostgresSQL with docker-compose we will update our docker-compose.yml file with the following contents.

services:
  ...
  messagewebapi:
    ...
    depends_on:
     - db

  db:
    container_name: 'postgres'
    image: postgres
    environment:
      POSTGRES_PASSWORD: ...

In our case, only the Web API will interact with the database. Hence, we need to make sure that the db service is started before the messagewebapi. In order to specify this relationship, we will use the depends_on option.

User’s messages can now be stored and listed on the web page.

Next Step

This is just the very beginning of my learning journey of dockerising ASP .NET Core solution. In the future, I shall learn more in this area.

References

Learning to Learn

The fast pace of change in today’s world means we must understand and quickly respond to changes. Hence, in order to survive and be successful in today’s VUCA world, we need to constantly scan for growth opportunities and be willing to learn new skills.

Working in software industry helps me to realise that with all the disruptions in the modern world, especially technology, ongoing skill acquisition is critical to persistent professional relevance. We shall always look for ways to stretch ourselves to get ahead.

Even though I have been dealing with cloud computing, especially Microsoft Azure, for more than 10 years in my career and study, I still would like to find out how well I compare with my peers instead of thinking that I’m already fine at this area. Hence, with that in mind, I focus on learning Microsoft Azure development related skills on Microsoft Learn during the holiday.

Make the Most of Our Limited Learning Time

So much to learn, so little time.

We all have very little time for learning outside of our work. Combine time we have for learning and the importance of the skills, we can get a simple 2×2 matrix with four quadrants.

2×2 matrix to help prioritizing skills to learn (Reference: Marc Zao-Sanders)

I don’t have much time to keep my cloud computing knowledge relevant because nowadays I focus more on desktop application development. Hence, I decided to give myself a one-week break from work and schedule 6-7 hours each day for learning in the holiday.

In order to make sure we’re investing our time wisely, we shall focus on learning what is needed. Unless we need the skill for our job or a future position, it’s better not to spend time and money for training on that skill because learning is an investment and we shall figure out what the return will be. This is why I choose to learn more about developing cloud apps on Microsoft Azure because that has been what I’m doing at work in the past decade.

To better achieve my goals in self learning, I’ve also identified the right learning materials before I get started. Since I already have the experience of developing modern cloud applications early in my career, I choose to focus only on going through all the 43 relevant modules available on the Microsoft Learn.

Make Learning a Lifelong Habit

No matter which technology era we are in, the world will always belong to people who are always keeping themselves up to date. Hence, lifelong learning is a habit many of us would like to emulate.

Before we start our learning journey, we need to set realistic goals, i.e. goals that are attainable, because there are limits to what we can learn. In addition, as we discussed earlier, we need to ask ourselves how much time and energy we can give to our self learning. We have to understand that learning a skill takes extreme commitment, so we can’t get very far on the journey of self learning if we don’t plan it properly.

Learning is hard work but it also can be fun, especially when we are learning together with like-minded people. Don’t try to learn alone, otherwise self learning can feel over-whelming. For example, besides learning from online tutorials, I also join local software development groups where members are mostly developers who love to share and learn from each other.

Azure Community Singapore, for all who are interested in cloud technology.

Finally, to improve our ability to learn, we also have to unlearn, i.e. choose an alternative mental model or paradigm. We should acknowledge that old mental model is not always relevant or effective. When we fail, we also should avoid defending ourselves and capture the lessons we’ve learned.

Certification and Exam

I’m now a Microsoft certified Azure Developer Associate after I passed their exam AZ-204 in November 2021.

The exam is not difficult but it’s definitely not easy as well.

The exam tests not only our knowledge in developing cloud solutions with Azure services such as Azure Compute and Storage Account, but also our understanding of cloud security and Azure services troubleshooting.

Clearing all the relevant modules on Microsoft Learn does not guarantee that one will pass the exam easily. In fact, it’s the skills and knowledge I gain from work and personal projects help me a lot in the exam, for example the service bus implementation that I learnt last year when I was building a POC for a container trailer tracking system.

How Microsoft Learn helps in my self learning is that it provides an opportunity for me to learn in a free sandbox environment. In addition, the learning materials on the platform are normally best practices to follow. Hence, by learning on Microsoft Learn, I find out some of the mistakes I’ve made in the past and things that I can improve, for example resource management with tags, RBAC, VNet setup, etc.

Notes taken when I was going through the learning materials on Microsoft Learn.

I use Notion to take notes. Notion is a great tool to keep our notes clean and organised. Taking notes helps me to do a last-minute quick revision.

Conclusion

In a fast-moving world, being able to learn new skills helps in our life. There are many ways to learn continuously in our life. Earning certificates by going through challenging exams is just one of the methods. You know what works for yourself, do more of it.

Stay hungry. Stay foolish.

References

Packaging PyQt5 app with PyInstaller on Windows

After we have developed a GUI desktop application using PyQt5, we need to distribute it to the users to use it. Normally the users are not developers, so giving them the source code of our application is not a good idea. Hence, in this article, we will discuss how we can use PyInstaller to package the application into an exe file on Windows.

Step 0: Setup Hello World Project

Our life will be easy if we start packaging our application in the very beginning. This is because as we add more features and dependencies to the application, we can easily confirm the packaging is still working. If there is anything wrong during the packaging, we can easily debug by just checking the newly added codes instead of debugging the entire app.

So, let’s start with a PyQt5 desktop application which has a label showing “Hello World”.

Currently PyInstaller works only up to Python 3.8. So, I will first create a virtual environment which uses Python 3.8 with the following command. Since I have many versions of Python installed on my machine, I simply use the path to the Python 3.8 in the command.

C:\Users\...\Python38\python.exe -m venv venv

After that, we can activate the virtual environment in VS Code by choosing the interpreter, as shown in the following screenshot.

VS Code will prompt us the recommended interpreter to choose for the project.

After that, we will install PyQt5 5.15.4 and Qt-Material 2.8.8 packages for the GUI. Once the two packages are installed in the virtual environment, we can proceed to design our Hello World app with the following codes in a file called main.py.

import sys

from PyQt5.QtWidgets import *
from qt_material import apply_stylesheet

class Window(QMainWindow):
    def __init__(self, *args, **kwargs):
        super().__init__(*args, **kwargs)

        self.setWindowTitle("Hello World")
        label = QLabel("Hello World")
        label.setMargin(10)
        self.setCentralWidget(label)
        self.show()

if __name__ == "__main__":
    app = QApplication(sys.argv)
    win = Window()

    apply_stylesheet(app, theme='dark_blue.xml')

    win.show()
    sys.exit(app.exec_())

Now when we run the code above, we will be able to see a simple window with a label saying “Hello World”.

Our simple PyQt desktop application.

Step 1: Package the App

Before we can proceed further, we need to install the PyInstaller, which helps to bundle our Python app and all its dependencies into a single package. We can do so with the following command.

pip install pyinstaller==4.5.1

Once it is installed successfully, we can start the packaging of our app with the command below.

pyinstaller main,py

PyInstaller will now read and analyse our codes in main.py to discover every other module and library our script needs in order to execute. After that, PyInstaller will put all the files and Python interpreter in a single folder for distributing later. This is useful because the end users of our app do not need to have Python installed beforehand in order to run our app.

Hence, running the command above will generate two new folders, i.e. build and dist, as well as a main.spec file in the project directory.

A new file main.spec and two new folders, build and dist, will be generated by PyInstaller.

It is important to take note that the PyInstaller output is specific to the active OS and the active version of Python. In this case, our distribution is for Windows under Python 3.8.

The build folder is used by PyInstaller to collect and and prepare files for packaging. We can ignore its content unless we are trying to debug the packaging issues.

The dist folder will be the folder we can distribute to end users to use our app. The folder has our application, i.e. main.exe, together with other dlls.

End users of our app just need to run the main.exe in the dist/main folder to use our app.

Finally, the main.spec is a SPEC file which contains the PyInstaller packaging configuration and instructions. Hence, for future packaging operations, we shall execute the following command instead.

pyinstaller main.spec

Now, when we run the main.exe, we will be able to see our Hello World application. However, at the same time, there would be a console window shown together by default, as demonstrated below.

A console window will be shown together with our desktop application.

The console window by right should be hidden from the end users. So, in the following step, we will see how we can configure the PyInstaller packaging to hide the console window.

Step 2: Configure the SPEC File

When the “pyinstaller main.py” command is executed, the first thing PyInstaller does is to generate the SPEC file, i.e. main.spec. The file tells PyInstaller how to process our script. Hence, PyInstaller later can build our app by simply executing the content of the SPEC file.

The SPEC file is actually a Python code. It contains the following classes.

  • Analysis: Takes a list of script file names as input and analyses the dependencies;
  • PYZ: PYZ stands for Python Zipped Executable, contains all the Python modules needed by the script(s);
  • EXE: Creates the executable file, i.e. main.exe in our example, based on Analysis and PYZ;
  • COLLECT: Creates the output folder from all the other parts. This class is removed in the one-file mode.

Step 2.1 Setup one-file Build

As we can see earlier, the dist folder does not only contain the executable file, main.exe, but also a long list of DLLs. It’s normally not a good idea to give the end users a huge folder like this as the users may have a hard time figuring out how to launch our app. So, we can create a one-file build for our app instead.

To do so, we can execute the following command. To make things clearer, we can also choose to delete the dist folder generated earlier before running the command.

pyinstaller --onefile main.py

After it is executed successfully, in the dist folder, we can see that there is only one executable file, as shown in the following screenshot. Now, we can just send the end users only this one executable file to run our app.

So, where do all the DLLs that we see in the non-one-file build go? They are actually compressed into the executable. Hence, the one-file build has a side-effect. Every time our app runs, it must create a temporary folder to decompress the content of the executable. This means that one-file built app will have a slower startup.

The outcome of one-file build.

Step 2.2: Remove Console Window

The first change that we can make to the SPEC file is to remove the default console window. To do so, we simply need to set console=False in the EXE, as shown in the screenshot below.

Hid the default console window.

With this being set, the app will not be launched with a console window showing together.

Step 2.3 Bundle Data Files

Let’s say we would like to have an app icon for our app, we can have the following line added in our main.py.

self.setWindowIcon(QIcon('resources/images/logo.png'))

This will load the image file logo.png from the resources/images directory. In this scenario, we thus need to find a way to bundle image files in the build. To do so, we can first update our SPEC files as follows.

Telling PyInstaller to copy the resources folder.

The list of data files is a list of tuples where each tuple has two strings.

  • The first string specifies the file or files as they are in this system now;
  • The second specifies the name of the folder to contain the files at run-time.

If we’re not using the one-file build, we will find out that the data files will be copied to the dist folder accordingly. However, if we are app is built with one-file mode, then we shall change our code accordingly to locate the data files at runtime.

Firstly, we need to check whether our app is running from the source directly or from the packaged executable with the following function.

def resource_path(relative_path):
    """ Get absolute path to resource, works for dev and for PyInstaller """
    if getattr(sys, 'frozen', False) and hasattr(sys, '_MEIPASS'):
        base_path = sys._MEIPASS
    else:
        base_path = os.path.abspath(".")

    return os.path.join(base_path, relative_path)

Secondly, we need to update the code getting the QIcon path to be something as follows.

self.setWindowIcon(QIcon(resource_path('resources/images/logo.png')))

Finally, we will be able to see our app icon displayed correctly, as shown in the following screenshot.

Yay, the app icon is updated!

Step 2.4 Setup EXECUTABLE App Icon

Even though the app icon has been updated, however, the icon of our executable is still not yet updated.

Before we can proceed to update the exe icon, we need to know that, on Windows, only .ico file can be used as icon image. Since our logo is a png file, we shall convert it to an ico file first. To do the conversion, I’m using ICO Convert which is available online for free and mentioned in one of the PyInstaller GitHub issues.

After getting the ICO file, we shall put it in the same directory as the SPEC file. Next, we can customise the SPEC file by adding icon parameter to the EXE as shown below.

Setting app icon for our app executable file.

Once the build is successful, we can refresh our dist folder and will find that our main.exe now has a customised icon, as shown below.

Yay, our exe file has customised icon as well now!

Step 2.5 Name Our App

By default, the executable file generated has the name of our source file. Hence, in this example, the executable file is named as main.exe. By updating our SPEC file, we can also name the executable file with a more user friendly name.

What we need to do is just editing the name of EXE, as shown in the following screenshot.

We will now get the executable file of our app as Face.exe.

Conclusion

That’s all for the quickstart steps to package our PyQt5 desktop GUI application with PyInstaller on Windows 10.

I have made the source code available on GitHub. You can also download the Face.exe under the Releases. After launching the app, you should be able to do facial recognition together with your personal Microsoft Azure Cognitive Services account, as shown in the following screenshot.

Facial recognition done using Face API in Microsoft Azure Cognitive Services.

References

Kaizen: Embark on My AI Certification Journey

Today, I’m finally getting recognised by Microsoft as a Microsoft Certified: Azure Artificial Intelligence (AI) Fundamentals.

Nowadays, in many of the industries, we hear words like AI, Machine Learning, and Deep Learning. The so-called AI revolution is here to stay and shows no signs of slowing. Hence, it’s getting more and more important to equip ourselves today for the future of tomorrow with relevant knowledge about AI.

In addition, big players in the AI industry such as Microsoft have made AI learning easier for anyone who has an interest in the AI field. In August 2021, Rene Modery, Microsoft MVP, shared on his LinkedIn profile about how to take a Microsoft Certification exam for free and Azure AI Fundamental certification is one of them. Without the discount, we will need to pay USD 106 just to take the Azure AI Fundamental certification exam in Singapore. Hence, this is a good opportunity for us to take the exam now while the discount is still available.

Why Am I Taking Certification Exam?

One word, Kaizen.

Kaizen is the Japanese term for continuous improvement. I first learnt about this concept from Riza Marhaban, who is also my mentor in my current workplace, in one of the Singapore .NET Community meetups last year. In his talk, Riza talked about how continuous improvement helped a developer to grow and to stay relevant in the ever-changing IT industry.

Riza’s sharing about Kaizen in Singapore .NET Developers Community meetup.

Yes, professional working experience is great. However, continuous learning and having the ability to demonstrate one’s skills through personal projects and certifications is great as well. Hence, after taking the online Azure AI training course, I decided to take the Microsoft Certificate exam, a way to verify my skills and unlock opportunities.

My Learning Journey

After I received my 2nd dose of the COVID-19 vaccination, I took a one-week leave to rest. During this period of time, every day I spent about 2-3 hours on average to go through the learning materials on Microsoft Learn.

To help us better prepared for the exam, our friendly Microsoft Learn has offered an online free learning path that we can learn at our own pace. I finished all the relevant modules within 7 days.

In addition, in order to be eligible for the free exam, I also spent another one day of my leave to attend the Microsoft Azure Virtual Training session on AI Fundamentals.

When I was going through the learning materials, I also took down important notes on Notion, which is a great tool for keeping our notes and documents, for future reference. Taking notes doesn’t only help me to learn better but also provide me an easier exam revision.

Studying for exam is a time of great stress. In fact, I was also busy at work at the same time. Hence, in order to destress, everyday I will find some time to login to Genshin Impact to travel in the virtual world and enjoy the nice view.

Feeling burned out, emotionally drained, or mentally exhausted? Play games with friends to destress! (Image Source: Genshin Impact)

The Exam

The certification exam, i.e. AI-900, has five main sections, i.e.

  • AI workloads and consideration;
  • Fundamental principles of ML on Azure;
  • Computer Vision workloads on Azure;
  • Natural Language Processing (NLP) workloads on Azure;
  • Conversational AI workloads on Azure.

In total, there are 40+ questions that we must answer within 45 minutes. This makes the exam a little difficult.

Based on my experience, as long as one has common sense and fully understands the learning materials on Microsoft Learn, it’s quite easy to pass the exam, which is to score at least 700 points only.

I choose to take the certification exam at NTUC Learning Hub located at Bras Basah. (Image Source: Wikimedia Commons)

WANNA BE Certified by Microsoft?

If you are new to Microsoft Certification and you’d like to find out more about their exams, feel free to check out the Microsoft Certifications web page.

Together, we learn better.