Available deployment source options in Azure App Service.
Although dotnet.sg source code is on Github, choosing the “GitHub” option cannot detect its repository. This is because the Github option only lists the repositories on my personal Github account. The dotnet.sg repo whereas is under the sg-dotnet Github Organization account. Hence, I have to choose “External Repository” as the deployment source instead.
Setting up External Repository (Git) as deployment source in Azure App Service.
After that, whenever there is a new commit, if we do “Sync”, it will create a new deployment record, as shown in the screenshot below. We can anytime revert back to the previous deployment by right-clicking on the desired deployment record and select “Redeploy”.
Deployment history in Azure App Service.
Kudu
So what if we want to customize the deployment process?
Riza Marhaban is sharing his SmartSuggestion algorithm to the audience during the community meetup. (Photo Credit: Singapore .NET Developers Community)
I find his program to be very interesting. In fact, I did a similar task when I was working in Easibook as well. By calculating the Levenshtein Distance of user input and the records in database, the small JavaScript code I wrote is able to suggest the places even user keys in the place name wrongly.
Soon after Riza’s talk about his SmartSuggestion, I read the announcement of general availability of Azure Search from Microsoft team.
Azure Search is generally available!
Azure Search
Azure Search is a fully managed search-as-a-service in Microsoft Azure. It offers scalable full-text search for the program. Hence, with its help, developers do not need to re-invent the text-searching capability in their programs and websites.
Azure Search currently provides two ways of querying text. One is using Simple Query Syntax where user can do keywords searching, phrase searching, suffix searching, etc. AND/OR/NOT operator is also available for use.
Another way of querying will be Lucene Query Parser. What interests me the most in Lucene Query Syntax is the use of Damerau–Levenshtein Distance in its Fuzzy Search, which does more than the Levenshtein Distance that only allows insertion, deletion, and substitution operations.
Try It Out!
In order to try out this feature, I have decided to create a demo program to test its functionality.
In this program, I use the event data from the .NET Developers Community Singapore to demonstrate how Azure Search works. To do this, I have to integrate with the Meetup APIs in this program.
Currently, this demo application covers the following features in Azure Search.
Create Azure Search index;
Data upload;
Keywords query in both Simple Query Syntax and Lucene Query Syntax.
Here are some of the screenshots of querying using Azure Search.
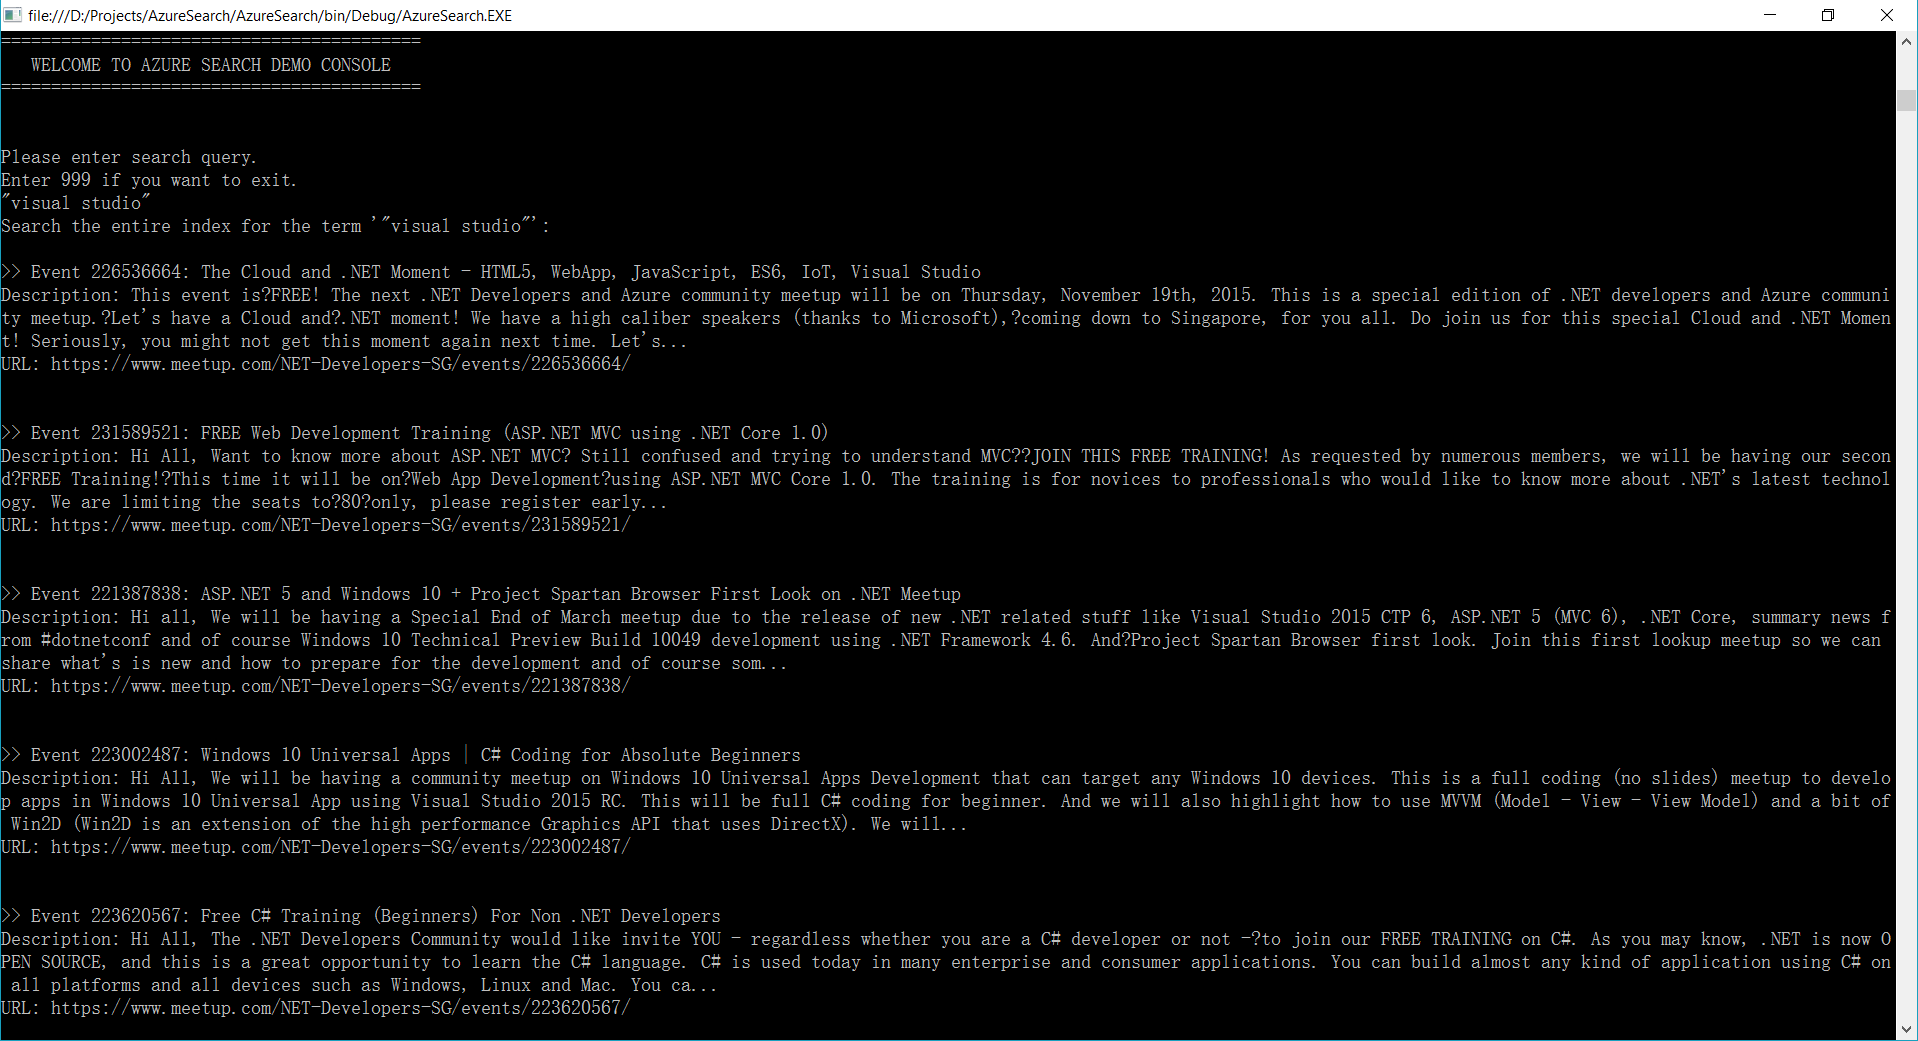
For example, if I’d like to find out what the talks covering topic about Visual Studio are, I can just simply search by “visual studio” as a phrase, as shown in the following screenshot.
Phrase Searching in Azure Search
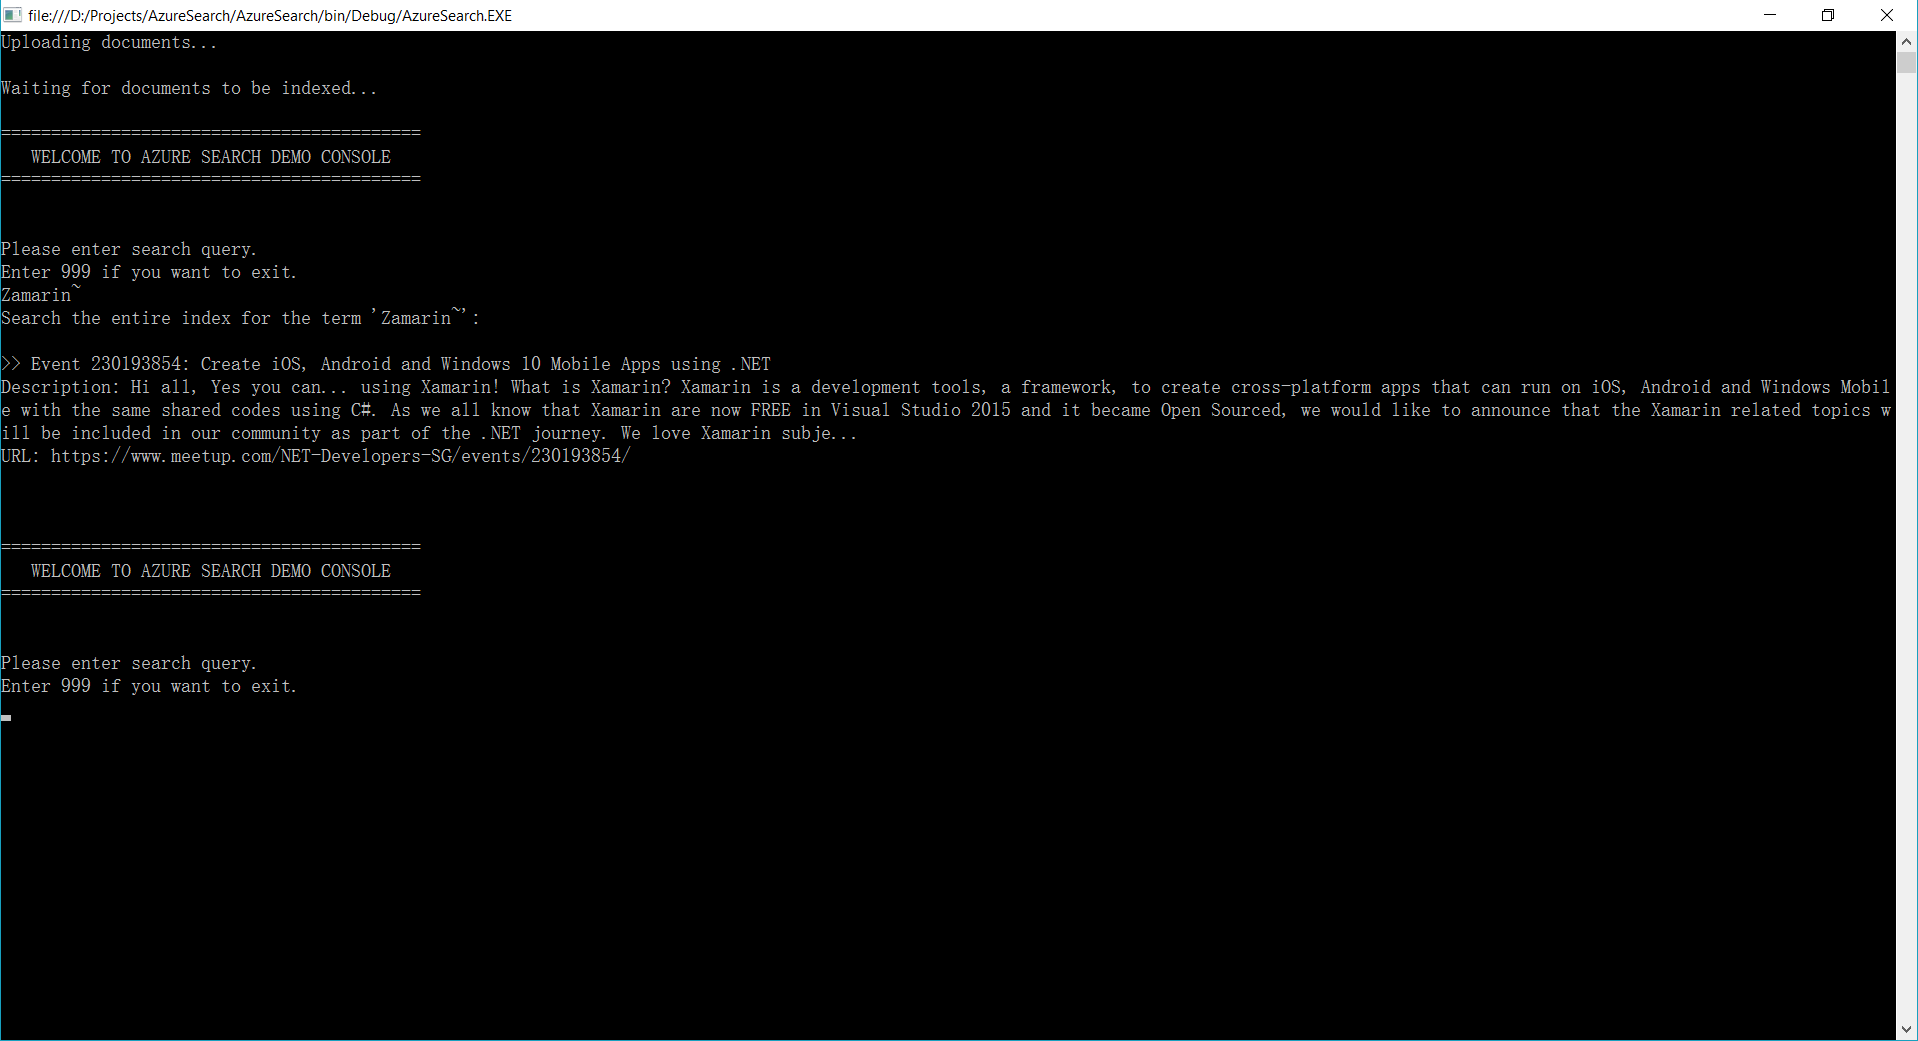
Or let’s say a user wants to search the meetup events about “Xamarin” but he doesn’t know its correct spelling is either Xamarin or Zamarin. So he can do a Fuzzy Search by keying in “Zamarin~”. Take note of the tilde “~” symbol at the end of the word. It means the search of the word will be done using Fuzzy Search.
Fuzzy Search in Azure Search
Holiday and Coding
Christmas is a public holiday in Singapore. Since Christmas is on Sunday, I get a day off on Monday. So besides taking a rest in my room, I did a quick research on Azure Search. It’s kind of fun because it helps me to learn new things which I don’t have chance to explore during work.
With Azure Search, we can now search with our minds at east. (Image Credit: Re:Zero Kara Hajimeru Isekai Seikatsu, KissAnime)
As a web developer, I don’t have many chances to play with mobile app projects. So rather than limit myself to just one field, I love to explore other technologies, especially mobile app development.
Burger Project: My First Xamarin App
Last month, I attended a Xamarin talk at Microsoft Singapore office with my colleague. The talk was about authentication and authorization with social networks such as Facebook and Twitter via Azure App Service: Mobile App.
Ben Ishiyama-Levy is talking about how Xamarin and Microsoft Azure works together.
The speaker is Ben Ishiyama-Levy, a Xamarin evangelist. His talk inspired me to further explore how I could retrieve user info from social network after authenticating the users.
Because I am geek-first and I really want to find out more, so I continue to read more about this topic. With the help from my colleague, I developed a simple Xamarin.Android app to demonstrate the Authentication and logged-in user’s info retrieval.
In this project, it’s also the first time I apply Reflection in my personal project. It helps me easily get the according social network login class with a neat and organized code.
The day is the first time Microsoft CEO Satya Nadella comes to Singapore. It’s also my first time learn about the powerful Cognitive Services and LUIS (Language Understanding Intelligence Service) in Microsoft Azure in Riza’s talk.
Riza’s presentation about Microsoft Cognitive APIs during Microsoft Developer Day.
Challenges in Cheese Project
Everyday, it takes about one hour for me to reach home from office. Hence, I will only have two to three hours every night to work on personal projects and learning. During weekends, when people are having fun out there, I will spend time on researching about some exciting new technologies.
There are many advance topics in LUIS. I still remember that when I was learning how LUIS works, my friend was actually playing the Rise of the Tomb Raider beside me. So while he was there phew-phew-phew, I was doing data training on LUIS web interface.
Microsoft LUIS (Language Understanding Intelligence Service) and Intents
Currently, I only worked on some simple intents, such as returning me current date and time as well as understanding which language I want to translate to.
My first idea in Cheese project is to build an Android app such that if I say “Please translate blah-blah to xxx language”, the app will understand and do the translation accordingly. This can be quite easily done with the help of both LUIS and Google Translate.
After showing this app to my colleagues, we realized one problem in the app. It’s too troublesome for users to keep saying “Please translate blah-blah to xxx language” every time they need to translate something. Hence, recently I have changed it to use GUI to provide language selection. This, however, reduces the role played by LUIS in this project.
VoiceText provides a range of speakers and voices with emotions!
To make the project even more fun, I implemented the VoiceText Web API from Japanese in the Android app. The cool thing about this TTS (Text-To-Speech) API is that it allows developers to specify the mood and characteristic of the voice. The challenge, of course, is to read the API written in Japanese. =P
Oh ya, this is the link to my Cheese repository on Github: https://github.com/goh-chunlin/Cheese. I will continue to work on this project while exploring more about LUIS. Stay tuned.
After-Work Personal Projects
There are still more things in mobile app development for me to learn. Even though most of the time I feel exhausted after long work day, working on new and exciting technologies helps me getting energized again in the evening.
I’m not as hardworking as my friends who are willing to sacrifice their sleep for their hobby projects and learning, hence the progress of my personal project development is kind of slow. Oh well, at least now I have my little app to help me talking to people when I travel to Hong Kong and Japan next year!
When my applications were hosted on Windows Azure Virtual Machines (VM), we stored the images uploaded via our web applications in the hard disks of the VMs (except the temporary disk). However, when we started load balancing, we soon encountered a problem that the uploaded images were only found in one of the VMs. So we needed to find a centralized storage for those images.
Recently, when we are using Azure PaaS (aka Cloud Service), even without load balancing, we already encounter the same issue. That is simply because the hard drives used in Cloud Service instances are not persistent. Hence, a persistent file storage on the cloud is needed.
There are two types of blob, Page Blob and Block Blob. Page Blob is commonly used for storing VHD files for VMs because it is optimized for random read and write operations.
The maximum size for a Block Blob is 64 MB. Hence, if the uploaded file is more than 64 MB, we must upload it as a set of blocks; otherwise, we will receive status code 413 (Request Entity Too Large). For my web applications, there is no need for uploading an image which is more than 5MB most of the time. Hence, I can just limit the size of images before the user uploads them.
HttpPostedFileBase imageUpload;
...
if (imageUpload.ContentLength > 0 && imageUpload.ContentLength <= 5242880)
{
    //warn the user to resize the image
}
Let’s Try Uploading Images
I’m going to share how to upload more than one image to the Azure Blob Storage from an ASP .NET MVC 5 application. If you are going to upload just one image, simply remove the for loop and change List to just DBPhoto in the codes below.
First of all, I create a class to handle upload to Azure Storage operation.
public class AzureStorage
{
    public static async Task UploadAndSaveBlobAsync(
        HttpPostedFileBase imageFile, CloudBlobContainer container)
    {
        string blobName = Guid.NewGuid().ToString() +
            Path.GetExtension(imageFile.FileName);

        CloudBlockBlob imageBlob = container.GetBlockBlobReference(blobName);
        using (var fileStream = imageFile.InputStream)
        {
            await imageBlob.UploadFromStreamAsync(fileStream);
        }

        return imageBlob;
    }
}
So, in my controller, I have the following piece of code which will be called when an image is submitted via web page.
[HttpPost]
[ValidateAntiForgeryToken]
public async Task Create(
    [Bind(Include = "ImageUpload")] PhotoViewModel model)
{
    var validImageTypes = new string[] { "image/jpeg", "image/pjpeg", "image/png" };

    if (ModelState.IsValid)
    {
        if (model.ImageUpload != null && model.ImageUpload.Count() > 0)
        {
            var storageAccount = CloudStorageAccount.Parse
                (WebConfigurationManager.AppSettings["StorageConnectionString"]);

            var blobClient = storageAccount.CreateCloudBlobClient();
            blobClient.DefaultRequestOptions.RetryPolicy =
                new LinearRetry(TimeSpan.FromSeconds(3), 3);

            var imagesBlobContainer = blobClient.GetContainerReference("images");
            foreach (var item in model.ImageUpload)
            {
                if (item != null) {
                    continue;
                }

                if (validImageTypes.Contains(item.ContentType) &&
                    item.ContentLength > 0 && item.ContentLength <= 5242880)
                {
                    var blob = await AzureStorage.UploadAndSaveBlobAsync(item, imagesBlobContainer);
                    DBPhoto newPhoto = new DBPhoto();
                    newPhoto.URL = blob.Uri.ToString();
                    db.DBPhoto.Add(newPhoto);
                }
                else
                {
                    // Show user error message
                    return View(model);
                }
            }
            db.SaveChanges();
            ...
        }
        else
        {
            // No image to upload
        }
    }
    return View(model);
}
In the code above, there are many new cool things.
Firstly, it is the connection string to Azure Blob Storage, which I store in StorageConnectionString in web.config. The format for secure connection string is as follows.
Secondly, it’s LinearRetry. It is basically a retry policy which states how many times the program will retry and how much time needed between retries. In my case, it will only wait for 3 seconds after each try up to 3 tries.
Thirdly, I get the URL of the image on the Azure Blob Storage via blob.Uri.ToString() and store it into the database table. The URL will be used later for displaying the image as well as deleting the image.
Fourthly, I actually check to see if model.ImageUpload has null entries. This is because if I submit the form without any image to upload, model.ImageUpload has one entry. Not zero, but one. The only one entry is actually null. So if I don’t check to see whether the entry in model.ImageUpload is null, there will be an exception thrown.
The controller has such a long code. Luckily the code needed in the model and view is short and simple.
For the model PhotoViewModel, I have the following.
public class PhotoViewModel
{
    ...

    [Display(Name = "Current Images")]
    public List AvailablePhotos { get; set; }
}
For view, it is easy to allow selecting multiple files in the same view page. The “multiple = “true”” is to make sure more than one file can be selected in the File Explorer. You can omit this attribute if you only want at most one file being selected.
@Html.LabelFor(model => model.ImageUpload, new { style = "font-weight: bold;" })
@Html.TextBoxFor(model => model.ImageUpload, new { type = "file", multiple = "true" })
@Html.ValidationMessageFor(model => model.ImageUpload)
Image Size and HttpException
The image upload function looks fine. However, when images having size larger than a certain size is uploaded, HttpException will be thrown.
There is no way that having exception would be fun too! (Image Credit: Tari Tari)
What if we just change the if clause above to allow only at most 4MB of image being uploaded? This won’t work because the exception is already thrown before the if condition is reached.
Then, can we just increase the IIS limit from 4MB to, let’s say, 100MB or something bigger? Sure. This can work. However, it still doesn’t stop someone uploads something bigger than the limit. Also, it makes attackers easier to exhaust your server with big files. Hence, expanding the upload size restriction is not really a full solution.
If you are interested, there are many good articles online discussing about this problem. I highlight some interesting ones below.
I don’t really like the methods listed above, especially the 3rd and 4th options. It’s already too late to inform the user when the exception is thrown. Could we do something at client side before the images are being uploaded?
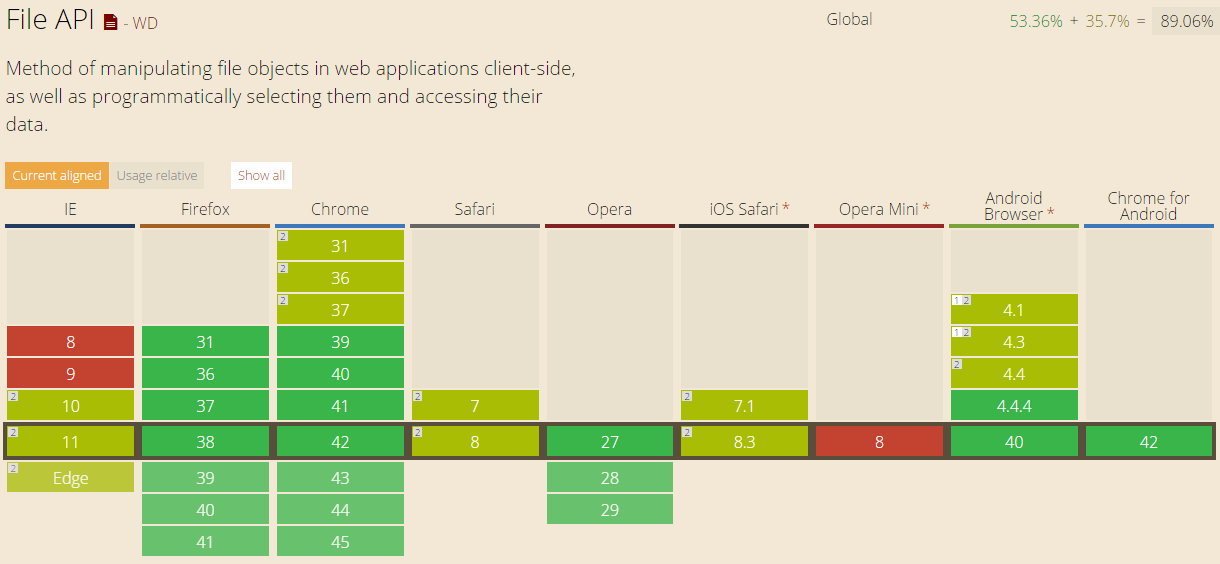
Luckily, we have File API in HTML 5. It allows to loop through the files in JavaScript to check their size. So, after the submit button is clicked, I will call a JavaScript method to check for the size of the images before they are being uploaded.
function IsFileSizeAcceptable() {
    if (typeof FileReader !== "undefined") {
        var filesBeingUploaded = document.getElementById('ImageUpload').files;
        for (var i = 0; i < filesBeingUploaded.length; i++) {
            if (filesBeingUploaded[i].size >= 4194304) { // Less than 4MB only
                alert('The file ' + filesBeingUploaded[i].name + ' is too large. Please remove it from your selection.');
                return false;
            }
        }
    }
    return true;
}
Secondly, I just pass in the Azure Storage URL of the image that I would like to remove and then call the DeleteBlobAsync method.
Uri blobUri = new Uri();
await AzureStorage.DeleteBlobAsync(blobUri, imagesBlobContainer);
Then the image will be deleted from the Azure Storage successfully.
Global.asax.cs and Blob Container
In order to have my application to create a blob container automatically if it doesn’t already exist, I add a few lines in Global.asax.cs as follows.
var storageAccount = CloudStorageAccount.Parse(
    WebConfigurationManager.AppSettings["StorageConnectionString"]);
var blobClient = storageAccount.CreateCloudBlobClient();
var imagesBlobContainer = blobClient.GetContainerReference("images");
if (imagesBlobContainer.CreateIfNotExists())
{
    imagesBlobContainer.SetPermissions(new BlobContainerPermissions
        {
            PublicAccess = BlobContainerPublicAccessType.Blob
        });
}
Write a Console Program to Upload File to Azure Storage
So, how is it done if we are developing a console application, instead of web application?
Windows Azure Storage NuGet Package needs to be installed first.
The codes below show how I upload an html file from my local hard disk to Azure Blob Storage. Then I can share the Azure Storage URL of the file to my friends so that they can read the web page.
Similar to what I do in web application, this is how I connect to the Storage account via https.
var azureStorageAccount = new CloudStorageAccount(
    new StorageCredentials("", ""), true);
This is how I access the container.
var blobClient = new CloudBlobClient(azureStorageAccount.BlobStorageUri, azureStorageAccount.Credentials);
var container = blobClient.GetContainerReference("myfiles");
Then the next thing I do is just upload the local file to Azure Storage by specifying the file name, content type, etc.
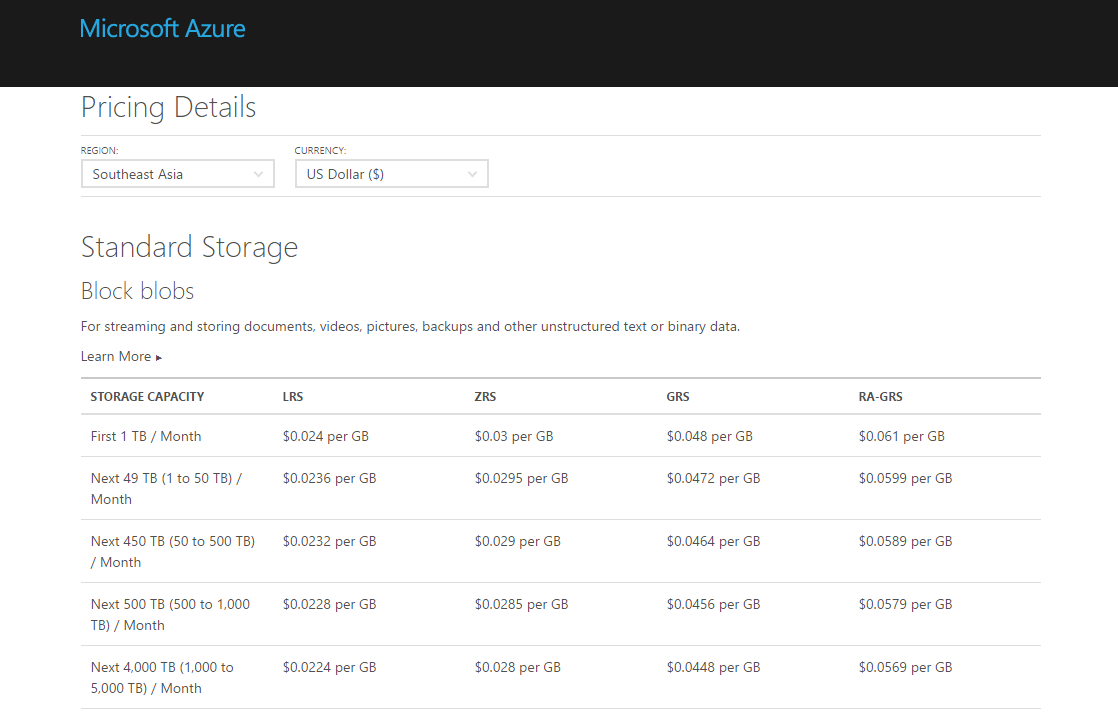
Hosting your files on cloud storage is sure convenience. However, Azure Blob Storage is not free. The following table shows the current pricing of Azure Block Blob Storage in South East Asia region. To get the latest pricing details, please visit Azure Storage Pricing page.