This morning, my friend messaged me a Chinese article about how to do clustering with Linux + .NET Core + Nginx. As we are geek first, we are going to try it out with different approaches. While my friend was going to set up on RaspberryPi, as a developer who loves playing with Microsoft Azure, I proceed to do load balancing of Azure Web Apps in different regions with Nginx.
Setup Two Azure Web Apps
Firstly, I deployed the same ASP .NET Core 2 web app to two different Azure App Services. One of them is deployed at Australia East; another one is deployed at South India (Huuray, Microsoft opens Azure India to the world in April 2017!).
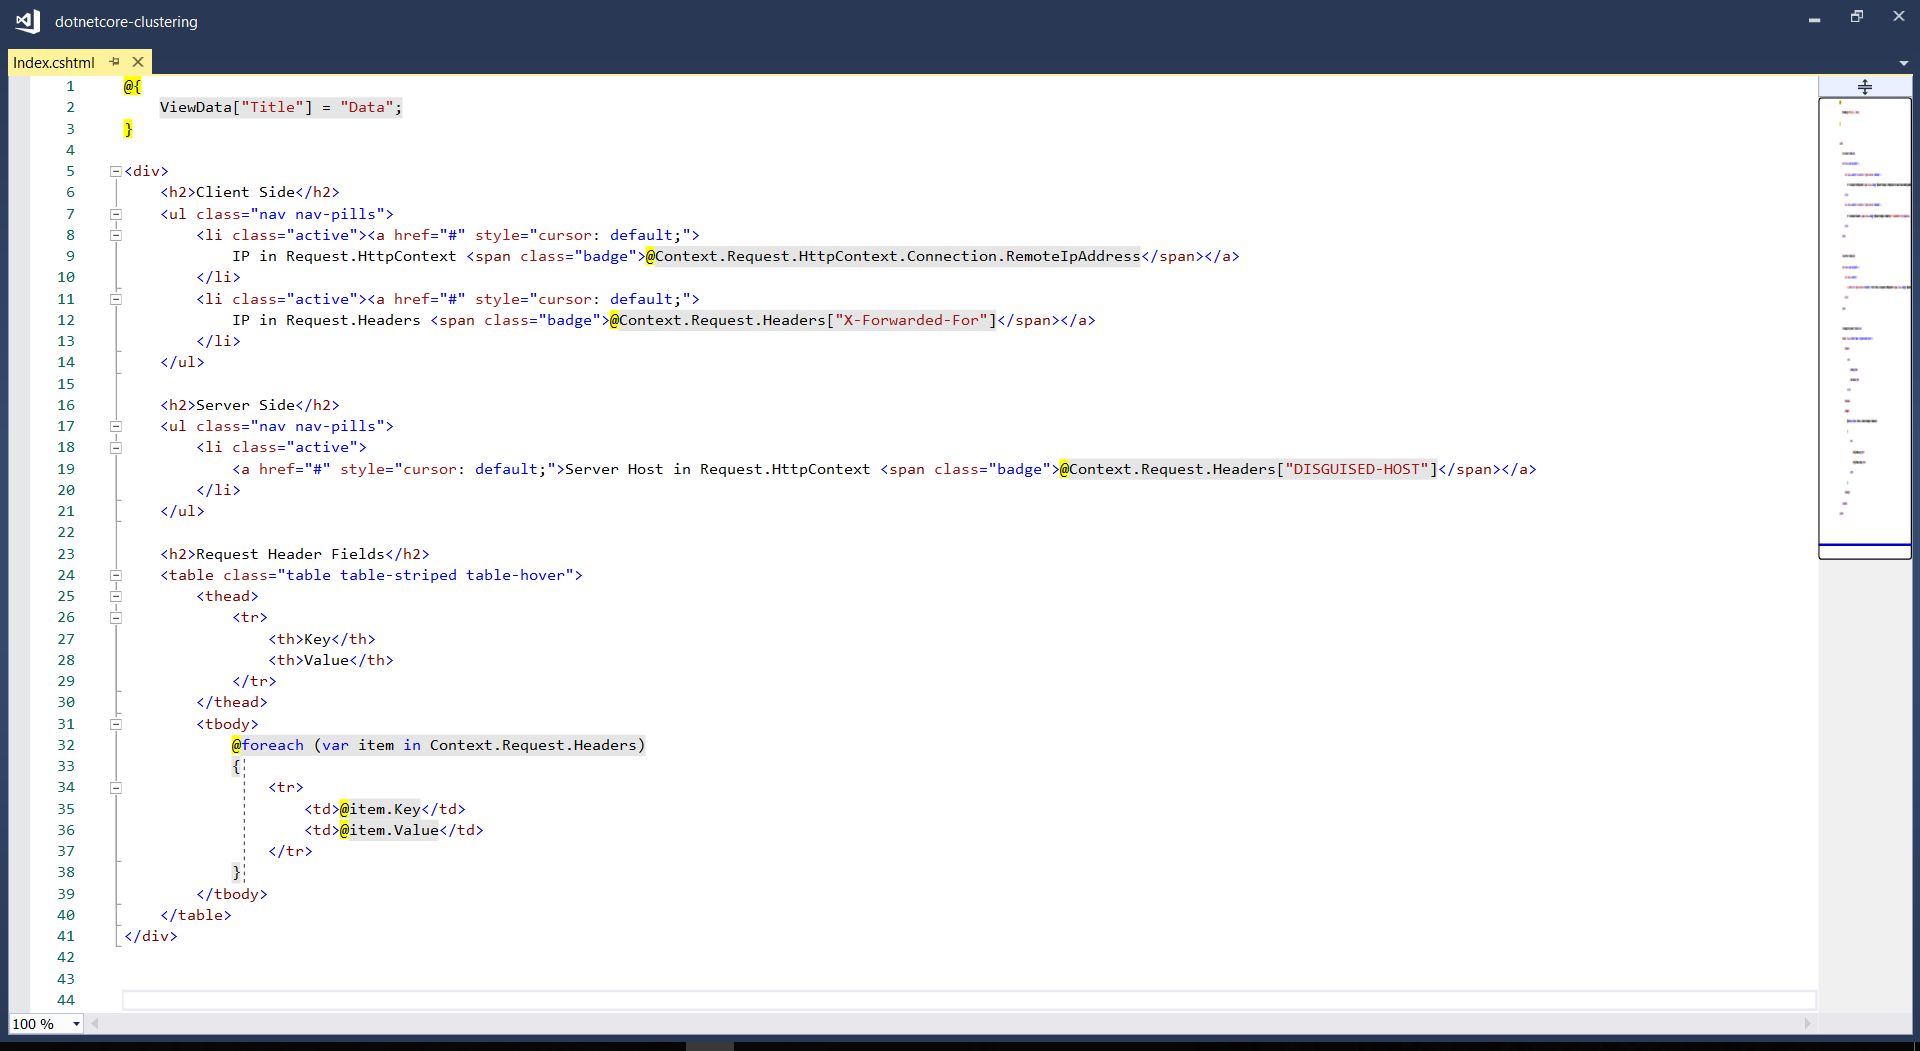
The homepage of my web app, Index.cshtml, is as follows to display the information in Request.Headers.
Since WordPress cannot show the HTML code properly, I show the code as an image here.
In the code above, Request.Headers[“X-Forwarded-For”] is used to get the actual visitor’s IP address instead of the IP address of the Nginx load balancer. To allow this to work, we need to have the following codes added in Startup.cs.
After that, I installed Nginx by using the following command.
sudo apt-get install nginx
After installing it, in order to test whether Nginx is installed properly, I visited the public IP address of the virtual machine. However, it turns out that I couldn’t visit the server because the port 80 by default is not opened on the virtual machine.
Hence, the next step I need to do is opening port using Azure Portal by adding a new inbound security rule for the port 80 and then associate it to the subnet of the virtual network of the virtual machine.
Then when I revisited the public IP of the server, I could finally see the “Welcome to Nginx” success page.
Nginx is now successfully running on our Ubuntu server!
Mission: Load Balancing Azure Web Apps with Nginx
As the success page mentioned, further configuration is required. So, we need to edit the configuration file by first opening it up with the following command.
sudo nano /etc/nginx/sites-available/default
The first section that I added is the Cache Configuration.
The proxy_cache_path is about in which directory the cache should be stored at. The levels=1:2 means that the cache will be stored in a single-character directory with a two-character subdirectory. The keys_zone parameter defines a my_cache cache zone which can store 20MB of keys at most but with the maximum size of the actual data to be 500MB. The inactive=60m means the maximum inactive time cache can be stored, which is 60 minutes in this case.
Next, upstream needs to be defined as follows.
# Cluster sites configuration
upstream backend {
    server dotnetcore-clustering-web01.azurewebsites.net fail_timeout=30s;
    server dotnetcore-clustering-web02.azurewebsites.net fail_timeout=30s;
}
For the default server configuration, we need to make a few modifications to it.
Now, we just need to restart the Nginx with the following command.
sudo service nginx restart
Then when we visit the Ubuntu server again, we will realize that we sort of able to reach Azure Web Apps but not really so because it says 404!
Oops, the Nginx routes the visitor to 404 land.
Troubleshooting 404 Error
According to another article which is written by Issac Lázaro, he said this was due to the fact that Azure App Service uses cookies to do ARR (Application Request Routing), hence we need to have the Ubuntu server to pass the header to the web apps by modifying our Nginx configuration to the following.
Then when we refresh the page, we shall see the website is loaded correctly with the content will be delivered from either web01 or web02.
Yay, we make it!
Yup, that’s all about setting up a simple Nginx to load balance multiple Azure Web Apps. You can refer to the following articles for more information about Nginx and load balancing.
The Internet of Things (IoT) is here today, and it begins with the data, devices, and services already at work in your organization. When your “things” are connected to each other and to the cloud, you create new ways to improve efficiency, enable innovation, and transform your business.
Gerald is sharing Azure IoT Hub during the lunchtime workshop.
IoT hasn’t gone totally mainstream, however, and we have yet to feel its impact. In many ways it is roughly where the big data movement was few years ago — consisting mainly of a buzzword that’s not yet widely understood.
Nevertheless, Gerald’s workshop does give me, a web developer who doesn’t know much about this field, a helpful quick start about IoT. After reading and experimenting, I learn more about the capability of Microsoft Azure in IoT and thus I’d like to share with you about what I’ve learnt so far about Azure IoT Hub.
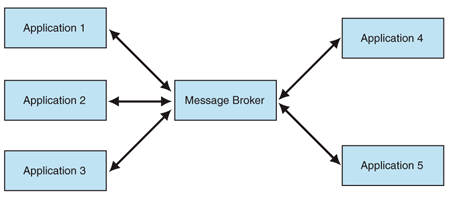
Message Broker
I’m working in Changi Airport. In the airport, we have several shops serving the travelers and visitors. Most of the shops have a back-end system that integrates several systems such as the retail system, e-commerce website, payment system, Changi Rewards system, inventory management system, the finance system.
So there will be cases where, when a customer buys something at the shop, the retail system needs to send as request to the payment system. Then when the purchase is successful, another purchase request will be sent to the inventory management system and the finance system.
I’m not too sure how the shops link different systems, especially this kind of point-to-point integration will cause a large number of connections among the systems. Hence, the developers of their system may find Message Broker useful.
Besides AMQP, MQTT (Message Queue Telemetry Transport) is another open protocol based on TCP/IP for asynchronous message queuing which has been developed and matured over past few years.
Dr Andy Stanform-Clark from IBM invented the MQTT protocol. (Image Source: IBM – Wikipedia)
While AMQP is designed to provide the full vibrancy of messaging scenarios, MQTT is designed as an extremely lightweight publish/subscribe message transport for small and simple devices sending small messages on low-bandwidth networks. Hence, MQTT is said to be ideal for mobile applications because of its low power usage and minimized data packets.
When two or more systems want to exchange information, they need a communication facilitator. This is where Microsoft Azure Service Bus comes into picture.
One of the messaging patterns offered in Azure Service Bus is called Service Bus Messaging, or Brokered Messaging. By using it, both senders and receivers do not have to be available at the exact same time.
In AMQP transport mode, the client library of sender will serialize the brokered message into an AMQP message so that the message can be received and interpreted by a receiver running on a different platform.
Since Event Hubs only enable event ingress, i.e. C2D, Azure offers another service, IoT Hub, for both C2D and D2C (Device-to-Cloud) communications which are reliable and secure. Not only allowing bi-directional communication, IoT Hub also supports AMQP, HTTP, and MQTT.
In a Hello World tutorial of connecting stimulated device to IoT Hub using C#, there is a way to add device and retrieve device identity programmatically as shown below.
The Registry Manager, which is connecting to the IoT Hub using a Connection String with proper Policy, will add an device identity with the Device ID “gclRasPi2” to the Device Explorer in Azure.
The device “gclRasPi2” is now in the Device Explorer.
After doing so, a message then can be sent from (stimulated) device to the IoT Hub. For example, the device wants to send data about the temperature and humidity at that moment using MQTT, we can use the following code.
var deviceClient = DeviceClient.Create(
    iotHubUri,
    new DeviceAuthenticationWithRegistrySymmetricKey("gclRasPi2", deviceKey),
    TransportType.Mqtt);

var telemetryDataPoint = new
{
    deviceId = "gclRasPi2",
    temperature = currentTemperature,
    humidity = currentHumidity
};

var messageString = JsonConvert.SerializeObject(telemetryDataPoint);

var message = new Message(Encoding.ASCII.GetBytes(messageString));
message.Properties.Add("temperatureAlert", (currentTemperature > 30) ? "true" : "false");

await deviceClient.SendEventAsync(message);
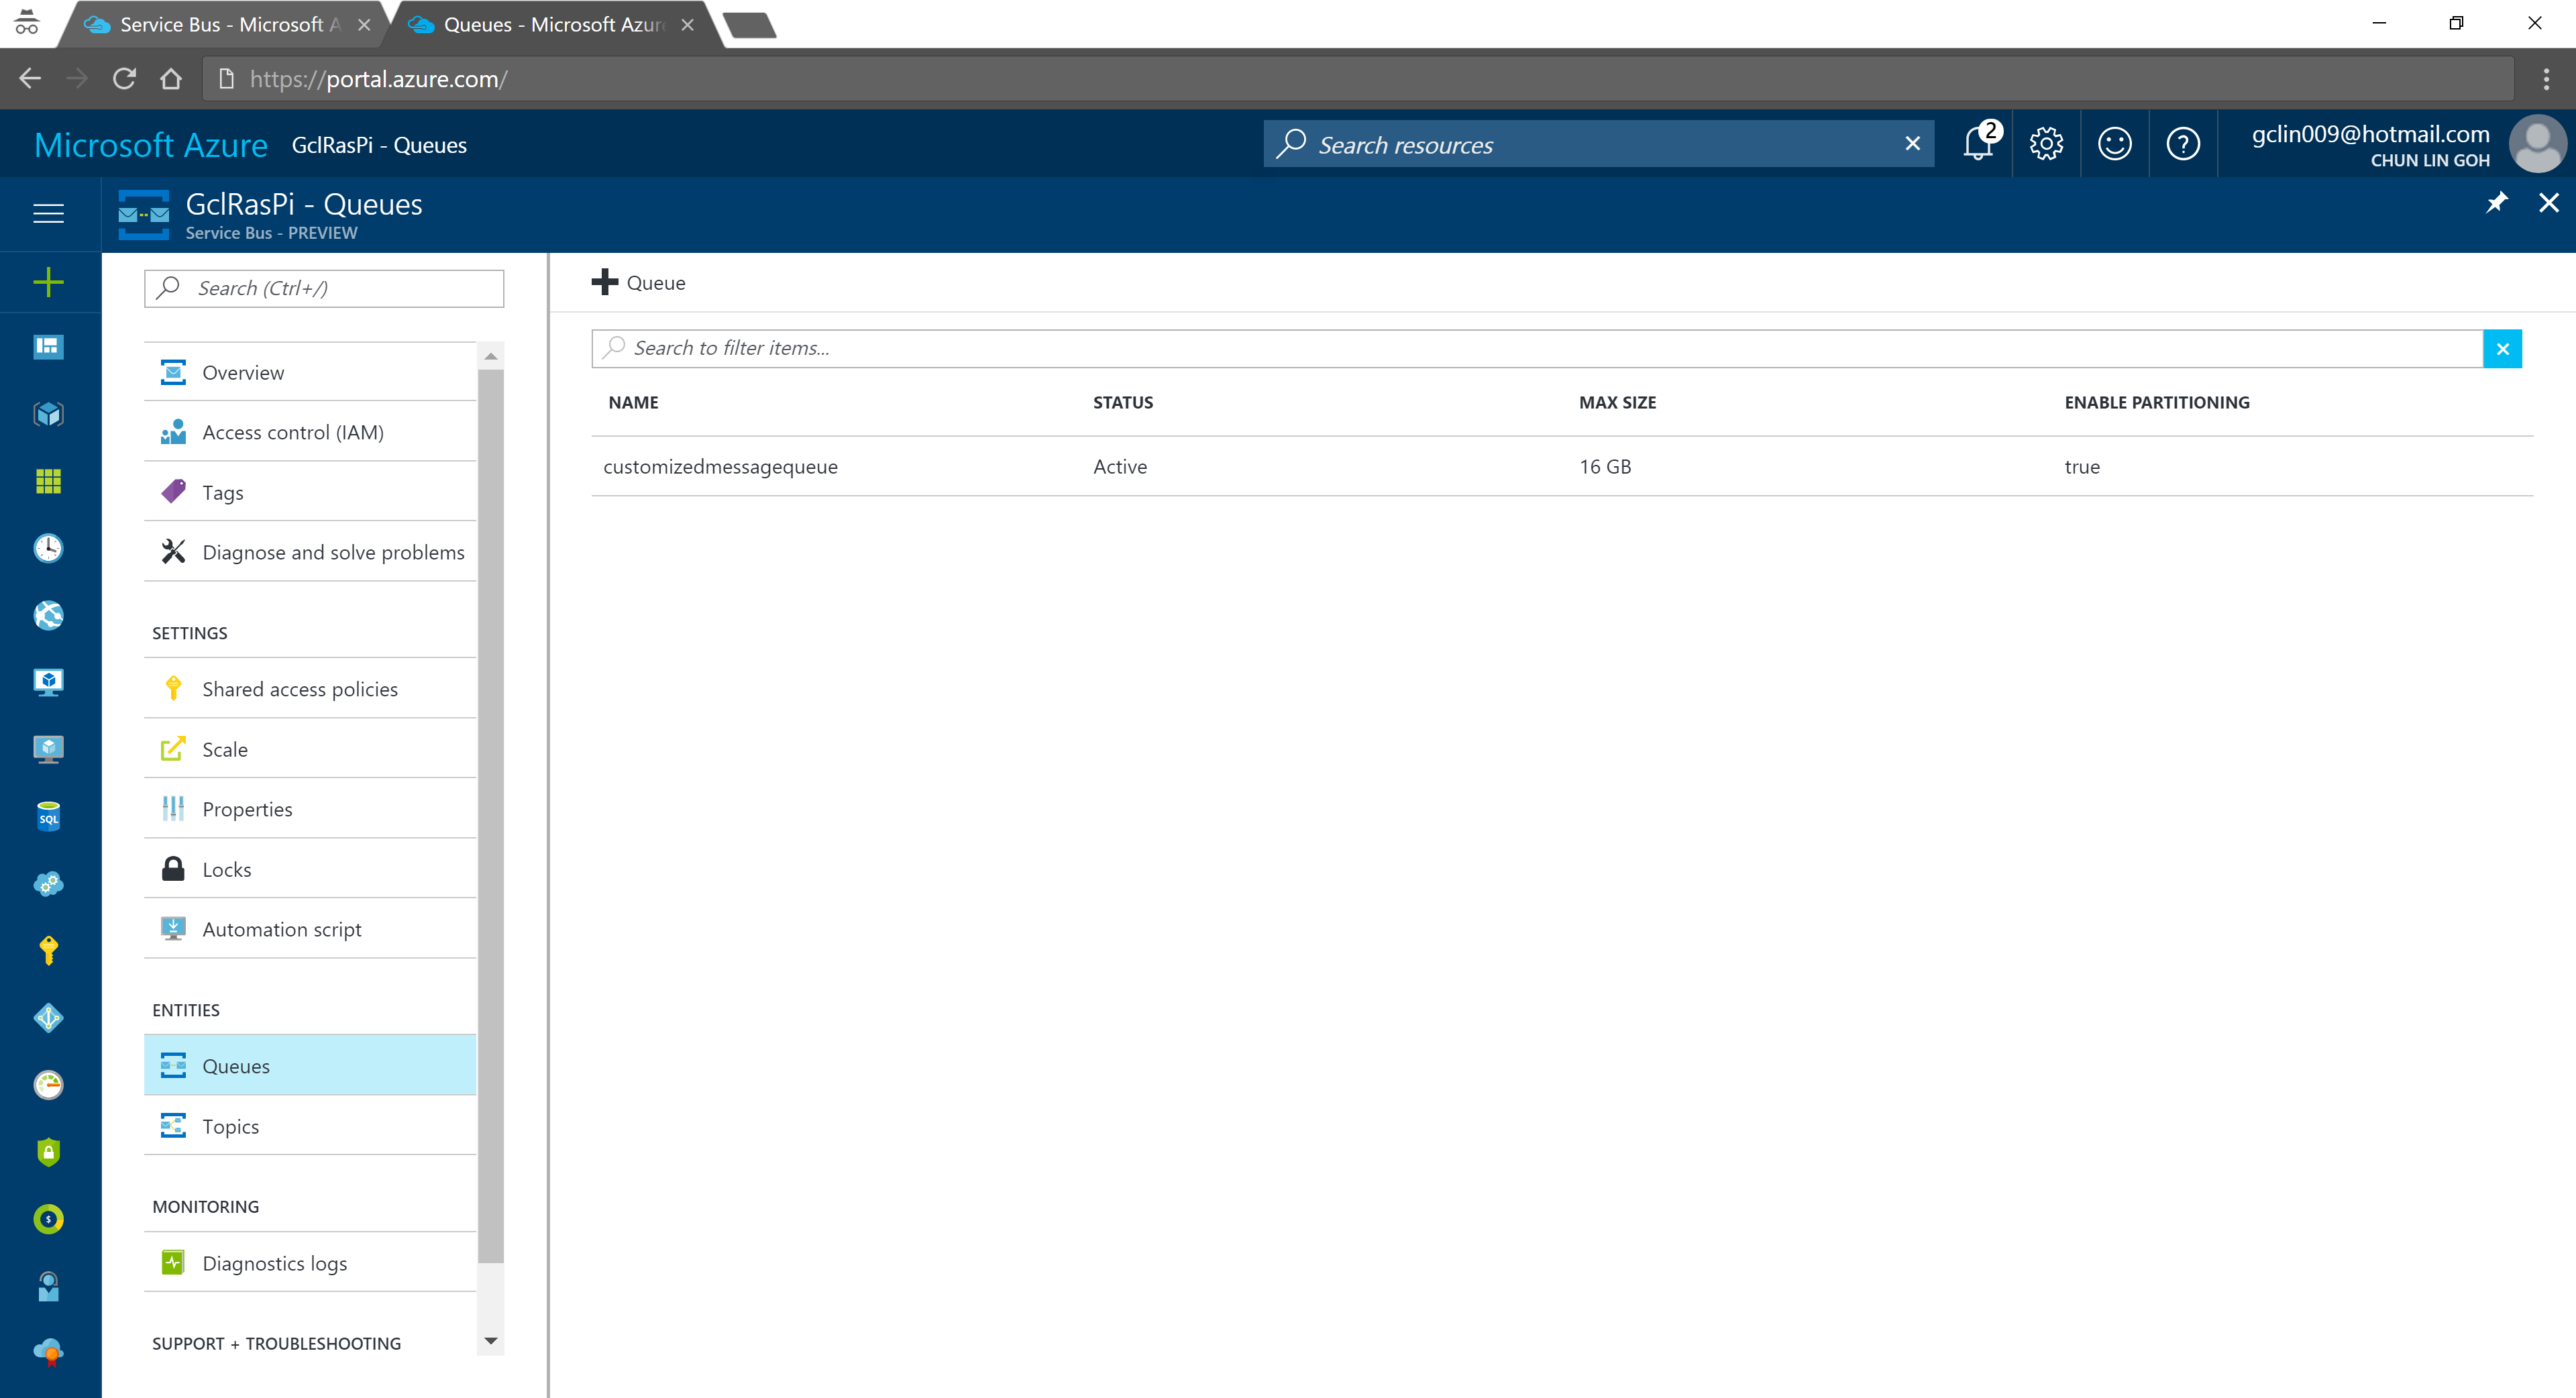
According to the tutorial, we first need to setup a Service Bus queue in the same Azure subscription and region as our IoT Hub.
Created a Queue in the Service Bus.
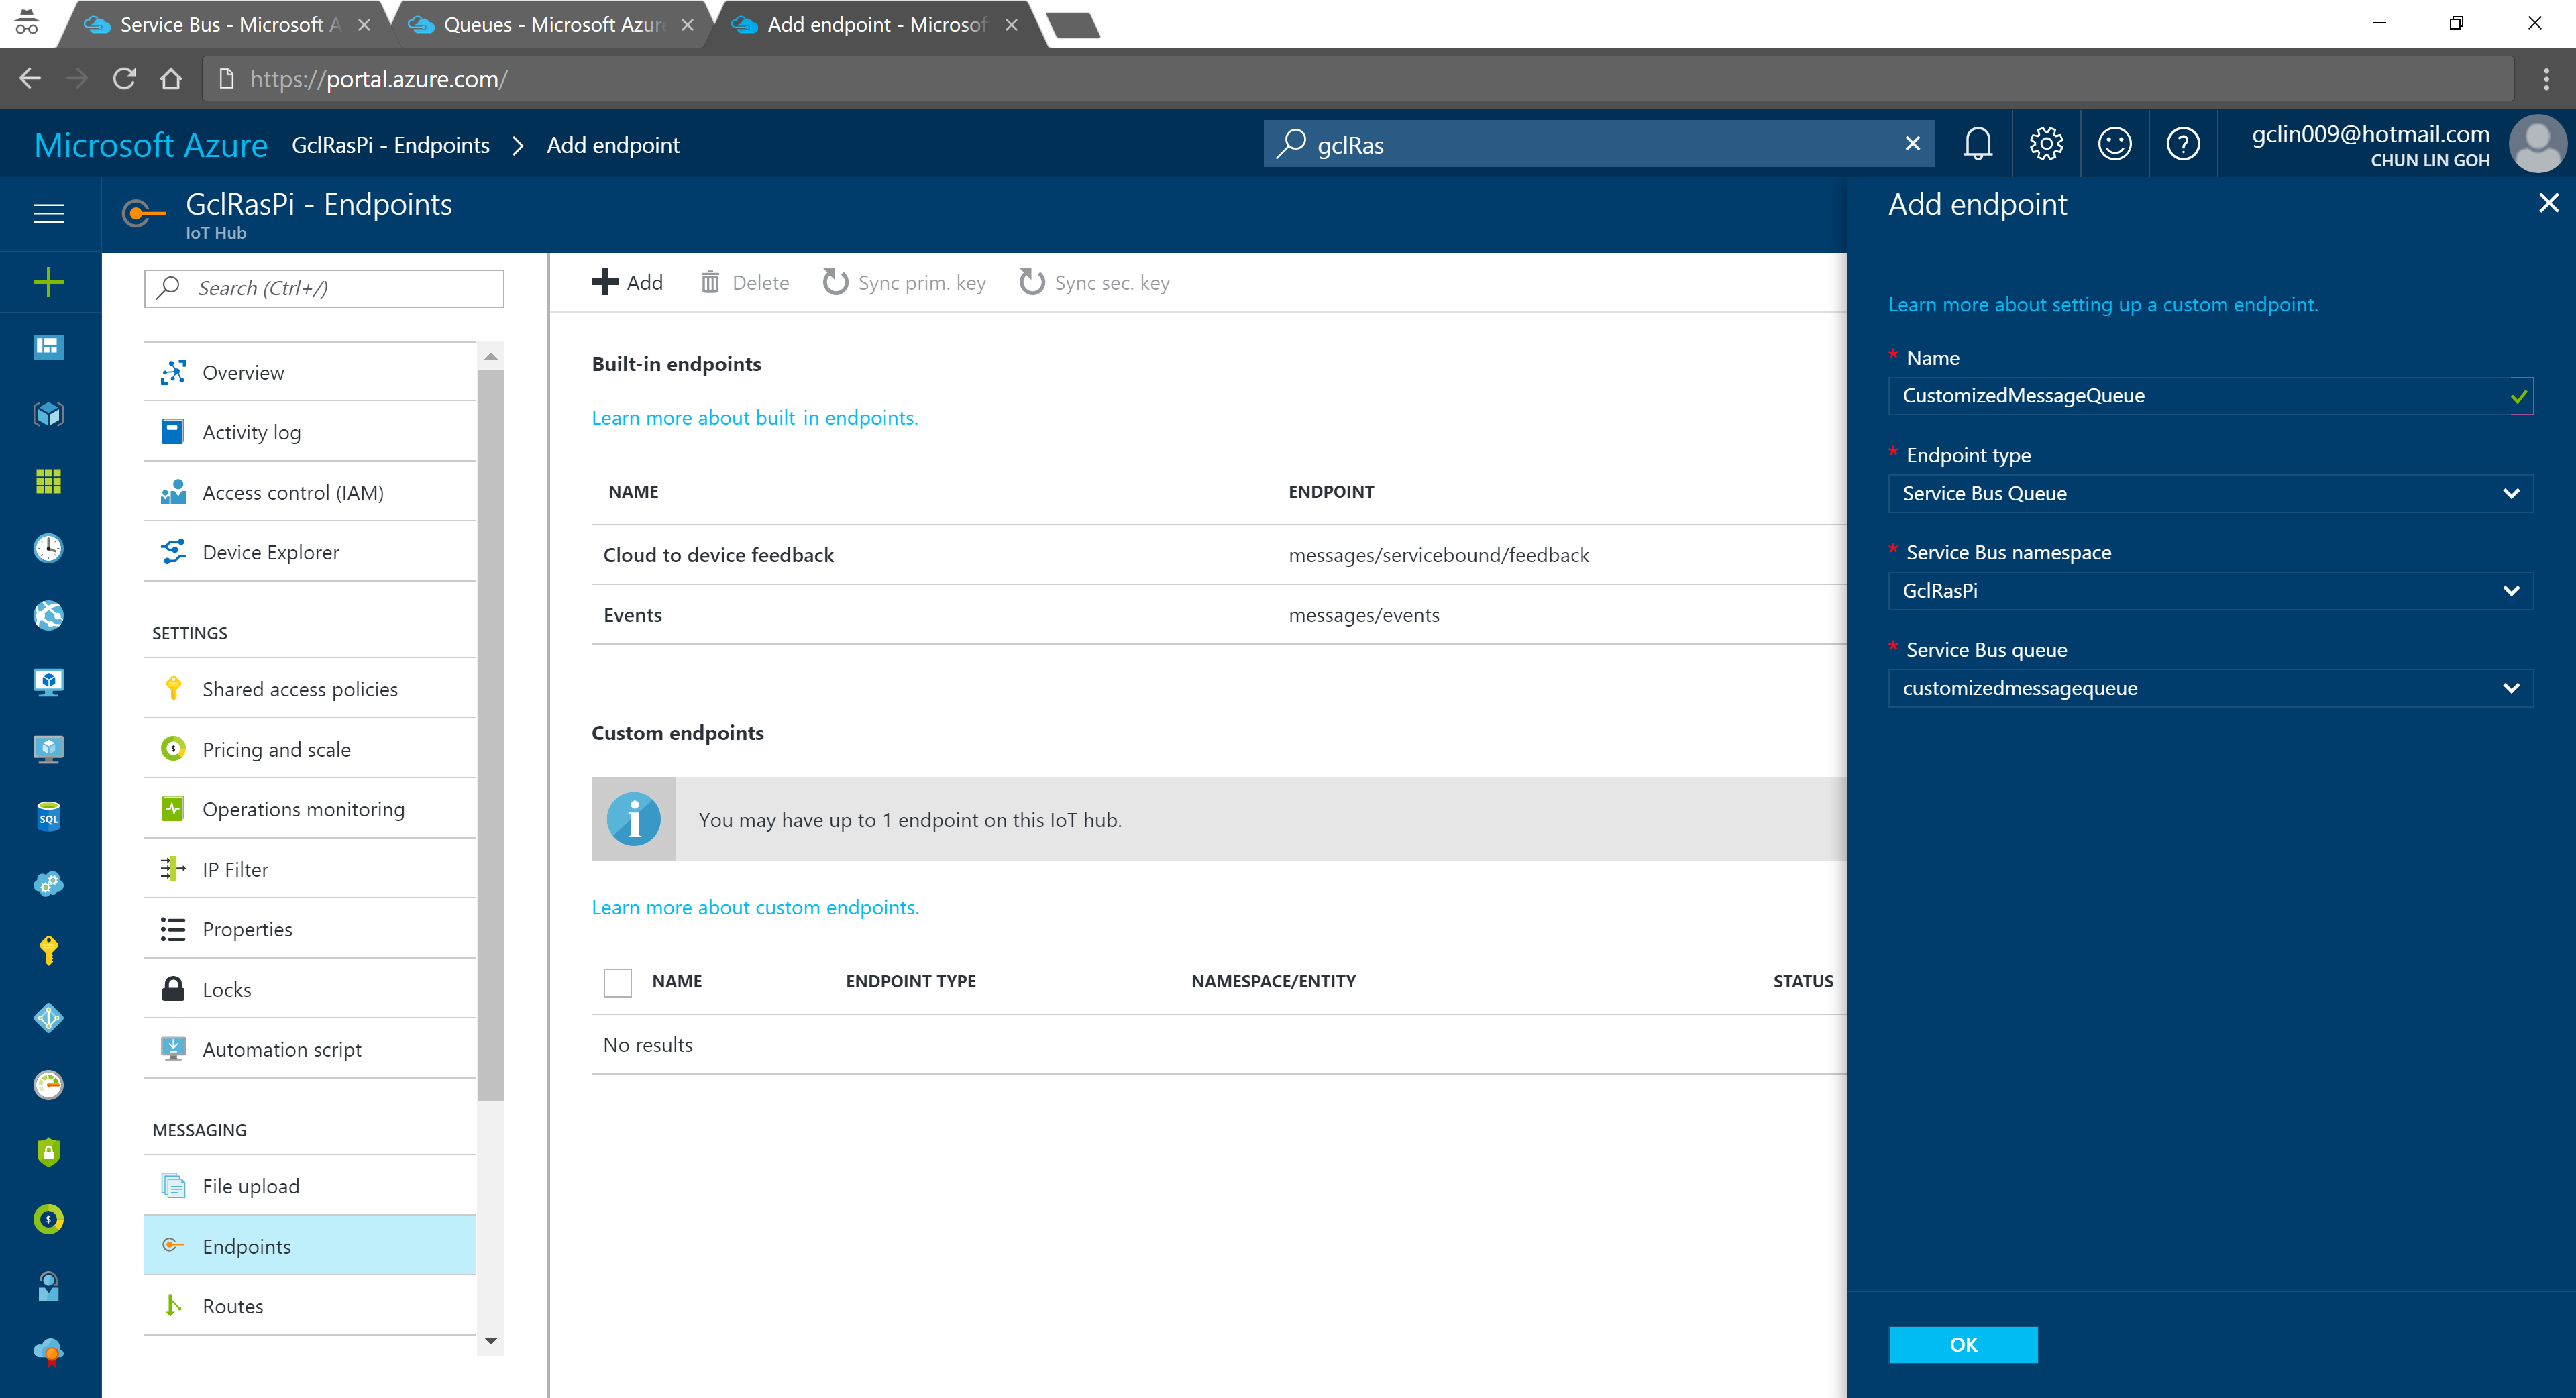
We can then add an Endpoint in the IoT Hub for the queue we just created. As shown in the following screenshot, there is a message saying that “You may have up to 1 endpoint on the IoT hub.” This is because I am using the free IoT Hub. For its paid versions, only at most 10 custom endpoints are allowed.
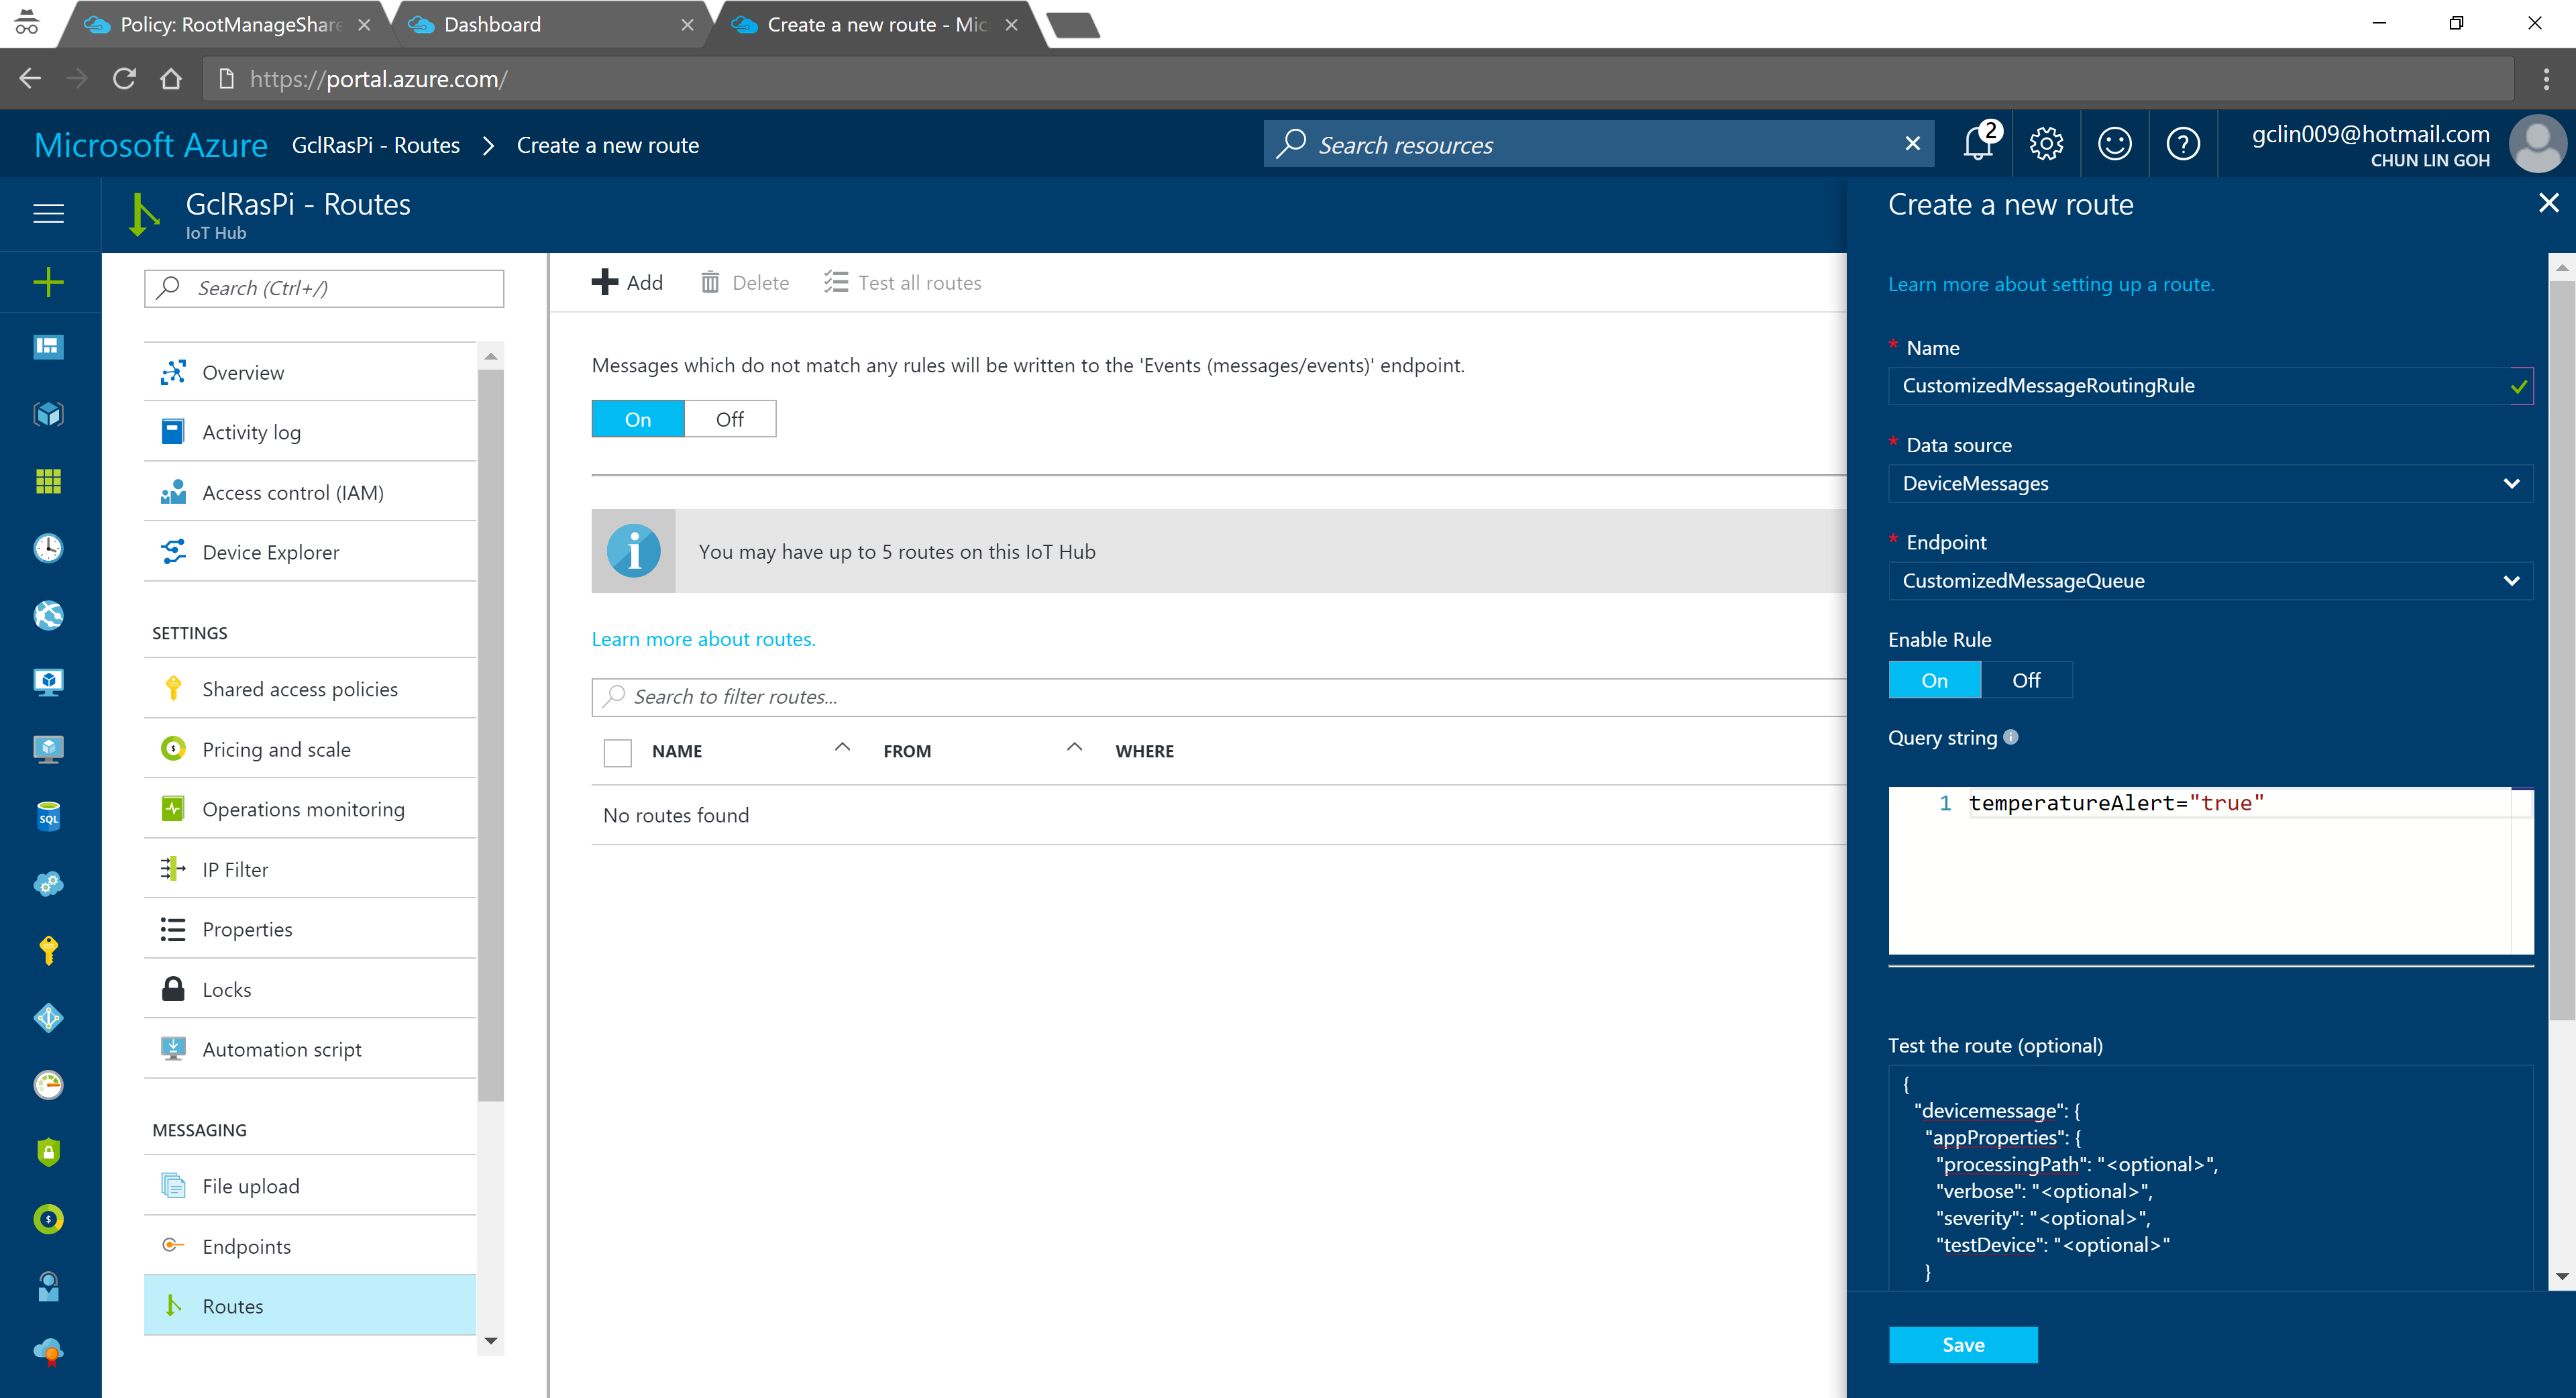
In the query string, I used temperatureAlert = “true” as the condition. Also, as shown on the screenshot above, there is a line saying “Messages which do not match any rules will be written to the ‘Events (messages/events)’ endpoint.” Hence, the following two console applications will show different results: The left one is connecting to the messages/events endpoint while the right one is showing messages that match the CustomizedMessageRoutingRule created above.
Only data with temperatureAlert = “true” will be sent to the “CustomizedMessageRoute”.
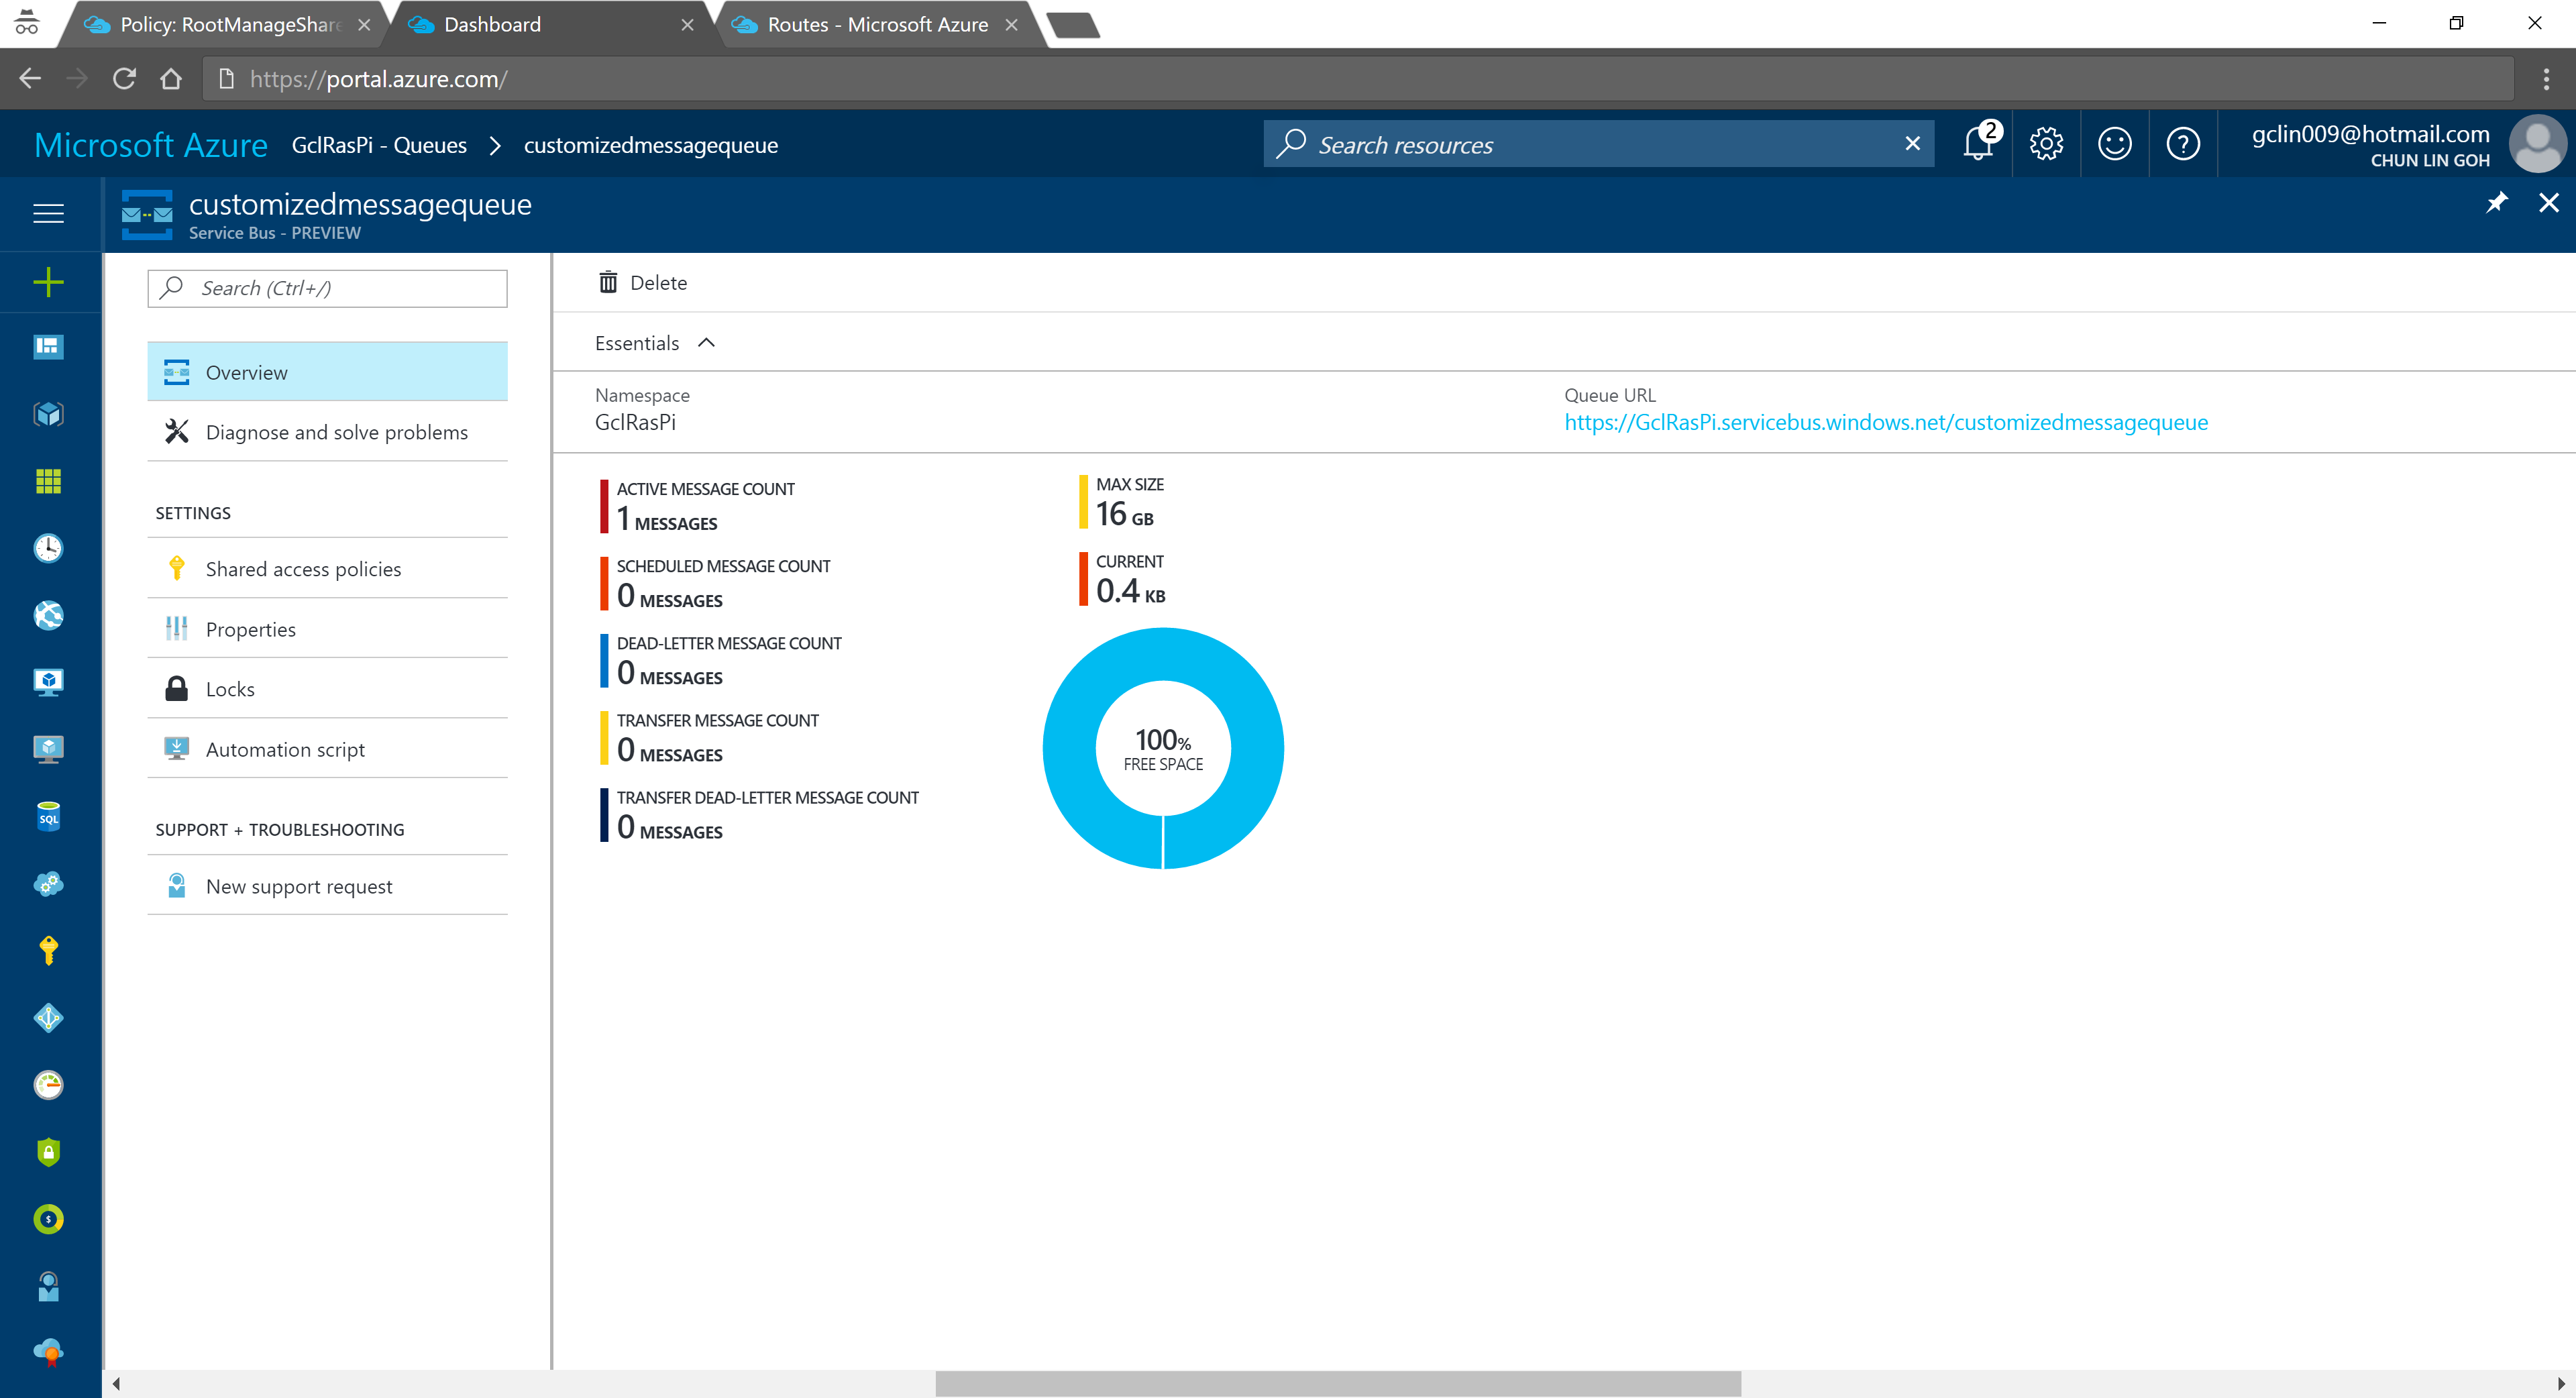
Now if we visit the Service Bus Queue page and IoT Hub page again, we will see some updates on the numbers.
Usage statistics in Service Bus Queue.2% of 8k messages sent from the stimulated device console application.
Conclusion
That’s all about my first try of Azure IoT Hub after attending the workshop delivered by Gerald. It’s a great lunchtime workshop.
This is just the beginning of my IoT learning journey. There are still more things for me to learn, such as Azure Stream Analysis and Microsoft Azure IoT Suite which is briefly brought up in the booklet mentioned above.
If you spot any mistake in this article or you have more to talk about IoT and in particular IoT in Azure ecosystem, please share with me. =)
During my first job after finishing my undergraduate degree in NUS, I worked in a local startup which was then the largest bus ticketing portal in Southeast Asia. In 2014, I worked with a senior to successfully migrate the whole system from on-premise to Microsoft Azure Virtual Machines, which is the IaaS option. Maintaining the virtual machines is a painful experience because we need to setup the load balancing with Traffic Manager, database mirroring, database failover, availability set, etc.
In 2015, when I first worked in Singapore Changi Airport, with the support of the team, we made use of PaaS technologies such as Azure Cloud Services, Azure Web Apps, and Azure SQL, we successfully expanded our online businesses to 7 countries in a short time. With the help of PaaS option in Microsoft Azure, we can finally have a more enjoyable working life.
Azure Functions
Now, in 2017, I decided to explore Azure Functions.
Azure Functions allows developers to focus on the code for only the problem they want to solve without worrying about the infrastructure like we do in Azure Virtual Machines or even the entire applications as we do in Azure Cloud Services.
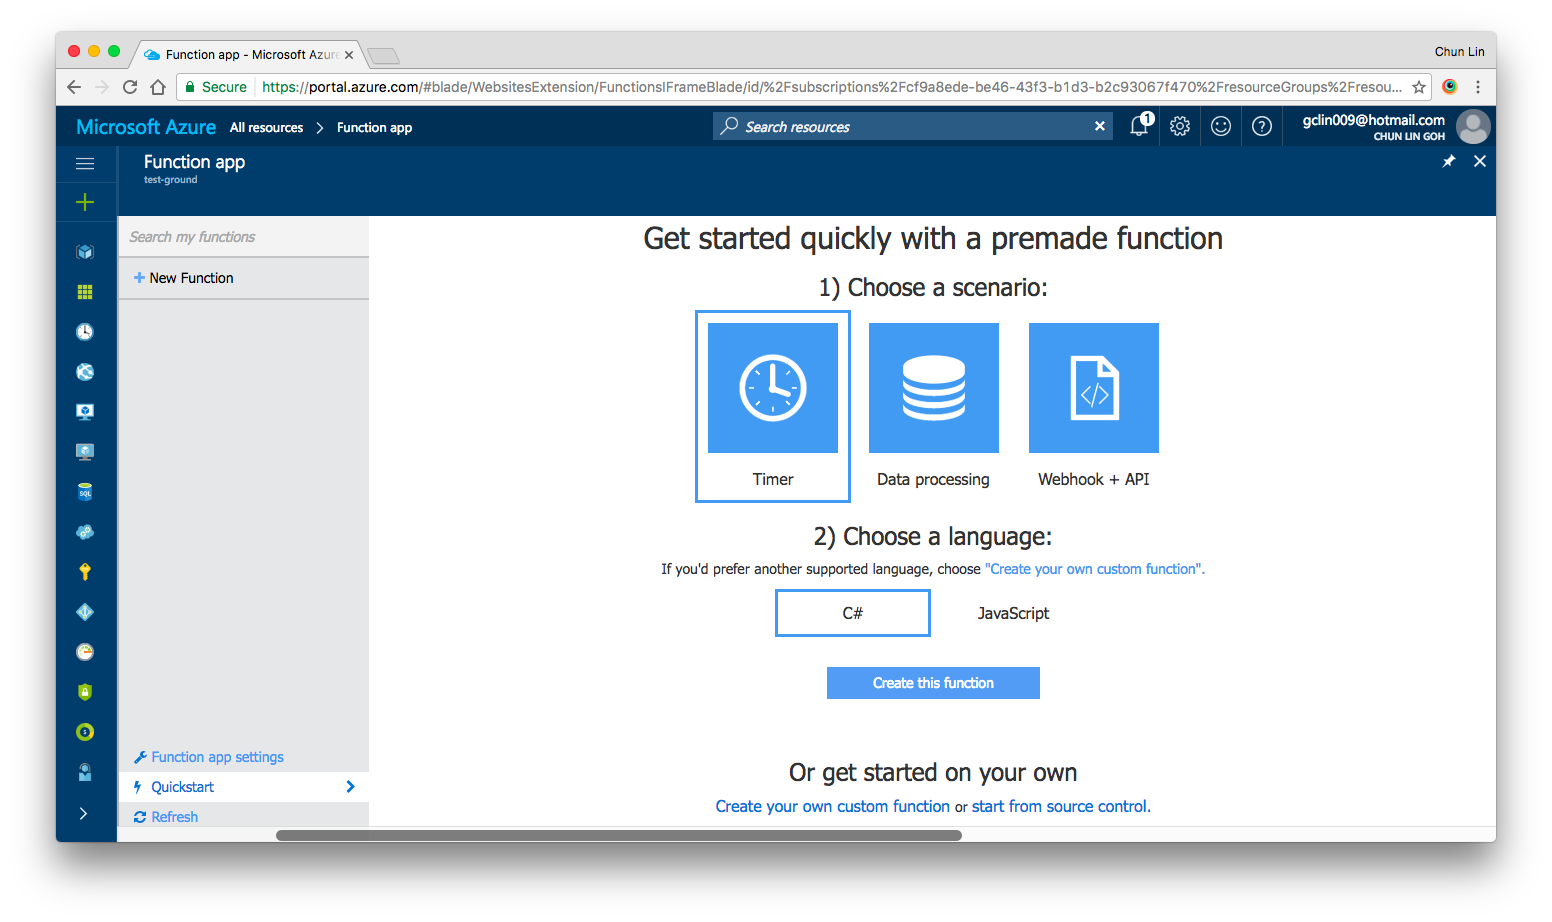
There are two important benefits that I like in this new option. Firstly, our development can be more productive. Secondly, Azure Functions has two pricing models: Consumption Plan and App Service Plan, as shown in the screenshot below. The Consumption Plan lets us pay per execution and the first 1,000,000 executions are free!
Two hosting plans in Azure Functions: Consumption Plan vs. App Service Plan
After setting up the Function App, we can choose “Quick Start” to have a simpler user interface to get started with Azure Function.
Under “Quick Start” section, there are three triggers available for us to choose, i.e. Timer, Data Processing, and Webhook + API. Today, I’ll only talk about Timer. We will see how we can achieve the scheduler functionality on Microsoft Azure.
Quick Start page in Azure Function.
Timer Trigger
Timer Trigger will execute the function according to a schedule. The schedule is defined using CRON expression. Let’s say if we want our function to be executed every four hours, we can write the schedule as follows.
Similar to the usual Azure Web App, the default time zone used in Azure Functions is also UTC. Hence, if we would like to change it to use another timezone, what we need to do is just add the WEBSITE_TIME_ZONE application setting in the Function App.
Companion File: function.json
So, where do we set the schedule? The answer is in a special file called function.json.
The name attribute is to specify the name of the parameter used in the C# function later. It is used for the bound data in the function.
The type attribute specifies the binding time. Our case here will be timerTrigger.
The direction attribute indicates whether the binding is for receiving data into the function (in) or sending data from the function (out). For scheduler, the direction will be “in” because later in our C# function, we can actually retrieve info from the myTimer parameter.
Finally, the schedule attribute will be where we put our schedule CRON expression at.
#r "Newtonsoft.Json"

using System;
using Newtonsoft.Json;
...

public static async Task Run(TimerInfo myTimer, TraceWriter log)
{
    ...
}
Assemblies in .csx File
Same as how we always did in C# project, when we need to import the namespaces, we just need to use the using clause. For example, in our case, we need to process the Json file, so we need to make use of the library Newtonsoft.Json.
using Newtonsoft.Json;
To reference external assemblies, for example in our case, Newtonsoft.Json, we just need to use the #r directive as follows.
For other assemblies, we need to upload the assembly file, for example MyAssembly.dll, into a bin folder relative to the function first. Only then we can reference is as follows.
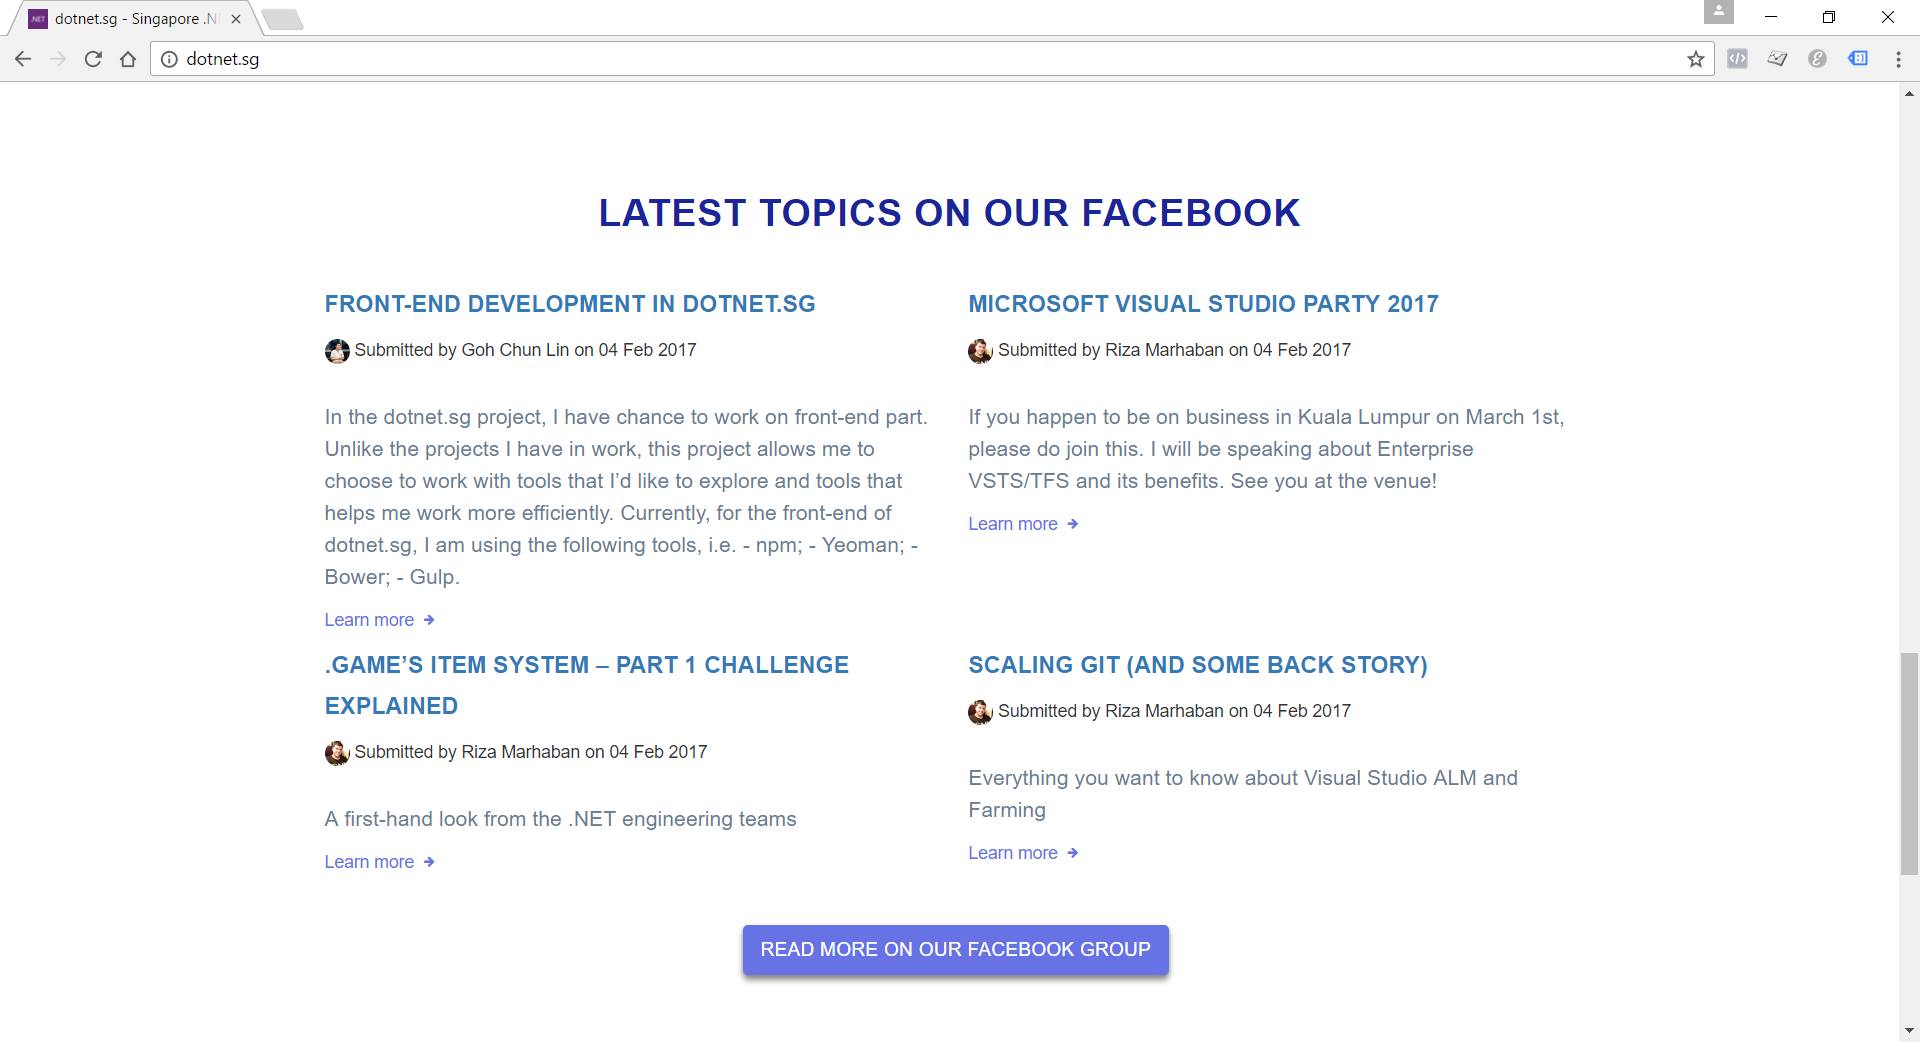
This section will display the top four latest Facebook posts pulled by Azure Function.
For our case, the purpose of Azure Function is to process the Facebook Group feeds and then store the feeds somewhere for later use. The “somewhere” here is DocumentDB.
To gets the inputs from DocumentDB, we first need to have 2nd binding specified in the functions.json as follows.
In the DocumentDB input binding above, the name attribute is, same as previous example, used to specify the name of the parameter in the C# function.
The databaseName and collectionName attributes correspond to the names of the database and collection in our DocumentDB, respectively. The id attribute is the Document Id of the document that we want to retrieve. In our case, we store all the Facebook feeds in one document, so we specify the Document Id in the binding directly.
The connection attribute is the name of the Azure Function Application Setting storing the connection string of the DocumentDB account endpoint. Yes, Azure Function also has Application Settings available. =)
Finally, the direction attribute must be “in”.
We can then now enhance our Run method to include inputs from DocumentDB as follows. What it does is basically just reading existing feeds from the document and then update it with new feeds found in the Singapore .NET Facebook Group
#r "Newtonsoft.Json"

using System;
using Newtonsoft.Json;
...

private const string SG_DOT_NET_COMMUNITY_FB_GROUP_ID = "1504549153159226";

public static async Task Run(TimerInfo myTimer, dynamic inputDocument, TraceWriter log)
{
    string sgDotNetCommunityFacebookGroupFeedsJson =
        await GetFacebookGroupFeedsAsJsonAsync(SG_DOT_NET_COMMUNITY_FB_GROUP_ID);

    ...

    var existingFeeds = JsonConvert.DeserializeObject(inputDocument.ToString());

    // Processing the Facebook Group feeds here...
    // Updating existingFeeds here...

    inputDocument.data = existingFeeds.Feeds;
}
Besides getting input from DocumentDB, we can also have DocumentDB output binding as follows to, for example, write a new document to DocumentDB database.
We don’t really use this in our dotnet.sg case. However, as we can see, there are only two major differences between DocumentDB input and output bindings.
Firstly, we have a new createIfNotExists attribute which specify whether to create the DocumentDB database and collection if they don’t exist or not.
Secondly, we will have to set the direction attribute to be “out”.
Then in our function code, we just need to have a new parameter with “out object outputDocument” instead of “in dynamic inputDocument”.
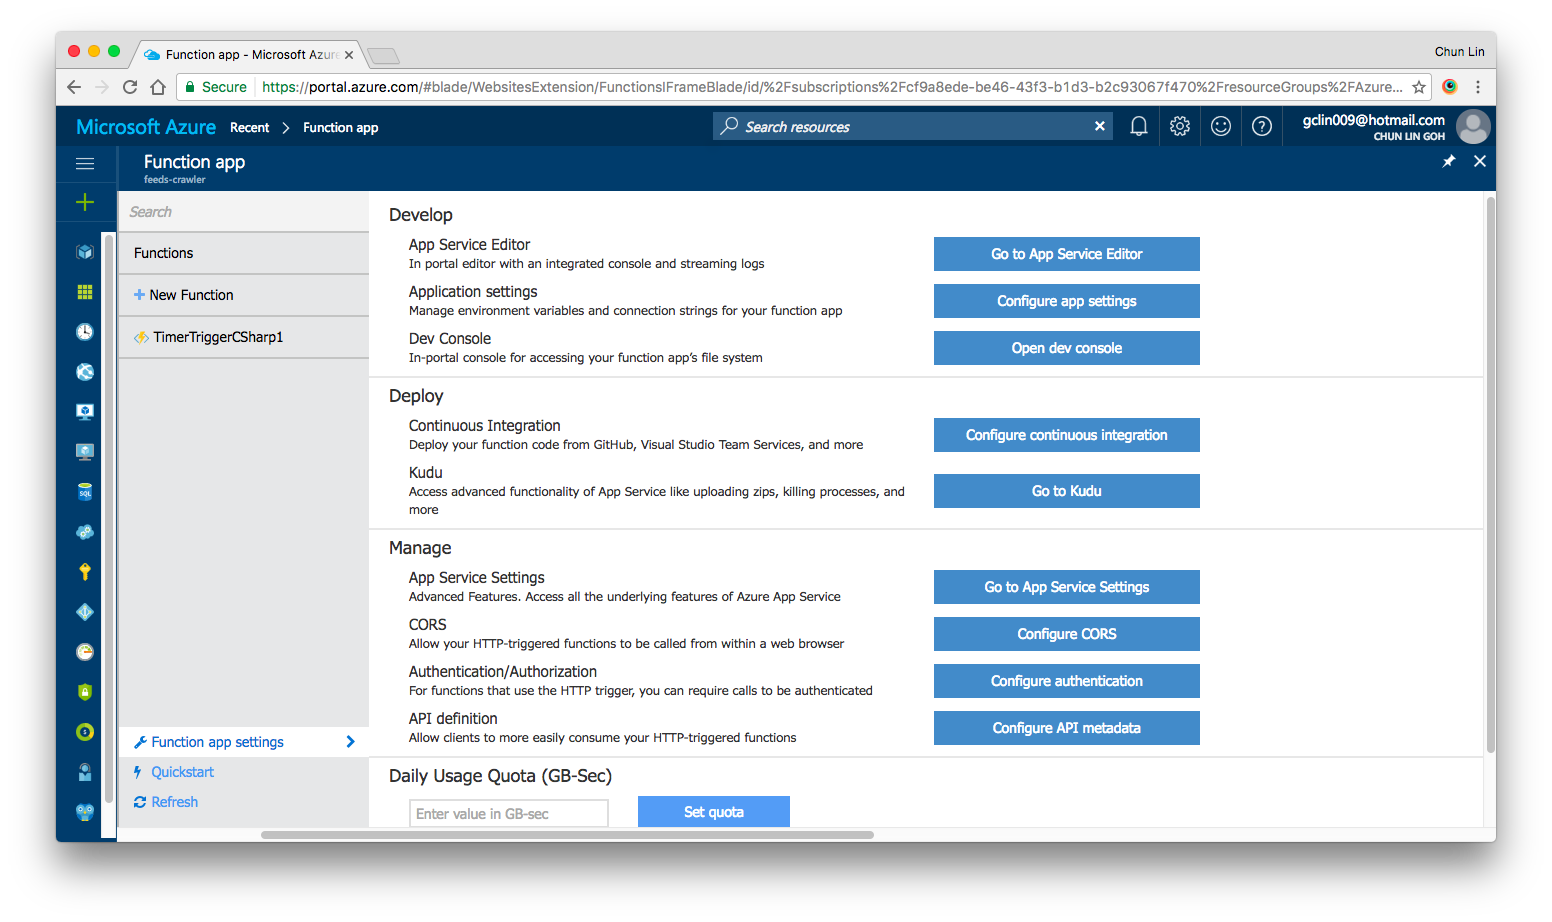
Yes, there are our familiar features such as Application Settings, Continuous Integration, Kudu, etc. in Azure Functions as well. All of them can be found under “Function App Settings” section.
Azure Function App Settings
As what we have been doing in Azure Web Apps, we can also set the timezone, store the App Secrets in the Function App Settings.
Deployment of Azure Functions with Github
We are allowed to link the Azure Function with variety of Deployment Options, such as Github, to enable the continuous deployment option too.
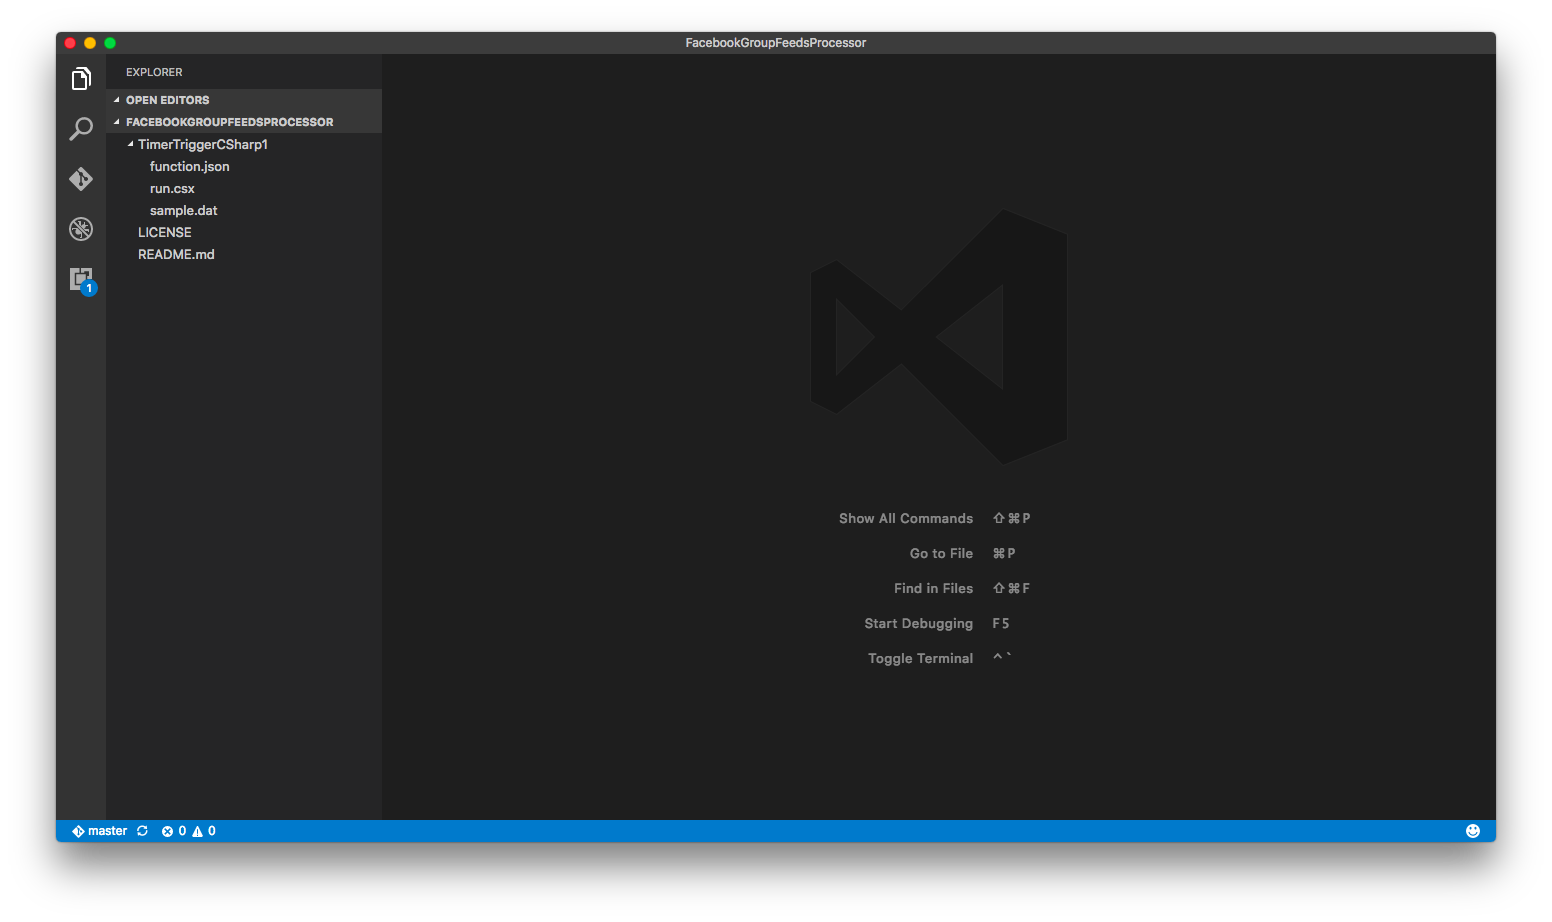
There is one thing that I’d like to highlight here is that if you are also starting from setting up your new Azure Function via Azure Portal, then when in the future you setup the continuous deployment for the function, please make sure that you first create a folder having the same name as the name of your Azure Function. Then all the files related to the function needs to be put in the folder.
For example, in dotnet.sg case, we have the Azure Function called “TimerTriggerCSharp1”. we will have the following folder structure.
Folder structure of the TimerTriggerCsharp1.
When I first started, I made a mistake when I linked Github with Azure Function. I didn’t create the folder with the name “TimerTriggerCSharp1”, which is the name of my Azure Function. So, when I deploy the code via Github, the code in the Azure Function on the Azure Portal is not updated at all.
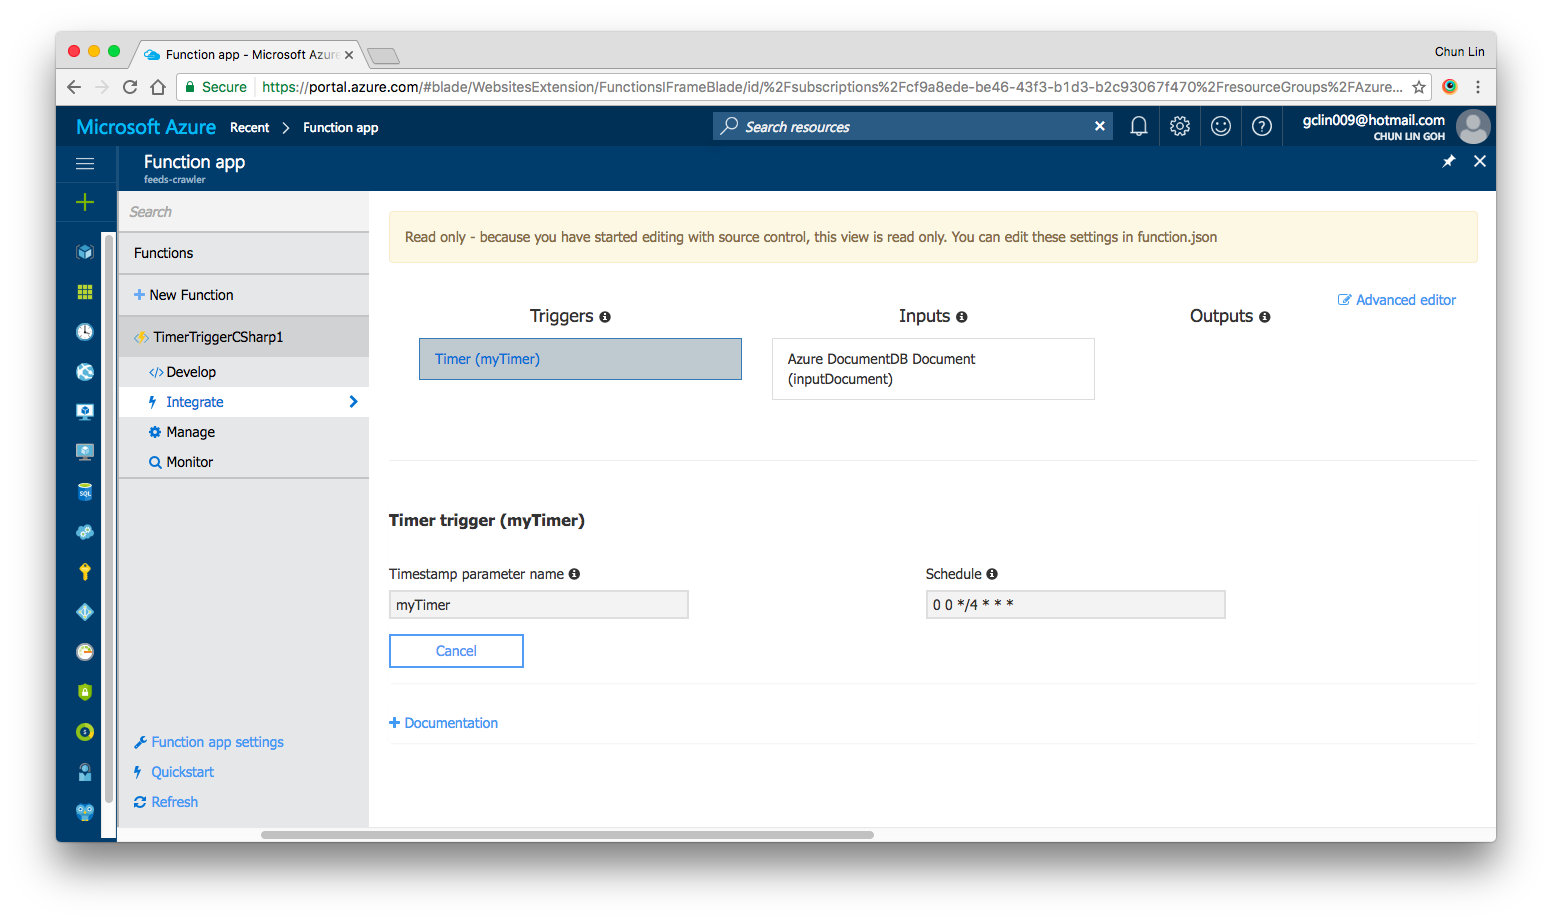
In fact, once the Continuous Deployment is setup, we are no longer able to edit the code directly on the Azure Portal. Hence, setting up the correct folder structure is important.
Read only once we setup the Continuous Deployment in Azure Function.
If you would like to add in more functions, simply create new folders at the same level.
Conclusion
Azure Function and the whole concept of Serverless Architecture are still very new to me. However, what I like about it is the fact that Azure Function allows us to care about the codes to solve a problem without worrying about the whole application and infrastructure.
In addition, we are also allowed to solve the different problems using the programming language that best suits the problem.
Finally, Azure Function is cost-saving because we can choose to pay only for the time our code is being executed.
If you would like to learn more about Azure Functions, here is the list of references I use in this learning journey.
It’s important to keep app secrets out of our codes. Most of the app secrets are however still found in .config files. This way of handling app secrets becomes very risky when the codes are on public repository.
Thus, they are people put some dummy text in the .config files and inform the teammates to enter their respective app secrets. Things go ugly when this kind of “common understanding” among the teammates is messed up.
The moment when your app secrets are published on Github public repo. (Image from “Kono Aozora ni Yakusoku o”)
Secret Manager Tool
So when I am working on the dotnet.sg website, which is an ASP .NET Core project, I use the Secret Manager tool.It offers a way to store sensitive data such as app secrets in our local development machine.
To use the tool, firstly, I need to add it in project.json as follows.
Due to the fact that the Secret Manager tool makes use of project specific configuration settings kept in user profile, we need to specify a userSecretsId value in the project.json as well.
After that, I can start storing the app secrets in the Secret Manager tool by entering the following command in the project directory.
$ dotnet user-secrets set AppSettings:MeetupWebApiKey ""
As shown in the example above, the name of the secret is “AppSettings:MeetupWebApiKey”. This is because in the appsettings.json, I have the following.
{
    "AppSettings": {
        "MeetupWebApiKey": ""
    },
    ...
}
Alright, now the API key is stored in the Secret Manager tool, how is it accessed from the code?
By default, appsettings.json is already loaded in startup.cs. However, we still need to add the following bolded lines in startup.js to enable User Secrets as part of our configuration in the Startup constructor.
public class Startup
{
    public Startup(IHostingEnvironment env)
    {
        var builder = new ConfigurationBuilder()
            .SetBasePath(env.ContentRootPath)
            .AddJsonFile("appsettings.json", optional: true, reloadOnChange: true)
            .AddJsonFile($"appsettings.{env.EnvironmentName}.json", optional: true);

        if (env.IsDevelopment())
        {
            builder.AddUserSecrets();
        }

        builder.AddEnvironmentVariables();

        Configuration = builder.Build();
    }
    ...
}
Then in the Models folder, I create a new class called AppSettings which will be used later when we load the app secrets:
public class AppSettings
{
    public string MeetupWebApiKey { get; set; }

    ...
}
So, let’s say I want to use the key in the HomeController, I just need to do the following.
public class HomeController : Controller
{
    private readonly AppSettings _appSettings;

    public HomeController(IOptions appSettings appSettings)
    {
        _appSettings = appSettings.Value;
    }

    public async Task Index()
    {
        string meetupWebApiKey = _appSettings.MeetupWebApiKey;
        ...
    }

    ...
}
Azure Application Settings
Just now Secret Manager tool has helped us on managing the app secrets in local development environment. How about when we deploy our web app to Microsoft Azure?
For dotnet.sg, I am hosting the website with Azure App Service. What so great about Azure App Service is that there is one thing called Application Settings.
Application Settings option is available in Azure App Service.