[KOSD Series] Certificate for Signing JWT on IdentityServer

KOSD, or Kopi-O Siew Dai, is a type of Singapore coffee that I enjoy. It is basically a cup of coffee with a little bit of sugar. This series is meant to blog about technical knowledge that I gained while having a small cup of Kopi-O Siew Dai.

kosd-identity-server-dotnet-core-openssl-app-service

Last year, Riza shared a very interesting topic twice during Singapore .NET Developers Community in Microsoft office. For those who attended the meetups, do you still remember? Yes, it’s about IdentityServer.

riza.png
Riza delivered a free hands-on training about IdentityServer 4 in August 2017.

IdentityServer 4 is a middleware, an OpenID Connect provider built to spec, which provides user identity and access control in ASP .NET Core applications.

In my example, I will start with the simplest setup where there will be one Authenticate Server and one Application Server. Both of them in my example will be using ASP .NET Core.

jwt-with-signin-and-verification-flow.png
How an application uses JWT to authenticate a user.

In the Authenticate Server, I register the minimum required dependencies in ConfigureServices method of its Startup.cs as follows.

services.AddIdentityServer()
     .AddDeveloperSigningCredential()
     .AddInMemoryIdentityResources(...)
     .AddInMemoryApiResources(...)
     .AddInMemoryClients(...)
     .AddAspNetIdentity();

I won’t be talking about how IdentityServer works here. Instead, I will be focusing on the “AddDeveloperSigningCredential” method here.

JSON Web Token (JWT)

By default, IdentityServer issues access tokens in the JWT format. According to the abstract definition in RCF 7519 from Internet Engineering Task Force (IETF) , JWT is a compact, URL-safe means of representing claims between two parties where claims are encoded as JSON objects which can be digitally signed or encrypted.

In the diagram above, the Application Server receives the secret key used in signing the JWT from the Authentication Server when the app sets up its authentication process. Hence, the app can verify whether the JWT comes from an authentic source using the secret key.

AddDeveloperSigningCredential

IdentityServer uses an asymmetric key pair to sign and validate JWT. We can use AddDeveloperSigningCredential to do so. In the previous version of IdentityServer, this method is actually called AddTemporarySigningCredential.

During development, we normally don’t have cert prepared yet. Hence, AddTemporarySigningCredential can be used to auto-generate certificate to sign JWT. However, this method has a disadvantage. Every time the IdentityServer is restarted, the certificate will change. Hence, all tokens that have been signed with the previous certificate will fail to validate.

This situation is fixed when AddDeveloperSigningCredential is introduced to replace the AddTemporarySigningCredential method. This new method will still create temporary certificate at startup time. However, it will now be able to persists the key to the file system so that it stays stable between IdentityServer restarts.

Anyway, as documented, we are only allowed to use AddDeveloperSigningCredential in development environments. In addition, AddDeveloperSigningCredential can only be used when we host IdentityServer on single machine. What should we do when we are going to deploy our code to the production environment? We need a signing key service that will provide the specified certificate to the various token creation and validation services. Thus now we need to change to use AddSigningCredential method.

Production Code

For production, we need to change the code earlier to be as follows.

X509Certificate2 cert = null;
using (X509Store certStore = new X509Store(StoreName.My, StoreLocation.CurrentUser))
{
    certStore.Open(OpenFlags.ReadOnly);
    var certCollection = certStore.Certificates.Find(
        X509FindType.FindByThumbprint,
        Configuration["AppSettings:IdentityServerCertificateThumbprint"],
        false);
 
    // Get the first cert with the thumbprint
    if (certCollection.Count > 0)
    {
        cert = certCollection[0];
    }
}

services.AddIdentityServer()
     .AddSigningCredential(cert)
     .AddInMemoryIdentityResources(...)
     .AddInMemoryApiResources(...)
     .AddInMemoryClients(...)
     .AddAspNetIdentity();

We use AddSigningCredential to replace the AddDeveloperSigningCredential method. Now, AddSigningCredential requires a X509Certificate2 cert as parameter.

Creation of Certificate with OpenSSL on Windows

It’s quite challenging to install OpenSSL on Windows. Luckily, Ben Cull, solution architect from Belgium, has shared a tutorial on how to do this easily with a tool called Win32 OpenSSL.

His tutorial can be summarized into 5 steps as follows.

  1. Install the Win32 OpenSSL and add its binaries to PATH;
  2. Create a new certificate and private key;
    openssl req -x509 -newkey rsa:4096 -sha256 -nodes -keyout cuteprogramming.key -out cuteprogramming.crt -subj "/CN=cuteprogramming.com" -days 3650
  3. Convert the certificate and private key into .pfx;
    openssl pkcs12 -export -out cuteprogramming.pfx -inkey cuteprogramming.key -in cuteprogramming.crt -certfile cuteprogramming.crt
  4. Key-in and remember the password for the private key;
  5. Import the certificate to the Current User Certificate Store on developer’s local machine by double-clicking on the newly generated .pfx file. We will be asked to key in the password used in Step 4 above again.
certificate-import-wizard.png
Importing certificate.

Now, we need to find out the Thumbprint of it. This is because in our production code above, we are using Thumbprint to look for the cert.

Thumbprint and Microsoft Management Console (MMC)

To retrieve the Thumbprint of a certificate, we need help from a tool called MMC.

adding-certificate-snap-ins.png
Using MMC to view certificates in the local machine store for current user account.

We will then be able to find the new certificate that we have just created and imported. To retrieve its Thumbprint, we first need to open it, as shown in the screenshot below.

open-new-cert.png
Open the new cert in MMC.

A popup window called Certificate will appear. Simply copy the value of the Thumbprint under the Details tab.

thumbprint.png
Thumbprint!

After keeping the value of the cert thumbprint in the appsettings.Development.json of the IdentityServer project, we can now build and run the project on localhost without any problem.

Deployment to Microsoft Azure Web App

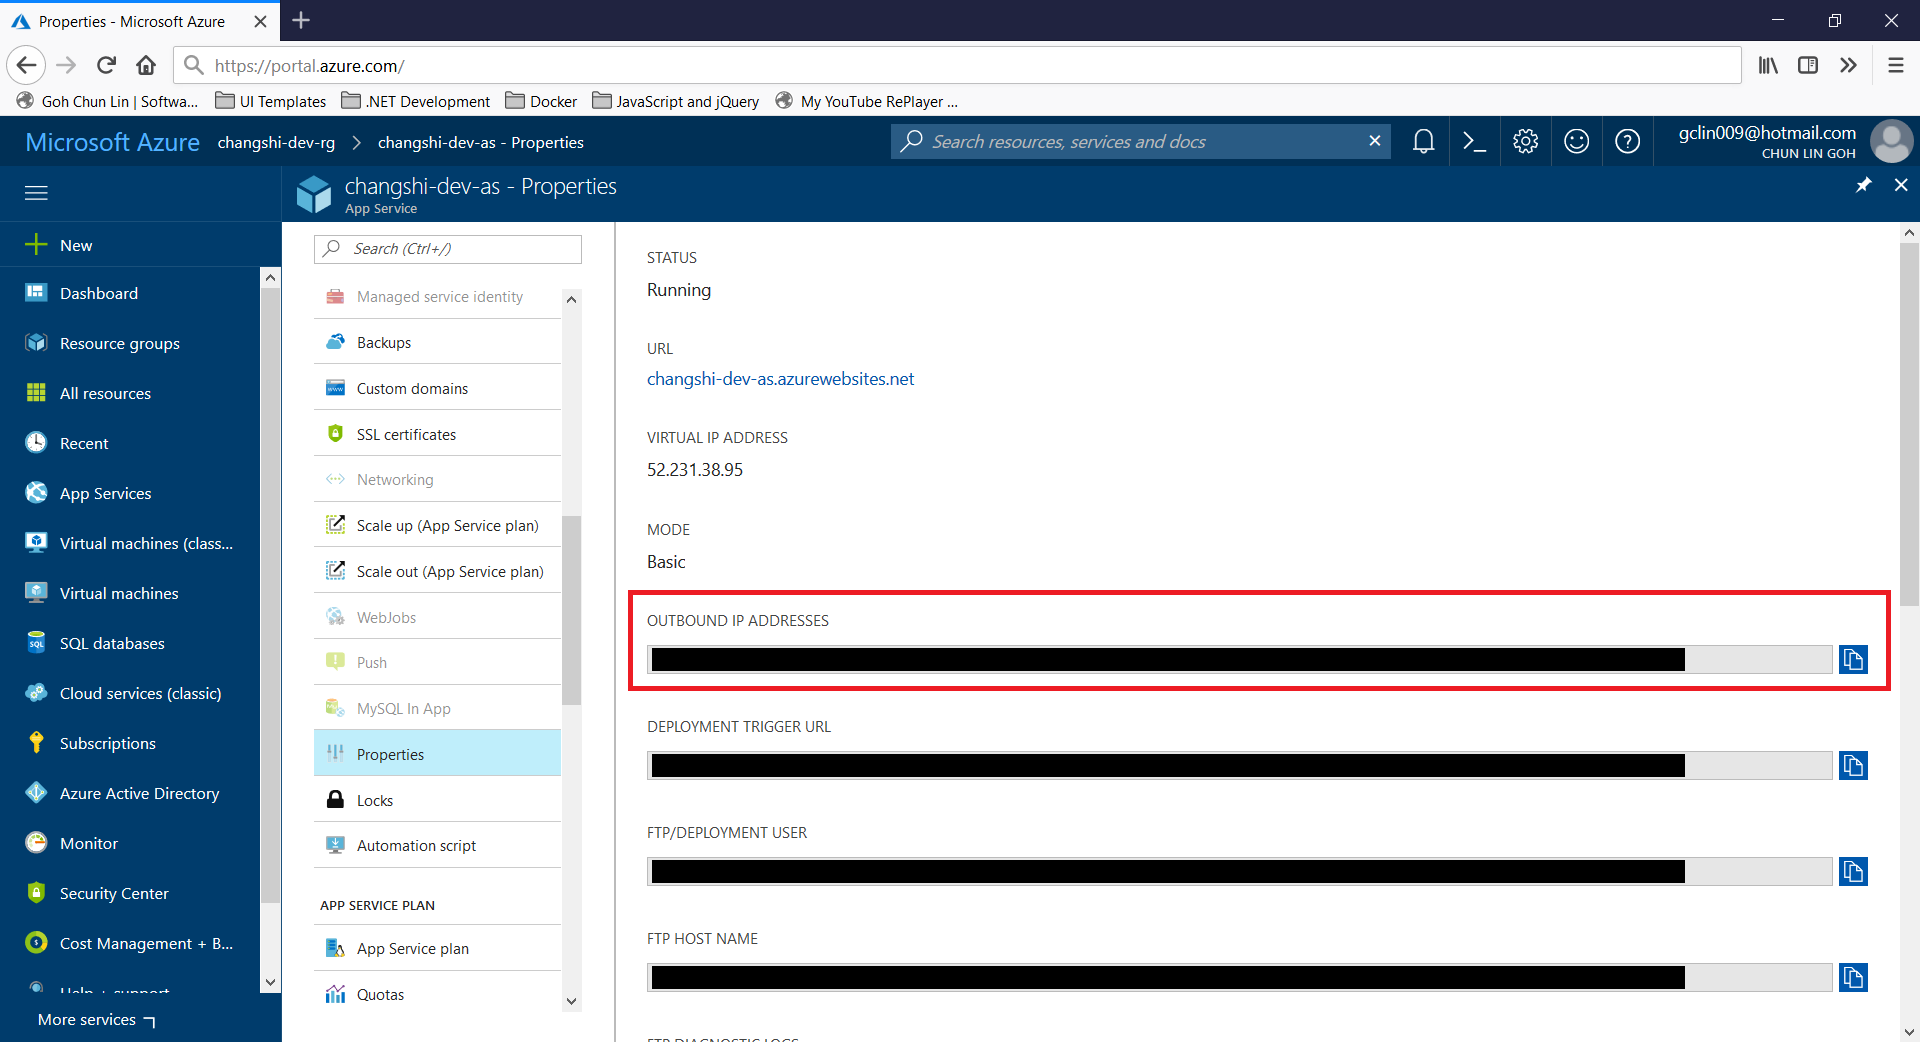
Before we talk about how to deploy the IdentityServer project to Microsoft Azure Web App, do you realize how come in the code above, we are looking cert only My/Personal store of the CurrentUser registry, i.e. “StoreName.My, StoreLocation.CurrentUser”? This is because this is the place where Azure will load the certificate from.

So now, we will first proceed to upload the certificate as Private Certificate that we self-sign above to Azure Web App. After selecting the .pfx file generated above and keying-in the password, the cert will appear as one of the Private Certificates of the Web App.

uploading-certificate-to-azure.png
To upload the cert, we can do it in “SSL certificates” settings of our Web App on Azure Portal.

Last but not least, in order to make the cert to be available to the app, we need to have the following setting added under “Application settings” of the Web App.

application-settings-for-cert.png
WEBSITE_LOAD_CERTIFICATES setting is needed to make the cert to be available to the app.

As shown in the screenshot above, we set WEBSITE_LOAD_CERTIFICATES to have * as its value. This will make all the certificates in the Web App being loaded to the personal certification store of the app. Alternatively, we can also let it load selective certificates by keying in comma-separated thumbprints of the certificates.

Two Certificates

There is an interesting discussion on IdentityServer3 Issues about the certificates used in IdentityServer project. IdentityServer requires two certificates: one for SSL and another for signing JWT.

brock-allen.png
Brock Allen was giving a talk about IdentityServer during NDC London in 2016.

In the discussion, according to Brock Allen, the co-author of IdentityServer framework, we should never use the same cert for both purposes and it is okay to use a self-signed cert to be the signing cert.

Brock also provided a link in the discussion to his blog post on how to create signing cert using makecert instead of OpenSSL as discussed earlier. In fact, during Riza’s presentation, he was using makecert to self-sign his cert too. Hence, if you are interested about how to use makecert to do that, please read his post here: https://brockallen.com/2015/06/01/makecert-and-creating-ssl-or-signing-certificates/.

Conclusion

This episode of KOSD series is a bit long such that drinking a large cup of hot KOSD while reading this post seems to be a better idea. Anyway, I think this post will help me and other beginners who are using IdentityServer in their projects to understand more about the framework bit by bit.

There are too many things that we can learn in the IdentityServer project and I hope to share what I’ve learnt about this fantastic framework in my future posts. Stay tuned.

References

[KOSD Series] Discussion about Cosmos DB Performance

KOSD, or Kopi-O Siew Dai, is a type of Singapore coffee that I enjoy. It is basically a cup of coffee with a little bit of sugar. This series is meant to blog about technical knowledge that I gained while having a small cup of Kopi-O Siew Dai.

kosd-cosmos-db.png

During a late dinner with my friend on 12 January last month, he commented that he encountered a very serious performance problem in retrieving data from Cosmos DB (pka DocumentDB). It’s quite strange because, in our IoT project which also stores millions of data in Cosmos DB, we never had this problem.

Two weeks later, on 27 January, he happily showed me his improved version of the code which could query the data in about one to two seconds.

Yesterday, after having a discussion, we further improved the code. Hence, I’d like to write down this learning experience here.

try-cosmos-db.png
Try Azure Cosmos DB today!

Preparation

Due to the fact that we couldn’t demonstrate using the real project code, I thus created a sample project getting data from database and collection on my personal Azure Cosmos DB account. The database contains one collection which has 23,967 records of Student data.

The Student class and the BaseEntity class that it inherits from are as follows.

public class Student : BaseEntity
{
    public string Name { get; set; }

    public int Age { get; set; }

    public string Description { get; set; }
}
public abstract class BaseEntity
{
    [JsonProperty(PropertyName = "id")]
    public string Id { get; set; }

    public string Type { get; set; }

    public DateTime CreatedAt { get; set; } = DateTime.Now;
}

You may wonder why I have Type defined.

Type and Cost Saving

The reason of having Type is that, before DocumentDB was rebranded as Cosmos DB in May 2017, the DocumentDB pricing is based on collections. Hence, the more collection we have in the database, the more we need to pay.

confused-about-documentdb-pricing.png
DocumentDB was billed per collection in the past. (Source: Stack Overflow)

To overcome that, we squeeze the different types of entities in the same collection. So, in the example above, let’s say we have three classes — Students, Classroom, Teacher that inherit from BaseEntity, then we will put the data of the three classes in the same collection.

Then here comes a problem: How do we know which document in the collection is Student, Classroom or Teacher? There is where the property Type will help us. So in our example above, the possible value for Type will be Student, Classroom, and Teacher.

Hence, when we add a new document through repository design pattern, we have the following method.

public async Task<T> AddAsync(T entity)
{
    ...

    entity.Type = typeof(T).Name;

    var resourceResponse = await _documentDbClient.CreateDocumentAsync(UriFactory.CreateDocumentCollectionUri(_databaseId, _collectionId), entity);

    return resourceResponse.StatusCode == HttpStatusCode.Created ? (dynamic)resourceResponse.Resource : null;
}

Original Version of Query

We used the following code to retrieve data of a class from the collection.

public async Task<IEnumerable<T>> GetAllAsync(Expression<Func<T, bool>> predicate = null)
{
    var query = _documentDbClient.CreateDocumentQuery<T>(UriFactory.CreateDocumentCollectionUri(_databaseId, _collectionId));

    var documentQuery = (predicate != null) ?
        (query.Where(predicate)).AsDocumentQuery():
        query.AsDocumentQuery();

    var results = new List<T>();
    while (documentQuery.HasMoreResults)
    {
        results.AddRange(await documentQuery.ExecuteNextAsync<T>());
    }

    return results.Where(x => x.Type == typeof(T).Name).ToList();
}

This query will run very slow because the line where it filters the class is after querying data from the collection. Hence, in the documentQuery, it may already contain data of three classes (Student, Classroom, and Teacher).

Improved Version of Query

So one obvious way is to move the line of filtering by Type above. The improved version of code now looks as such.

public async Task<IEnumerable<T>> GetAllAsync(Expression<Func<T, bool>> predicate = null)
{
    var query = _documentDbClient
        .CreateDocumentQuery<T>(UriFactory.CreateDocumentCollectionUri(_databaseId, _collectionId))
        .Where(x => x.Type == typeof(T).Name);

    var documentQuery = (predicate != null) ?
        (query.Where(predicate)).AsDocumentQuery():
        query.AsDocumentQuery();

    var results = new List<T>();
    while (documentQuery.HasMoreResults)
    {
        results.AddRange(await documentQuery.ExecuteNextAsync<T>());
    }

    return results;
}

By doing so, we managed to reduce the query time significantly because all the actual filtering will be done at Cosmos DB side. For example, there was one query I managed to reduce the query time of it from 1.38 minutes to 3.42 seconds using the 23,967 records of Student data.

Multiple Predicates

The code above however has a disadvantage. It cannot accept multiple predicates.

I thus changed it to be as follows so that it returns IQueryable.

public IQueryable<T> GetAll()
{
    return _documentDbClient
        .CreateDocumentQuery<T>(UriFactory.CreateDocumentCollectionUri(_databaseId, _collectionId))
        .Where(x => x.Type == typeof(T).Name);
}

This has another inconvenience is there whenever I call GetAll, I need to remember to load the data with HasMoreResults as shown in the code below.

var studentDocuments = _repoDocumentDb.GetAll()
    .Where(s => s.Age == 8)
    .Where(s => s.Name.Contains("Ahmad"))
    .AsDocumentQuery();

var results = new List<T>();
while (studentDocuments.HasMoreResults)
{
    results.AddRange(await studentDocuments.ExecuteNextAsync<T>());
}

Conclusion

This is just an after-dinner discussion about Cosmos DB between my friend and me. If you have any better idea of designing repository for Cosmos DB (pka DocumentDB), please let us know. =)

TCP Listener on Microsoft Azure for IoT Devices

cloud-service-worker-role-automation-runbook.png

After working on the beacon projects back half a year ago, I was given a new task which is building a dashboard for displaying data collected from IoT devices. The IoT devices basically are GPS tracker with a few other additional sensors such as temperature and shaking detection.

I’m new to IoT field, so I’m going to share in this article what I had learnt and challenges I faced in this project so that it would benefit to juniors who are going to do similar things.

Project Requirements

We plan to have the service to receive data from the IoT devices to be on Microsoft Azure. There will be thousands or even millions of the same devices deployed eventually, so choosing cloud platform to help us scaling up easily.

We also need to store the data in order to display it on dashboard and reports for business use cases.

Challenge 1: Azure IoT Hub and The Restriction of Device Firmware

In the documentation of the device protocol, there is a set of instructions as follows.

First when device connects to server, module sends its IMEI as login request. IMEI is sent the same way as encoding barcode. First comes short identifying number of bytes written and then goes IMEI as text (bytes).

After receiving IMEI, server should determine if it would accept data from this module. If yes server will reply to module 01 if not 00.

I am not sure who wrote the documentation but I am certain that his English is not that easy to comprehend in the first read.

Anyway, this is a good indication that Azure IoT Hub will be helpful because it provides secure and reliable C2D (Cloud-to-Device) and D2C communication with HTTP, AMQP, and MQTT support.

However, when I further read the device documentation, I realized that the device could only send TCP packets over in a protocol the device manufacturer defined. In addition, the device doesn’t allow us to update its firmware at this moment, making it to send data using protocols accepted by Azure IoT Hub is impossible.

There is a fierce discussion about this on Stack Overflow. Unfortunately, none of the respondents understood what the OP was trying to say.

So, I have to say bye-bye to Azure IoT Hub and move on to build TCP Listener myself on Azure.

Challenge 2: Hosting TCP Listener on Azure

There is a great code sample on how to build a TCP listener in C# to listen for connections from TCP network clients.

So, where could we put this code at?

Could we use Azure App Service, such as Functions or Web Apps? Unfortunately, no. This is because only 80/TCP and 443/TCP are exposed publicly and the only protocol that works is HTTP. In addition, App Service is all IIS, the web server provides the entire platform, there is no room for long running processes or threads that can sit and wait for communication on another port outside of IIS.

The only easy option we have now is to use Azure Cloud Service with Worker Role. Worker Role does not use IIS and it can run our app standalone.

creating-worker-role.png
Creating a new Cloud Service project with one Worker Role on Visual Studio 2017.

A default template of WorkerRole class will be provided.

public class WorkerRole : RoleEntryPoint
{
    private readonly CancellationTokenSource cancellationTokenSource = new CancellationTokenSource();
    private readonly ManualResetEvent runCompleteEvent = new ManualResetEvent(false);

    public override void Run()
    {
        Trace.TraceInformation("TrackerTcpListener is running");

        try
        {
            this.RunAsync(this.cancellationTokenSource.Token).Wait();
        }
        finally
        {
            this.runCompleteEvent.Set();
        }
    }

    public override bool OnStart()
    { 
        // Set the maximum number of concurrent connections
        ServicePointManager.DefaultConnectionLimit = 12;

        // For information on handling configuration changes
        // see the MSDN topic at https://go.microsoft.com/fwlink/?LinkId=166357.

        bool result = base.OnStart();

        Trace.TraceInformation("TrackerTcpListener has been started");

        return result;
    }

    public override void OnStop()
    {
        Trace.TraceInformation("TrackerTcpListener is stopping");

        this.cancellationTokenSource.Cancel();
        this.runCompleteEvent.WaitOne();

        base.OnStop();

        Trace.TraceInformation("TrackerTcpListener has stopped");
    }

    private async Task RunAsync(CancellationToken cancellationToken)
    {
        // TODO: Replace the following with your own logic.
        while (!cancellationToken.IsCancellationRequested)
        {
            Trace.TraceInformation("Working");
            await Task.Delay(1000);
        }
    }
}

It’s obvious that the first method we are going to work on is the RunAsync method with a “TODO” comment.

However, before that, we need to define an IP Endpoint for this TCP listener so that we can tell the IoT device to send the packets to the specified port on the IP address.

worker-role-endpoints.png
Configuring Endpoints of a Cloud Service.

With endpoints defined, we can then proceed to modify the code.

private async Task RunAsync(CancellationToken cancellationToken)
{
    try
    {
        TcpClient client;

        while (!cancellationToken.IsCancellationRequested)
        {
            var ipEndPoint = RoleEnvironment.CurrentRoleInstance.InstanceEndpoints["TcpListeningEndpoint1"].IPEndpoint;
            
            var listener = new System.Net.Sockets.TcpListener(ipEndPoint) { ExclusiveAddressUse = false };
            listener.Start();

            // Perform a blocking call to accept requests.
            client = listener.AcceptTcpClient();

            // Get a stream object for reading and writing
            NetworkStream stream = null;

            try
            {
                stream = client.GetStream();

                await ProcessInputNetworkStreamAsync(stream);
            }
            catch (Exception ex)
            {
                // Log the exception
            }
            finally
            {
                // Shutdown and end connection
                if (stream != null)
                {
                    stream.Close();
                }

                client.Close();

                listener.Stop();
            }
        }
    }
    catch (Exception ex)
    {
        // Log the exception
    }
}

The code for the method ProcessInputNetworkStreamAsync above is as follows.

private async Task ProcessInputNetworkStreamAsync(string imei, NetworkStream stream)
{
    Byte[] bytes = new Byte[5120];
    int i = 0;
    byte[] b = null;
    var receivedData = new List<string>();

    while ((i = stream.Read(bytes, 0, bytes.Length)) != 0)
    {
        receivedData = new List<string>();

        for (int reading = 0; reading < i; reading++)
        {
            using (MemoryStream ms = new MemoryStream())
            {
                ms.Write(bytes, reading, 1);
                b = ms.ToArray();
            }
            
            receivedData.Add(ConvertHexadecimalByteArrayToString(b));
        }

        Trace.TraceInformation("Received Data: " + string.Join(",", receivedData.ToArray()));

        // Respond from the server to device
        byte[] serverResponse = ConvertStringToHexadecimalByteArray("<some text to send back to the device>");
        stream.Write(serverResponse, 0, serverResponse.Length);
    }
}

You may wonder what I am doing above with ConvertHexadecimalByteArrayToString and ConvertStringToHexadecimalByteArray methods. They are needed because the packets used in the TCP protocol of the device is in hexadecimal. There is a very interesting discussion about how to do the conversion on Stack Overflow, so I won’t repeat it here.

Challenge 3: Multiple Devices

The code above is only handling one port. Unfortunately, the IoT device doesn’t send over the IMEI number or any other identification number of the device when the actual data pack is sent to the server. Hence, that means if there is more than one IoT device sending data to the same port, we will have no way to identify who is sending the data at the server side.

Hence, we need to make our TCP Listener to listen on multiple ports. The way I chose is to use List<Task> in the Run method as shown in the code below.

public override void Run()
{
    try
    {
        // Reading a list of ports assigned for trackers use
        ...

        var tasks = new List<Task>();
        
        foreach (var port in trackerPorts)
        {
            tasks.Add(this.RunAsync(this.cancellationTokenSource.Token, port));
        }
 
        Task.WaitAll(tasks.ToArray());
    }
    finally
    {
       this.runCompleteEvent.Set();
    }
}

Challenge 4: Worker Role Not Responding Irregularly

This turns out to be the biggest challenge in using Worker Role. After receiving data from the IoT devices for one or two days, the server was not recording any further new data even though the devices are working fine. So far, I’m still not sure about the cause even though there are people encountering similar issues as well.

Hence, I have to find a way to automatically restart the Worker Role for me. Thus, I decided to use PowerShell script to reboot the instance. There is a sample code on Microsoft Technet Gallery – Script Center which does similar thing.

I proceed to use Azure Automation which provides Runbooks to help handling the creation, deployment, monitoring, and maintenance of Azure resources. The Powershell Workflow Runbook that I use for rebooting the worker role daily is as follows.

workflow Reboot-CloudService
{
    Write-Output "Started!"
    
    $azureSubscriptionId = Get-AutomationVariable -Name "AzureSubscriptionId"
    $cloudServiceName = Get-AutomationVariable -Name "CloudServiceName"
    $workerRoleInstanceName = Get-AutomationVariable -Name "WorkerRoleInstanceName" 
    
    $myCredential = Get-AutomationPSCredential -Name "Chun Lin"
    Add-AzureAccount -Credential $myCredential
    
    Select-AzureSubscription -SubscriptionId $AzureSubscriptionId

    Write-Output "Restarting for cloud service: $cloudServiceName."

    ReSet-AzureRoleInstance -ServiceName $cloudServiceName -Slot "Production" -InstanceName $workerRoleInstanceName -Reboot

    Write-Output "Restarted successfully!"
}

In case you wonder where I defined the values for variables such as AzureSubscriptionId, CloudServiceName, and WorkerRoleInstanceName, as well as automation PowerShell credential, there are all easily found in the Azure Portal under “Share Resources” section of Azure Automation Account.

variables-and-credentials-in-automation.png
Providing credentials and variables for the Runbook.

After setting up the Runbook, we need to define schedules in Automation Account and then link it to the Runbook.

setting-schedules-for-automation.png
Setting up schedule and linking it to the Runbook.

There is another tool in the Azure Portal that I find it to be very useful to debug my PowerShell script in the Runbook. It is called the “Test Pane”. By using it, we can easily find out if the PowerShell script is correctly written to generate desired outcome.

test-pane.png
Test Pane available in Runbook.

After that, we can easily get a summary of how the job runs on Azure Portal, as shown in the following screenshot.

azure-automation.png
Job Statistics of Azure Automation.

Yup, that’s all what I had learnt in the December while everyone was enjoying the winter festivals. Please comment if you find a better alternative to handle the challenges above. Thanks in advance and happy new year to you!

References

[KOSD Series] IP Addresses of Our Azure App Services that need to be Whitelisted by Our API Providers

KOSD, or Kopi-O Siew Dai, is a type of Singapore coffee that I enjoy. It is basically a cup of coffee with a little bit of sugar. This series is meant to blog about technical knowledge that I gained while having a small cup of Kopi-O Siew Dai.

kosd-azure_web_app-powershell

It is a common scenario for developers to integrate with different parties by using their APIs. Most of the time, the APIs are located in a locked-down network environment where only whitelisted IP addresses are allowed to access their APIs. We will then be asked to give the API providers the IP addresses of our servers.

If it’s our web back-end calling the APIs and we host our web applications on Microsoft Azure App Services, then how could we get the IP addresses?

As mentioned in a discussion about inbound IP address by Benjamin Perkins, the Escalation Engineer on the Azure team, there are about 4 outgoing IP addresses for an Azure Web Apps normally. To retrieve the outbound IP addresses of an Azure web app, we simply need to get it from the Properties of the web app on Azure Portal.

outbound-ip-addresses-in-azure-app-service.png
Locate the outbound IP addresses here.

We can also get the same result if we use the Azure Resource Explorer which is still in preview now.  Benjamin covered this in a video clip on his article too.

For PowerShell lovers, as pointed out by Adrian Calinescu, one of the commenters on Benjamin’s article, we can use PowerShell to find out the outbound IP addresses too. With the new Azure Cloud Shell, we can simply use the following command to retrieve directly the outbound IP addresses of an Azure web app on Azure Portal directly.

Get-AzureRmResource -ResourceGroupName  -ResourceType Microsoft.Web/sites -ResourceName  | select -expand Properties | Select-Object outboundIpAddresses
outbound-ip-addresses-in-azure-app-service-using-powershell.png
Managing Azure resources using shell directly on a browser.

For those who would like to have your own set of outbound IP addresses, please check out ASE (App Service Environment) which grants users control over inbound and outbound application network traffic.

Finally, we can also whitelist all the IP addresses of the Azure datacentres, which can be downloaded here.

azure-datacenter-ip-range-download.png
List of Microsoft Azure Datacentre IP addresses are available on Microsoft website.

References