Handwritten Text Recognition, OCR, and Key Vault

Recently, I am glad to have help from Marvin Heng, the Microsoft MVP in Artificial Intelligence category, to work with me on building an experiment tool, FutureNow, to recognize handwritten texts as well as apply OCR technology to automate forms processing.

In January 2019, we also successfully presented our solution during the Singapore .NET Developers Community meetup. Taking the opportunity, I also presented how Azure Key Vault is used in our project to centralize our key and secret management.

Marvin is sharing with the audience about Custom Vision during the meetup.

Hence, in this article, I’d like to share about this project in terms of how we use Cognitive Services and Key Vault.

Code Repository

The code of our project is available in both Azure DevOps and Github. I will update both places to make sure the codes are updated.

The reason I have my codes in both places because the project is originally collaborated in Azure DevOps. However, during meetup, I realized majority of the audience still prefer us to have our codes on Github. Well…

Azure DevOps: https://dev.azure.com/gohchunlin/JobCreationAutomation
Github: https://github.com/sg-dotnet/text-recognition-ocr

Our “FutureNow” tool where user can use it to analyze text on images.

Custom Vision

What Marvin has contributed fully is to implement a function to detect and identify the handwritten texts in the uploaded image.

To do so, he first created a project in Custom Vision to train the model. In the project, he uploaded many images of paper documents and then labelled the handwritten texts found on the paper.

The part where the system analyzes the uploaded image and finds the handwriting part is in the TagAndAnalyzeService.cs.

In the AnalyzeImageAsync method, we first use the Custom Vision API which is linked to Marvin’s project to identify which parts in the image are “probably” handwritten.

At this point of time, the system still cannot be hundred-percent sure the parts it identifies as handwritten text really contain handwritten text. Hence, the result returns from the API contains a probability value. That’s why we have a percentage bar on our front-end to control the threshold for this probability value to accept only those results having a higher probability value will be accepted.

Handwritten Text Extraction with Computer Vision

After the previous step is done, then we will crop those filtered sections out from the uploaded image and then send each of the smaller image to the text recognition API in Cognitive Service to process the image and to extract out the text.

Hence in the code, the HandwrittenRecognitionService will be called to perform the image processing with the Computer Vision API version 1.0 recognizeText method.

There is an interesting do…while loop in the method. The loop is basically used to wait for the API to return the image processing results. It turns out that most of the time, the API will not directly return the result. Instead, it will return a JSON object telling us that it’s still processing the image. Only when it returns the JSON object with status set to “Succeeded”, then we know that the analysis result is returned together in the JSON object.

do
{
var textOperation = response.Headers.GetValues("Operation-Location").FirstOrDefault();

var result = await client.GetAsync(textOperation);

string jsonResponse = result.Content.ReadAsStringAsync().Result;

var handwrittenAnalyzeResult = JsonConvert.DeserializeObject(jsonResponse);

isAnalizying = handwrittenAnalyzeResult.Status != "Succeeded";

if (!isAnalizying)
{
return handwrittenAnalyzeResult;
}
} while (isAnalizying);

In order to display to the user in front-end the results, we will store the cropped images in Azure Blob Storage and then display both the images and their corresponding extracted texts on the web page.

Unfortunately, the reading of handwritten text from images is a technology which is still currently in preview and is only available for English text. Hence, we need to wait a while until we can deploy it for production use.

OCR with Computer Vision

Using Computer Vision to perform OCR can better detect and extract text in an image especially when the image is a screenshot of a computer generated PDF file.

In OpticalCharacterRecognitionService, we simply call the Computer Vision API OCR method with the uploaded image and language set to English by default, then we can easily get the result of the OCR back in JSON format.
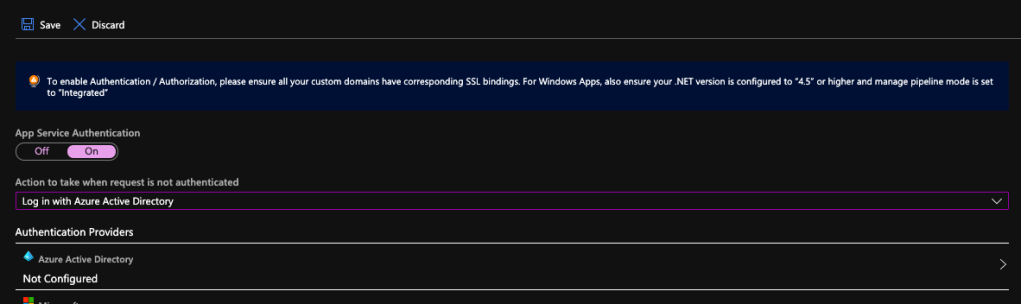
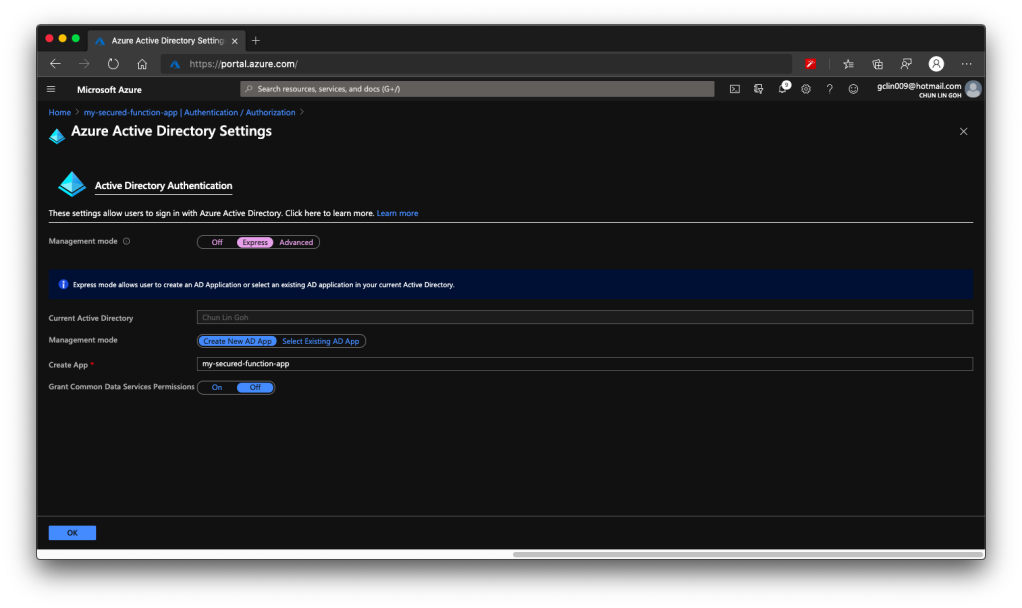
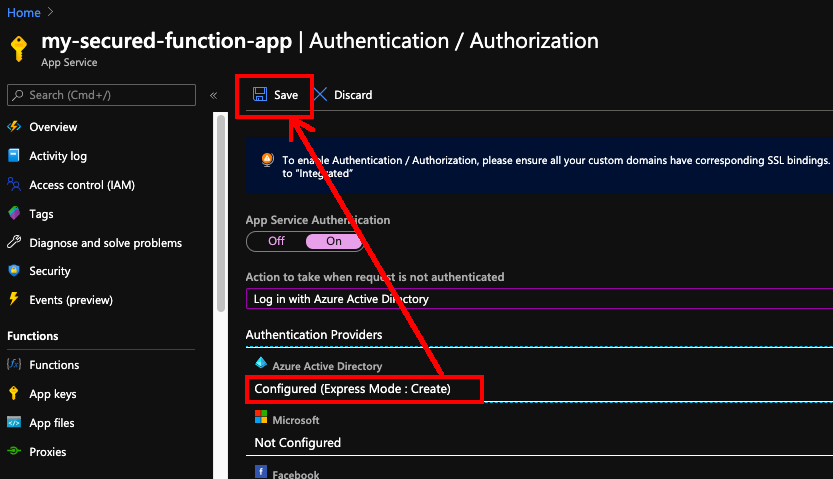
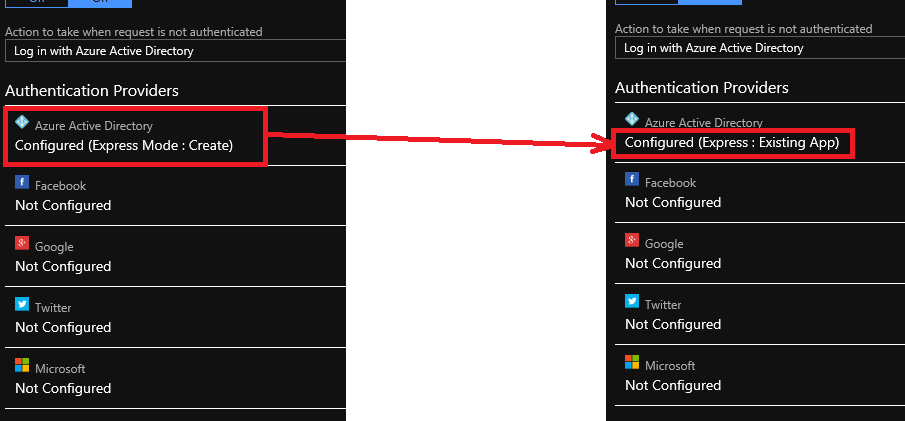
Key Vault

Key Vault in this project is mainly for managing the keys and connection string to the Azure Blob Storage.

Secrets of the FutureNow project in the Azure Key Vault.

To retrieve any of the secrets, we simply make use of the Microsoft.Azure.KeyVault Nuget package, as shown below.

var azureServiceTokenProvider = new AzureServiceTokenProvider();

var keyVaultClient = new KeyVaultClient(new KeyVaultClient.AuthenticationCallback(azureServiceTokenProvider.KeyVaultTokenCallback));

var secret = await keyVaultClient.GetSecretAsync($"https://futurenow.vault.azure.net/secrets/{ secretName }").ConfigureAwait(false);

According to Microsoft Azure documentation, there are service limits in Key Vault to ensure quality of service provided. Hence, when a service threshold is exceeded, any further requests from the client will not get successful response from Key Vault. Instead, HTTP status code 429 (Too many requests) will be returned.

There is an official guidance to handle Key Vault throttling. Currently, the code sample provided in the sample is not correct because the retry and waitTime variables are not used.

Incorrect sample code provided in Microsoft Docs.

Regarding this problem, I have raised issues (#22859 and #22860) and submitted a pull request to Microsoft on Github. Currently the PR is not yet approved but both Bryan Lamos and Prashanth Yerramilli have agreed that the code is indeed incorrect. Anyway, in our KeyVaultService class, the code has already been corrected.

EDIT (26 January 2019): The pull request has been approved. =)

Conclusion

Even though this project is just an experimental project for us to understand more about the power of Custom Vision and Computer Vision, I am glad that through this project, I manage to learn additional knowledge about Blob Storage, Azure DevOps, Key Vault, etc. and then later share it with the Singapore .NET Developers Community members.

Special thanks to Marvin for helping me in this project.

Authenticate an Azure Function with Azure Active Directory

[This post is updated on 19th July 2020 to reflect the latest UI of both Azure Portal and Postman. I’d like to take this chance to correct some of my mistakes made in earlier post, as friendly pointed out by readers in the comment section.]

Today is the first working day of a new year. Today is the second half of year 2020 where I have been instructed to work from home for months. I thus decided to work on a question raised previously by the senior developer in my previous job back in 2018: How do we authenticate an Azure Function?

The authentication tool that I am using is the Azure Active Directory (Azure AD). Azure AD provides an identity platform with enhanced security, access management, scalability, and reliability for connecting users with all our apps.

Setting up Azure Function

The Azure Function that I’m discussing here is the Azure Function app with .NET Core 3.1 runtime stack and published as Code instead as Docker Container.

🎨 Creating a new Function that will be deployed on Windows. 🎨

The whole Function creation process takes about 2 minutes. Once it is successfully created, we can proceed to add a new function to it. In this case, we are going to choose a HTTP trigger, as shown in the screenshot below. We choose to use a HTTP trigger function because later we will show only authenticated users can get the results when sending a POST request to this function.

🎨 Creating a function which runs when it received an HTTP request. 🎨

Once the trigger is created, we will see that there is a default C# code template given which will return the caller a greeting message if a name is provided in the body of HTTP request (or through query string).

🎨 Default template code for HTTP Trigger. 🎨

HTTP Methods and Function Keys

Before we continue, there are a few things we need to handle. The steps below are optional but I think they are useful for the readers.

Firstly, by default, the Function accepts both GET and POST requests. If you would like to only allow POST request, changing only the C# codes above is not going to help much. The correct way is to choose the accepted HTTP methods for this Function under its “Integration” section, as shown in the screenshot below.

🎨 This shows where to locate the “Selected HTTP methods”. 🎨

In our case, since we will only accept POST request, we will tick only the POST option.

As you notice in the “Authorization level” dropdown which is right above the “Selected HTTP methods”, it currently says “Function”. Later we must change this but for now we keep it as it is. If you would like to manage the Function Key, or checkout the default one, you can find the keys in the “Function Keys” section of the Function.

Secondly, what is the URL of this Function? Unlike the previous version of Azure Function, the URL of the Function can be retrieved at both the Overview section and the Code + Test section of the Function. However, the URL in the Overview section has no HTTPS, so we will be using the HTTPS URL found in Code + Test, as shown in the screenshot below.

🎨 Getting the function URL (in HTTPS). 🎨

Now if we send a GET request to the Function, we shall receive 404 Not Found, as shown in the following screenshot, because we only open for POST requests.

🎨 GET request sent to our Function will now be rejected. 🎨

Thus, when we send another HTTP request but make it to be a POST request, we will receive the message that is found in the C# codes in the Function, as shown in the following screenshot.

🎨 Yay, the POST requests are allowed. 🎨

Now, everyone can send a POST request and get the message as long as they know the Function Key. So how do we add Authentication to this Function?

Authorization Level for the Function

Remember in the earlier section above, we talked about the Authorization Level of the Function? It has three options: Function, Admin, and Anonymous.

We must change the Authorization Level of the Function to be “Anonymous”, as shown in the screenshot below. This is because for both “Function” and “Admin” levels, they are using keys. What we need here is user-based authentication, hence we must choose “Anonymous” instead.

🎨 Without setting the Authorization Level to be Anonymous, the Azure AD authorisation will not work as expected. 🎨

This step is very important because if we forgot to change the Authorization Level to “Anonymous”, the Function will still need the Function Key as the query string even though the request comes in with a valid access token.

Enable App Service Authorization

After that, we need to visit the App Service of the Function App to turn on App Service Authentication. This feature is at App Service level instead of the Function itself. So please pay attention to where to look for the feature.

🎨 This is the place to turn on the “App Service Authentication” for the Function app. 🎨

After the Authentication is turned on, we need to specify “log in with Azure Active Directory” as the action to be taken when the request is not authenticate, as illustrated below. This step is also very important because if we forgot to change it and “Allow Anonymous requests (no action)”, then no matter whether we set the Authentication Providers or not, people can still access the Function. Hence, please remember to change this setting accordingly.

🎨 Turning on App Service Authentication. 🎨

Next, please click on the Azure Active Directory which is listed as one of the Authentication Providers. It is currently labelled as “Not Configured”. Don’t worry, we will now proceed to configure it.

Firstly, we choose the Express mode as management mode. Then we can proceed to create a new Azure AD. The Portal then will help us to setup a new AD Application (or choose from existing AD Application). You can go to Advanced directly if you are experienced with Azure AD.

You should now see the page which looks like what is shown in the following screenshot.

🎨 Creating a new Azure AD Application for the Function in an easy way. (Waypoint 1) 🎨

There is one thing that may catch your attention. It is the last item in the page called “Grant Common Data Service Permissions”. Common Data Service, or CDS, is Microsoft way of providing a secure and cloud-based storage option for our data. There is a one-hour Microsoft online course about CDS, you can take the course to understand more. Grace MacJones, Microsoft Azure Customer Engineer, also gave us a short-and-sweet explanation about this setting on GitHub.

We basically can leave everything as default in the page and proceed to click the “OK” button at the bottom of the page.

After this, the Azure AD will be labelled as “Configure (Express Mode: Create)”. We can then proceed to save the changes.

🎨 Do not forget to save the settings! 🎨

After the settings are saved, we can refresh the page and realising the Azure AD is now labelled as “Configure (Express: Existing App)”. That means the Azure AD app has been created successfully.

🎨 The status of Azure AD for the Function is updated. 🎨

Now, click in to the Azure AD under the Authentication Providers list again. We will be brought to the section where we specified the management node earlier. Instead of choosing Express mode, now we can proceed to choose the Advanced mode.

We will then be shown with Client ID, Issuer Url, and Client Secret, as shown in the following screenshot. According to Ben Martens’ advise, we have to add one more record, which is the domain URL of the Function, to the “Allowed Token Audiences” list to make Azure AD work with this Function, as shown in the following screenshot. (This step is no longer needed with the new interface since October 2019 so I strikethrough it)

🎨 Getting the Azure AD important parameters. 🎨

When you leave this page, the Azure Portal may prompt you to save it. You can choose not to save it. It is optional. If you save it, the Azure AD mode will be changed from Express to Advanced and this will not affect our setup.

Testing on Postman

Now, let’s test our setup above.

When we send the same POST request to the Function again (with the code query string removed since it’s no longer necessary), this time with the App Service Authorization enabled for the Function App, we will no longer be able to get the same message back. Instead, we are told to be 401 Unauthorised and “You do not have permission to view this directory or page”, as shown in the screenshot below.

🎨 Yup, we are unauthorised now. 🎨

Now, let’s try to authenticate ourselves.

To do so, we will make a POST request with the body containing Grant Type, Client ID, Client Secret, and Resource to the following URL:
https://login.microsoftonline.com/<Tenant ID>/oauth2/token to retrieve the access token, as shown in the following screenshot.

🎨 Yesh, we got the access token. 🎨

If we use the access token to send POST request to our Function, we will be told that we are now authorised and the message found in C# code is presented to us, as shown in the following screenshot.

🎨 Yay, we can access our Function again! 🎨

Conclusion

If you would like to get the claims in the Azure Function, you can refer to the following code which loops through all the claims. If you would like to allow a certain client app to call the Azure Function, you can check for the value of the claim having “appid” as its type.

foreach(var claim in principal.Claims)
{
    log.LogInformation($"CLAIM TYPE: {claim.Type}; CLAIM VALUE: {claim.Value}");
}

That’s all it takes to setup a simple authentication for Azure Function with Azure AD. If you find anything wrong above, feel free to correct me by leaving a message in the comment section. Thanks!

References

[KOSD Series] Increase Memory Allocated to PHP in WordPress hosted on Microsoft Azure App Services on Linux

kosd-azure-app-service-filezilla-wordpress.png

“It became clear that we needed to support the Linux operating system, and we had already taken some rudimentary steps towards that with Azure.”

This is what Satya Nadella, Microsoft CEO, said in his book Hit Refresh. With the change he announced, today we can host a WordPress site easily on Microsoft Azure with the App Service on Linux option. Currently, my team has made use of this function on Azure to host our WordPress sites.

microsoft-loves-linux.png
Satya Nadella announcing the partnership. (Image Credit: The Verge)

This morning, I received a message from teammate with the following screenshot asking how to get rid of the following red messages.

memory-issues.png
Memory issues on WordPress!

This only happened after we installed a new theme called G5Theme for our WordPress site. The theme that we are using is called G5Plus Mowasalat.

So how do we approach this problem. Even though the three red lines are linked to the same “Increasing memory allocated to PHP“, there are fundamentally two places that we need to change.

Firstly, we need to add the following line to increase the WP_MEMORY_LIMIT to 128M in wp-config.php.

define('WP_MEMORY_LIMIT', '128M');
Released with WordPress 2.5, the WP_MEMORY_LIMIT option allows us to specify the maximum amount of memory that can be consumed by PHP.
The file is located under /site/wwwroot directory, as shown in the FTP screenshot below.

ftp-wp-config.png
This is where wp-config.php is located.

Changing this will only remove the first two red lines.

For the issue highlighted by the third red line, we need to update the max_input_vars value in .htaccess file which is located at the same directory with the following line.

php_value max_input_vars 3000

This max_input_vars is one of the PHP runtime configurations that is introduced since PHP 5.3.9 with default value of 1,000. What it means is simply the maximum number of input variables can be accepted in for example $_GET and $_POST.

Adding this will remove the final red line and everything will be shown green.

success
Hola! All are green.

KOSD, or Kopi-O Siew Dai, is a type of Singapore coffee that I enjoy. It is basically a cup of coffee with a little bit of sugar. This series is meant to blog about technical knowledge that I gained while having a small cup of Kopi-O Siew Dai.

Connecting Azure VM with Singtel Meg@POP

singtel-expressroute-vnet-virtualnetworkgateway-vm

Singtel Meg@POP IP VPN is a new service provided by Singtel, the largest mobile network operators in Singapore. According to its official website, it is designed for retail businesses with multi-sites and it can provide a more secure network as compared to Internet VPN. It leverages MPLS (Multi-Protocol Label Switching) technology, which bypasses the Internet and reduces exposure to cyberthreats.

One thing that I’d like to highlight here is that Singtel Meg@POP also offers connection to major cloud providers, such as Alibaba Cloud, Amazon Web Services, and Microsoft Azure, via their Cloud Gateway. Hence, if we have our services hosted on the cloud and our systems would like to talk to the applications running behind Singtel Meg@POP, we need to understand how to configure our cloud infrastructure to connect to the Singtel Meg@POP.

megapop-and-clouds.png
How Meg@POP works with the public clouds. (Source: Singtel Meg@POP)

In this article, I will be sharing my journey of setting up our VM on Microsoft Azure to link with Singtel Meg@POP via ExpressRoute.

Step 1: Subscribing ExpressRoute Service

Azure ExpressRoute is for us to create private connections between Azure datacentres and on-premise infrastructure. One good thing about ExpressRoute is that it does not go over the public Internet and thus it is able to offer a more reliable and faster Internet connection.

Hence, to connect with Singtel Meg@POP, Singtel staff recommended us to subscribe to the ExpressRoute on Microsoft Azure before they could provision the Meg@POP service.

It is better to consult with Singtel side before we proceed to subscribe ExpressRoute. In the first step of subscribing, we need to provide information such as Provider and Peering Location. After discussing with the friendly Singtel sales manager from the Business Segment, we managed to get the correct values to setup the ExpressRoute circuit.

setting-expressroute.png
Creating new ExpressRoute circuit on Azure Portal to connect to Singtel Meg@POP.

Step 2: Provisioning Meg@POP

Once the circuit is created successfully, we need to provide the Service Key of the circuit to Singtel staff. The Service Key can be found in the Overview section of the circuit, as shown in the screenshot below.

expressroute-service-key.png
Service Key of ExpressRoute circuit.

After we emailed the Service Key to Singtel, we needed to wait for them to provision Meg@POP. The whole process took about 21 days for our case. Finally we received a confirmation email from them saying that Singtel had commissioned the service and we could proceed to link our virtual network in Microsoft Azure to the ExpressRoute circuit.

Now, under the Peerings section of the ExpressRoute circuit, we shall see something as follows.

expressroute-peerings.png
Primary and secondary subnets are provisioned for Azure private peering.

Step 3: Creating Virtual Network on Azure

This is a step that we need to be careful. Before we proceed to create the VNet, we need to understand from the service provider that we are connecting to whether they only provision a certain subnet for us to use to connect.

For our case, the service provider that we are connecting to told us to use 10.10.1.0/24 subnet. Hence, when we are creating VNet, we need to use that as Address Space.

Also, please take note that the Address Range for the subnet that we are going to put our virtual machine in later needs to be smaller than the Address Space of the VNet specified above. Otherwise later we will not have address left for the Virtual Network Gateway. Hence, in our case, I choose 10.10.1.0/25.

creating-vnet.png
Creating VNet with a subnet having only 128 addresses.

Step 4: Creating Virtual Machine

Next, we proceed to create a new VM. In the Networking tab, we are required to configure VNet for the VM.

In this step, we need to choose the VNet and Subnet that we just created in Step 3. After that, for the convenience of direct RDP into the VM, we also need to set a Public IP and make sure Public inbound ports include RDP 3389 port

configuring-vnet-for-vm.png
Configuring the network interface of a VM.

Step 5: Opening Inbound and Outbound Ports

After the VM is setup successfully, we then need to proceed to configure the inbound and outbound port rules for the VM. This step is only necessary if we are asked to use certain ports to communicate with service hosted behind the Meg@POP.

This step can be easily done in the Network Security Group of the VM.

network-security-group-of-vm.png
Inbound and outbound security rules applied for a VM.

Step 6: Creating Virtual Network Gateway

We now need to create the Virtual Network Gateway with its subnet in one go.

A Virtual Network Gateway has two or more VMs which are deployed to the Gateway Subnet. The VMs are configured to contain routing tables and gateway services specific to the gateway. Thus, we are not allowed to directly configure the VMs and we are advised to never deployed additional resources to the Gateway Subnet.

There is one important step where we need to make sure we choose “ExpressRoute” as the Gateway Type, as shown in the screenshot below.

creating-virtual-network-gateway.png
Remember to choose ExpressRoute as the Gateway Type!

For the Gateway SKU, we are given three options: Standard, High Performance, Ultra Performance. As a start, we choose the Standard SKU which costs the least among three.

gateway-skus.png
Estimated performances by different gateway SKUs. (Source: Azure ExpressRoute)

Finally after choosing the VNet for the gateway, we will be prompted to specify the Address Range for the Gateway Subnet. In our case, I make it to be a bit smaller, which is 10.10.1.0/28.

Step 7: Creating Connection between ExpressRoute and VNet

Finally, we have to link up our VNet with the ExpressRoute.

To do so, we simply head to the Connections section of the ExpressRoute circuit to add the Virtual Network Gateway to it.

add-connection-to-expressroute-circuit.png
The table shows one connection successfully added to the circuit.

Conclusion

results.png
End results.

Yes, that’s all. This learning process took me about two weeks to learn. Hence, if you spot any mistakes in my article, please let me know. Thank you in advance.

If you would like to learn more about this, there is a very good tutorial video on Channel 9 about this too which they talk about Hybrid Networking! I learnt most of the knowledge from that tutorial video so I hope you find it useful as well. =)

Together, we learn faster!