In our earlier post about setting up AWS Lambda, we understood that for Lambda which will be invoked by HTTP requests, we normally need API Gateway to handle incoming HTTP requests and route them to the appropriate Lambda function. Hence, the API Gateway is often used as a complementary service to manage and expose our Lambda functions to the outside world.
By default, AWS provides a custom domain name in the form of api-id.execute-api.region.amazonaws.com, as shown in the screnshot below.
This Lambda is deployed in Singapore and thus it is ap-southeast-1 for the region.
Usually, we would like to expose our API Gateway through a domain name that we own, rather than using the default domain provided, in order to enhance the visibility, security, and professionalism of our API, while also providing greater flexibility and control over its configuration and branding. In this article, we will show one of the available approaches.
Domain Registrar
We must have a registered Internet domain name before we can set up custom domain names for our API Gateway.
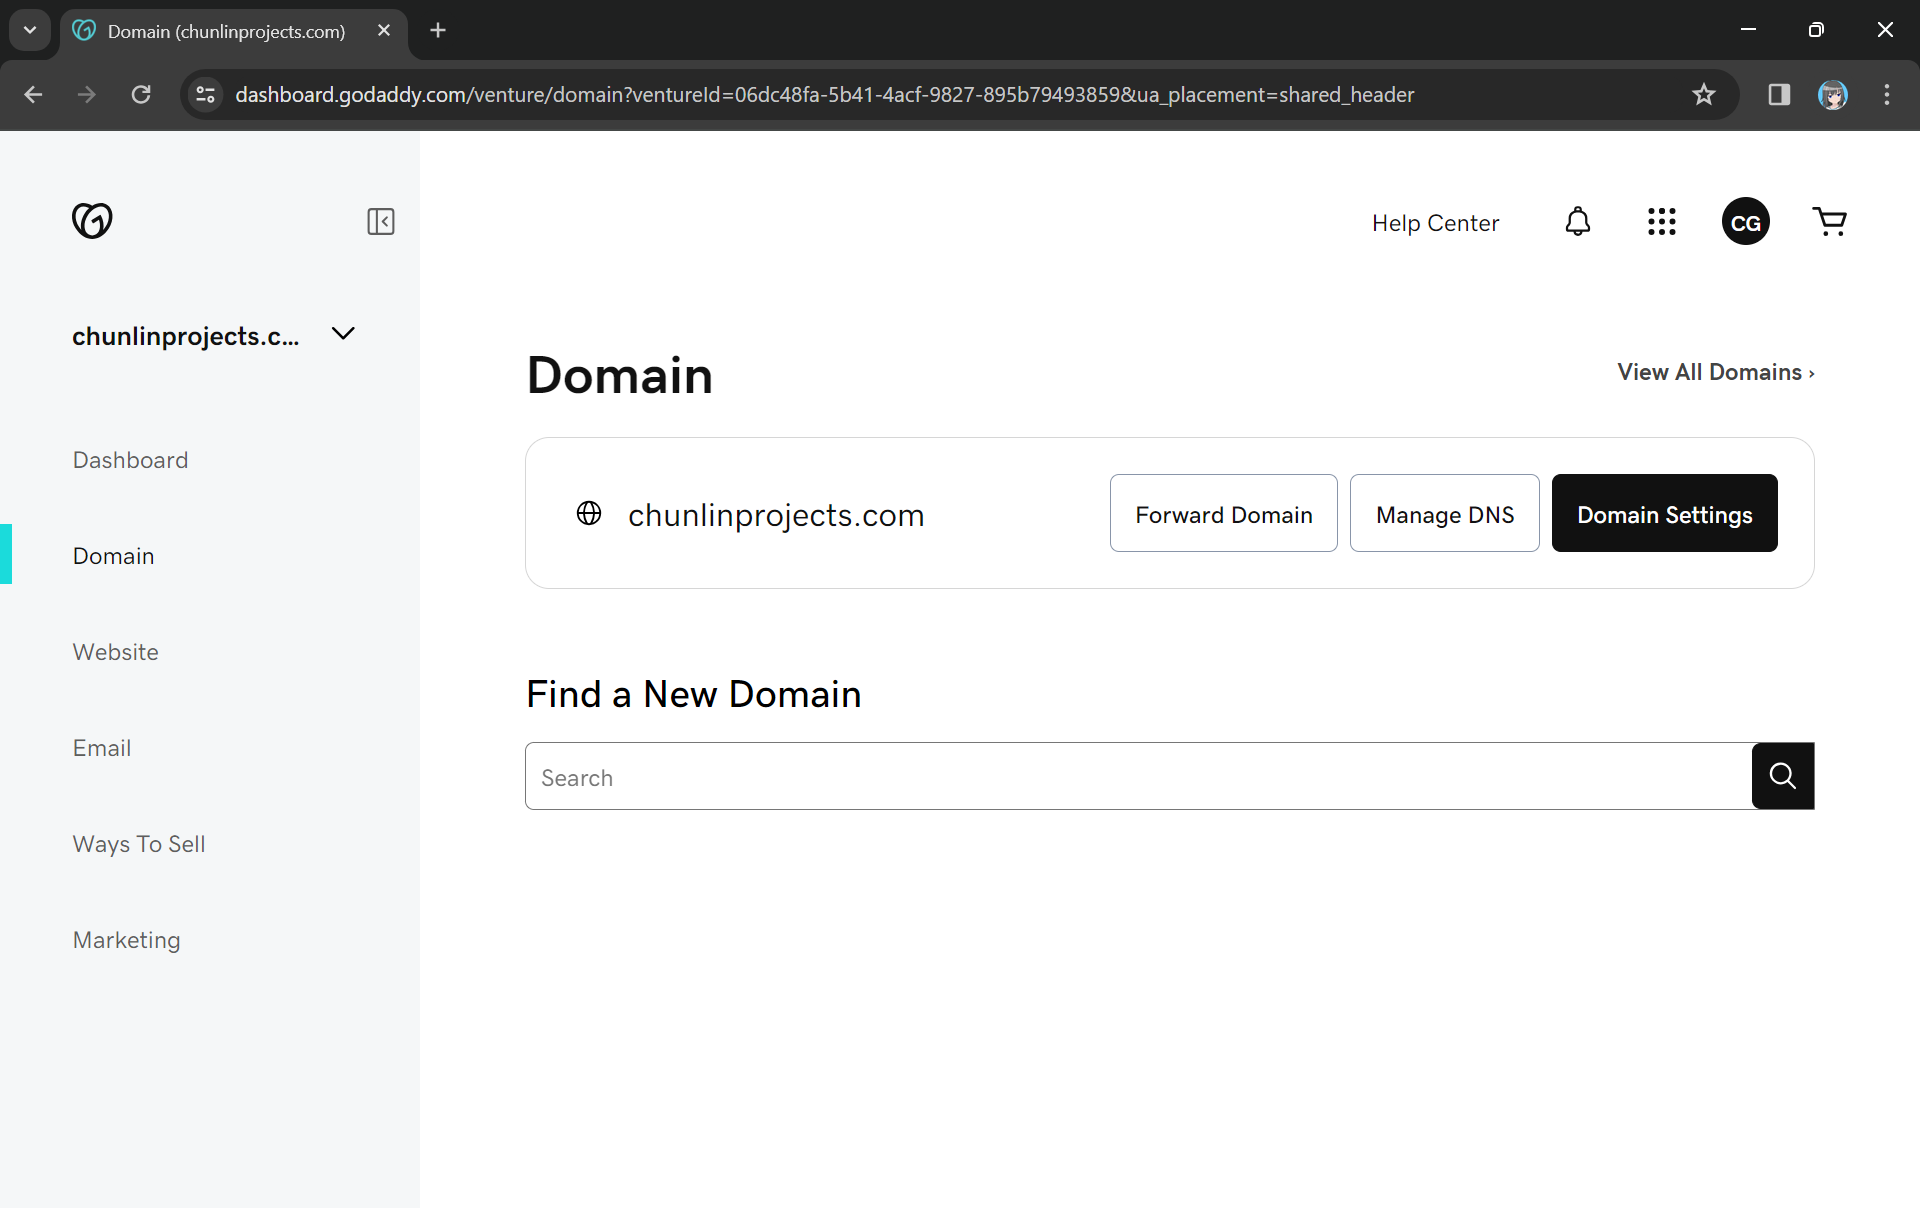
Previously, I have registered a domain name, chunlinprojects.com, on GoDaddy, one of the world’s largest domain registrars. Hence, I decided to create a subdomain called poker.chunlinprojects.com and then use it for my API Gateway.
My personal domain, chunlinprojects.com, on GoDaddy.
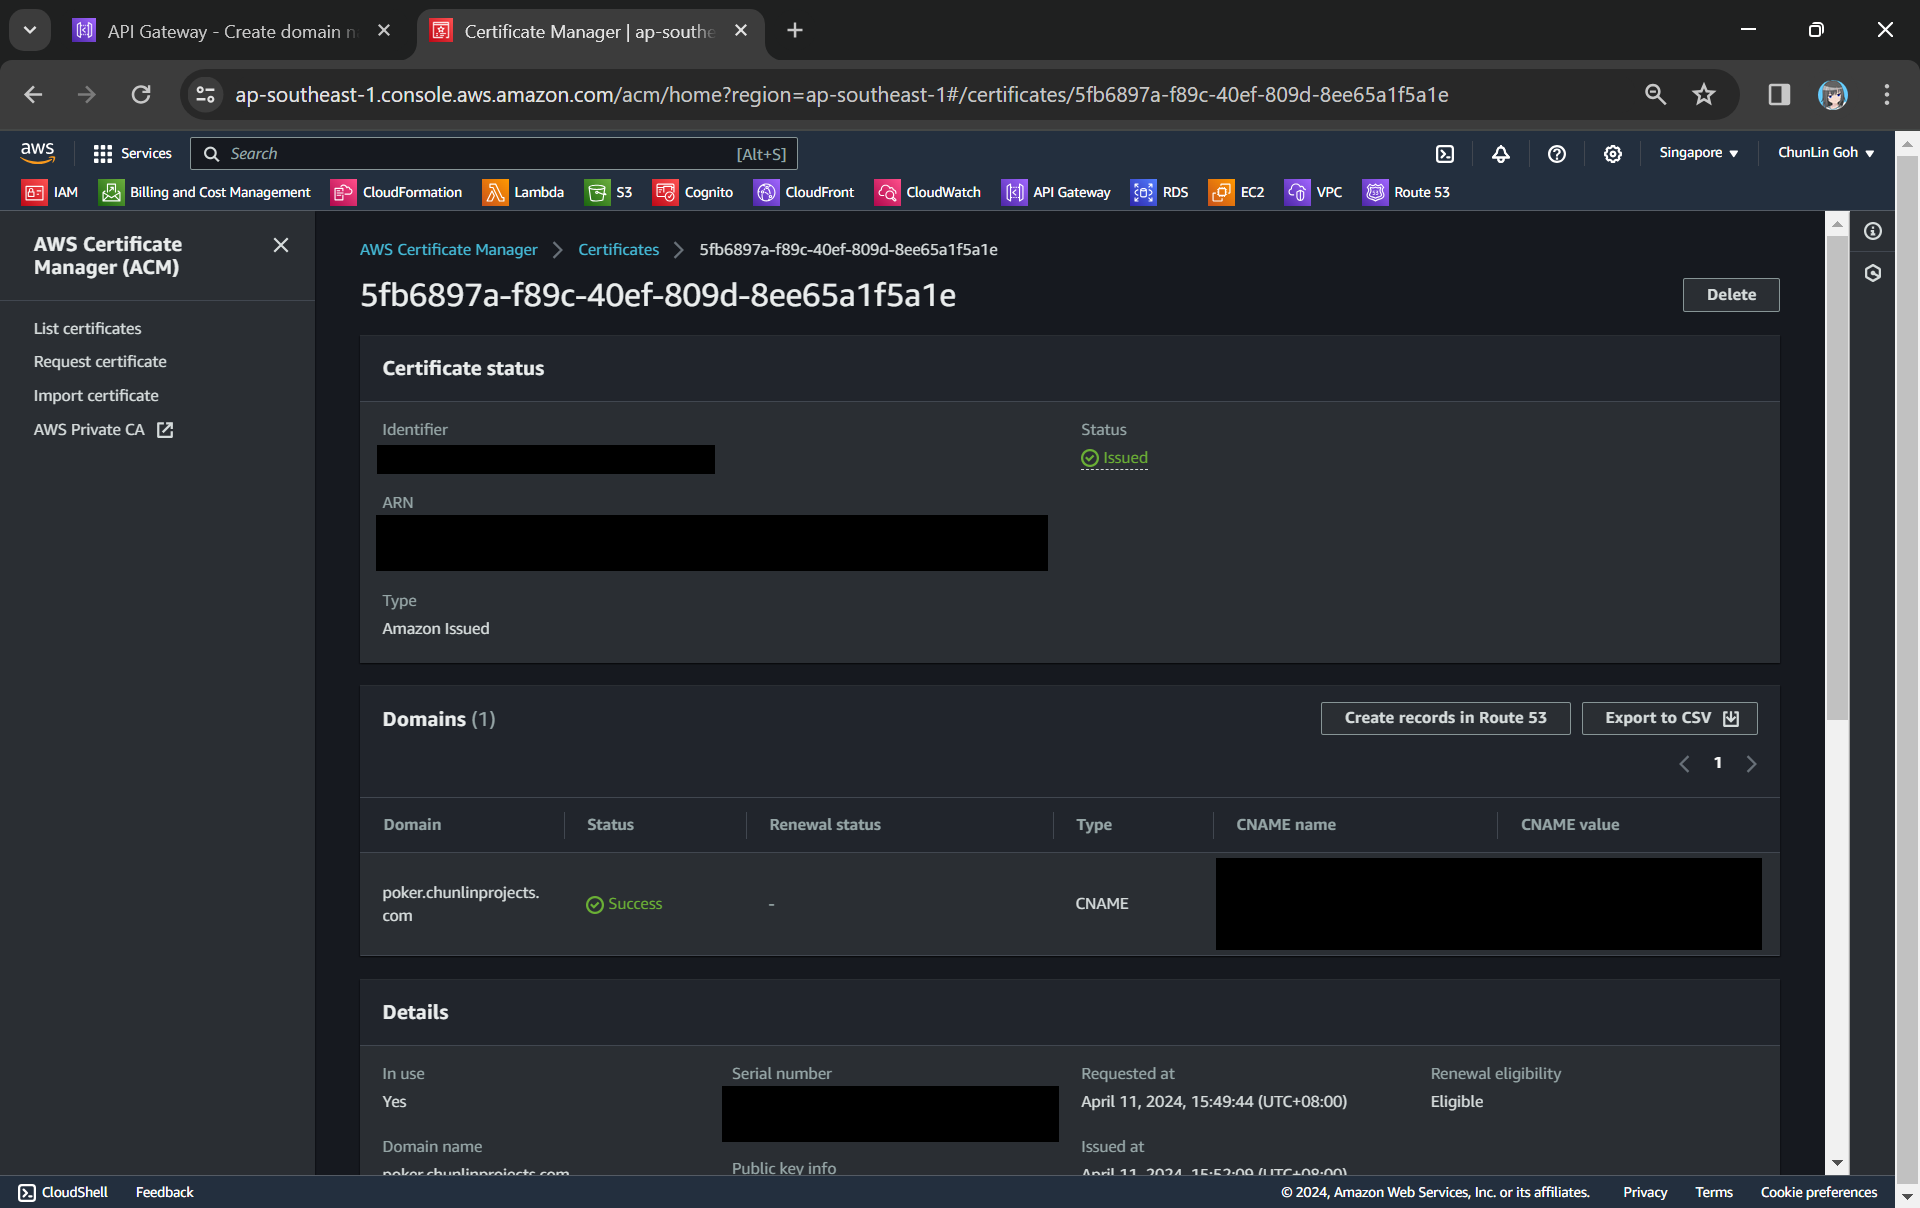
In the certificate request page, we need to specify the domain name. In my case, it should be poker.chunlinprojects.com. Once it is done, we will need to add a CNAME record to our domain registrar. Its status will only be “Success” after we have added the CNAME record successfully, as shown in the screenshot below.
We need to add the CNAME record under the “Domain” section to our domain registrar.
Route 53
As shown in the screenshot above, it is also possible to add the CNAME record to Route 53. So what is this Route 53 about?
Route 53 is Amazon Domain Name System (DNS) web service. It allows us to manage the DNS records for your domain, including A records, CNAME records, TXT records, and more. This is similar to what we can do on GoDaddy, so why do we need Route 53?
Route 53 is a better option because Route 53 provides a user-friendly interface for adding, updating, and deleting these records. In addition, Route 53 supports alias records, which can be used to map our custom domain directly to the API Gateway endpoint. Alias records work similarly to CNAME records but with the advantage of being resolved by Route 53 without incurring additional DNS lookup costs. This can improve the performance and reliability of our API Gateway by reducing latency and DNS resolution times.
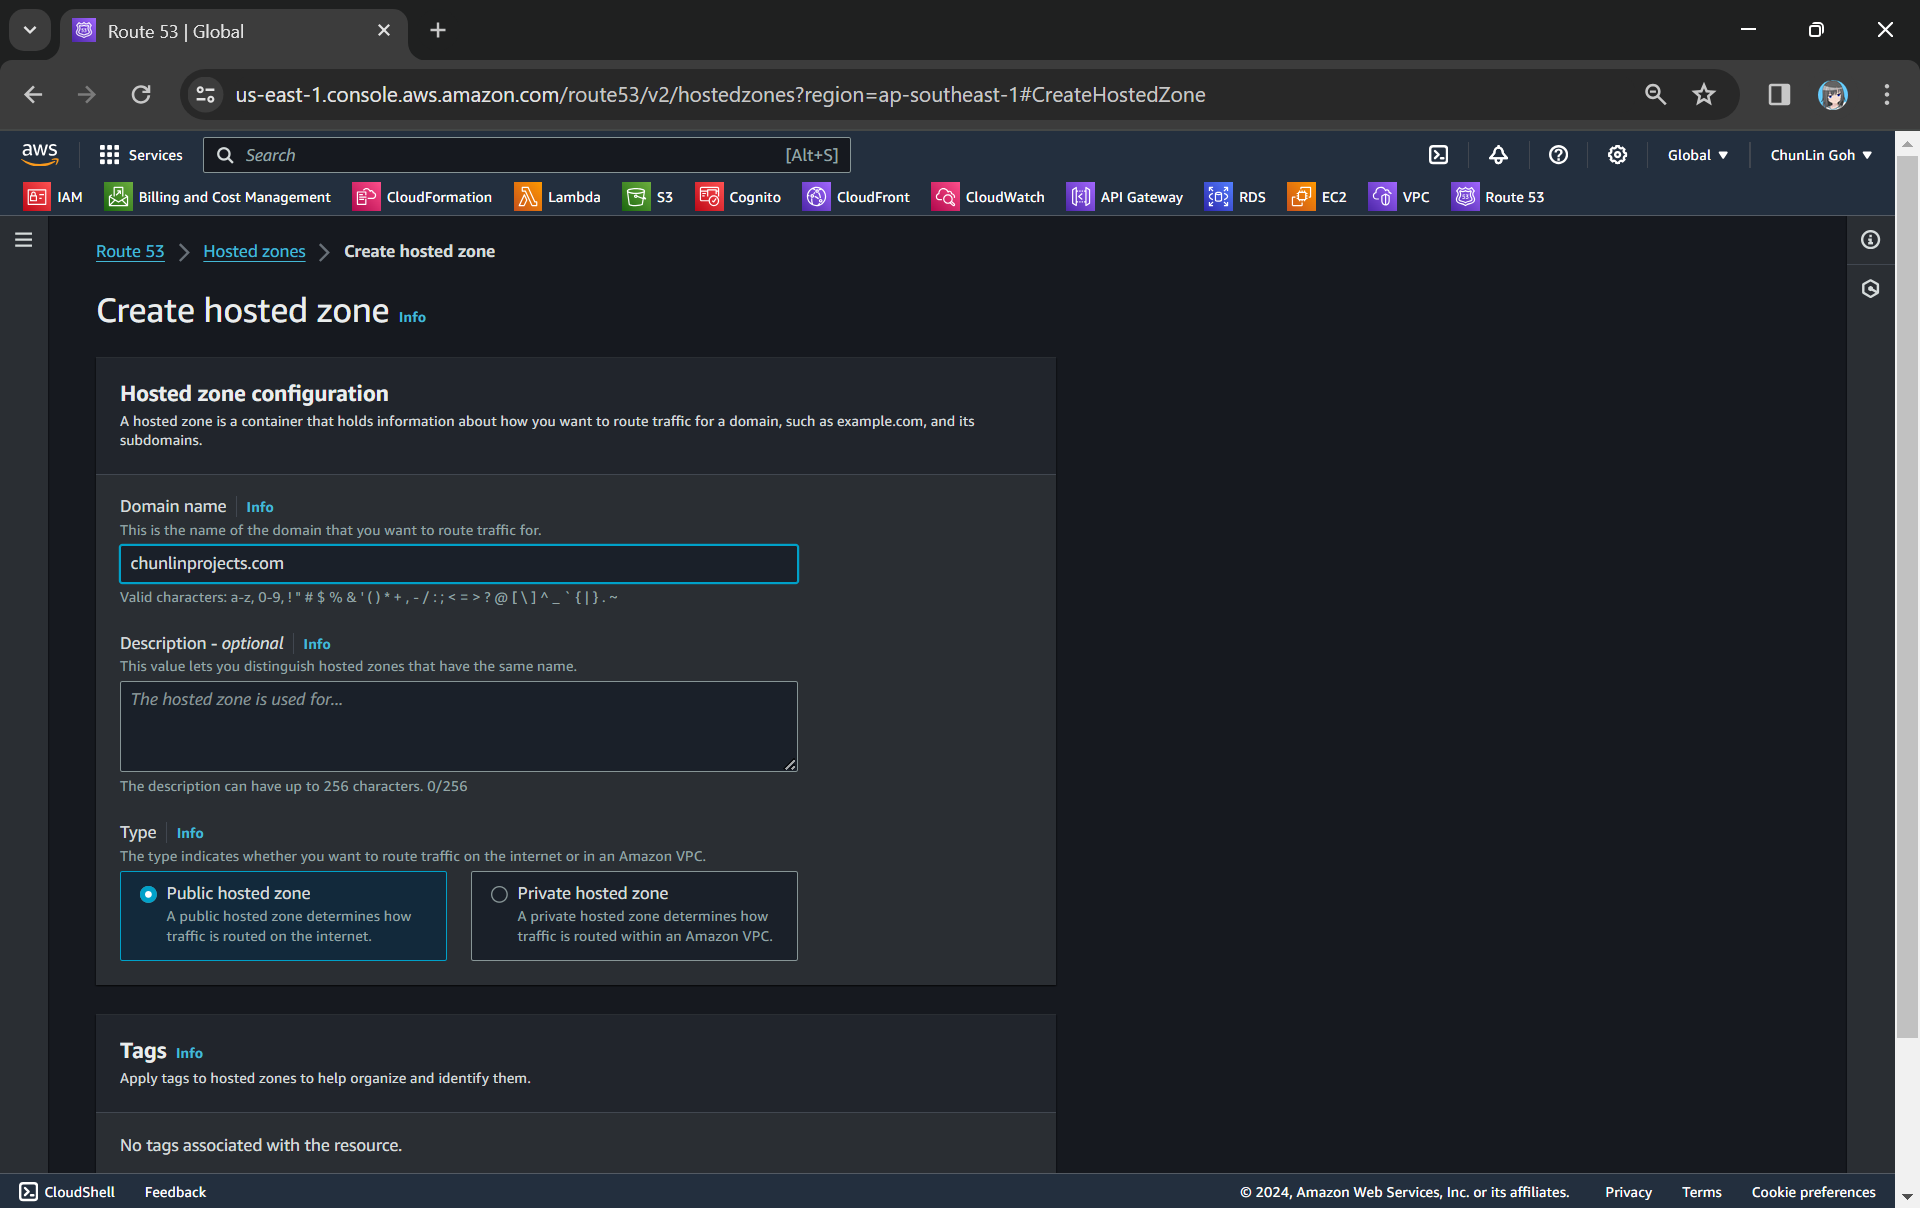
To setup Route 53 for our custom domain, we first need to create a Hosted Zone in Route 53 for our domain, as shown in the screenshot below.
Creating a new hosted zone for our custom domain.
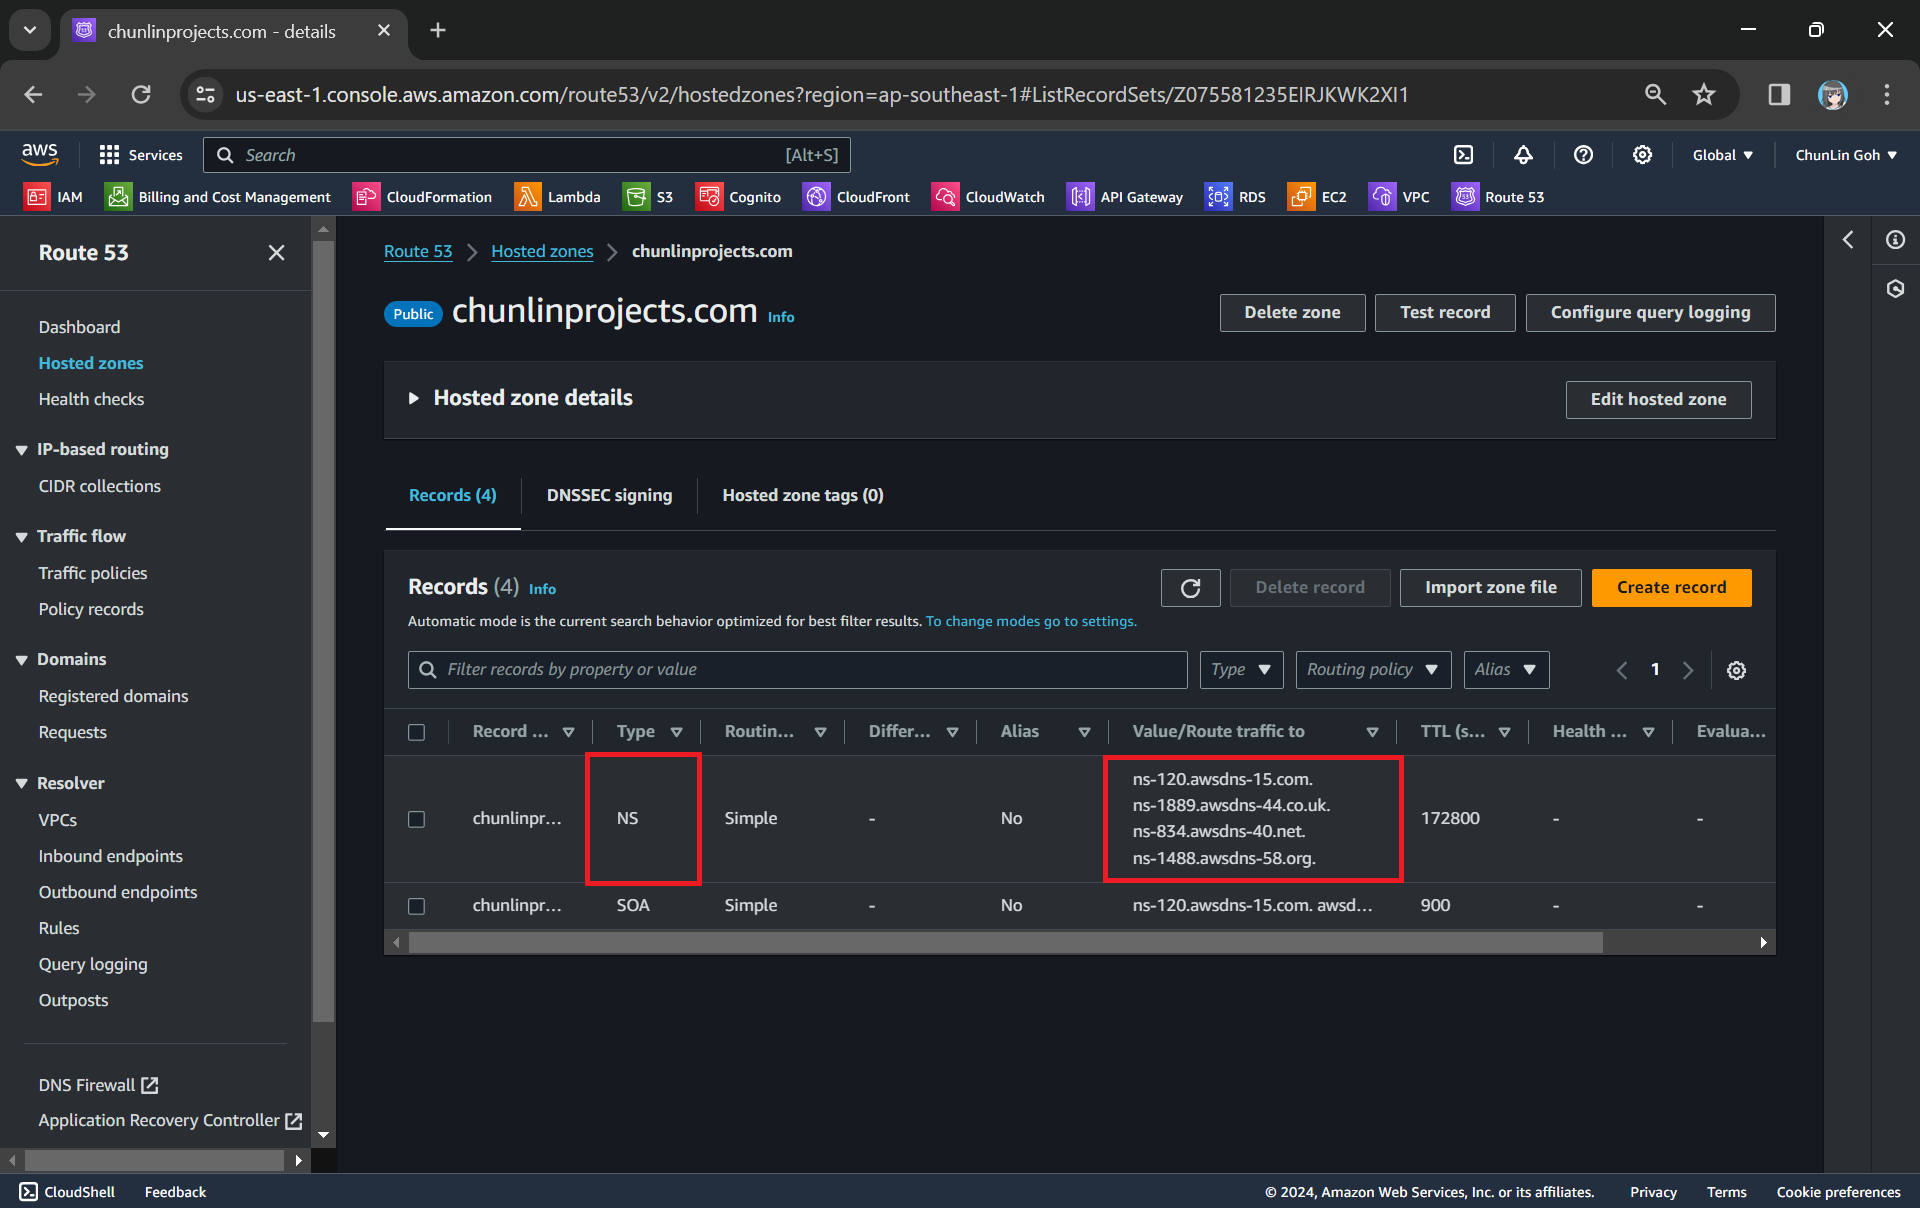
After getting the hosted zone created, we will be able to get the list of name servers that we can use, as shown in the following screenshot.
NS (Name Server) records in Route 53 are used to specify the name servers responsible for answering DNS queries for our domain.
Since we want to use Route 53 name servers for DNS resolution, we need to update the (NS) records in GoDaddy DNS settings to point to the Route 53 name servers.
The name servers in GoDaddy for my domain have been updated to use Route 53 ones.
Now we can add the CNAME record earlier in our Route 53 hosted zone too.
The CNAME record required by the ACM certificate has been added to Route 53.
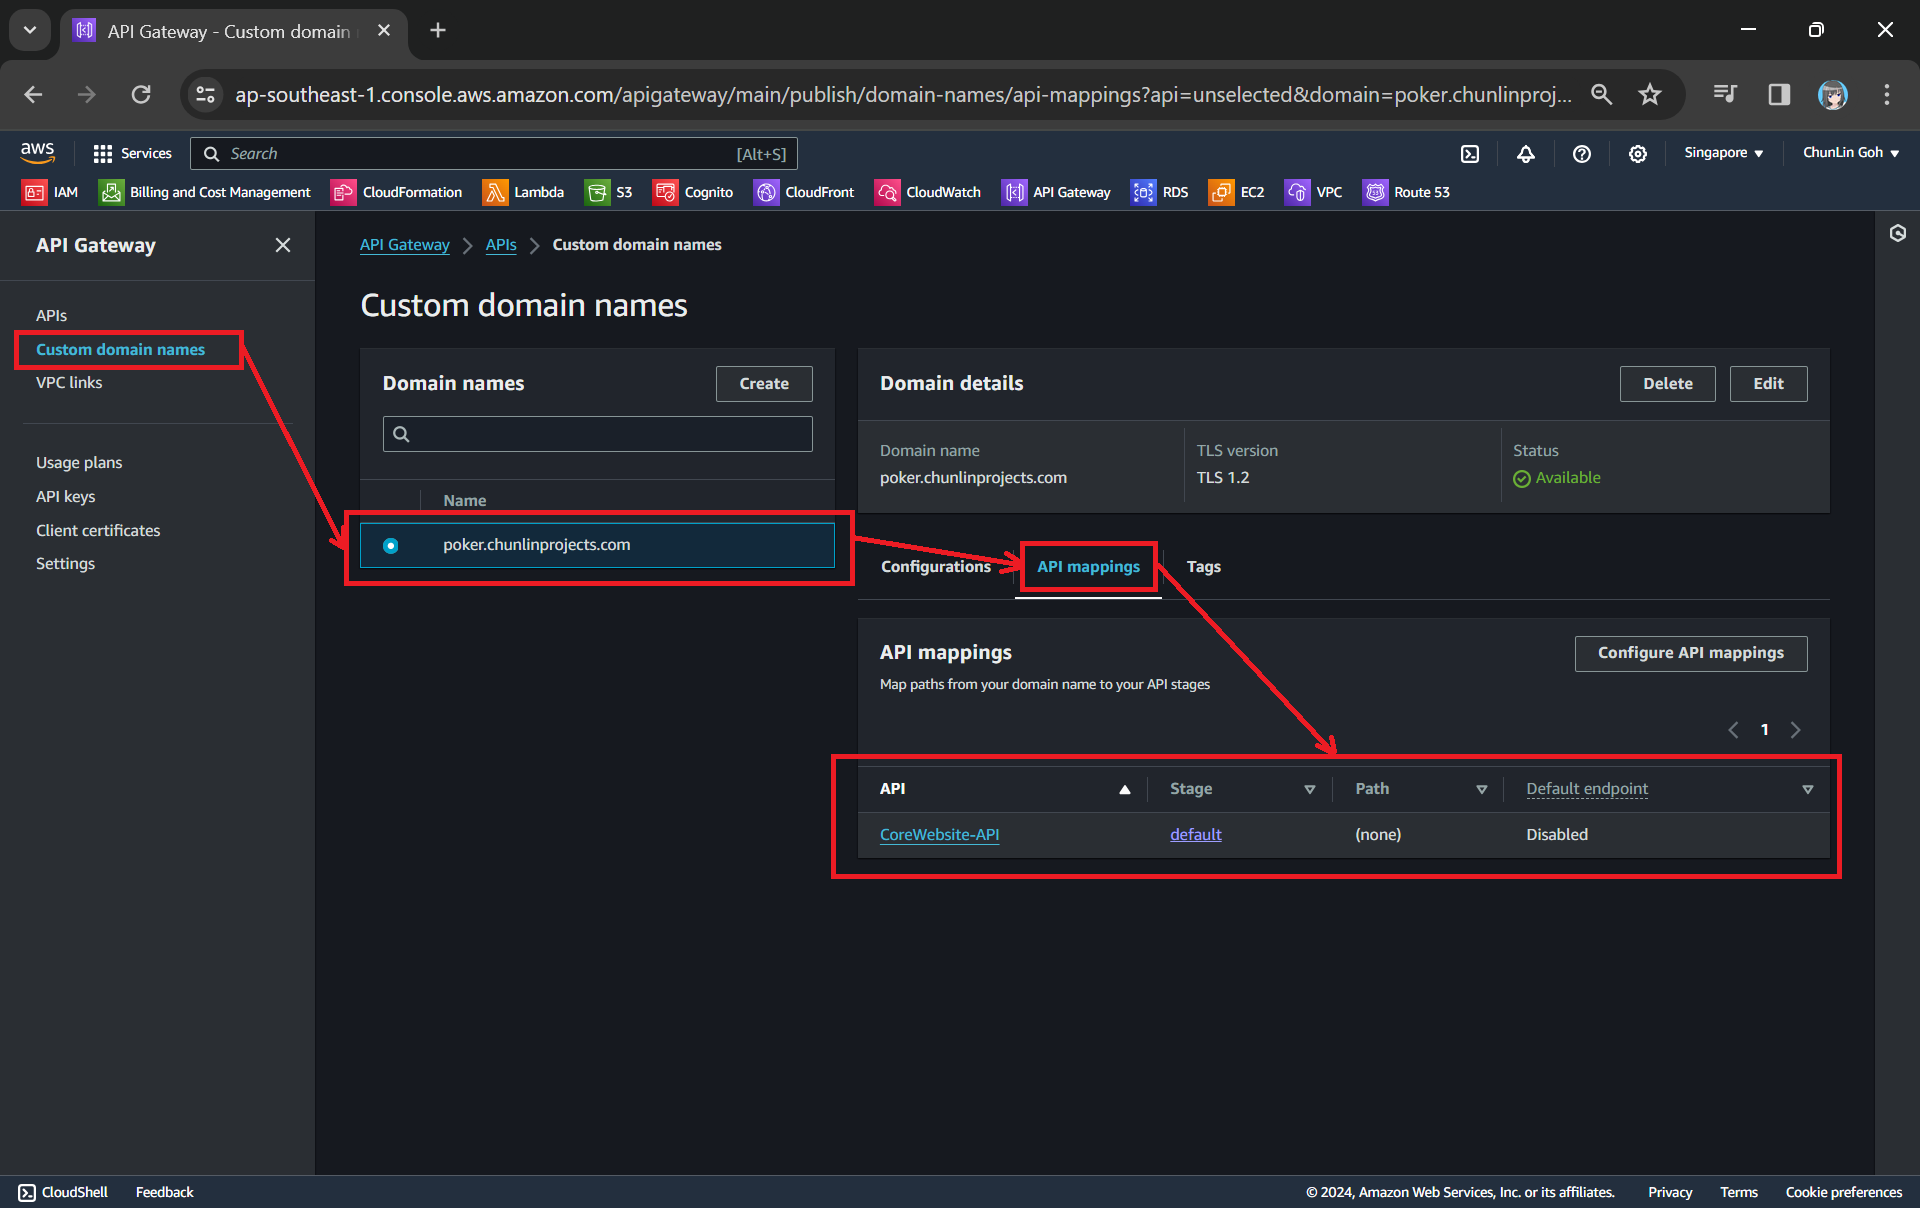
Custom Domain Name in API Gateway
After we have both ACM and Route 53 setup completely, we can move on to configure our custom domain name for the API Gateway.
The ACM certificate we created earlier will be available as one of the options.
Next, we use API mappings to connect API stages to the custom domain name. For more information about how API mapping is configured, please read the official AWS documentation.
We have mapped the custom domain to the API Gateway that we created.
If you ever encounter an error message saying “Not Found” as shown in the screenshot below, it is possible that the API mapping is not done properly or there is a typo in the Path.
Error message: { “message”: “Not Found” }
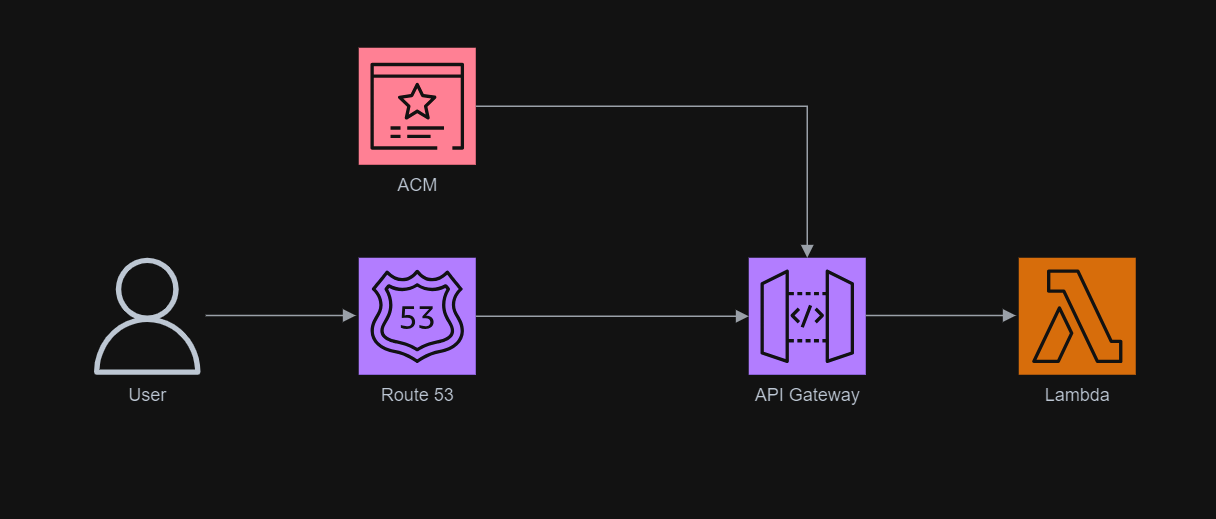
The entire infrastructure that we have gone through in this article basically can be described in the following diagram.
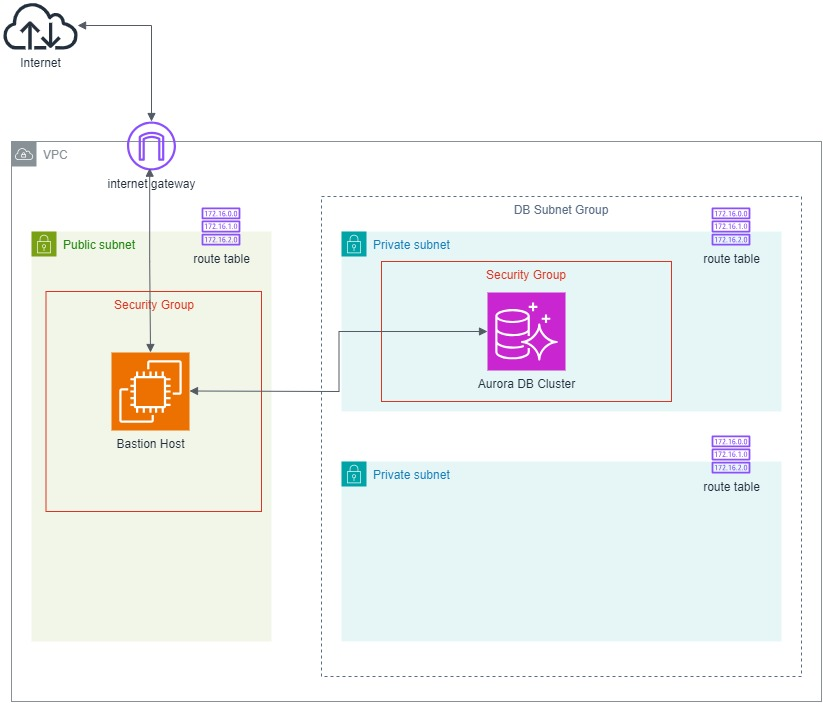
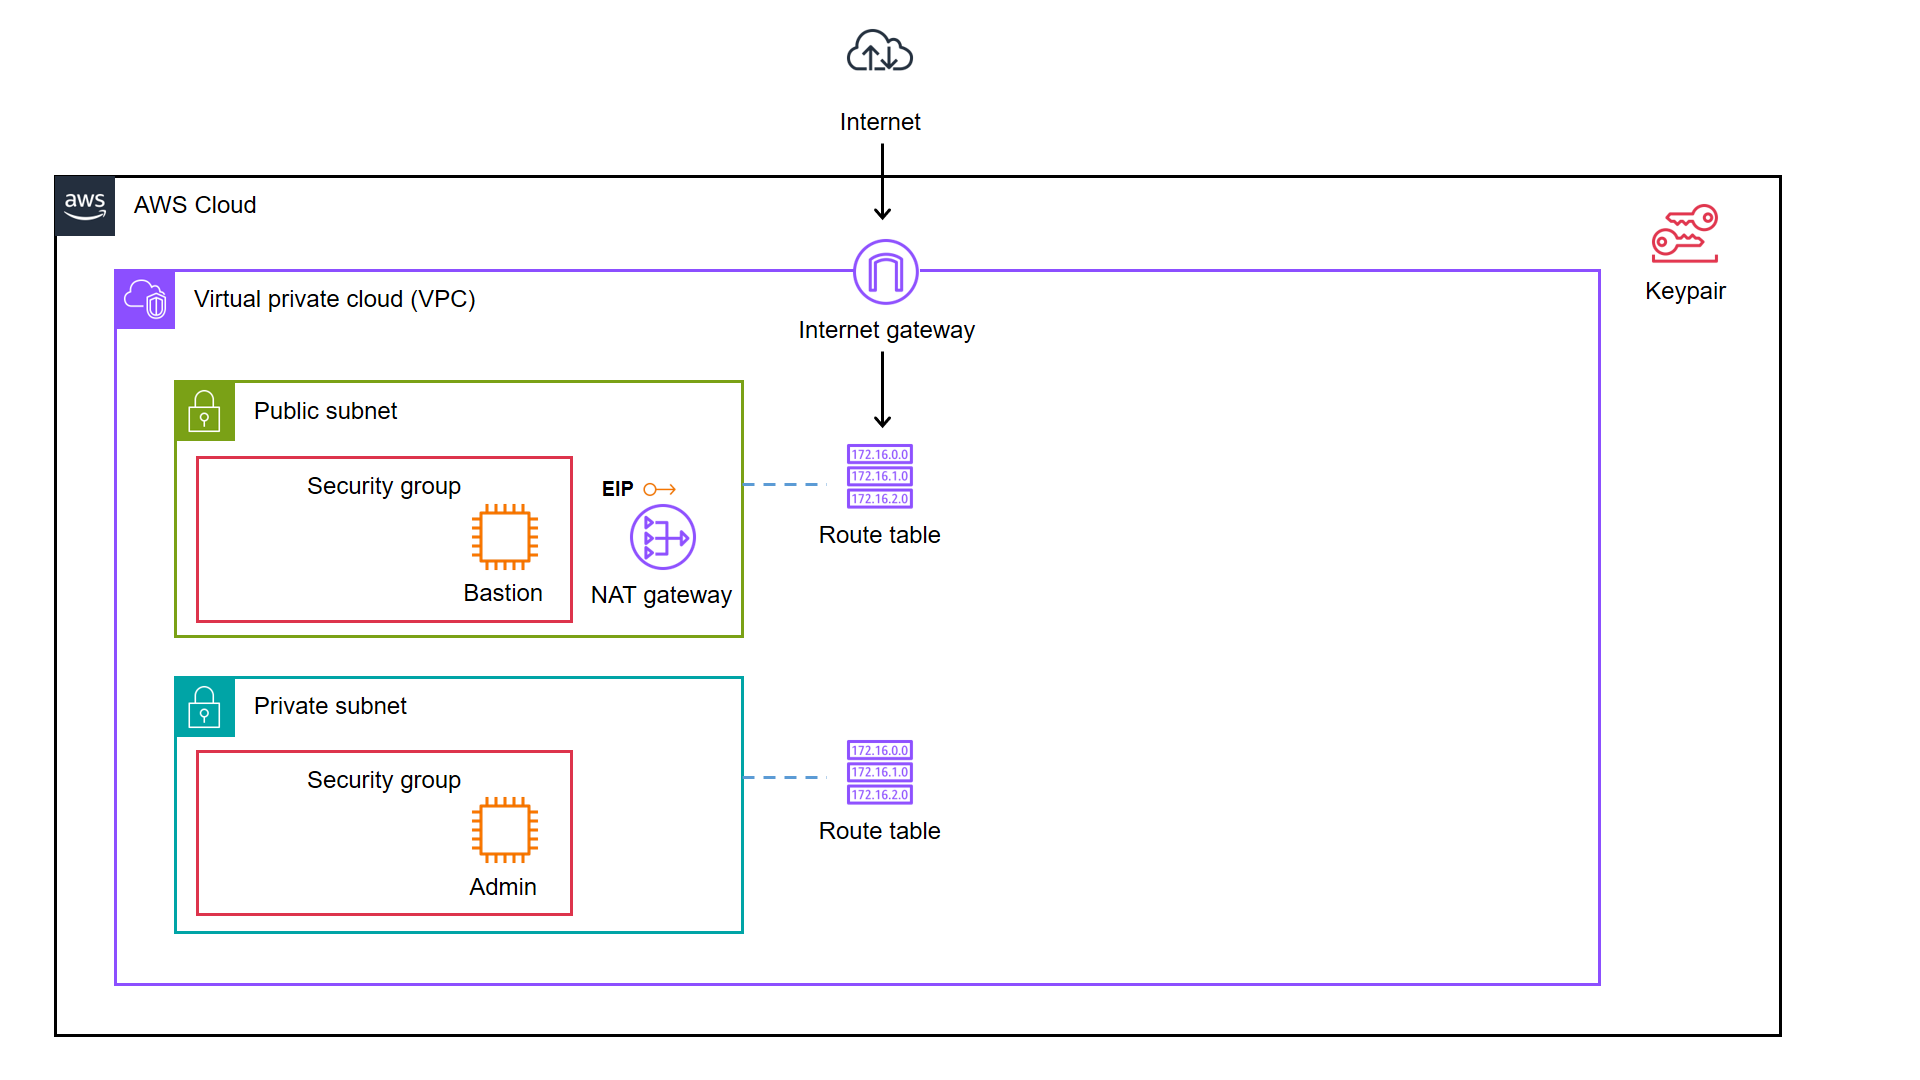
There is always a common scenario that requires cloud engineers to configure infrastructure which allows developers to safely and securely connect to the RDS or Aurora database that is in a private subnet.
For development purpose, some developers tend to create a public IP address to access the databases on AWS as part of setup. This makes it easy for the developers to gain access to their database, but it is undoubtedly not a recommended method because it has huge security vulnerability that can compromise sensitive data.
Architecture Design
In order to make our database secure, the recommended approach by AWS is to place our database in a private subnet. Since a private subnet has no ability to communicate with the public Internet directly, we are able to isolate our data from the outside world.
Then in order to enable the developers to connect remotely to our database instance, we will setup a bastion host that allows them to connect to the database via SSH tunnelling.
The following diagram describes the overall architecture that we will be setting up for this scenario.
We will be configuring with CloudFormation template. The reason why we use CloudFormation is because it provides us with a simple way to create and manage a collection of AWS resources by provisioning and updating them in a predictable way.
Step 1: Specify Parameters
In the CloudFormation template, we will be using the following parameters.
When we use a VPC, we have control over our virtual networking environment. We can choose our own IP address range, create subnets, and configure routing and access control lists.
A bastion host, also known as a jump server, is used as a bridge between the public Internet and a private subnet in a network architecture. It acts as a gateway that allows secure access from external networks to internal resources without directly exposing those resources to the public.
This setup enhances security by providing a single point of entry that can be closely monitored and controlled, reducing the attack surface of the internal network.
In this step, we will be launching an EC2 instance which is also our bastion host into our public subnet which is defined as follows.
This public subnet will be able to receive public connection requests from the Internet. However, we should make sure that our bastion host to only be accessible via SSH at port 22.
BastionSecurityGroup: Type: AWS::EC2::SecurityGroup Properties: GroupName: !Sub '${AWS::StackName}-bastion-sg' GroupDescription: !Sub 'Security group for ${AWS::StackName} bastion host' VpcId: !Ref VPC
CidrIp defines the IP address range that is permitted to send inbound traffic through the security group. 0.0.0.0/0 means from the whole Internet. Thus, we can also make sure that the connections are from certain IP addresses such as our home or workplace networks. Doing so will reduce the risk of exposing our bastion host to unintended outside audiences.
In order to enable resources in our public subnets, which is our bastion host in this case, to connect to the Internet, we also need to add Internet Gateway (IGW). IGW is a VPC component that allows communication between the VPC and the Internet.
For outbound traffic, a route table for the IGW is necessary. When resources within a subnet need to communicate with resources outside of the VPC, such as accessing the public Internet or other AWS services, they need a route to the IGW.
A destination of 0.0.0.0/0 in the DestinationCidrBlock means that all traffic that is trying to access the Internet needs to flow through the target, i.e. the IGW.
Finally, we can define our bastion host EC2 instance with the following template.
Step 4: Configure Private Subnets and Subnet Group
The database instance, as shown in the diagram above, is hosted in a private subnet so that it is securely protected from direct public Internet access.
When we are creating a database instance, we need to provide something called a Subnet Group. Subnet group helps deploy our instances across multiple Availability Zones (AZs), providing high availability and fault tolerance. Hence, we need to create two private subnets in order to successfully setup our database cluster.
Even thought resources in private subnets should not be directly accessible from the internet, they still need to communicate with other resources within the VPC. Hence, route table is neccessary to define routes that enable this internal communication.
In this article, as shown in the diagram above, one of the private subnets is not used. The additional subnet makes it easier for us to switch to a Multi-AZ database instance deployment in the future.
After we have defined the two private subnets, we can thus proceed to configure the subnet group as follows.
DBSubnetGroup:
  Type: 'AWS::RDS::DBSubnetGroup'
  Properties:
    DBSubnetGroupDescription:
      !Sub 'Subnet group for ${AWS::StackName}-core-db DB Cluster'
    SubnetIds:
      - !Ref PrivateSubnet1
      - !Ref PrivateSubnet2
    Tags:
      - Key: Project
        Value: !Ref ProjectName
Step 5: Define Database Cluster and Instance
As mentioned earlier, we will be using Amazon Aurora. So what is Aurora?
Five years after that, in 2019, Aurora Serverless was generally available in several regions such as US, EU, and Japan. Aurora Serverless is a flexible and cost-effective RDBMS option on AWS for apps with variable or unpredictable workloads because it offers an on-demand and auto-scaling way to run Aurora database clusters.
The ServerlessV2ScalingConfiguration property is specially designed for Aurora Serverless v2 only. Here, we configure the minimum and maximum capacities for our database cluster to be 0.5 and 1 ACUs, respectively.
Step 6: Allow Connection from Bastion Host to the Database Instance
Finally, we need to allow the traffic from our bastion host to the database. Hence, our database security group template should be defined in the following manner.
DatabaseSecurityGroup: Type: AWS::EC2::SecurityGroup Properties: GroupName: !Sub '${AWS::StackName}-core-database-sg' GroupDescription: !Sub 'Security group for ${AWS::StackName} core database' VpcId: !Ref VPC
The -L option in the format of port:host:hostport in the command above basically specifies that connections to the given TCP port on the local host are to be forwarded to the given host and port on the remote side.
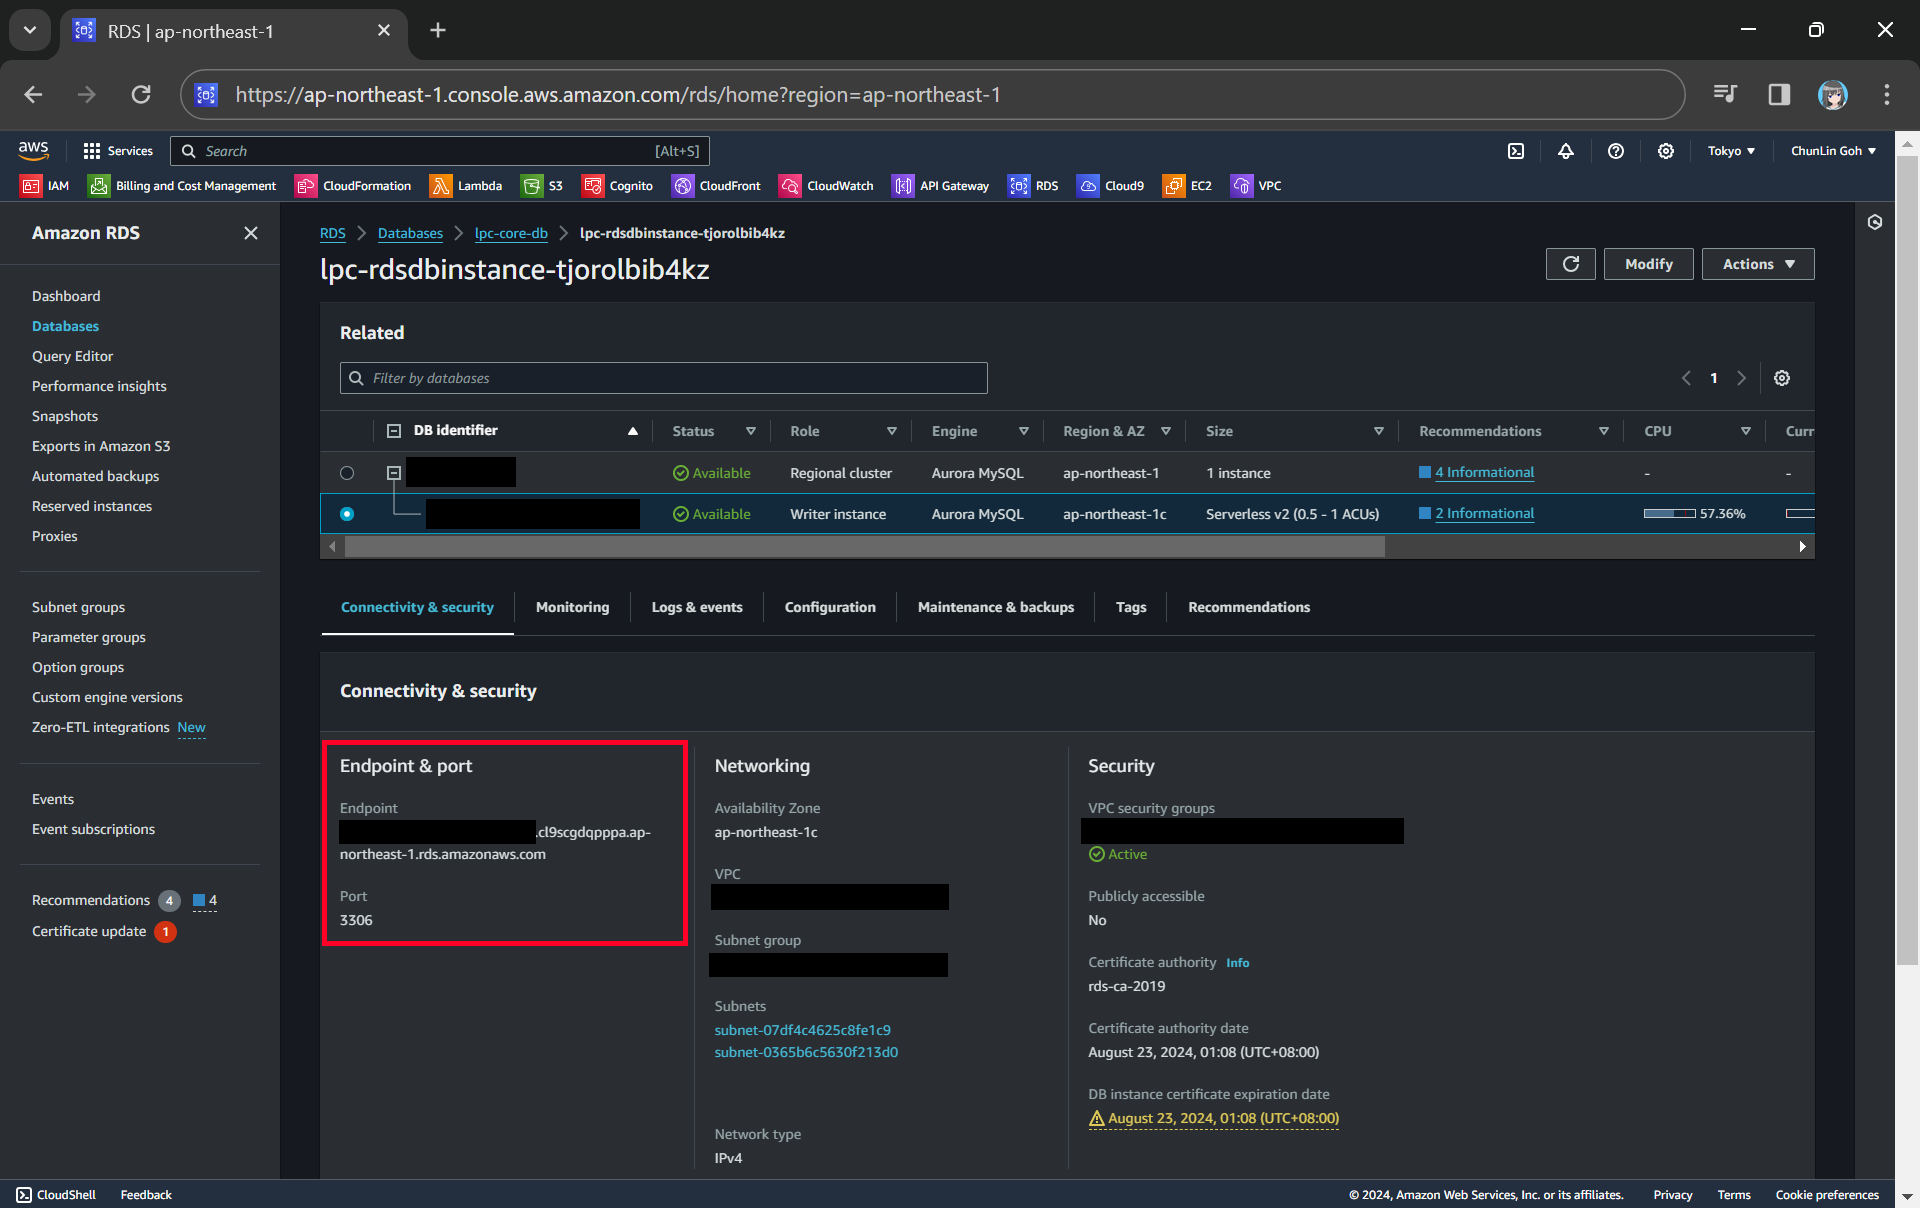
We can get the endpoint and port of our DB instance from the AWS Console.
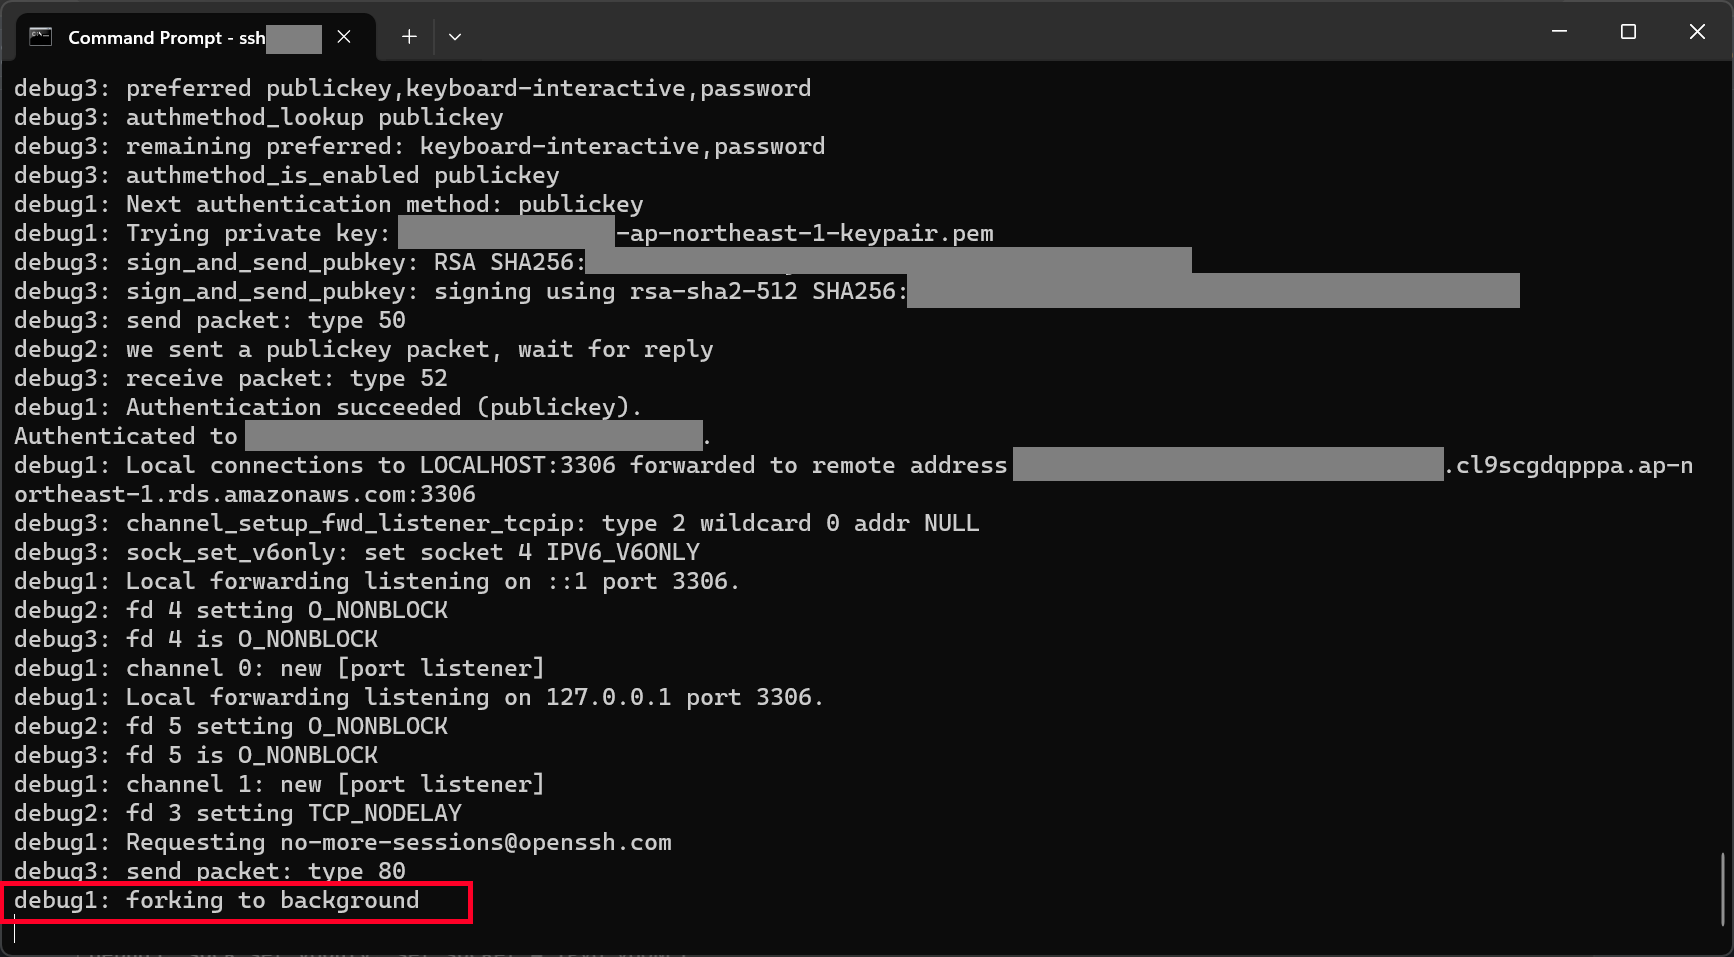
With the command above, we should be able to connect to our database instance via our bastion host, as shown in the screenshot below.
We can proceed to connect to our database instance after reaching this step.
Now, we are able to connect to our Aurora database on MySQL Workbench.
Connecting to our Aurora Serverless database on AWS!
WRAP-UP
That’s all for how we have to configure the infrastructure described in the following diagram so that we can connect to our RDS databases in private subnets through a bastion host.
I have also attached the complete CloudFormation template below for your reference.
# This is the complete template for our scenario discussed in this article. --- AWSTemplateFormatVersion: '2010-09-09' Description: 'Setup and Access Private RDS Database via a Bastion Host'
Last week, my friend working in the field of infrastructure management gave me an overview of Infrastructure as Code (IaC).
He came across a tool called Terraform which can automate the deployment and management of cloud resources. Hence, together, we researched on ways to build a simple demo in order to demonstrate how Terraform can help in the cloud infrastructure management.
We decided to start from a simple AWS cloud architecture as demonstrated below.
As illustrated in the diagram, we have a bastion server and an admin server.
A bastion server, aka a jump host, is a server that sits between internet network of a company and the external network, such as the Internet. It is to provide an additional layer of security by limiting the number of entry points to the internet network and allowing for strict access controls and monitoring.
An admin server, on the other hand, is a server used by system admins to manage the cloud resources. Hence the admin server typically includes tools for managing cloud resources, monitoring system performance, deploying apps, and configuring security settings. It’s generally recommended to place an admin server in a private subnet to enhance security and reduce the attack surface of our cloud infrastructure.
In combination, the two servers help to ensure that the cloud infrastructure is secure, well-managed, and highly available.
As we can see in the architecture diagram above, the cloud resources are all available on AWS. We can set them up by creating the resources one by one through the AWS Console. However, doing it manually is not efficient and it is also not easy to be repeatedly done. In fact, there will be other problems arising from doing it with AWS Console manually.
Manual cloud resource setup leads to higher possibility of human errors and it takes longer time relatively;
Difficult to identify cloud resource in use;
Difficult to track modifications in infrastructure;
Burden on infrastructure setup and configuration;
Redundant work is inevitable for various development environments;
Restriction is how only the infrastructure PIC can setup the infrastructure.
A concept known as IaC is thus introduced to solve these problems.
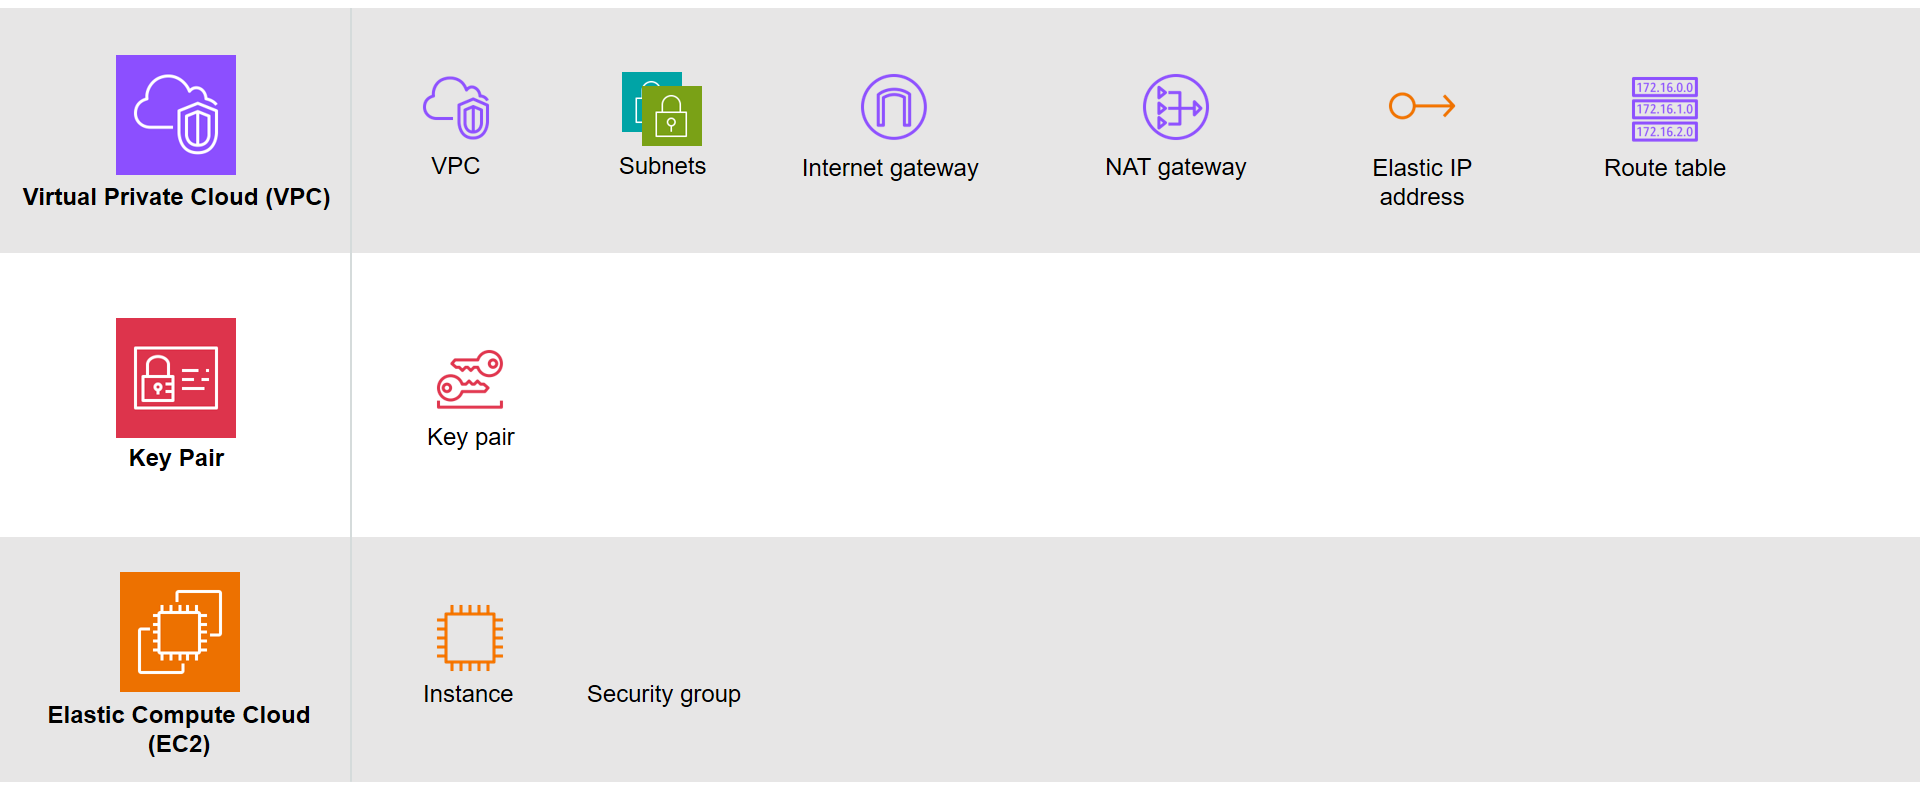
Based on the architecture diagram, the services and resources necessary for configuring with IaC can be categorised into three parts, i.e. Virtual Private Cloud (VPC), Key Pair, and Elastic Compute Cloud (EC2).
The resources necessary to be created.
There are currently many IaC tools available. The tools are categorised into two major groups, i.e. those using declarative language and those using imperative language. Terraform is one of them and it is using Hashicorp Configuration Language (HCL), a declarative language.
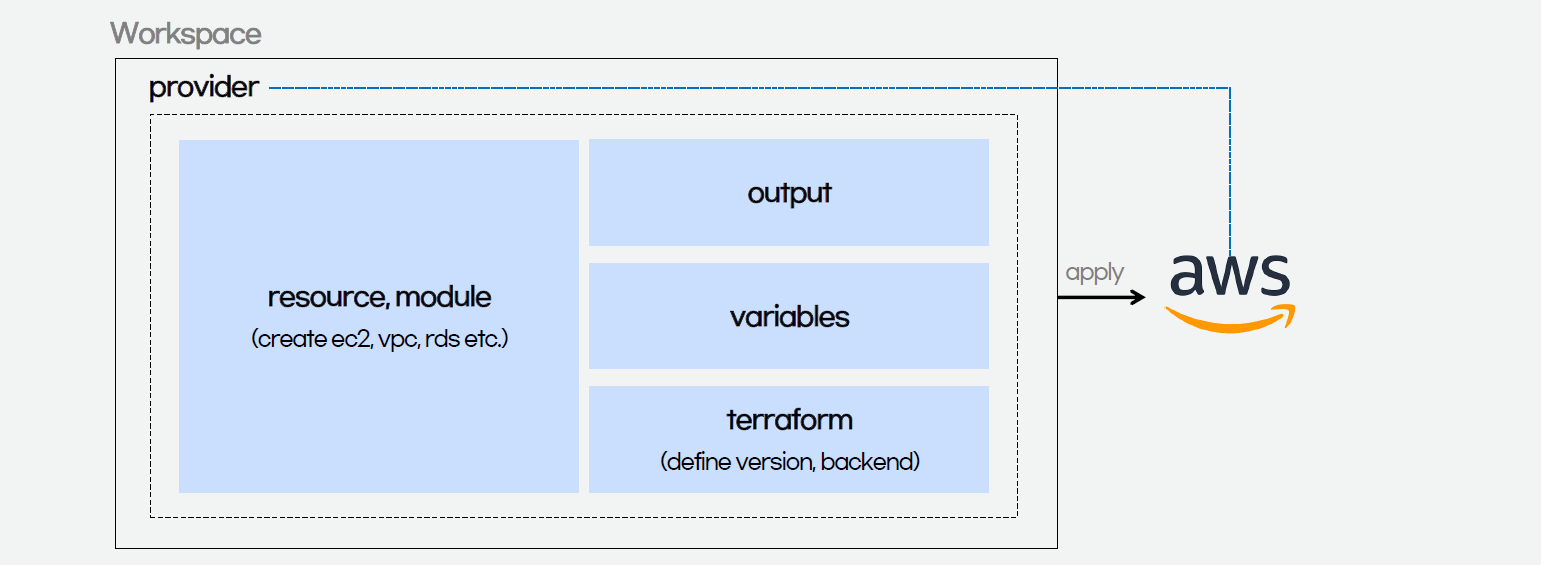
The workflow for infrastructure provisioning using Terraform can be summarised as shown in the following diagram.
We first write the HCL code. Then Terraform will verify the status of the code and apply it to the infrastructure if there is no issue in verification. Since Terraform is using a declarative language, it will do the identification of resources itself without the need of us to manually specify the dependency of resources, sometimes.
After command apply is executed successfully, we can check the applied infrastructure list through the command terraform state list. We can also check records of output variable we defined through the command terraform output.
When the command terraform apply is executed, a status information file called terraform.tfstate will be automatically created.
After understanding the basic process of Terraform, we proceed to write the HCL for different modules of the infrastructure.
Terraform
The components of a Terraform code written with the HCL are as follows.
Terraform code.
In Terraform, there are three files, i.e. main.tf, variables.tf, and outputs.tf recommended to have for a minimal module, even if they’re empty. The file main.tf should be the primary entry point. The other two files, variables.tf and outputs.tf, should contain the declarations for variables and outputs, respectively.
For variables, we have vars.tf file which defines the necessary variables and terraform.tfvars file which allocated value to the defined variables.
In the diagram above, we also see that there is a terraform block. It is to declare status info, version info, action, etc. of Terraform. For example, we use the following HCL code to set the Terraform version to use and also specify the location for storing the status info file generated by Terraform.
This is a S3 bucket we use for storing our Terraform state file.
The reason why we keep our terraform.tfstat file on the cloud, i.e. the S3 bucket, is because state is a necessary requirement for Terraform to function and thus we must make sure that it is stored in a centralised repo which cannot be easily deleted. Doing this also good for everyone in the team because they will be working with the same state so that operations will be applied to the same remote objects.
Finally, we have a provider block which declares cloud environment or provider to be created with Terraform, as shown below. Here, we will be creating our resources on AWS Singapore region.
provider "aws" {
  region = "ap-southeast-1"
}
Module 1: VPC
Firstly, in Terraform, we will have a VPC module created with resources listed below.
The resource_prefix is a string to make sure all the resources created with the Terraform getting the same prefix. If your organisation has different naming rules, then feel free to change the format accordingly.
1.2 Subnets
The public subnet for the bastion server is defined as follows. The private IP of the bastion server will be in the format of 10.2.10.X. We also set the map_public_ip_on_launch to true so that instances launched into the subnet should be assigned a public IP address.
The aws_availability_zones data source is part of the AWS provider and retrieves a list of availability zones based on the arguments supplied. Here, we make the public subnet and private subnet to be in the same first availability zones.
1.3 Internet Gateway
Normally, if we create an internet gateway via AWS console, for example, we will sometimes forget to associate it with the VPC. With Terraform, we can do the association in the code and thus reduce the chance of setting up the internet gateway wrongly.
If you have noticed, in the NAT gateway definition above, we have assigned a public IP to it using EIP. Since Terraform is declarative, the ordering of blocks is generally not significant. So we can define the EIP after the NAT gateway.
Once we have the key pair, we can finally move on to define how the bastion and admin servers can be created. We can define a module for the servers as follows.
The output.tf of EC2 instance module is defined as follows.
output "instance_public_ip" {
  description = "Public IP address of the EC2 instance."
  value       = aws_instance.linux_server.public_ip
}

output "instance_private_ip" {
  description = "Private IP address of the EC2 instance in the VPC."
  value       = aws_instance.linux_server.private_ip
}
With this definition, once the Terraform workflow is completed, the public IP of our bastion server and the private IP of our admin server will be displayed. We can then easily use these two IPs to connect to the servers.
Main Configuration
With all the above modules, we can finally define our AWS infrastructure using the following main.tf.
Here, we will pre-install the AWS Command Line Interface (AWS CLI) in the admin server. Hence, we have the following script in the admin_server_init.sh file. The script will be run when the admin server is launched.
Thus, I made the change accordingly with expression references. In the change, I forced the description of security group which the admin server depends on to use the the private route table association ID returned from the VPC module. Doing so will make sure that the admin server is created only after the private route table is setup properly.
With expression references, we force the admin server to be created at a later time, as compared to the bastion server.
If we don’t force the admin_server to be created after the private route table is completed, the script may fail and we can find the error logs at /var/log/cloud-init-output.log on the admin server. In addition, please remember that even though terraform apply runs just fine without any error, it does not mean user_data script is run successfully without any error as well. This is because Terraform knows nothing about the status of user_data script.
We can find the error in the log file cloud-init-output.log in the admin server.
Demo
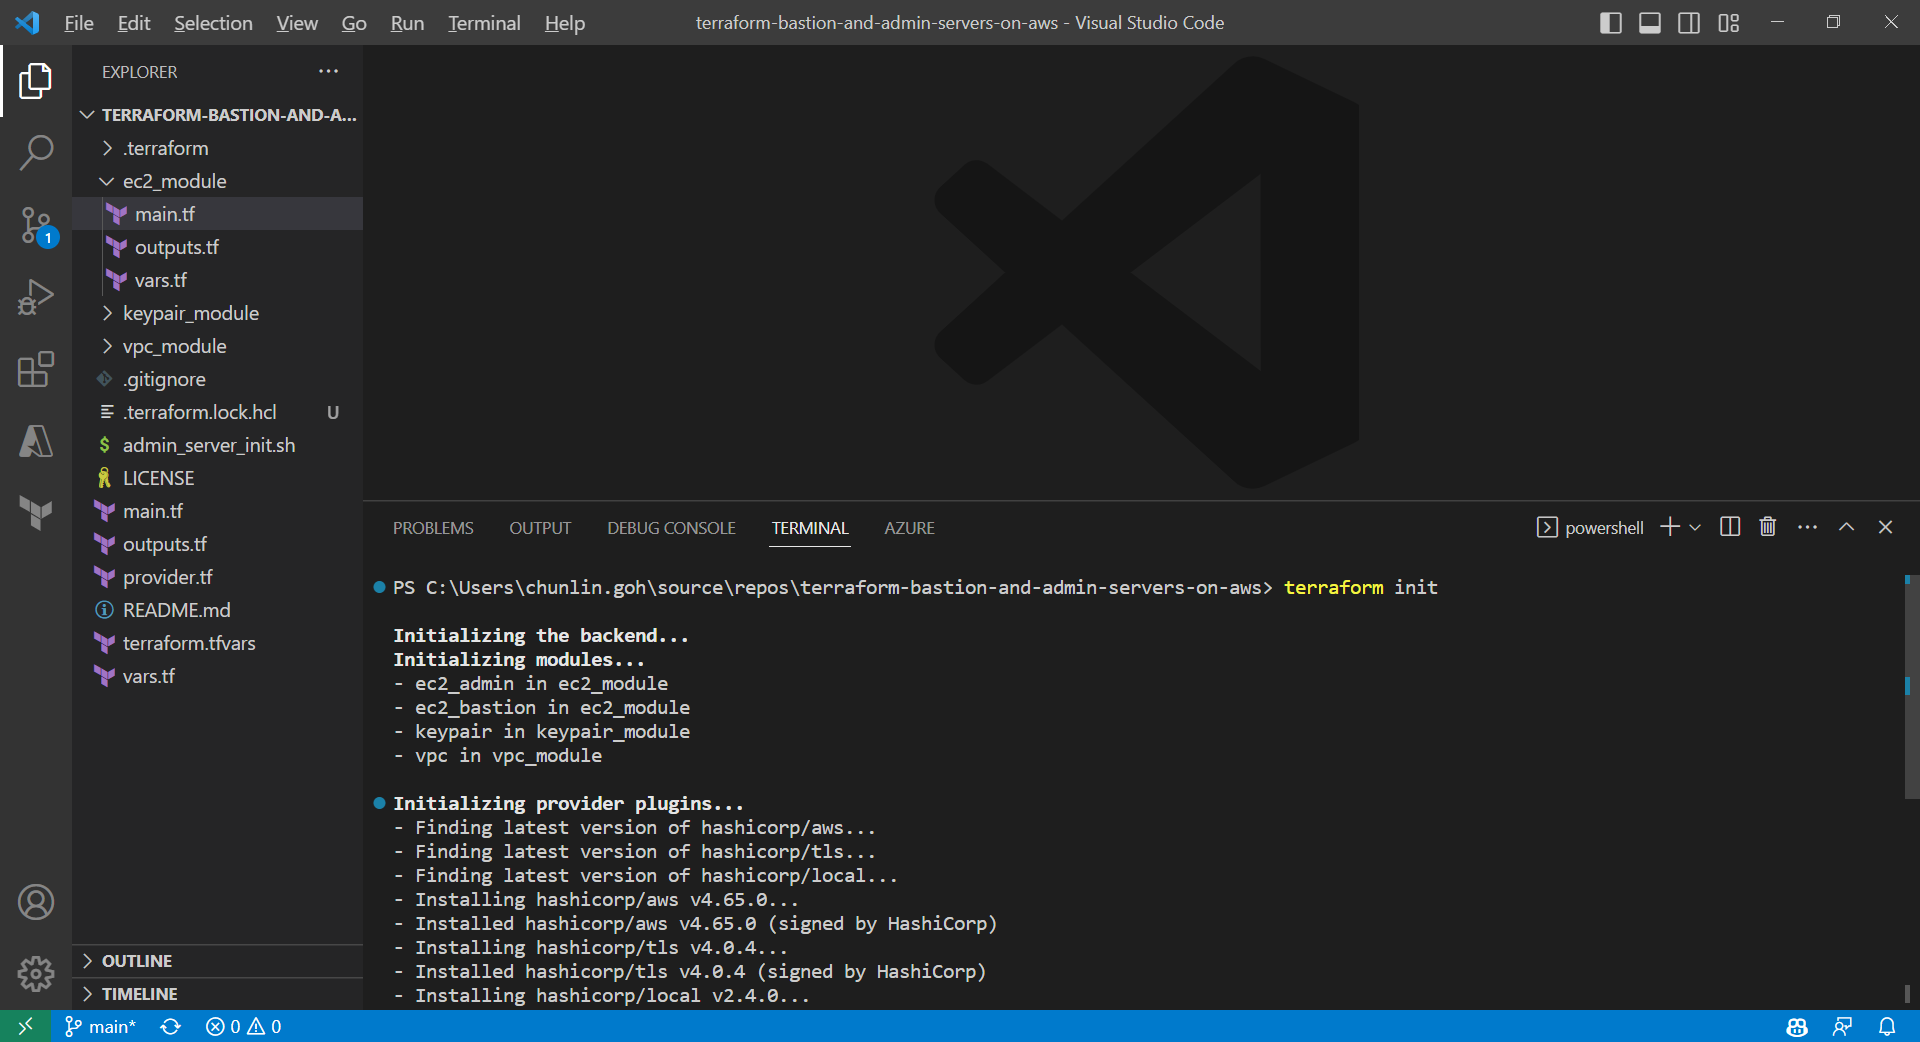
With the Terraform files ready, now we can move on to go through the Terraform workflow using the commands.
Before we begin, besides installing Terraform, since we will deploy the infrastructure on AWS, we also shall configure the AWS CLI using the following command on the machine where we will run the Terraform commands.
aws configure
Once it is done then only we can move on to the following steps.
Firstly, we need to download plug-in necessary for the defined provider, backend, etc.
Initialising Terraform with the command terraform init.
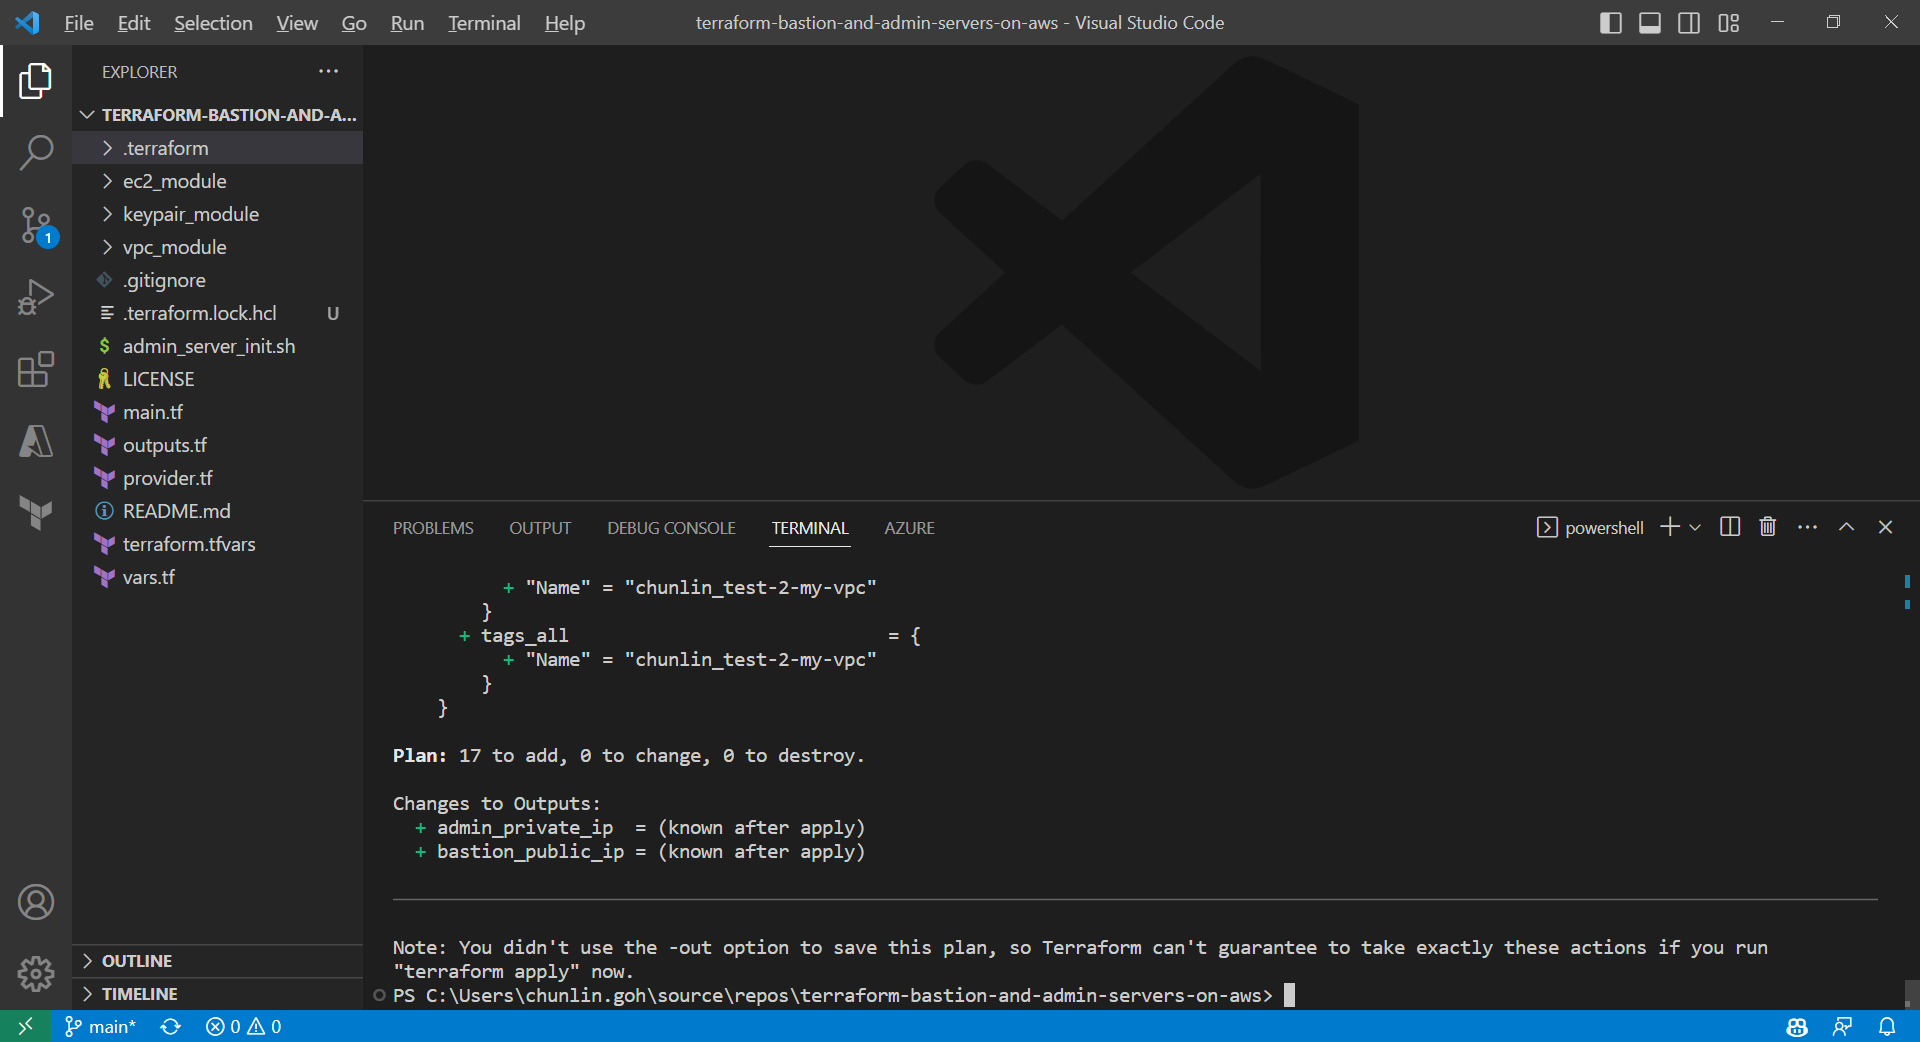
Only after initialisation is completed, we can execute other commands, like terraform plan.
Result of executing the command terraform plan.
After running the command terraform plan, as shown in the screenshot above, we know that there are in total 17 resources to be added and two outputs, i.e. the two IPs of the two servers, will be generated.
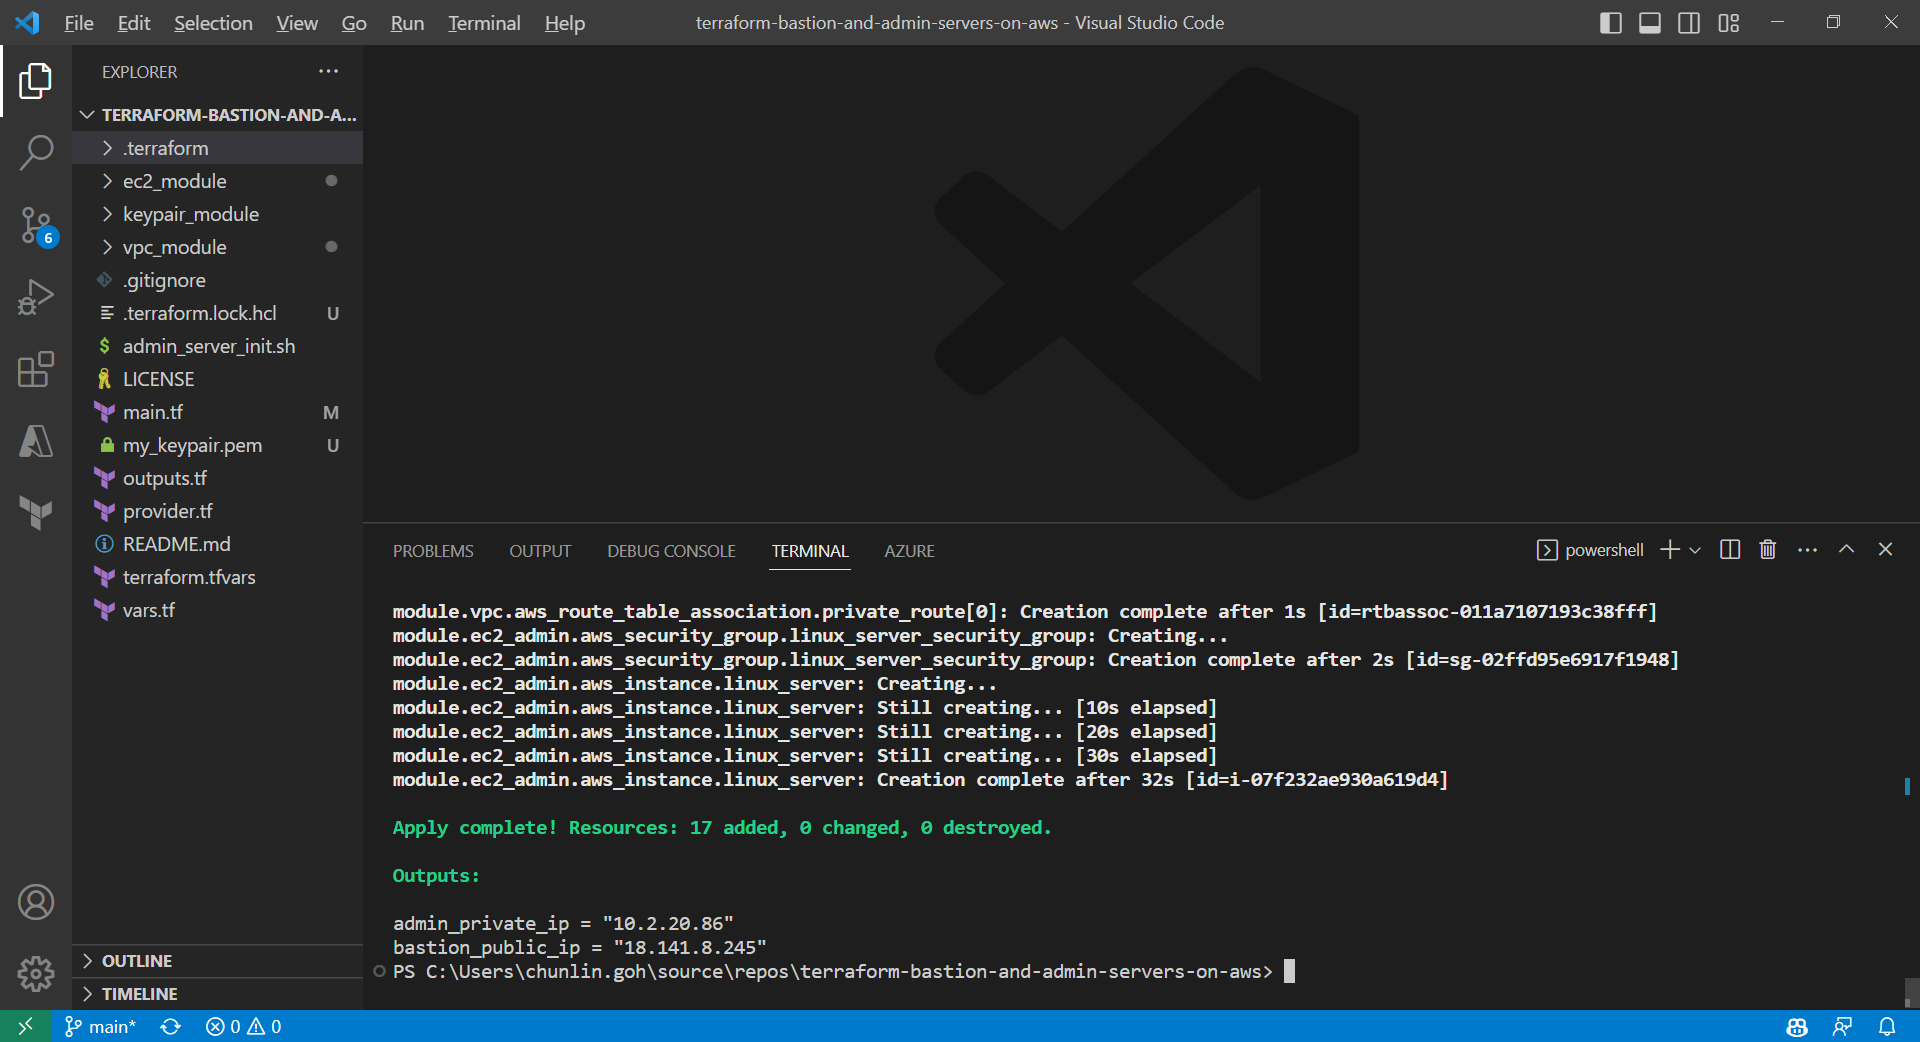
Apply is successfully completed. All 17 resources added to AWS.
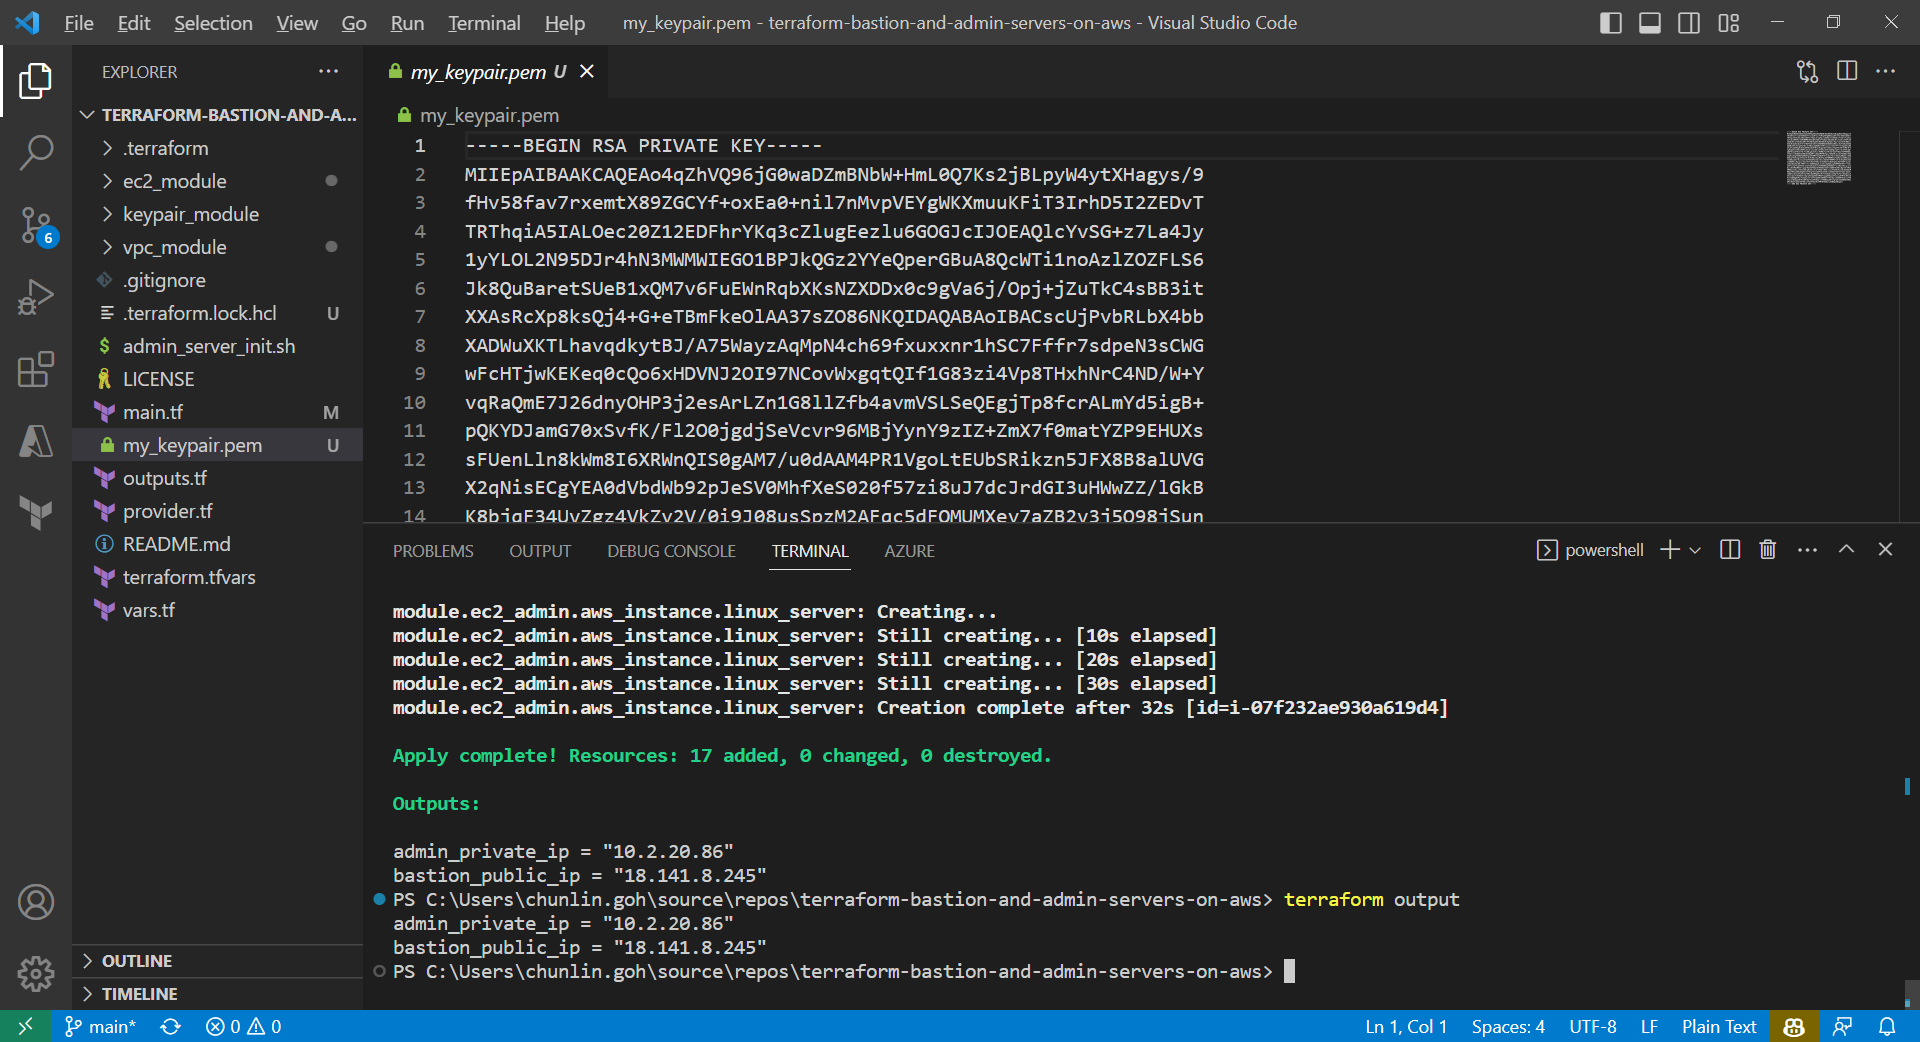
We can also run the command terraform output to get the two IPs. Meanwhile, we can also find the my_keypair.pem file which is generated by the tls_private_key we defined earlier.
The PEM file is generated by Terraform.
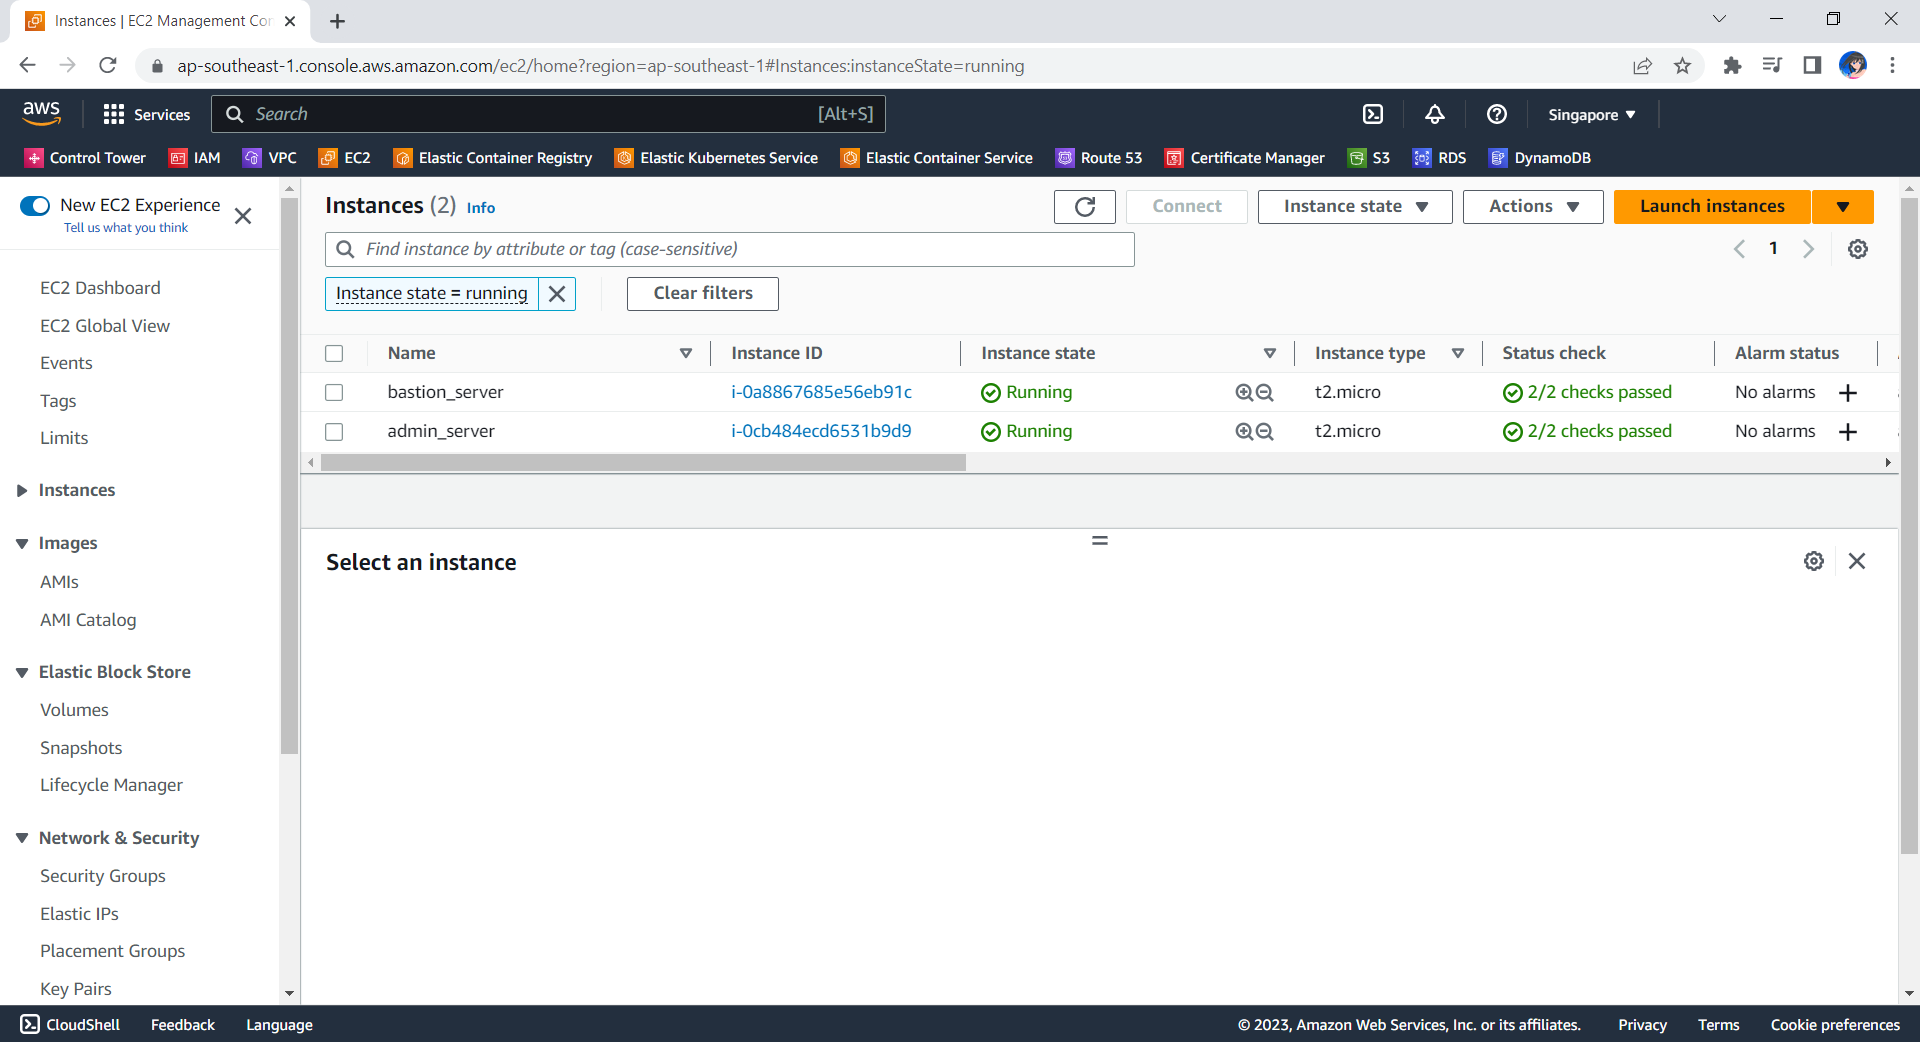
Now, if we check the resources, such as the two EC2 instances, on AWS Console, we should see they are all there up and running.
The bastion server and admin server are created automatically with Terraform.
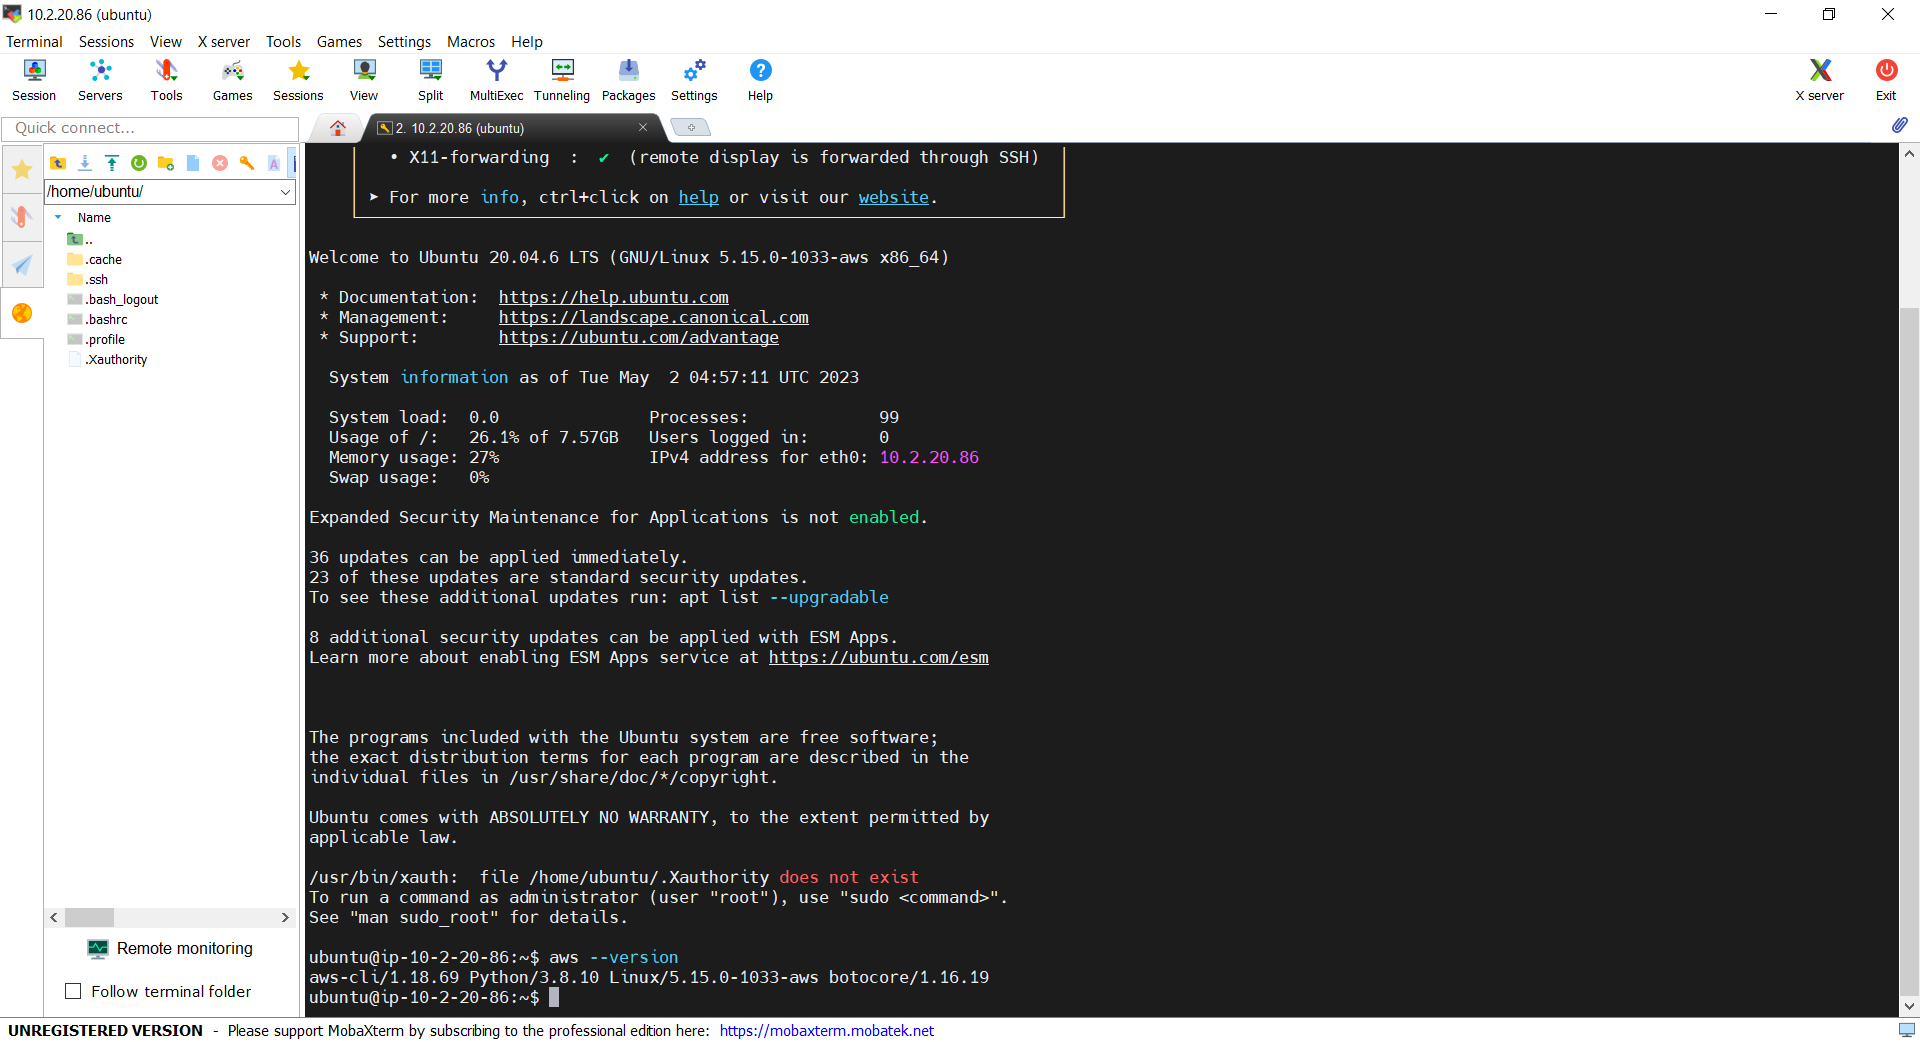
Now, let’s see if we can access the admin server via the bastion server using the private key. In fact, there is no problem to access and we can also realise that the AWS CLI is already installed properly, as shown in the screenshot below.
With the success of user_data script, we can use AWS CLI on the admin server.
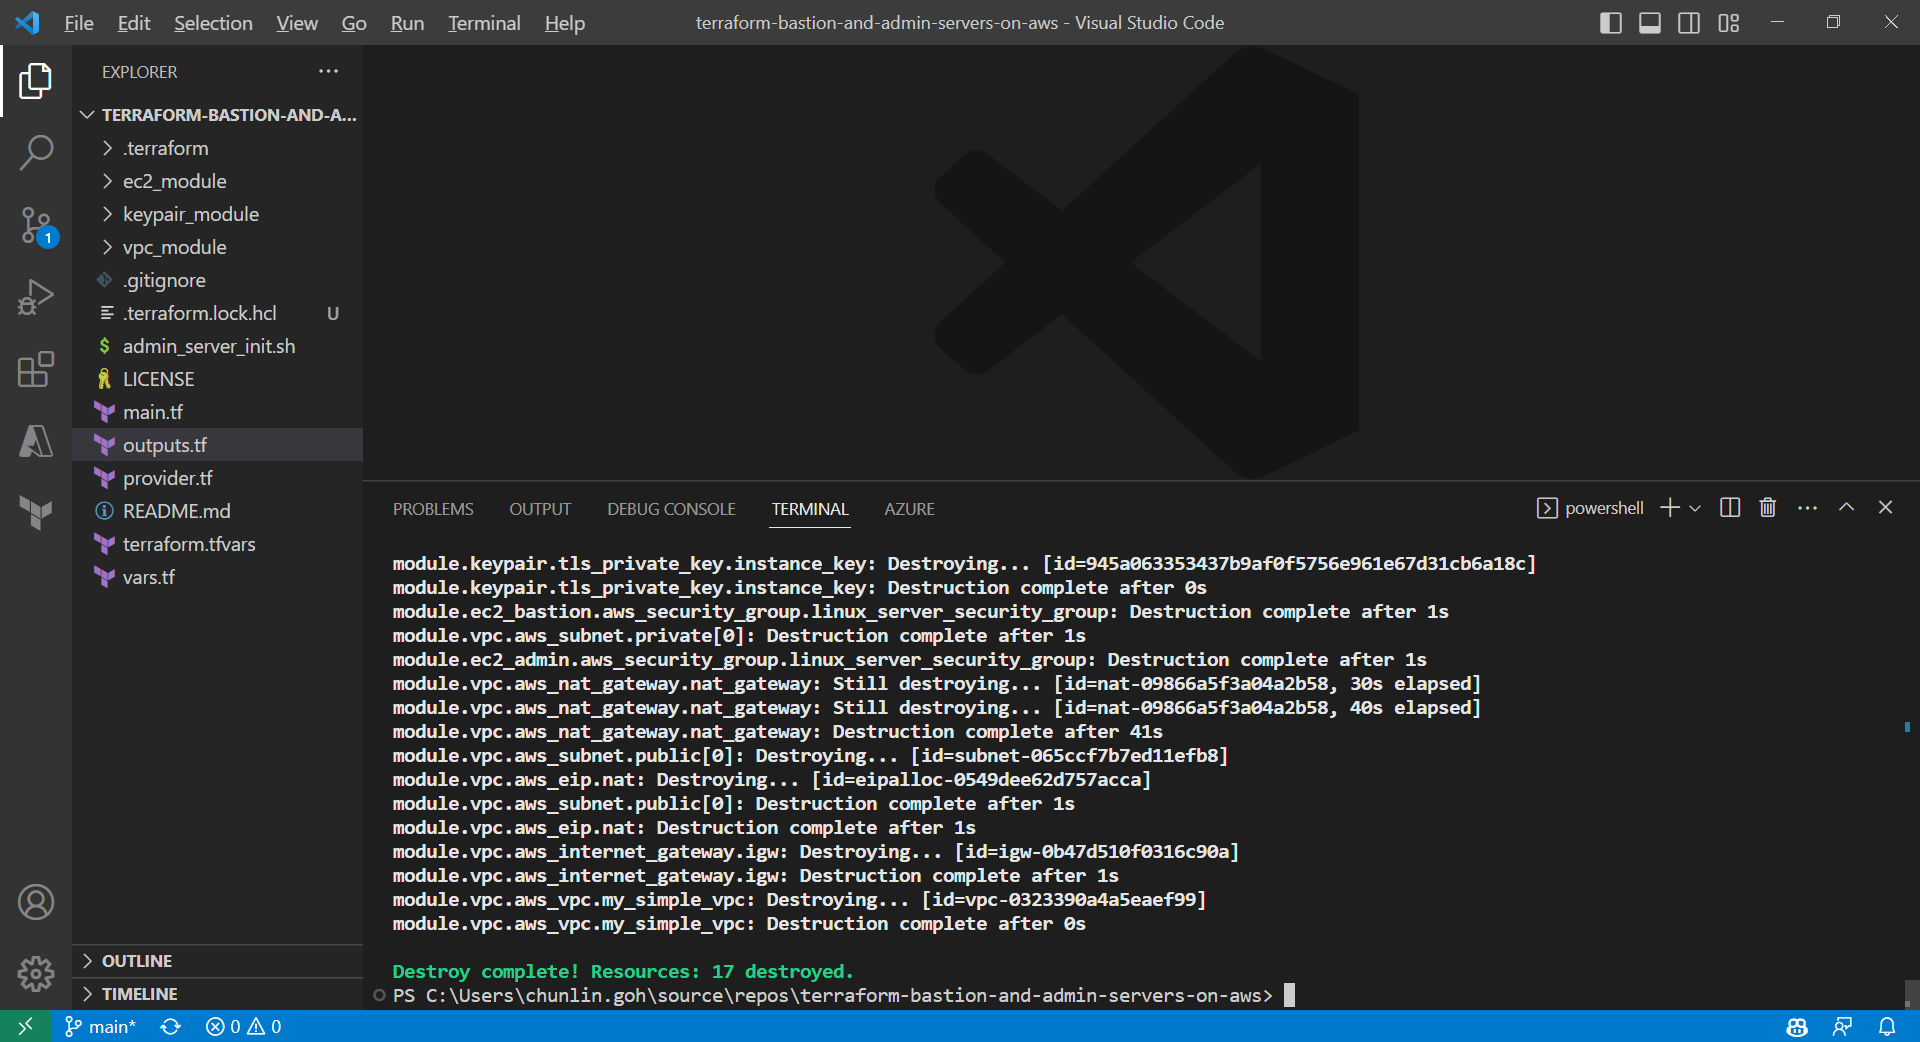
Deleting the Cloud Resources
To delete what we have just setup using the Terraform code, we simply run the command terraform destroy. The complete deletion of the cloud resources is done within 3 minutes. This is definitely way more efficient than doing it manually on AWS Console.
All the 17 resources have been deleted successfully and the private key file is deleted too.
Conclusion
That is all for what I had researched on with my friend.
One day before the end of my long weekend, I decided to learn setting up Windows Server 2012 instance on Amazon EC2. Also, I noted down the setup steps for my future reference.
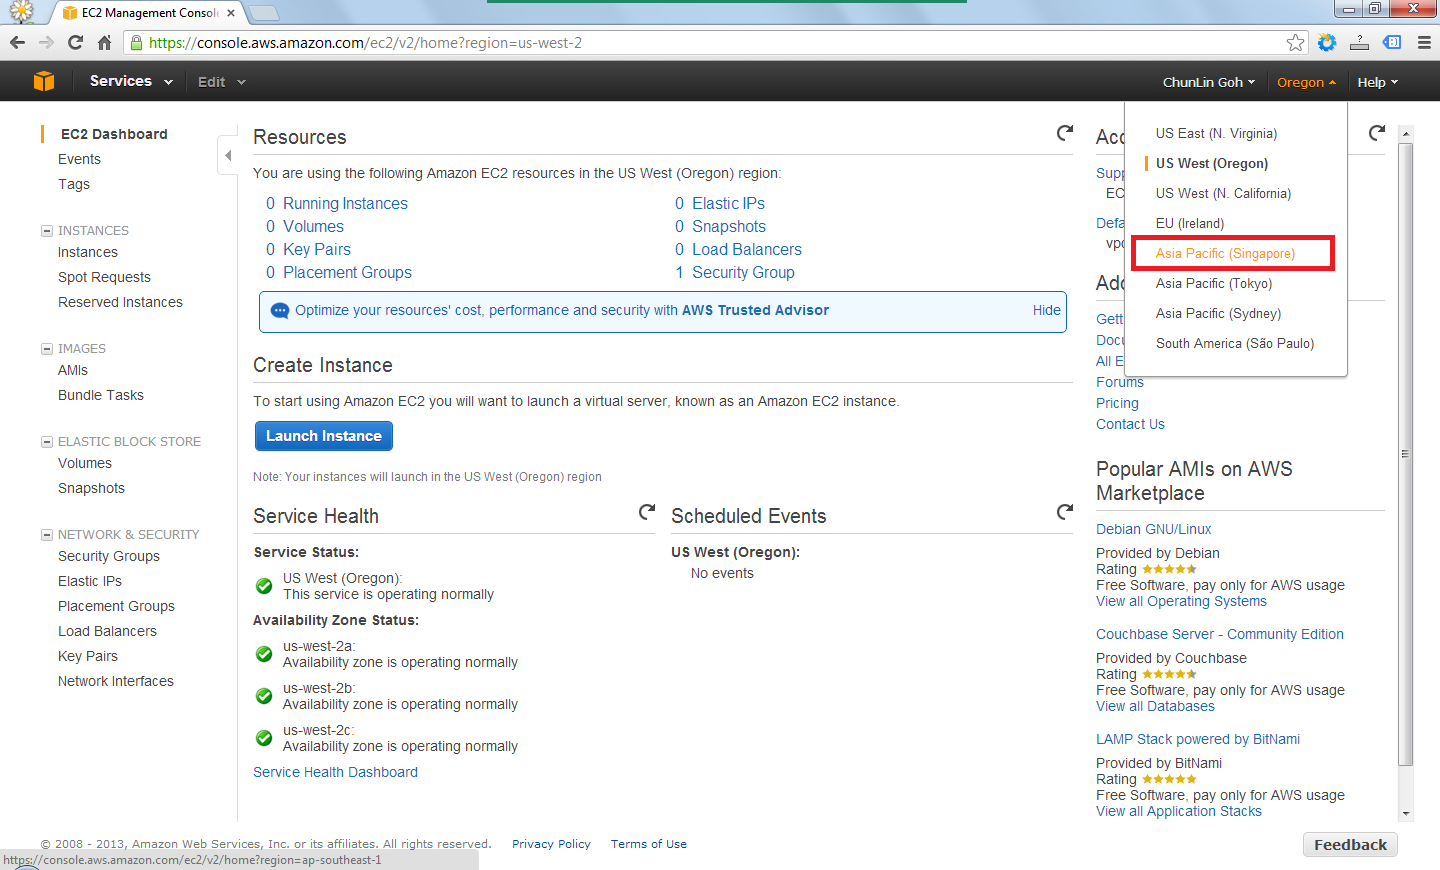
After signing up at Amazon Web Service website, I visited the EC2 Dashboard from the AWS Management Console. Since I’d like to setup one instance in Singapore, I had to choose the region from the drop-down list at the top-right corner of the website.
Choosing region for the instance.
After the region was chosen, I clicked on the blue “Launch Instance” button located at the middle of the web page to launch my first virtual server on EC2. Normally I chose the Classic Wizard so that some configurations could be changed before the setup.
Create a new instance.
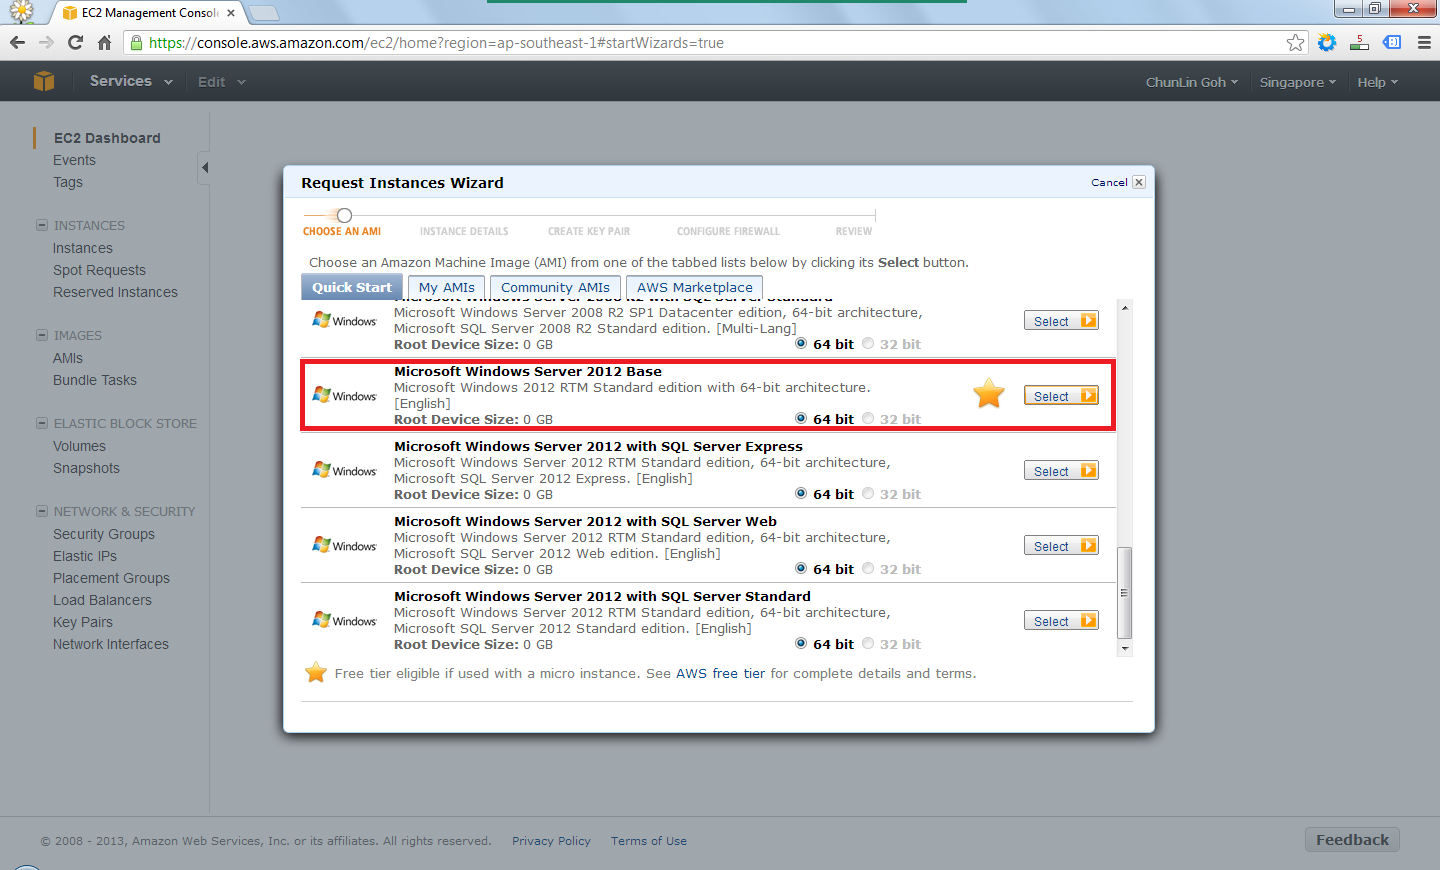
The following step would be choosing an Amazon Machine Image (AMI). Somehow the Root Device Size was 0 GB which I had no idea why so. Due to the fact that I only wanted to try out AWS, I chose the one with Free Usage Tier, i.e. the Microsoft Windows Server 2012 Base.
Choose an AMI.
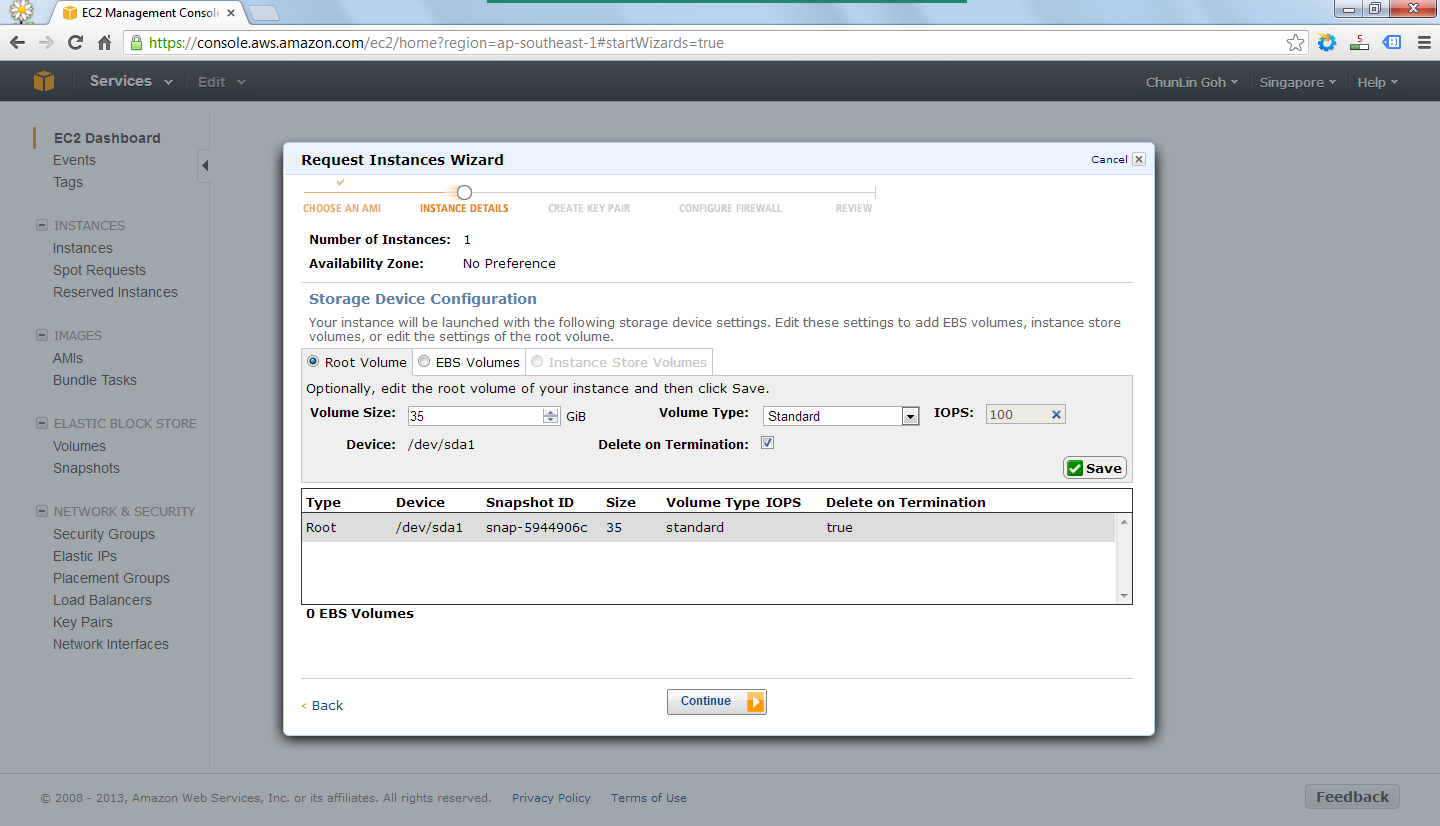
In the following steps, there were options for me to set the number of instances required, instance type (set to Micro to enjoy free usage tier), subnet, network interfaces, etc. After all these, there would be a section to set the root volume size. By default, it’s 0 GB. So the instance wouldn’t be launched if the value was left default. I set it to 35 GB.
Set the volume size of the root to be 35GB.
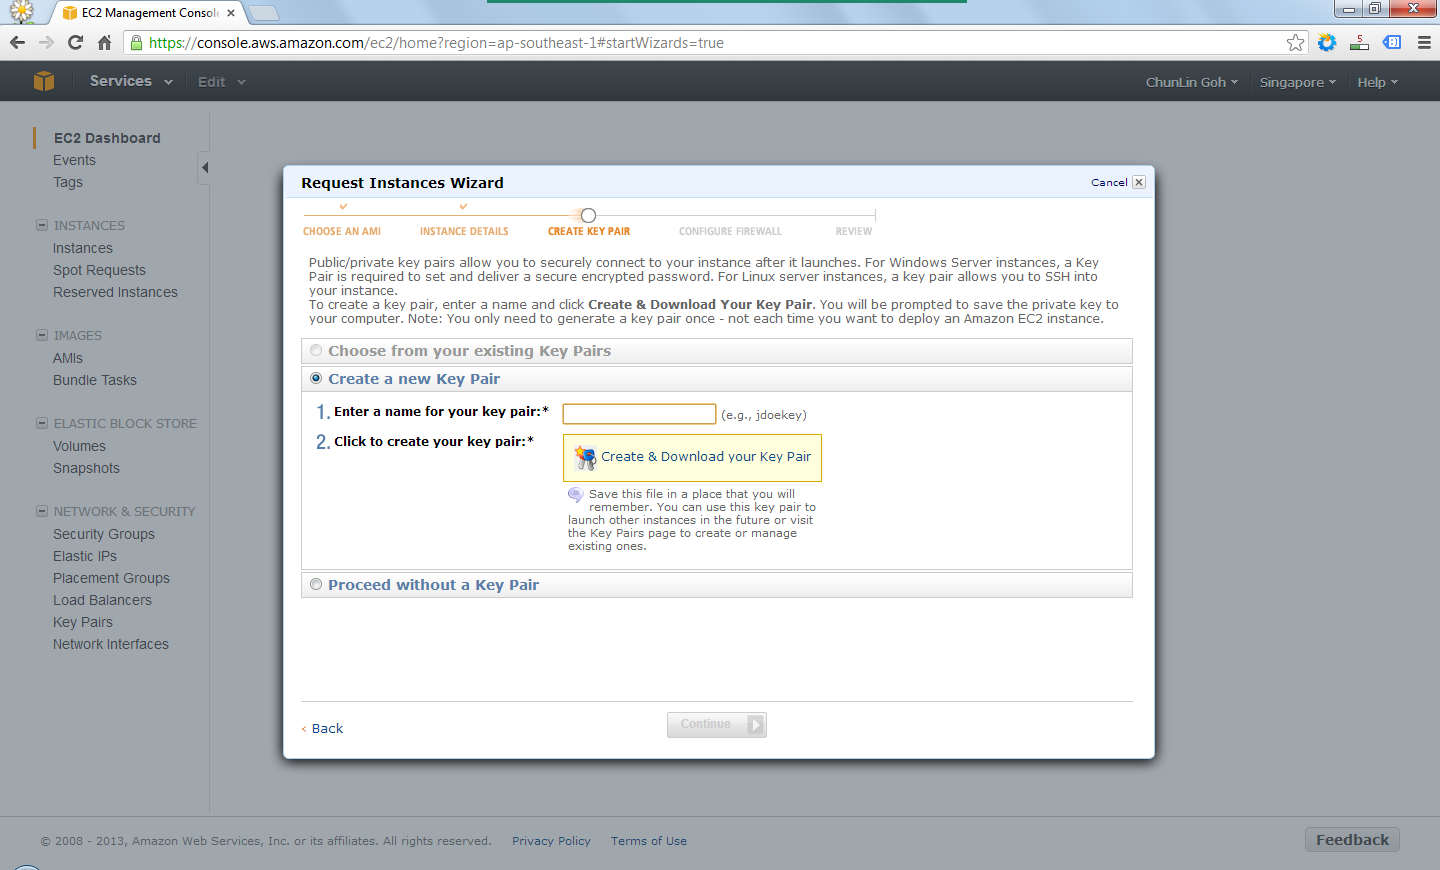
After providing the instance details, the next step would be creating key pair which would be used to decrypt the RDP password in the later stage. Thus, the key pair needed to be downloaded and stored safely on the computer.
Create a key pair.
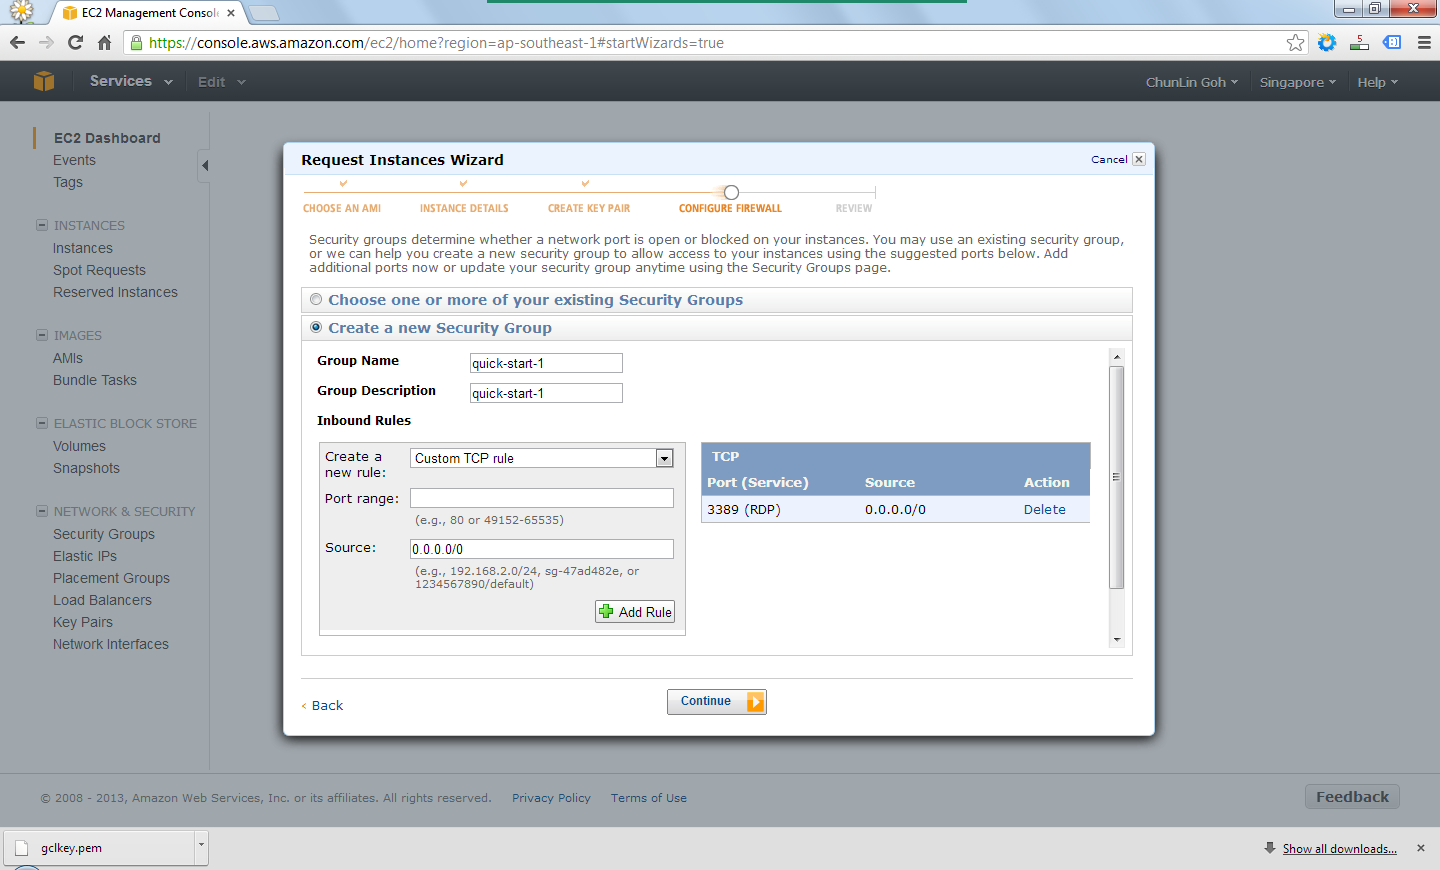
There was also another section to set which ports would be open/blocked on the instance.
Set up security group to determine whether a network port is open or blocked on the instance.
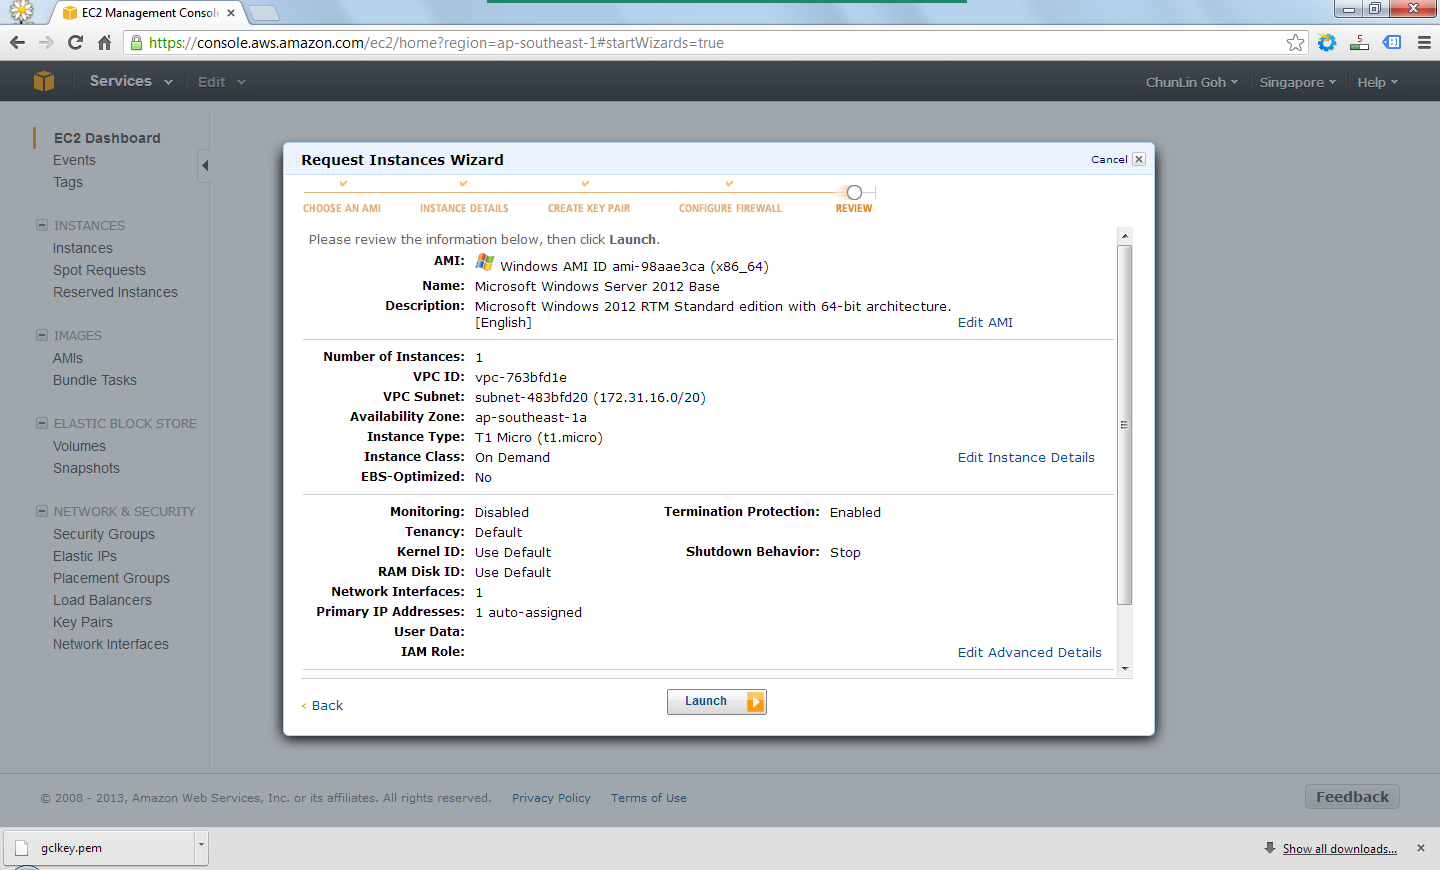
Finally, after reviewing all the details, I just clicked on the “Launch” button to launch the instance.
Review the information provided earlier before the launch of the instance.
Right after the button was clicked, there was a new record added to the Instances table and its State immediately changed to “running”.
The new instance is successfully added.
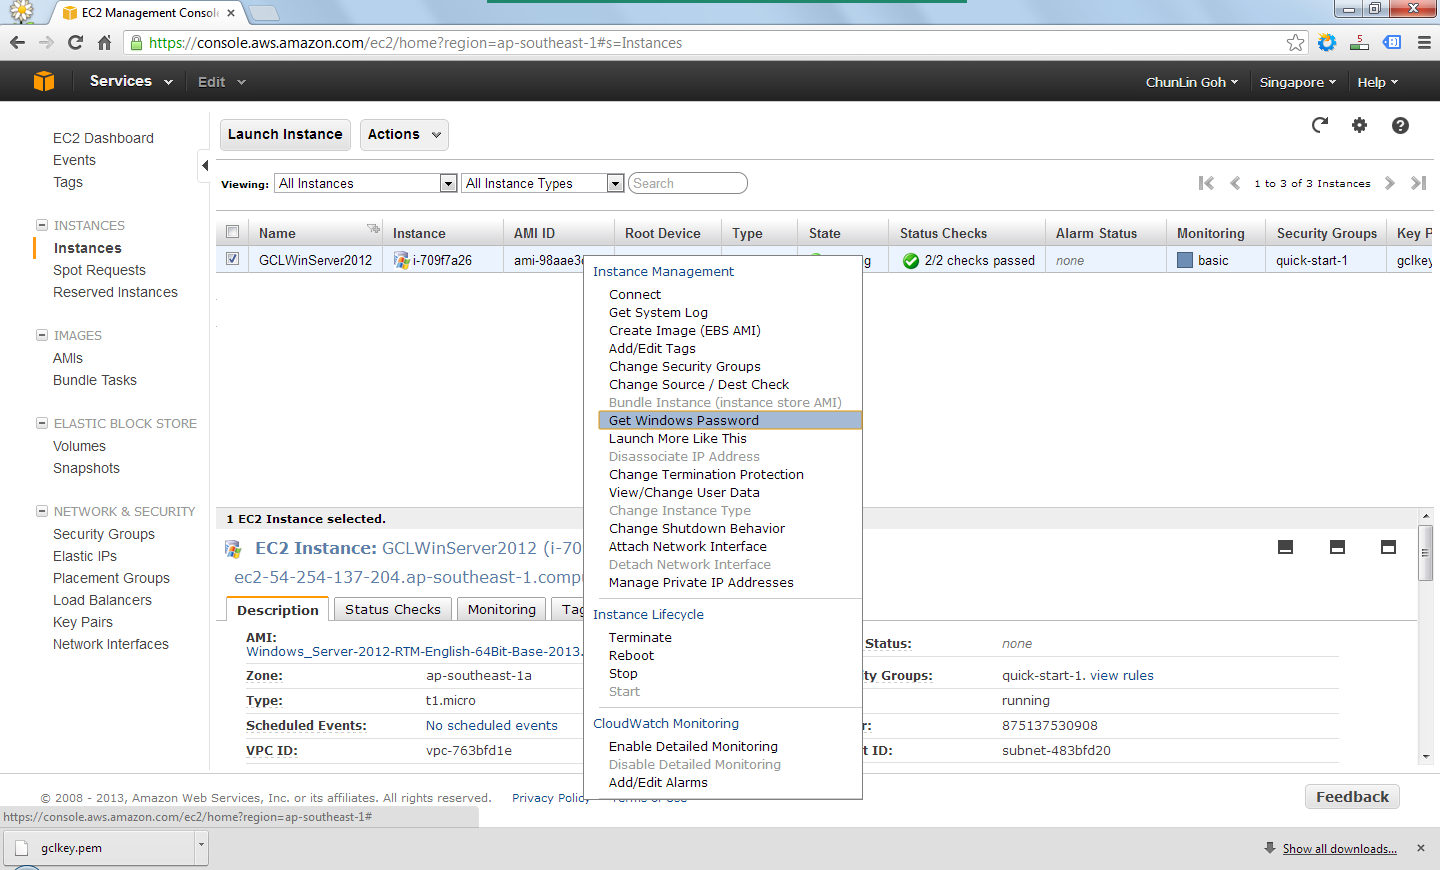
By right-clicking on the instance and choosing the item “Get Windows Password”, I received the default Windows Administrator password which would be used to access the instance remotely via RDP.
Retrieve the Windows Administrator password.
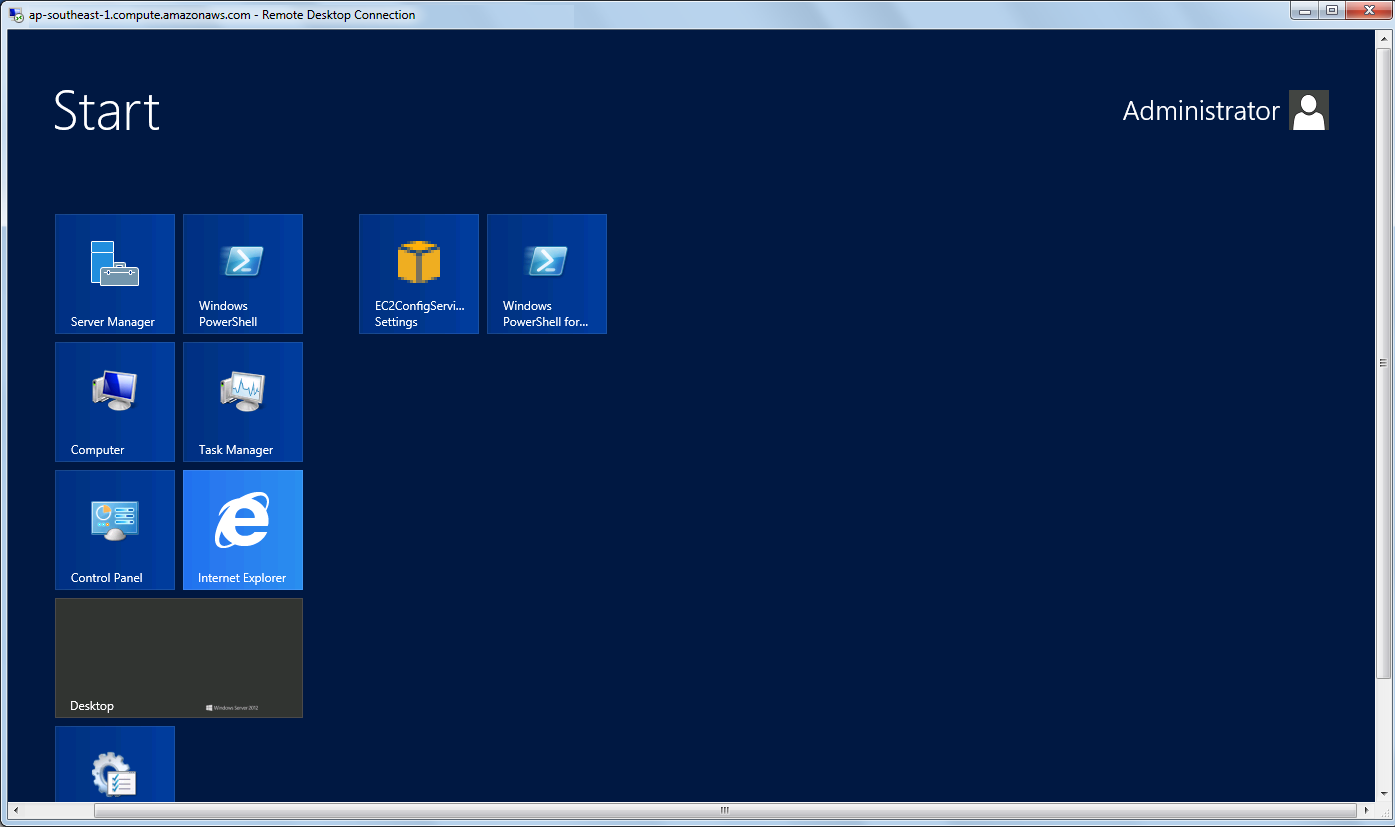
Yup, finally I can start playing with Windows Server 2012. =D
Yesh, successfully access the new Windows Server 2012!