In the previous article, we talked about how to generate realistic but not real patient data using Synthea(TM) and then also how to store them securely in Azure Storage.
Setup Azure API for FHIR®
Today, we will continue the journey. The first step we need to do is to setup the Azure API for FHIR®.
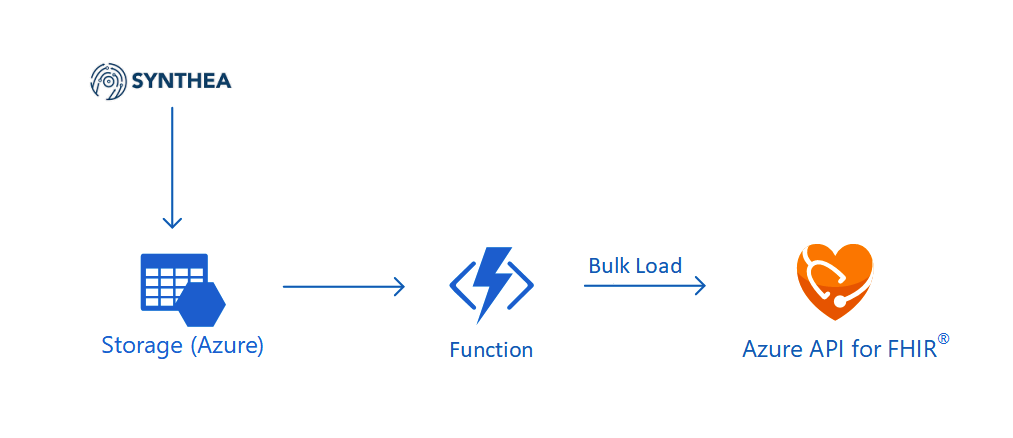
🎨 The architecture of the system we are going to setup in this article. 🎨
The Azure API for FHIR® is a managed, standards-based, and healthcare data platform available on Azure. It enables organisations to bring their clinical health data into the cloud based on the interoperable data standard FHIR®. The reason why we choose to use it is because security and privacy features are embedded into the service. As customers, we own and control the patient data, knowing how it is stored and accessed. Hence, it’s a PaaS that enables us build healthcare data solution easily.
When we are setting up the Azure API for FHIR®, we need to specify the version of FHIR® we are going to use. Currently there are only four milestone releases of FHIR®. The latest version, R4, was released in December 2018. On Azure, we can only choose either R4 or STU3 (which is the third release). We will go for R4.
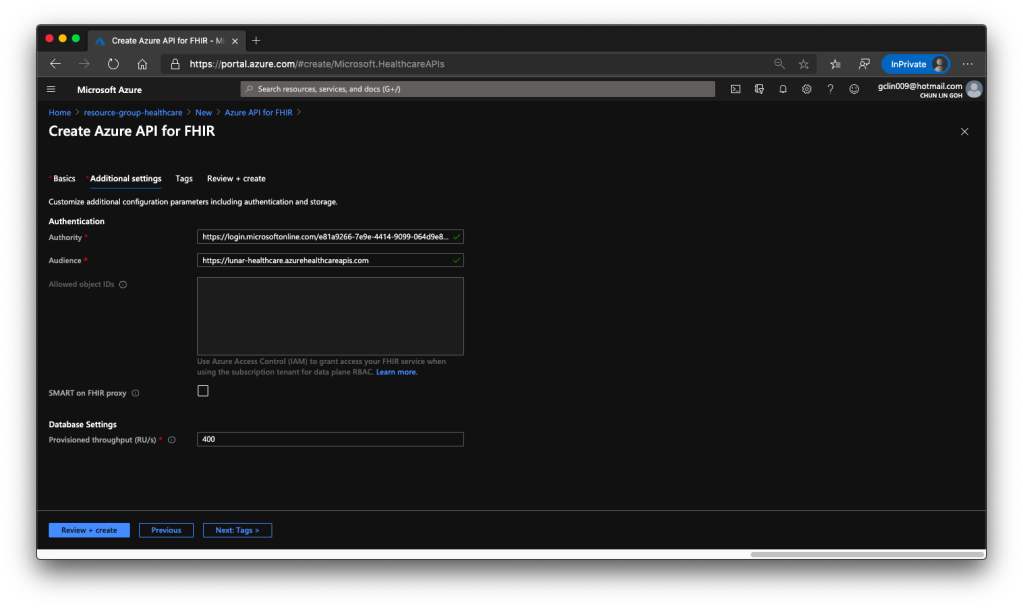
🎨 Default values of authentication and database settings when we’re creating the API. 🎨
For the Authentication of the API service, we will be using Azure Access Control (IAM) which is the default option. Hence, we will use the Authority and Audience default values.
When we are setting up this API service, we also need to specify the throughput of the database which will be used to store the imported patient data later.
After we click on the button to create the API service, it will take about 5 minutes to successfully deploy it on Azure.
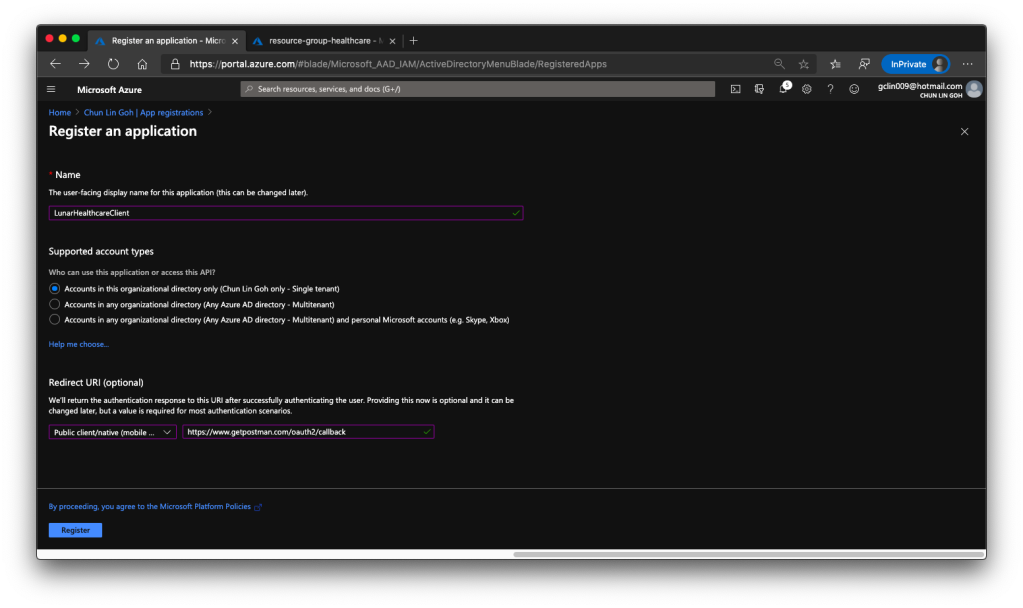
The following screenshot shows how we register the client application with a redirect URI pointing to https://www.getpostman.com/oauth2/callback which will help us to test the connectivity via Postman later.
🎨 Registering a client application. 🎨
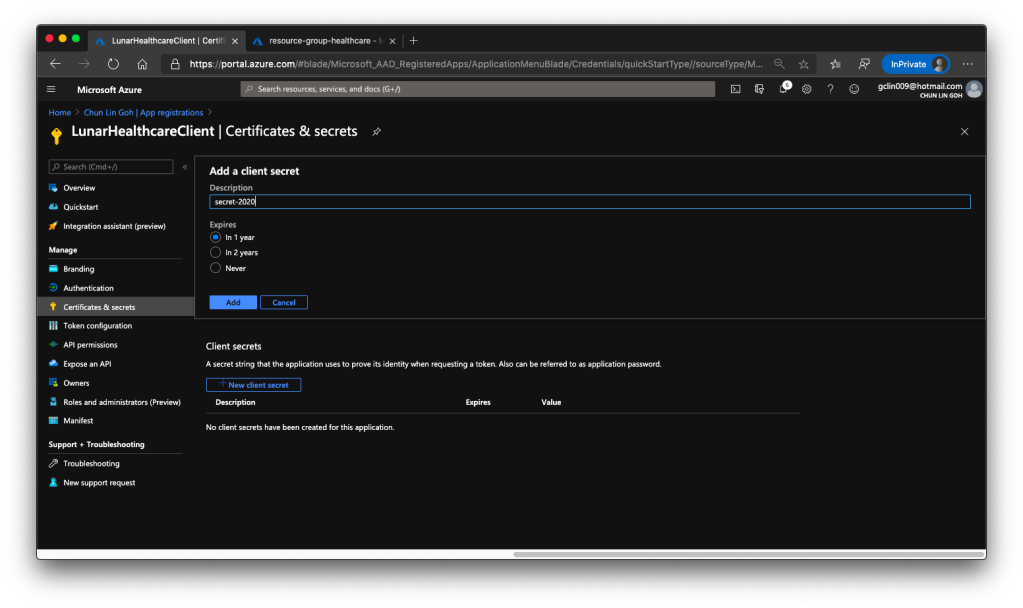
Once the client application is created we need to proceed to create a client secret, as shown in the following screenshot, so that later we can use it to request a token.
🎨 Creating a client secret which will expire one year later. 🎨
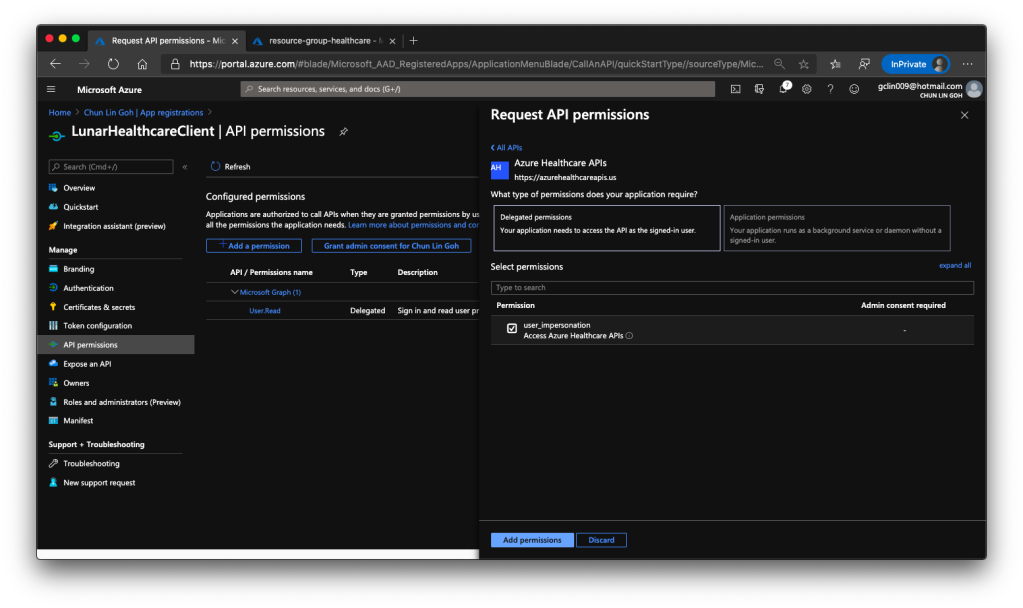
Then we have to allow this client application to access our Azure API for FHIR®. There are two things we need to do.
Firstly, we need to grant the client application a permission called user_impersonation from the Azure Healthcare APIs, as shown in the screenshot below.
🎨 Granting API permissions. 🎨
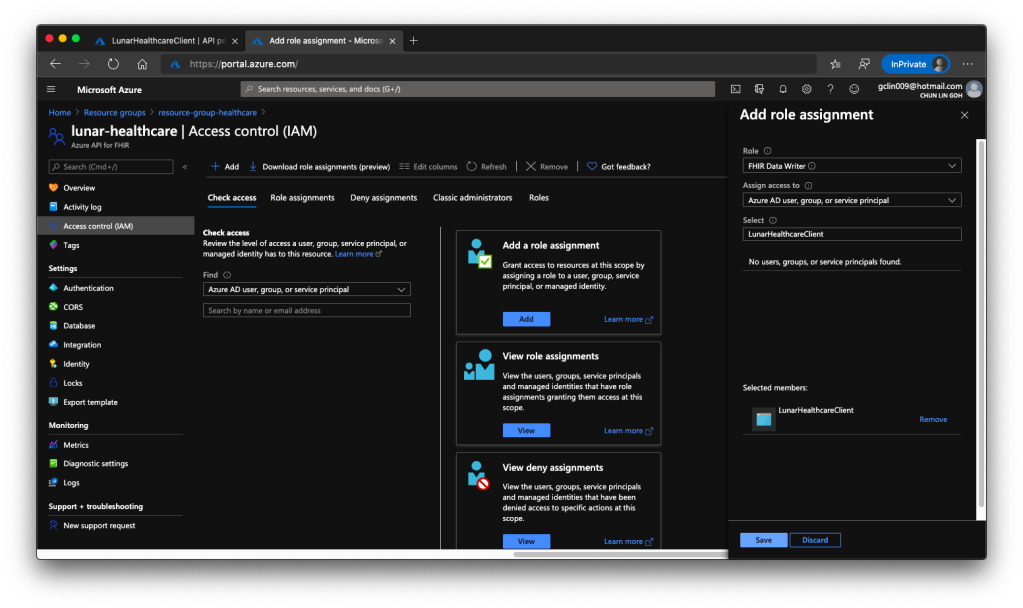
Secondly, we need to head back to our Azure API for FHIR® to enable this client application to access it, as shown in the following screenshot.
🎨 Adding the client application to have the role FHIR® Data Writer. 🎨
The reason we choose only “FHIR Data Writer” role is because this roles enable both read and write access to the API. Once the role is successfully added, we shall see something similar as shown in the screenshot below.
🎨 The client application can now read and write FHIR® data. 🎨
Test the API with Postman
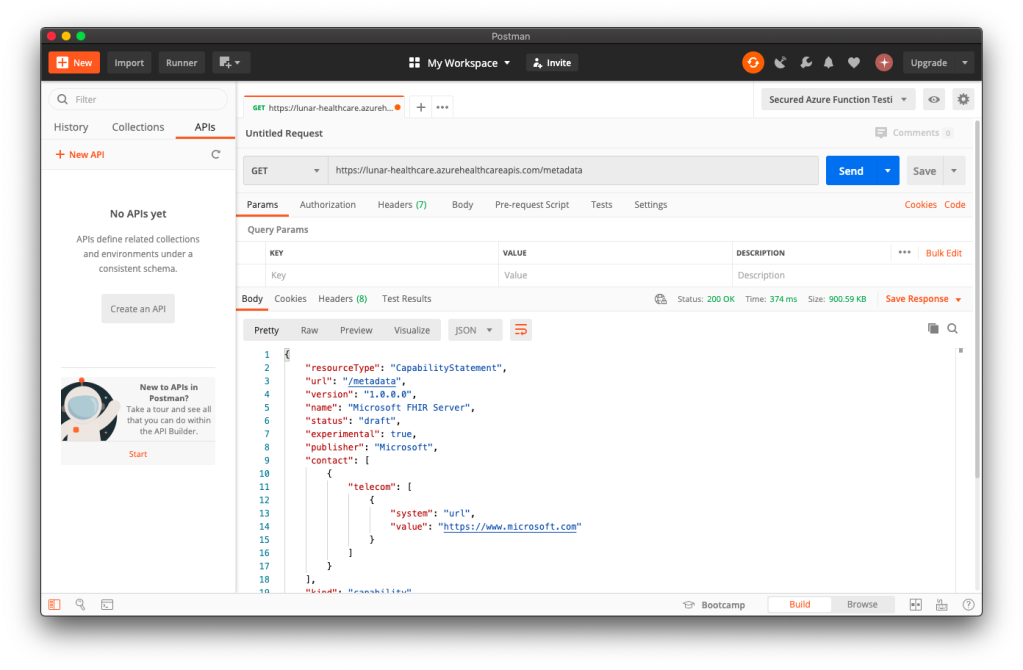
To make sure our Azure API for FHIR® is running well, we can visit its metadata link without any authentication. If it is running smoothly, we shall see something as shown in the following screenshot.
🎨 Yay, our Azure API for FHIR® is running! 🎨
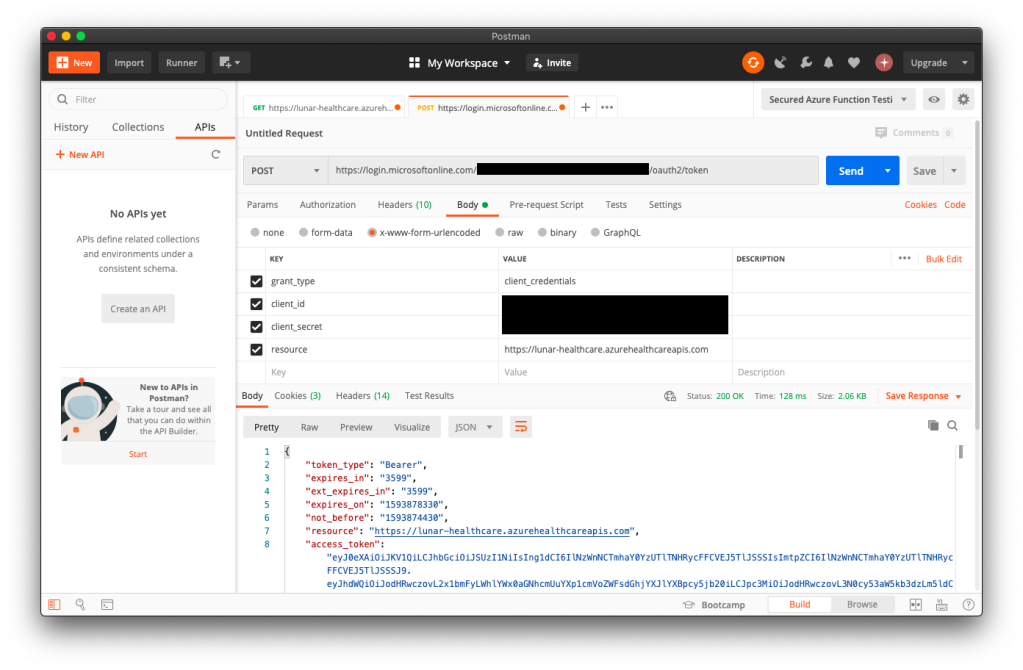
To access the patient data, we need to authenticate ourselves. In order to do so, we first need to get an access token from the client application in Azure Active Directory. We do so by making a POST request to the following URL https://login.microsoftonline.com/<tenant-id>/oauth2/token.
As shown in the following screenshot, the Tenant ID (and also Client ID) can be found at the Overview page of the client application. The resource is basically the URL of the Azure API for FHIR®.
🎨 Successfully retrieved the access_token! 🎨
Once we have the access token, we then can access the Patient endpoint, as shown in the following screenshot.
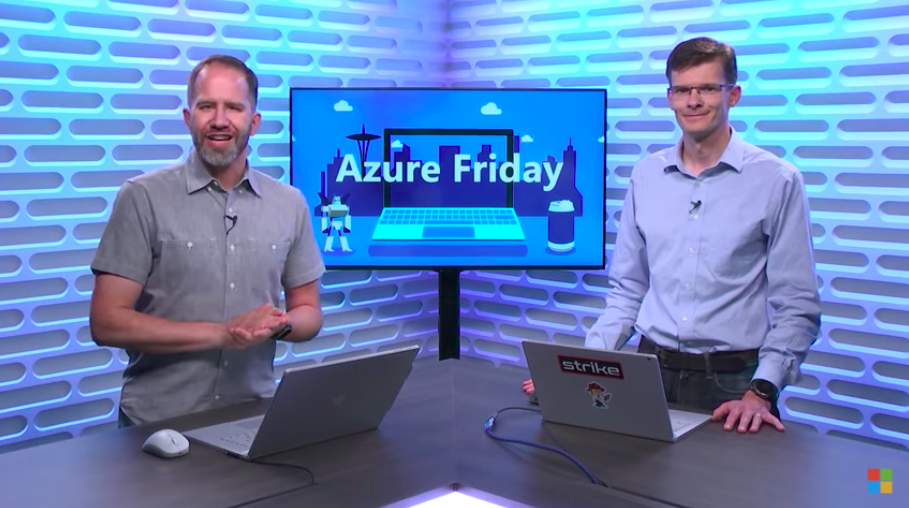
🎨 Michael Hansen on Azure Friday with Scott Hanselman to talk about Azure API for FHIR®. (Source: YouTube) 🎨
Import Data from Azure Storage
Now that we have the realistic but real patient data in the Azure Storage and we have the Azure API for FHIR® with a SQL database. So the next step that we need to do is pump the data into the SQL database so that other clients can consume the data through the Azure API for FHIR®. In order to do so, we will need a data importer.
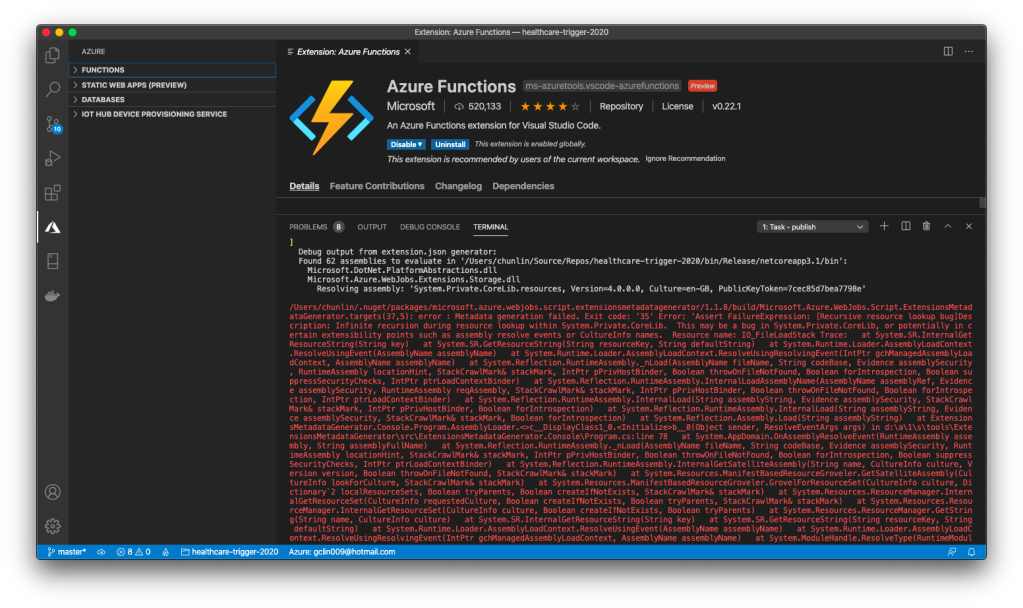
Firstly, we will create an Azure Function which will do the data import. There is an official sample on how to write this Function. I didn’t really follow the deployment steps given in the README of the project. Instead, I created a new Azure Function project in the Visual Studio and published it to the Azure. Interestingly, if I use VS Code, the deployment will fail.
🎨 I could not publish Azure Function from local to the cloud via VS Code. 🎨
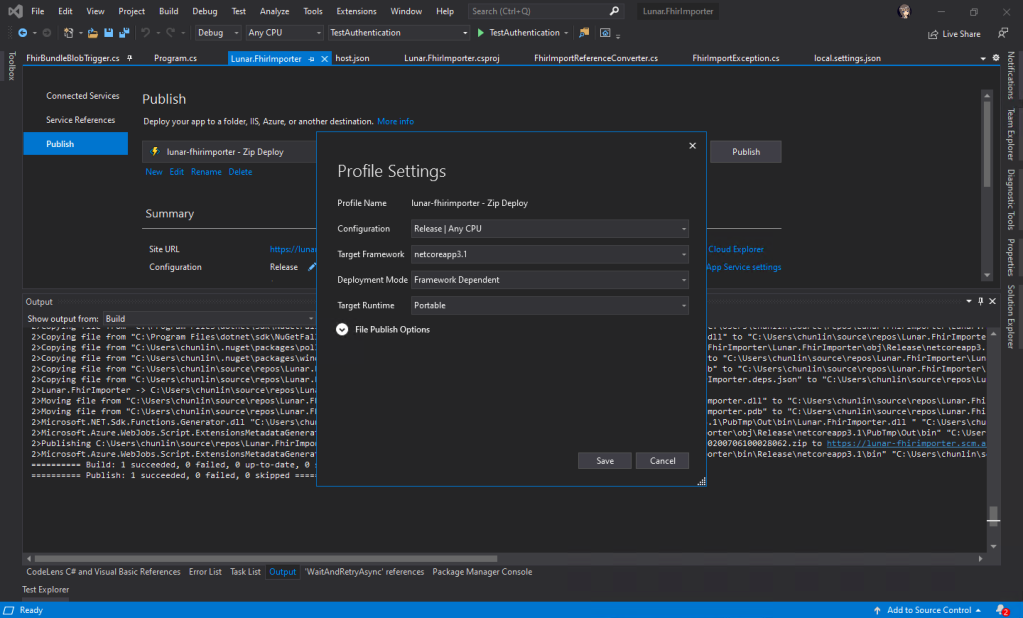
In Visual Studio, we will be creating a C# function which will run whenever a new patient data is uploaded to the container. Then the same function will remove the patient data from the Azure Storage once the data is fully updated.
🎨 Publish successful on Visual Studio 2019. 🎨
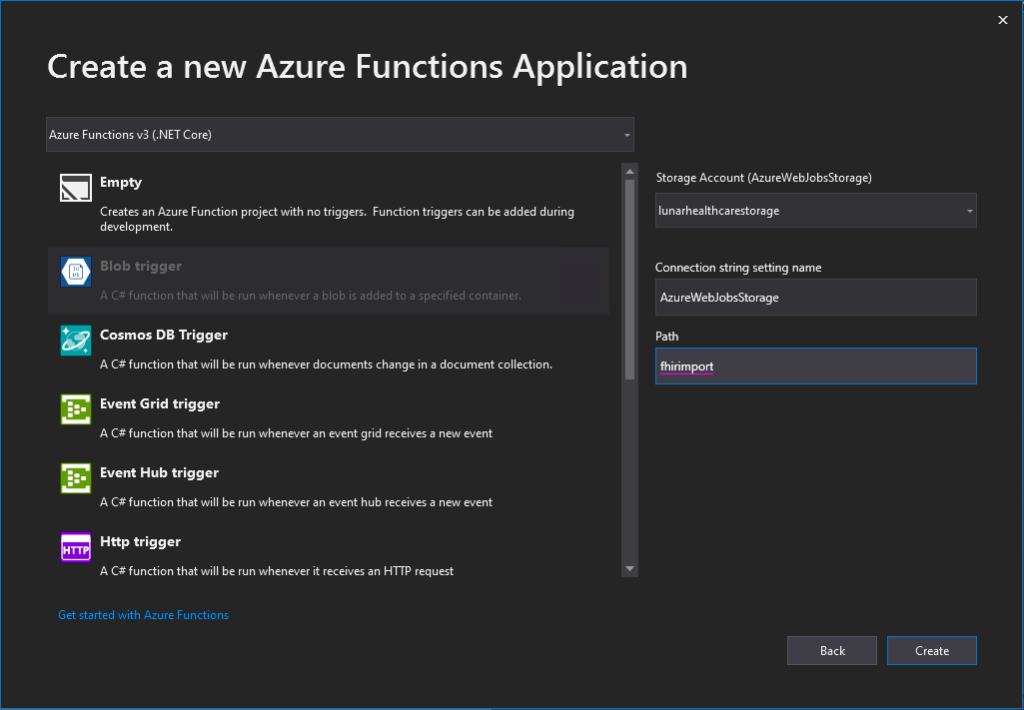
When we are creating a new Azure Function project on Visual Studio, for the convenience later, it’s better we use back the Azure Storage that we use for storing the realistic but not real patient data for our Azure Function app storage as well, as shown in the following screenshot. Thus, the Connection Setting Name will be AzureWebJobsStorage and the Path will point to the container storing our patient data (I recreated the container from syntheadata used in previous article to fhirimport in this article).
🎨 Creating new Azure Functions application. 🎨
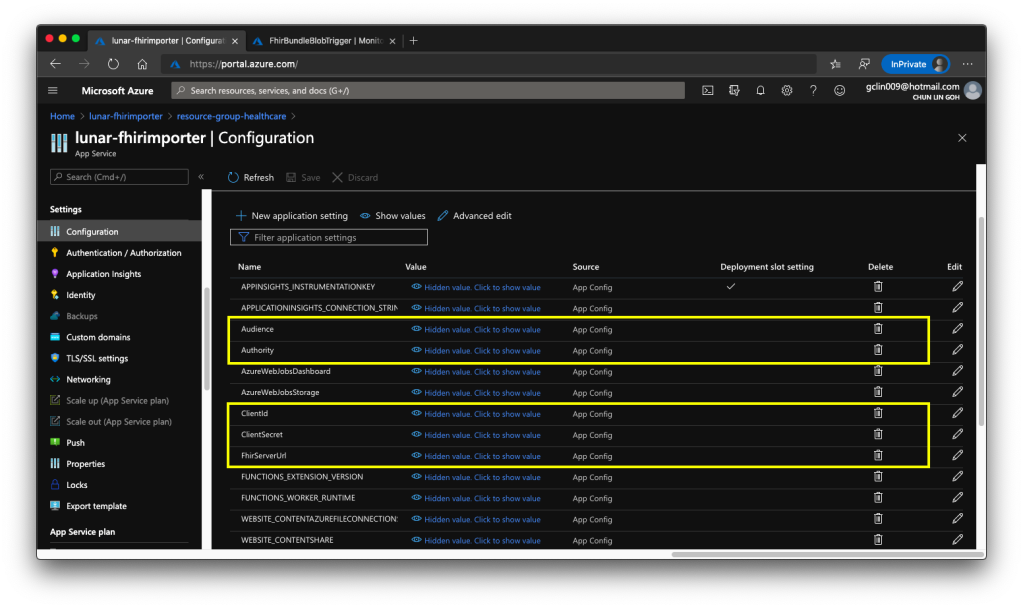
After the deployment is successful, we need to add the following application settings to the Azure Function.
Audience: <found in Authentication of Azure API for FHIR®>
Authority: <found in Authentication of Azure API for FHIR®>
ClientId: <found in the Overview of the Client App registered>
ClientSecret: <found in the Certificates & secrets of the Client App>
FhirServerUrl: <found in the Overview of Azure API for FHIR®>
🎨 We need to add these five application settings correctly. 🎨
After that, in order to help us diagnose problems happening in each data import, it’s recommended to integrate Application Insights to our Azure Function. After that, we can use ILogger to log information, warnings, or errors in our Azure Function, for example
log.LogWarning($"Request failed for {resource_type} (id: {id}) with {result.Result.StatusCode}.");
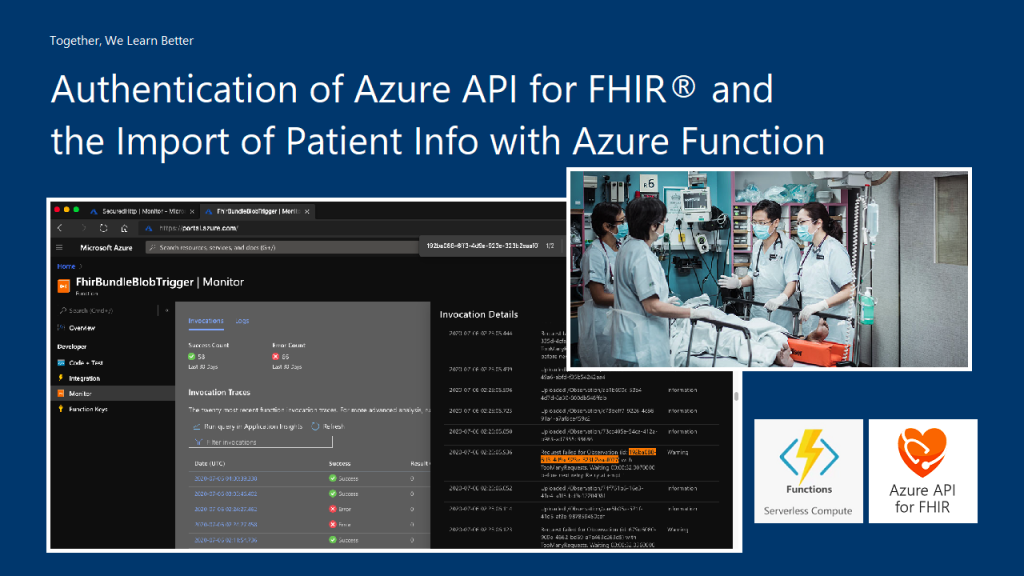
Then with Application Insights, we can easily get the log information from the Azure Function in its Monitor section.
🎨 Invocation details of the Azure Function. 🎨
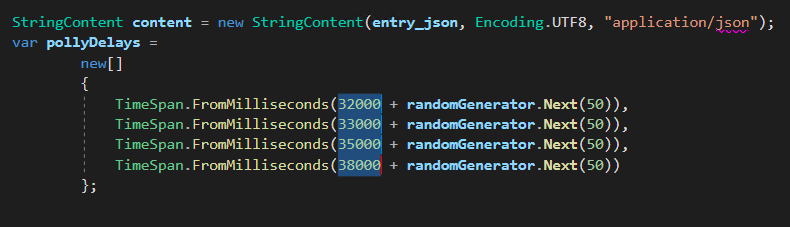
From the official sample code, I made a small change to the waiting time between each try of the request to the Azure API for FHIR®, as shown in the following screenshot.
In the FhirBundleBlobTrigger.cs, I increased the waiting time to have extra 30 seconds because the original waiting time is short that sometimes the data import will fail.
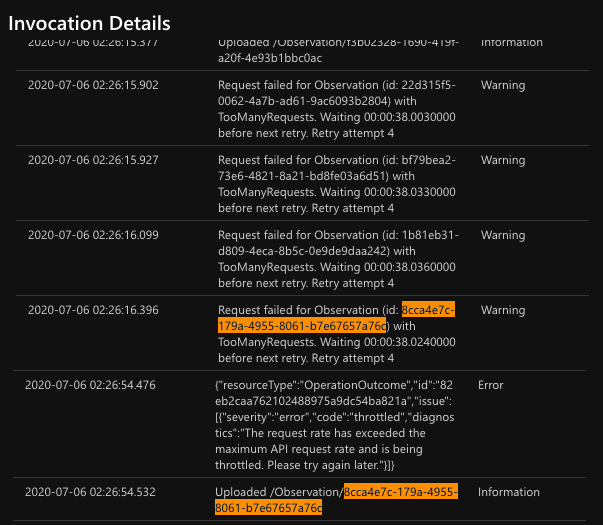
In the following screenshot, the Observation data can only be uploaded after 5 attempts. In the mean time, our request rate has exceeded the maximum API request rate and thus has been throttled too. So we cannot make calls to Azure API for FHIR® too frequent.
🎨 Five attempts with the same request with throttling happens. 🎨
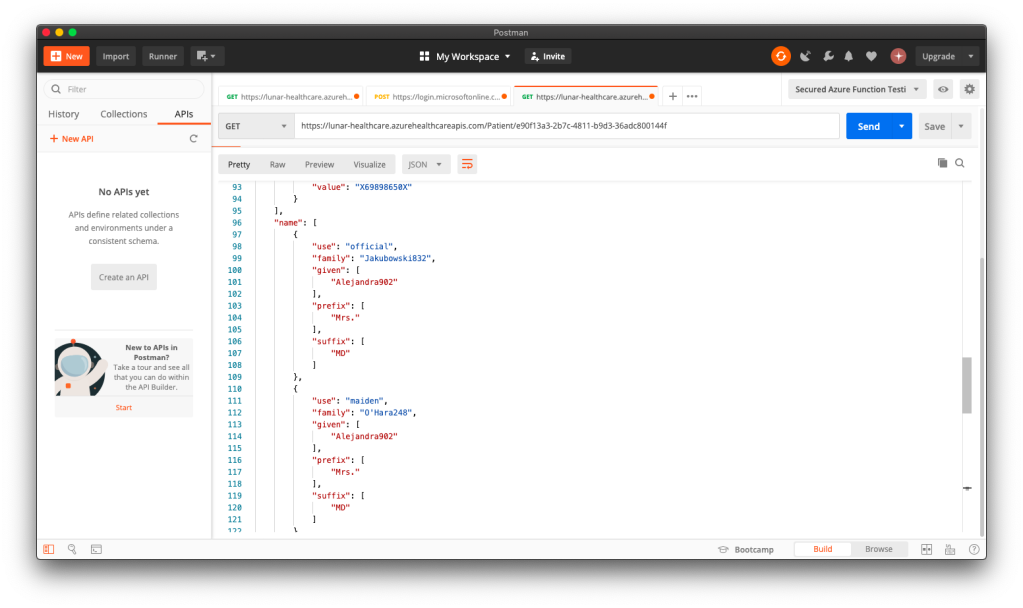
Now, when we make a GET request to the Patient endpoint of Azure API for FHIR® with a certain ID, we will be able to get the corresponding patient data back on Postman.
🎨 Successfully retrieved the patient data from the API service. 🎨
Yup, so at this stage, we have successfully imported data generated by Synthea(TM) to the Azure API for FHIR® database.
Software testing makes sure that the software is doing exactly what it is supposed to do and it also points out all the problems and errors found in the software. Hence, involving testing as early as possible and as frequent as possible is a key to build a quality software which will be accepted by the customers or the clients.
There are many topics I’d love to cover about testing. However, in this article, I will only focus on my recent learning about setting up automated GUI testing for my UWP program on Windows 10.
Appium
One of the key challenges in testing UWP app is to do the GUI testing. In the early stage, it’s possible to do that manually by clicking around the app. However, as the app grows larger, testing it manually is very time consuming. After sharing my thoughts with my senior Riza Marhaban, he introduced me a test automation framework called Appium.
Together with Windows App Driver which enables Appium by using new APIs added in Windows 10 Anniversary Edition, we can use them to do GUI test automation on Windows apps. The following video demonstrates the results of GUI testing with Appium in my demo project Lunar.Paint.Uwp.
Here, I will list down those great tutorials about automated GUI testing of UWP apps using Appium which are ranked top in Google Search:
Some of them were written about four years ago when Barack Obama was still the President of the USA. In addition, none of them continues the story with DevOps. Hence, my article here will talk about GUI testing with Appium from the beginning of a new UWP project until it gets built on Azure DevOps.
🎨 Barack Obama served as the 44th president of the United States from 2009 to 2017. (Image Credit: CBS News) 🎨
Getting Started with Windows Template Studio for UWP
Here, I will start a new UWP project using Windows Template Studio.
🎨 Configuring the Testing of the UWP app with Win App Driver. 🎨
There is one section in the project configuration called Testing, as shown in the screenshot above. In order to use Appium, we need to add the testing with Win App Driver feature. After that, we shall see a Test Project suffixed with “Tests.WinAppDriver” being added.
By default, the test project has already come with necessary NuGet packages, such as Appium.WebDriver and MSTest.
🎨 NuGet packages in the test project. 🎨
Writing GUI Test Cases: Setup
The test project comes with a file called BasicTest.cs. In the file, there are two important variables, i.e. WindowsApplicationDriverUrl and AppToLaunch.
The WindowsApplicationDriverUrl is pointing to the server of WinAppDriver which we will install later. Normally we don’t need to change it as the default value will be “http://127.0.0.1:4723”.
The AppToLaunch variable is the one we need to change. Here, we need to replace the part before “!App” with the Package Family Name, which can be found in the Packaging tab of the UWP app manifest, as shown in the screenshot below.
🎨 Package Family Name 🎨
Take note that there is a line of comment right above the AppToLaunch variable. It says, “The app must also be installed (or launched for debugging) for WinAppDriver to be able to launch it.” This is a very important line. It means when we are testing locally, we need to make sure the latest of our UWP app is deployed locally. Also, it means that the UWP app needs to be available on the Build Agent which we will talk about in later part of this article.
To access this button, in the test code, we can do like the following.
var welcomeScreenEnterButton = AppSession.FindElementByAccessibilityId("WelcomeScreenEnterButton");
Of course, if we want to have an AccessibilityId which is different from the Name of the XAML control (or the XAML control doesn’t have a Name), then we can specify the AccessibilityId in the XAML directly as follows.
Then to access this button, in the test code, we need to use EnterButton instead.
var welcomeScreenEnterButton = AppSession.FindElementByAccessibilityId("EnterButton");
Writing GUI Test Cases: AccessibilityName
The method above works well with XAML controls which are having simple text as the content. If the content property is not string, for example if the XAML control is a Grid that consists of many other XAML controls or the XAML control is a custom user control, then Appium will fail to detect the control with the AccessibilityId with the following exception message “OpenQA.Selenium.WebDriverException: An element could not be located on the page using the given search parameters”.
Thanks to GeorgiG from UltraPay, there is a solution to this problem. As GeorgiG pointed out in his post on Stack Overflow, the workaround is to overwrite the AutomationProperties.Name with a non-empty string value, such as “=”.
Then in the test cases, I can easily access the Grid with the following code.
var welcomeScreen = AppSession.FindElementByAccessibilityId("WelcomeScreen");
Writing GUI Test Cases: Inspect Tool
The methods listed out above work fine for the XAML controls in our program. How about for the prompt? For example, when user clicks on the “Open” button and an “Open” window is prompted. How do we instruct Appium to react to that?
🎨 Launched the “Inspect” tool from the Developer Command Prompt for VS 2019. 🎨
Next, we can mouse over the Open prompt to find out the AccessibilityId of the GUI element that we need to access. For example, the AccessibilityId of the area where we key in the file name is 1148, as shown in the screenshot below.
🎨 Highlighted in red is the AccessibilityId of the File Name text input area. 🎨
This explains why in the test cases, we have the following code to access it.
var openFileText = AppSession.FindElementByAccessibilityId("1148");
Now, we have done our software test locally. How do we make the testing to be part of our build pipeline on Azure DevOps?
This turns out to be quite a complicated setup. Here, I setup the build pipeline based on the .NET Desktop pipeline in the template.
🎨 .NET Desktop build pipeline. 🎨
Next, we need to make sure the pipeline is building our solution with VS2019 on Windows 10 at least. Otherwise, we will receive the error “Error CS0234: The type or namespace name ‘ApplicationModel’ does not exist in the namespace ‘Windows’ (are you missing an assembly reference?)” in the build pipeline.
🎨 The “Agent Specification” of the pipeline needs to be at least “windows-2019”. 🎨
Now, if we queue our pipeline again, we will encounter a new error which states that “Error APPX0104: Certificate file ‘xxxxxx.pfx’ not found.” This is because for UWP app, we need to package our app with a cert. However, by default, the cert will not be committed to the Git repository. Hence, there is no such cert in the build pipeline.
To solve this problem, we need to first head to the Library of the Pipelines and add the following Variable Group.
🎨 This is basically the file name of the cert and its password. 🎨
Take note that, the required cert is now still not yet available on the pipeline. Hence, we need to upload the cert as one of the Secured Files in the Library as well.
🎨 Uploaded pfx to the Azure DevOps Pipeline Library. 🎨
So, how to we move this cert from the Library to the build pipeline? We need the following task.
🎨 Download secure file from the Library. 🎨
This is not enough because the task will only copy the cert to a temporary storage on the build agent. However, when the agent tries to build, it will still be searching for the cert in the project folder of our UWP app, i.e. Lunar.Paint.Uwp.
Hence, as shown in the screenshot above, we have two more powershell script tasks to do a little more work.
With these three new tasks, the build task should be executed correctly.
🎨 Build solution task. 🎨
Here, my BuildPlatform is x64 and the BuildConfiguration is set to release. Also in the MSBuild Arguments, I specify the PackageCertificatePassword because otherwise it will throw an error in the build process saying “[error]C:\Program Files (x86)\Microsoft Visual Studio\2019\Enterprise\MSBuild\Microsoft\VisualStudio\v16.0\AppxPackage\Microsoft.AppXPackage.Targets(828,5): Error : Certificate could not be opened: Lunar.Paint.Uwp_TemporaryKey.pfx.”
Introduction of WinAppDriver to the Build Pipeline
Okay, so how do we run the test cases above on Azure DevOps?
Actually, it only requires the following five steps as highlighted in the following screenshot.
🎨 The five steps for GUI testing. 🎨
Firstly, we need to start the WinAppDriver.
Secondly, we need to introduce two tasks after it to execute some PowerShell scripts. Before showing what they are doing, we need to recall one thing.
Remember the one line of comment above the AppToLaunch variable in our test project? It says, “The app must also be installed (or launched for debugging) for WinAppDriver to be able to launch it.” Hence, we must install the UWP app using the files in AppxPackages generated by the Build task. This is what the two Powershell tasks are doing.
The first Powershell task is to import the cert to the store.
The second task, as shown in the following screenshot, is to install the UWP app using Add-AppDevPackage.ps1. Take note that here we need to do SilentContinue else it will wait for user interaction and cause the pipeline to be stuck.
🎨 Run the PowerShell file generated by Build Solution task directly to install our UWP app. 🎨
At the point of writing this article, the Windows Template Studio automatically sets the Targeting of the UWP app to be “Windows 10, version 2004 (10.0; Build 19041)”. However, the Azure DevOps pipeline is still not yet updated to Windows 10 v2004, so we should lower the Target Version to be v1903 and minimum version to be v1809 in order to have the project built successfully on the Azure DevOps pipeline.
Thirdly, we will need the test with VsTest. This task exists in the default template and nothing needs to be changed here.
Fourthly, we need to stop the WinAppDriver.
That’s all. Now when the Build Pipeline is triggered, we can see the GUI test cases are being run as well.
🎨 Yay, our GUI test cases are being tested successfully. 🎨
In addition, Azure DevOps will also give us a nice test report for each of our builds, as shown in the following the screenshot.
🎨 Test report in Azure DevOps. 🎨
Conclusion: To Be Continued
Well, this is actually just the beginning of testing journey. I will continue to learn more about software testing especially in the DevOps part and share with you all in the future.
Feel free to leave a comment here to share with other readers and me about your thoughts. Thank you!
Recently due to the coronavirus pandemic, ordering food from online platform becomes one of the popular choices here. Drivers will deliver the food to us without us leaving our house to pickup the food from the restaurants.
The drivers are all equipped with a smart phone that will send I’m not sure how those online food ordering platforms design their backend system to track the drivers. However, today I’d like to suggest how we can build such driver tracking system with Azure Event Hub and Stream Analytics.
The Traditional Approach
Previously, the approach that I took to build such system by building a Web API which provides endpoints for the mobile devices (assuming to be only Android and iOS) to send the GPS data to. Then our Web API will save the data to CosmosDB, which is a good choice for any serverless application that needs low order-of-millisecond response times.
However, this approach is costly in terms of hosting and maintainability, especially with the expensive CosmosDB even though there is now a free tier available for CosmosDB starting March 2020. Also it is not scalable unless we spent extra time working on the infrastructure to load balance the Web APIs and the reporting servers.
So, let’s see how we can use the robust Azure services and Microsoft tools to help us build a better tracking system.
Eventing in Azure
As we all know, GPS reporting of drivers in delivery industry needs real-time processing and the volume of data is always huge to a certain level that there are millions of events happening in every second.
Hence, in this article, I’d like to share with you all an alternative, which is cheaper (unfortunately, not free) and more scalable with higher maintainability.
🎨 Alternative solution for driver tracking system with Eventing in Microsoft Azure. 🎨
In this approach, we will be using tools such as Event Hub, Stream Analytics, and Power BI. There is also Azure Function needed for iOS side which I will explain why later in this article.
Event Hub
As shown in the diagram above, we remove the needs of building the API endpoints and maintaining a reporting module ourselves. Instead, we have Event Hub, a serverless Big Data streaming platform and event ingestion service which can provide real-time event processing and is able to stream million of events per second. Since it’s a serverless setup, we don’t need to provision server resources to handle the events and we also don’t have to pay for large upfront infrastructure cost.
🎨 One of my event hubs that is receiving geolocation data from the mobile devices. 🎨
Since Event Hub is an open multi-platform, it accepts a range of input methods. So later we shall see how data can be sent to Event Hub from both Android app and iOS app directly.
Event Hub Namespace Throughput Unit
There is a very interesting property in Event Hub Namespace called the Throughput Unit (TU), which is the amount of work that we want to assign to the namespace.
1 TU gives us 1MB/s ingress or 1,000 events/s and 2MB/s outgress or 2,000 events/s. We can scale our namespace up to 20 TUs.
🎨 Scaling the event hub namespace by its TU. 🎨
In the screenshot above, we can see that there is also a functionality to auto-inflate our namespace which will auto scale-up the TU to a defined limit. This is good for handling sudden peak in volume. However, take note that there is no auto-deflate, so once the TU goes up, we need to use another way to scale it down when the peak is over.
One more thing to take note here is that the TU is shared among the Event Hubs under the namespace.
Capture in Event Hub
By default, Event Hub can store the data for one day. We can adjust it to be the maximum, which is 7 days (in Standard pricing tier only). This is to remind us that Event Hub should not be used as a data storage.
However, with the easy integration of Event Hub with the Azure Stream Analytics, Event Hub can serve as input of the Stream Analytics and output the data to places such as Power BI for data analysis and visualisation or SQL / Azure Storage for data storage.
In addition, we can also enable the Capture function in Event Hub. Capture will automatically persist the data to Azure Storage with no administrative cost. This is the easiest way to load streaming data into Azure without the need of Stream Analytics. The captured streaming data will be stored in the AVRO format which has the data serialised in a compact binary format.
🎨 Viewing the captured streaming data in Azure Storage on the portal. 🎨
Mobile Clients
Now with the Event Hub setup, we will proceed to discuss how we can send data from our mobile devices to the Event Hub.
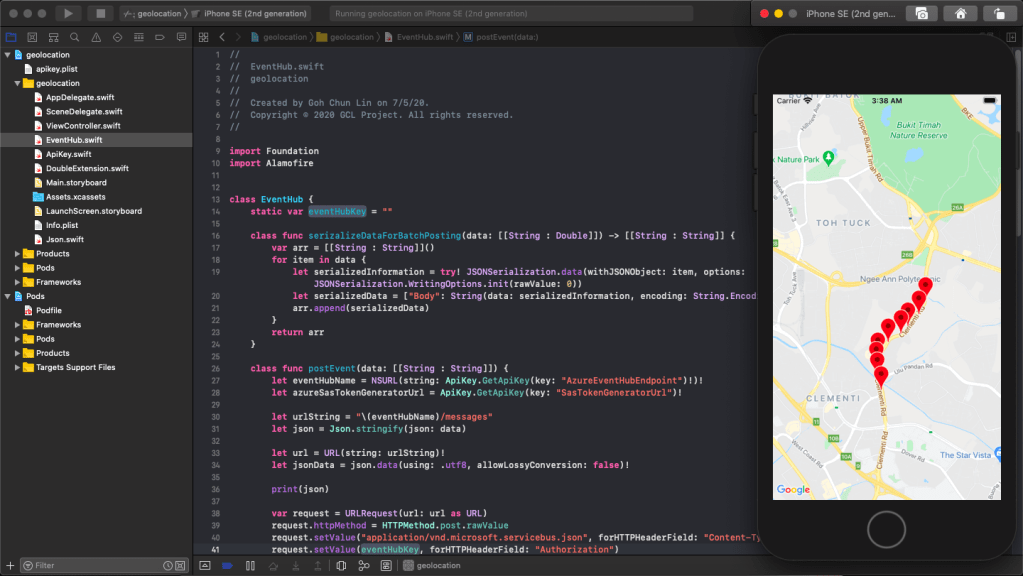
🎨 “Driving” on iOS Google map. 🎨
Unfortunately, there are very little documentation about how to do this online, especially on Kotlin/Swift + Event Hub. Hence, I hope this article can help somebody out there who are interested in similar approach.
Since during the coronavirus pandemic, we are advised not to leave our house so how do I test in such a situation? I thus decide to cheat a bit here. Instead of using the actual mobile location, I will be running my apps on the emulator/simulator. What the apps do is then collecting the latitude and longitude of the points that I click on the app and send them to the Event Hub.
In the system, we have both Android and iOS mobile devices that will send GPS data of the users to the Event Hub. For the Android, I will be using Kotlin because it’s the modern recommended way of developing Android app.
Having said that, I will still be using the existing Java client library for Event Hub from the repository. However, there are a few configurations we need to take care of in order to use this Java library.
Firstly, we will add the dependency to the project as follows in the build.gradle of the app.
Another thing why we choose Event Hub is that it allows us to send data in batches. The following function shows how to send data in batch to the Event Hub.
private fun sendLatitudeAndLongitudeDataToAzure() {
    var producer = EventHubClientBuilder()
        .connectionString(BuildConfig.AZURE_EVENT_HUB_CONNECTION_STRING, BuildConfig.AZURE_EVENT_HUB_NAME)
        .buildProducerClient()

    val batch = producer.createBatch()

    recentLatitudeAndLongitudeRecords.forEach {
        batch.tryAdd(EventData(it))
    }

    if (batch.count > 0) {
        producer.send(batch)
    }

    producer.close()
}
The variable recentLatitudeAndLogitudeRecords is a collection of all recent latitude and longitude data collected by the device. In my demo code, which is not shown above, I make it to hold 10 records. So in just one send command, 10 geolocation records will be sent altogether to the Event Hub. The devices thus do not need to make multiple connections to the server to send multiple records.
I only highlighted the key points here for programming an Android app in Kotlin to connect to the Azure Event Hub. The complete demo code is available on GitHub for those who want to find out more about how we can integrate Event Hub in Android projects.
We should be glad that there is still Event Hub documentation and library available for Android platform because for iOS, there is basically nothing, not even an Event Hub SDK for iOS from Microsoft.
🎨 Barack Obama served as the 44th president of the United States from 2009 to 2017. (Image Credit: CBS News) 🎨
Since there is no Event Hub SDK for iOS, we have to use its REST APIs instead. For using Event Hub REST APIs, we first need to programmatically generate a SAS (Shared Access Signature) token in order to call the APIs.
This is where the Azure Function comes into picture. In Luis’ blog post, he setup an Azure Web App to host a NodeJS application which will generate SAS token. To be more cost effective, we will be using Azure Function with a short and sweet C# code as shown in the Microsoft documentation.
With this, then we can then use Alamofire, an HTTP networking library, to make a request to the Azure Event Hub. To send batch data, we first need to make sure the message body to have a valid JSON payload, which is something as follows.
[
{"Body": "<stringify of the record 01 JSON object to send>"},
{"Body": "<stringify of the record 02 JSON object to send>"},
...
]
We then also need to make sure we have set the Content-Type header to “application/vnd.microsoft.servicebus.json”. For more details, please refer to the Microsoft documentation on sending batch data.
Of course, here I also highlight only the key points to successfully send event data in batch from iOS using Swift 5 to Azure Event Hub. If you would like to find out more, I have my entire demo project for this available on my GitHub repository, please review it.
🎨 Running the app which is sending data to the Event Hub on iPhone simulator. 🎨
Stream Analytics
With the events sent from the mobile devices to the Event Hub, we now can link the Event Hub with the Stream Analytics. Take note that Stream Analytics is just one of the many ways of pulling data from the Event Hub. For example, if you are familiar with Apache Storm, you can link it up with that too.
Consumer groups enable multiple consuming applications to each have a separate view of the event stream, and to read the data stream independently. Hence, it is recommended to create a new consumer group for each Stream Analytics Job.
The Stream Analytics accepts multiple inputs and multiple outputs with multiple queries. In our scenario, we have one input from the Event Hub and two outputs to two different datasets on the Power BI.
One dataset is to show all the data points collected by the mobile devices. We will use this dataset to plot the places visited by the drivers on a map. Another dataset will be showing the number of points collected in each mobile device.
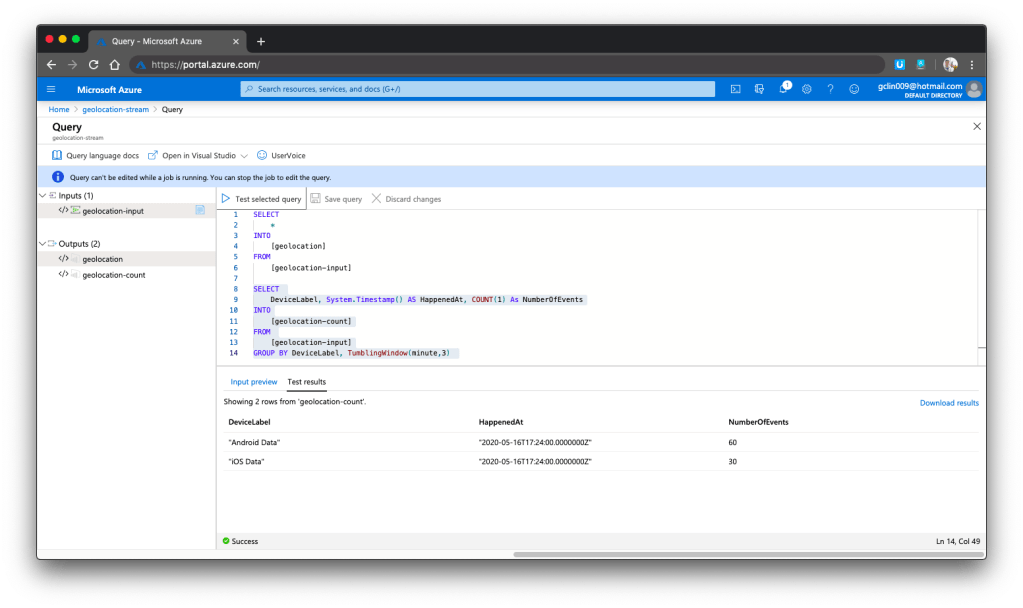
Hence, we have the following queries in our Stream Analytics.
SELECT *
INTO [geolocation]
FROM [geolocation-input]

SELECT DeviceLabel, System.Timestamp() AS HappenedAt, COUNT(1) As NumberOfEvents
INTO [geolocation-count]
FROM [geolocation-input]
GROUP BY DeviceLabel, TumblingWindow(minute,3)
We can now test run the queries above on the Azure Portal, as shown in the screenshot below.
🎨 We can choose to test only the selected query and view its test results. 🎨
Here, there are additional two things that I’d like to highlight.
Firstly, the data format that we sent to Event Hub is very important. Sometimes it is possible that the Event Hub can receive the messages but due to the wrong format in the messages, Stream Analytics cannot take them as inputs and there will be warning shown in the Overview page of the Stream Analytics.
In Power BI, with our setup above in the Stream Analytics, it should now show two datasets.
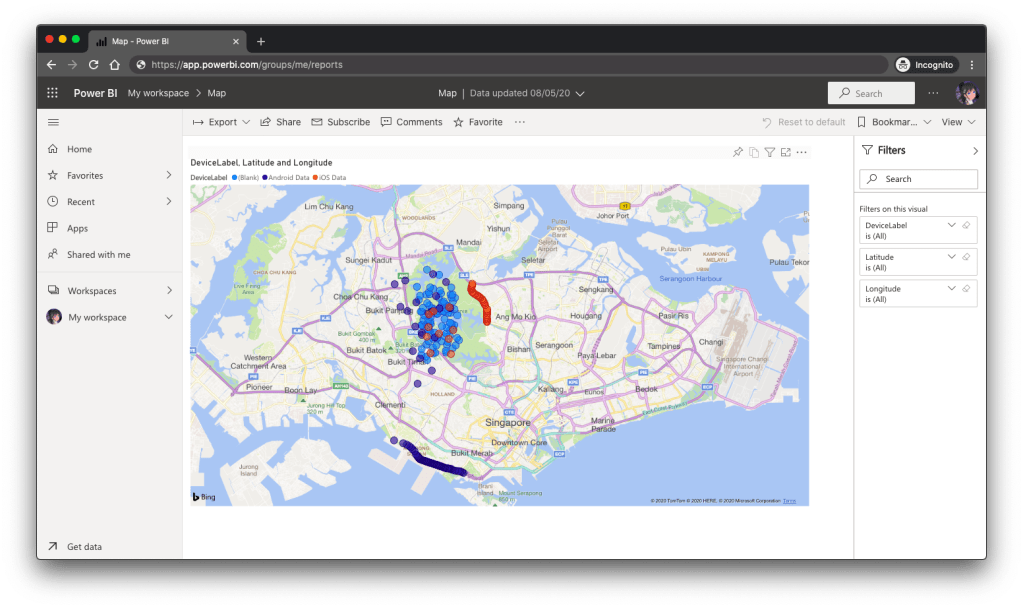
Firstly, we have the map in Power BI using the first dataset to show the location of the drivers. There are some data points having blank Device ID because it is a new field I added after I setup the first dataset in the Stream Analytics.
🎨 Map showing the driver locations using results returned from the first query in Stream Analytics. 🎨
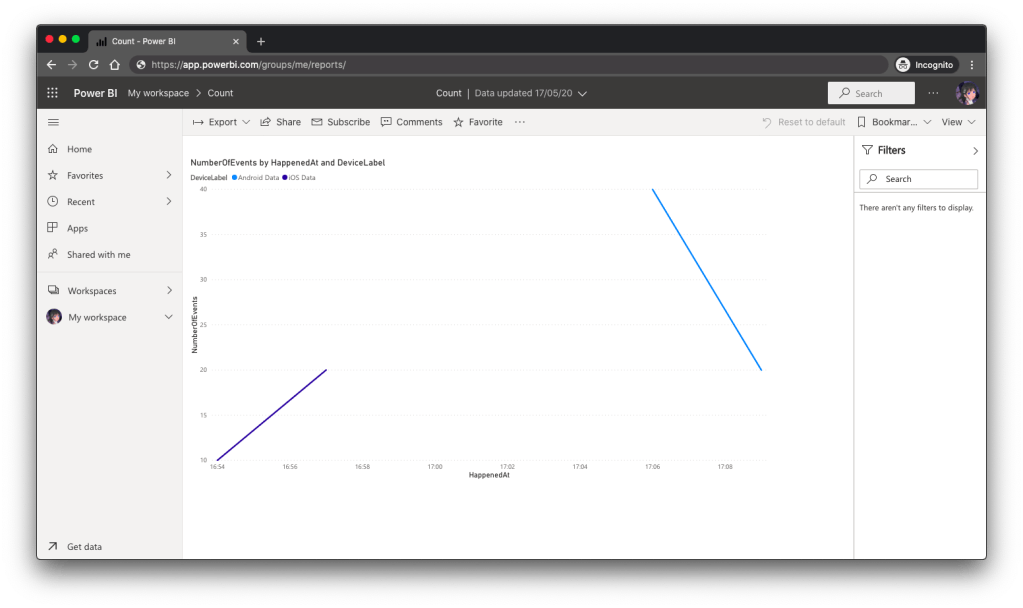
Secondly, we can also visualise the results returned from the second dataset using the Line Chart in Power BI, as shown below.
🎨 The second driver starts work after the first driver. 🎨
Conclusion
So, what do you think about my alternative above? In fact, there are other ways of doing this as well. There is one more alternative that requires Azure Time Series Insights service which I will be researching. Hopefully I can have time to blog about it soon.
If you have any other better solution, feel free to let me know in the comment section. I may not have time to try all of them out but it may help other developers to find out more alternatives. Thank you in advance!
🎨 If you have a good suggestion to share, let’s discuss over a meal. 🎨
I thus decided to document down the steps on how I approach this problem to help the developers out there who are facing the same issue.
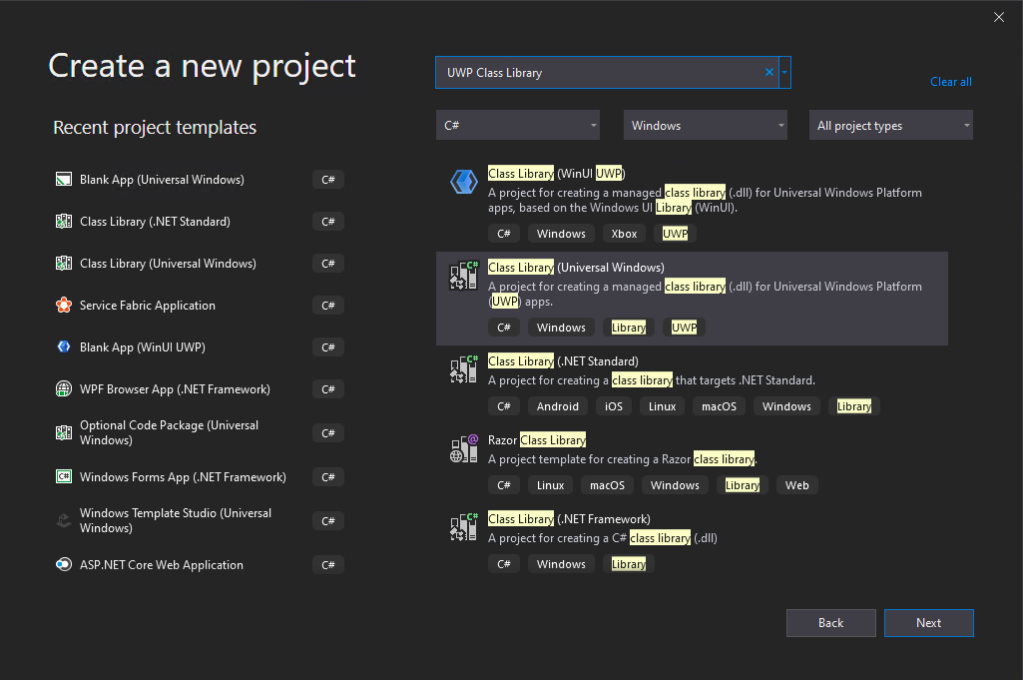
Step 1: Setup the UWP Class Library Project
🎨 We will be using “Class Library (Universal Windows) in this post. 🎨
In this post, the new project we create is called “RedButton” which is meant to provide red button in different style. Yup, it’s important to make our demo as simple as possible so that we can focus on the key thing, i.e. generating the NuGet package.
Before we proceed with the new project, we need to configure the project Build properties, as shown in the following screenshot, to enable the XML Documentation file. This will make a XML file generated in the output folder which we need to use later.
🎨 Enable the XML documentation file by checking the checkbox. 🎨
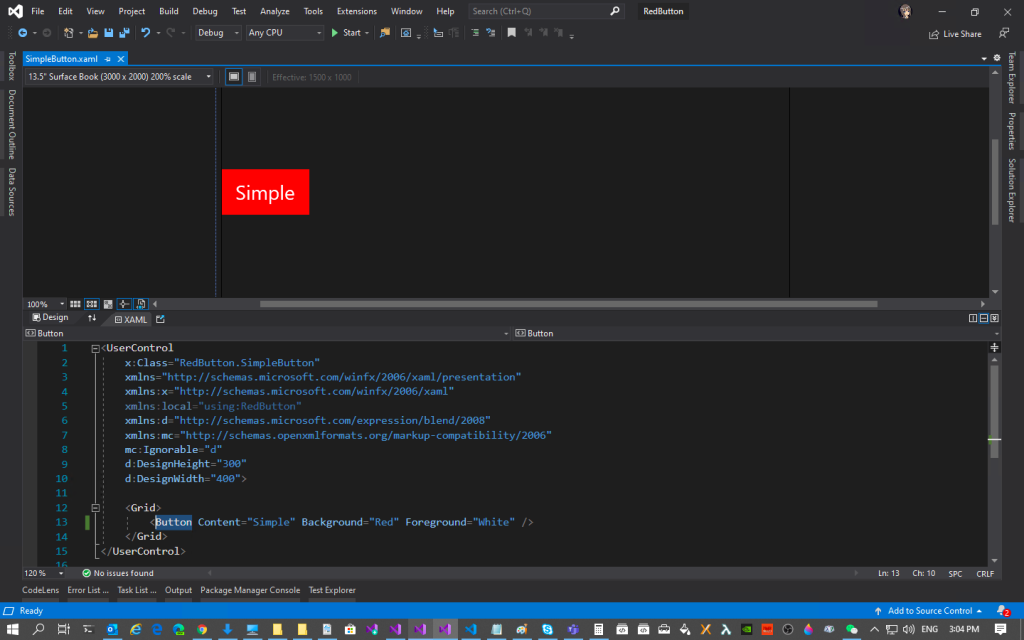
Now, we can proceed to add a new user control, called SimpleButton.xaml.
🎨 Yay, we have simple red button here. 🎨
So this marks the end of the steps where we create an UWP user control where we need to package it with NuGet.
Step 2: Install NuGet.exe
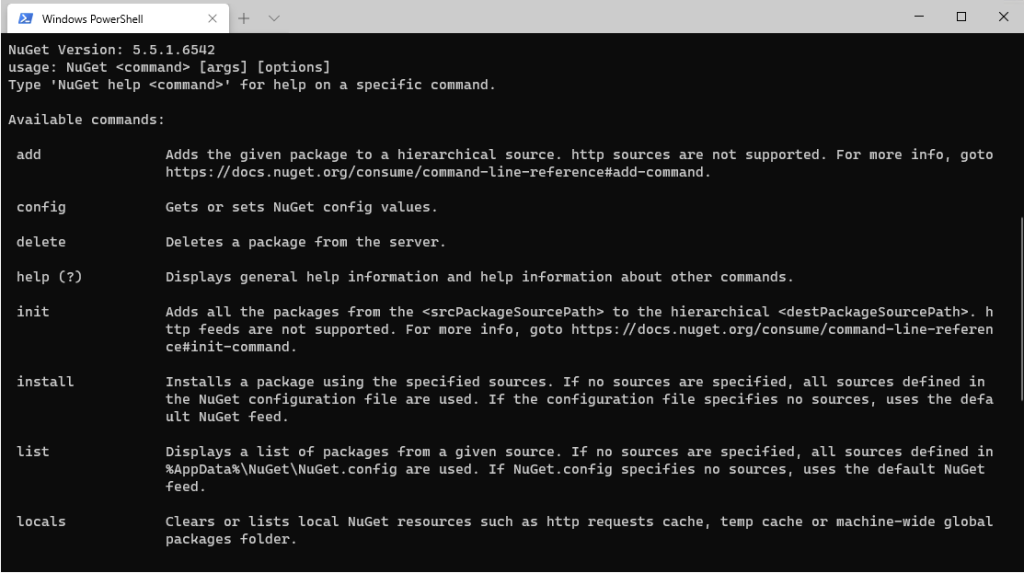
Before we proceed, please make sure we have nuget installed. To verify that, just run the following command in the PowerShell.
> nuget
If it is installed, it will show something as follows.
🎨 Yay, nuget is installed. 🎨
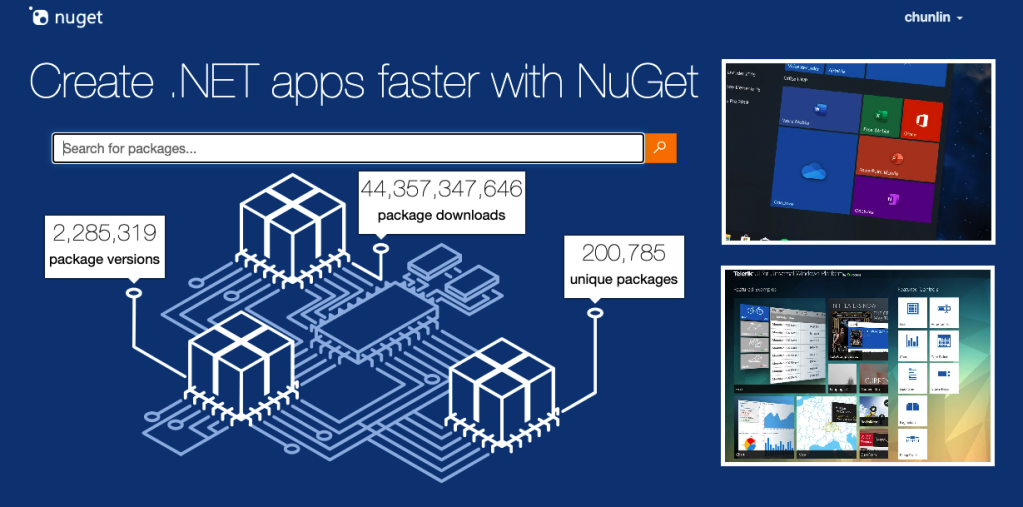
If it is not installed, please download the latest recommended nuget.exe from the NuGet website. After that, add the path the the folder containing the nuget.exe file in the PATH environment variable.
Now we need to navigate in PowerShell to the project root folder, i.e. the folder containing RedButton.csproj. Then, we need to key in the following command to run it.
nuget spec
If the command is successfully executed, there will be a message saying “Created ‘RedButton.nuspec’ successfully.”
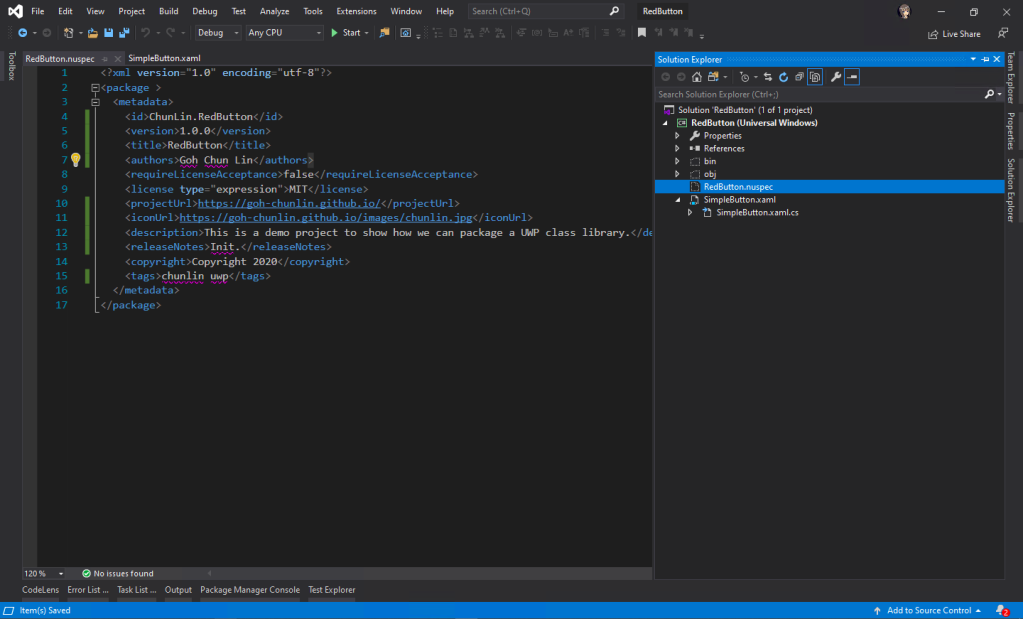
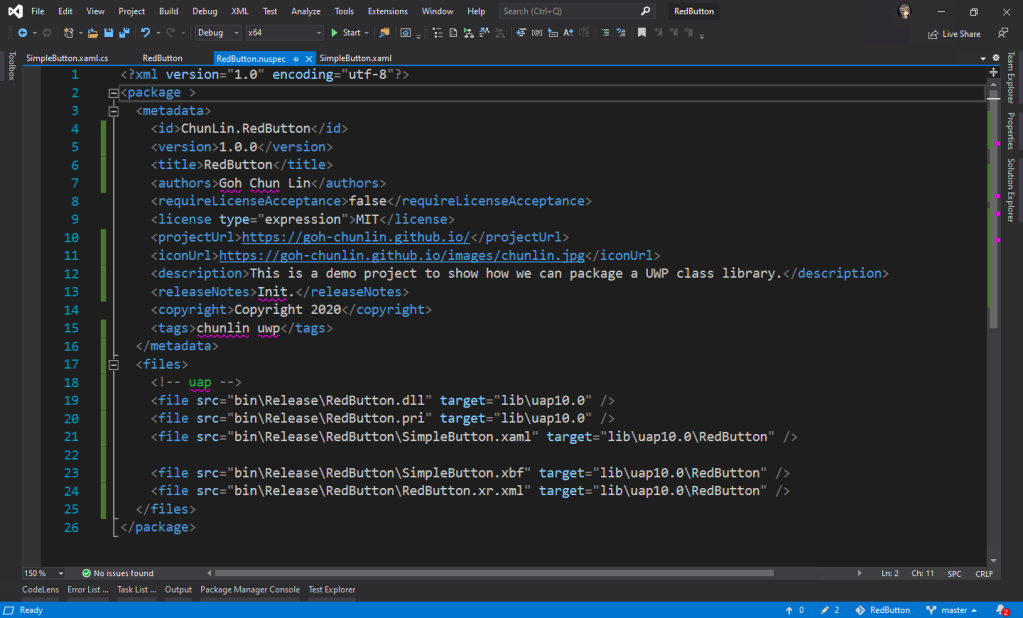
Now, we can open the RedButton.nuspec in Visual Studio. Take note that the file itself is not yet included in the solution. So we need to make sure we have enabled the “Show All Files” in the Solution Explorer to see the NuSpec file.
In order to automate the publish of our package to the NuGet, we will need to implement Continuous Integration. Here, the tools that we will be using are GitHub and Azure DevOps.
After committing our codes to GitHub, we will proceed to setup the Azure DevOps pipeline.
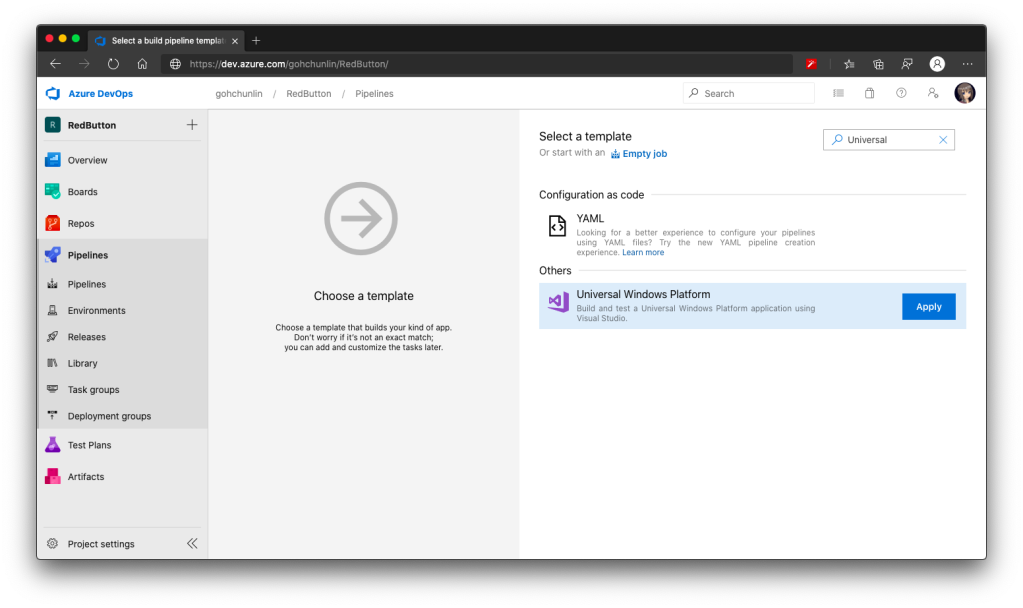
Firstly, we can make use of the UWP build template available on the Azure DevOps.
🎨 Yes, we can build UWP app on Azure DevOps. 🎨
At the time I am writing this port, there are 5 tasks in the agent job:
Use NuGet 4.4.1;
NuGet restore **\*.sln;
Build solution **\*.sln;
Publish artifact: drop;
Deploy to Visual Studio App Center.
Take note that the NuGet version by default is 4.4.1, which is rather old and new things like <license> element in our NuSpec file will not be accepted. Hence, to solve this problem, we can refer to the list of available NuGet version at https://dist.nuget.org/tools.json.
At the time this post is written in April 2020, the latest released and blessed NuGet version is 5.5.1. So we will change it to 5.5.1. Please update it to any other latest number according to your needs and the time you read this post.
After that, for the second task, we need to update its “Path to solution, packages.config, or project.json” to be pointing at “RedButton\RedButton.csproj”.
Similarly, for the “Solution” field in the third task, we also need to point it to the “RedButton\RedButton.csproj”. Previously I pointed it to the RedButton folder which contains the .sln file, it will not work even though it is asking for “Solution”.
On the third task, we also need to update the “Visual Studio Version” to be “Visual Studio 2019” (or any other suitable VS for our UWP app). It seems to be not working when I was using VS2017. After that, I also updated the field “Configuration” to Release because by default it’s set to Debug and publishing Debug mode to public is not a good idea. I have also enabled “Clean” build to avoid incremental build which is not useful in my case. Finally, I changed the MSBuild Architecture to use MSBuild x64. The update of the third task is reflected on the screenshot below.
🎨 Third task configuration. 🎨
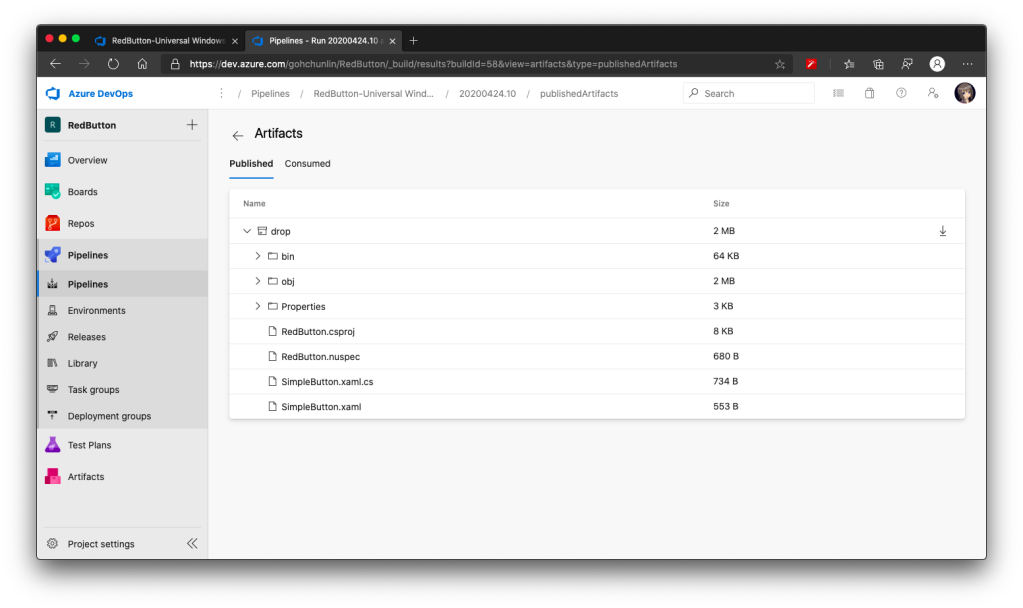
For the forth task, similarly, we also set its “Path to publish” to “RedButton”. Ah-ha, this time we are using the solution folder itself. By right, this fourth task is not relevant if we just publish our UWP class library to a NuGet server. I still keep it and set its path to publish to be the solution so that later I can view the build results of previous tasks by downloading it from the Artifact of the build.
I’d recommend to have this step because sometimes your built output folder structure may not be the same as what I have here depends on how you structure your project. Hence, based on the output folder, you many need to make some adjustments to the paths used in the Azure DevOps.
🎨 The fourth task helps to show build results from previous tasks. 🎨
By default, the fifth task is disabled. Since we are also not going to upload our UWP app to VS App Center, so we will not work on that fifth task. Instead, we are going to add three new tasks.
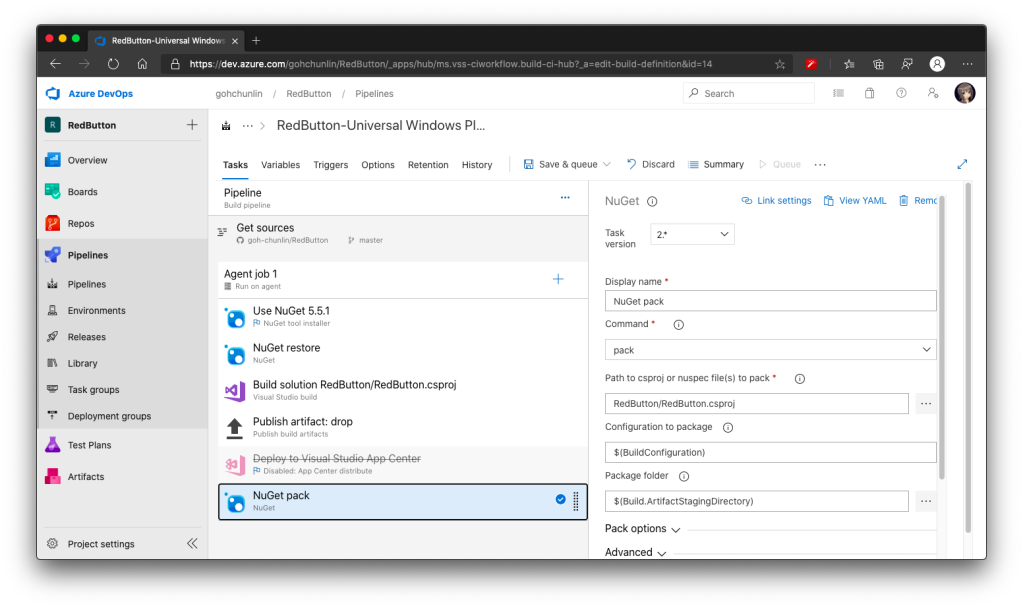
Firstly, we will introduce the NuGet pack task as the sixth task. The task in the template is by default called “NuGet restore” but we can change the command from “restore” to “pack” after adding the task, as shown in the following screenshot.
🎨 Remember to point the “Path to csproj” to the directory having the RedButton.csproj. 🎨
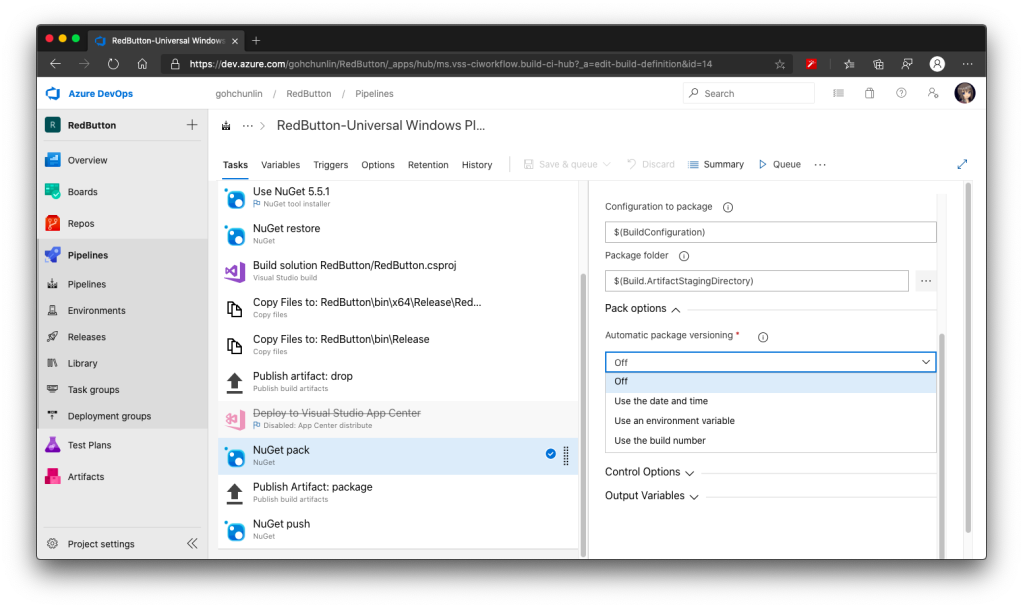
There is one more important information that we need to provide for NuGet packaging. It’s the version of our package. We can either do it manually or automatically. It’s better to automate the versioning else we may screw it up anytime down the road.
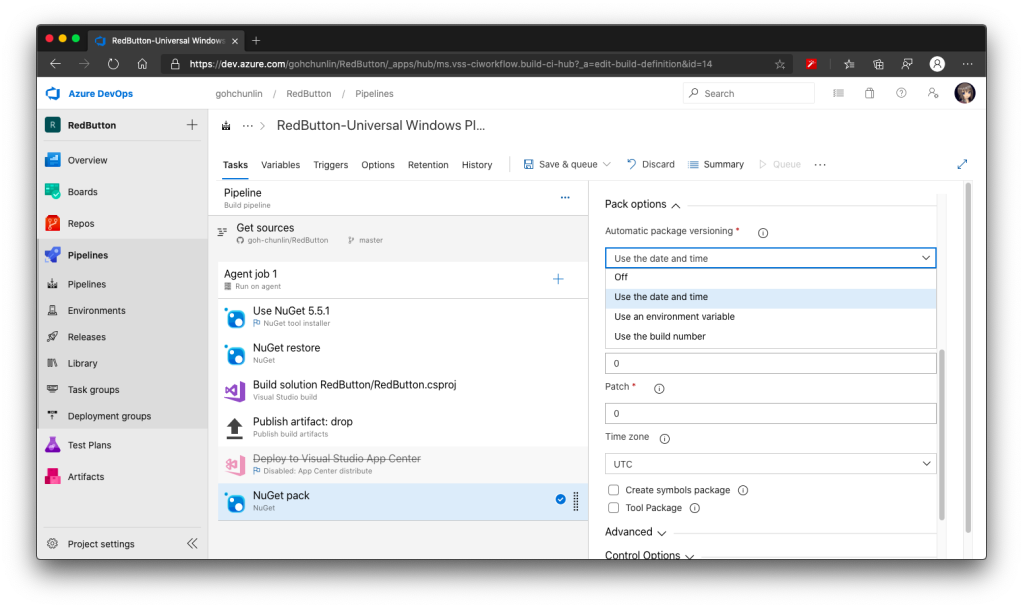
There are several ways to do auto versioning. Here, we will go with the “Date and Time” method, as shown in the screenshot below.
🎨 Choose “Use the date and time”. 🎨
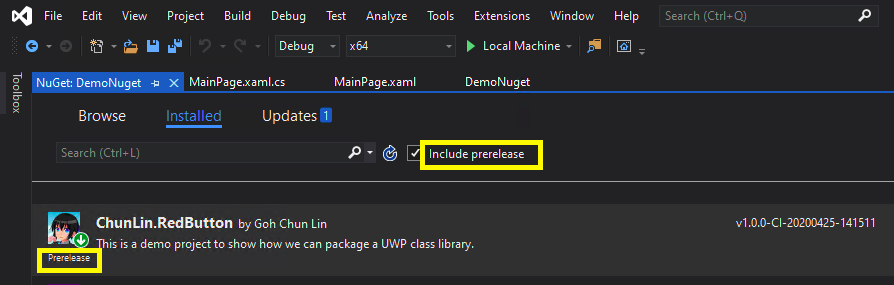
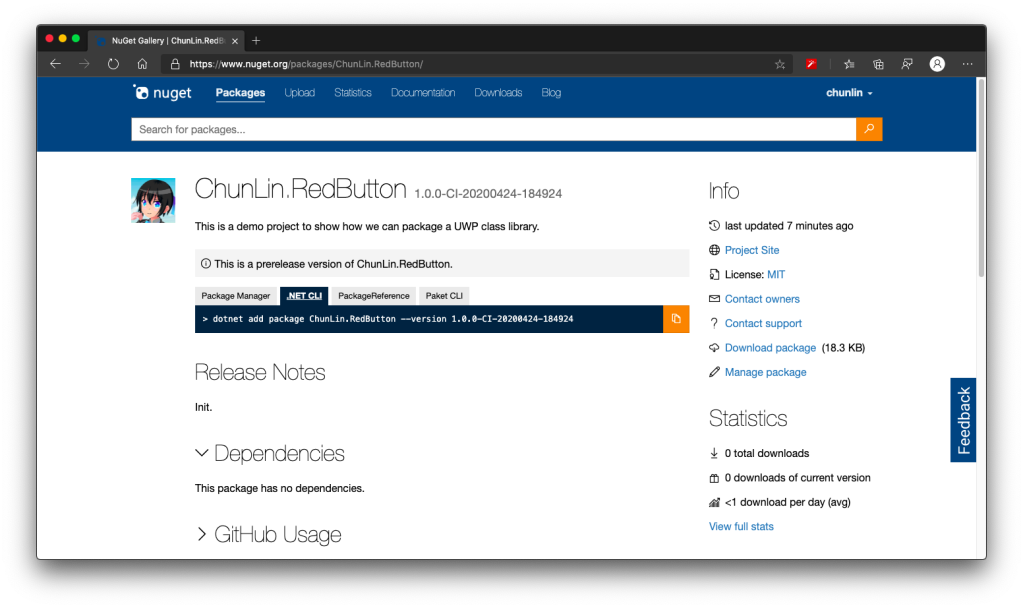
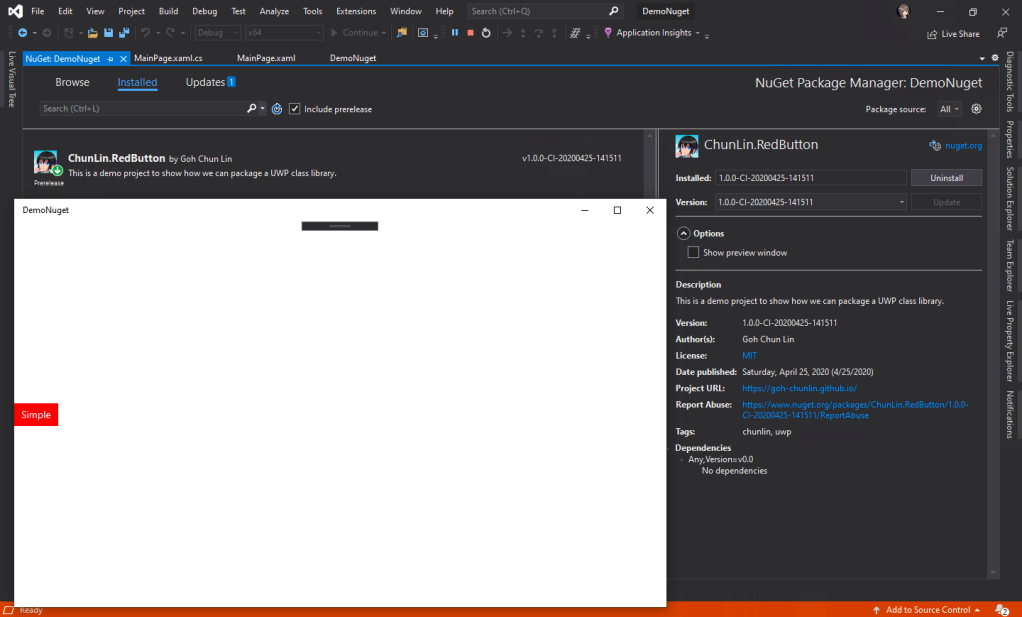
This way of versioning will append datetime at the end of our version automatically. Doing so allows us to quickly test the release on the NuGet server instead of spending additional time on updating the version number. Of course, doing so means that the releases will be categorized as pre-released which users cannot see on Visual Studio unless they check the “Include prerelease” checkbox.
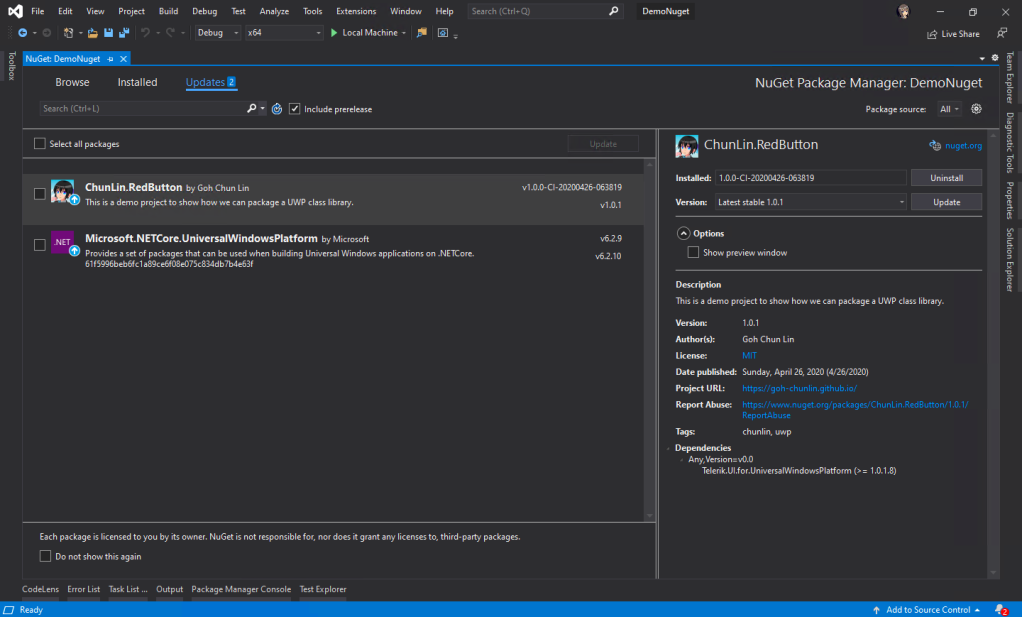
🎨 The prerelease checkbox on Visual Studio 2019. 🎨
Secondly, if you are also curious about the package generated by the sixth task above, you can add a task similar to the fourth task, i.e. publish the package as artifact for download later. Here, the “Path to publish” will be “$(Build.ArtifactStagingDirectory)”.
🎨 Publishing NuGet package for verifying manually later. 🎨
Since a NuGet package is just a zipped file, we can change its extension from .nupkg to .zip to view its content on Windows. I did the similar on MacOS but it didn’t work, so I guess it is possible on Windows only.
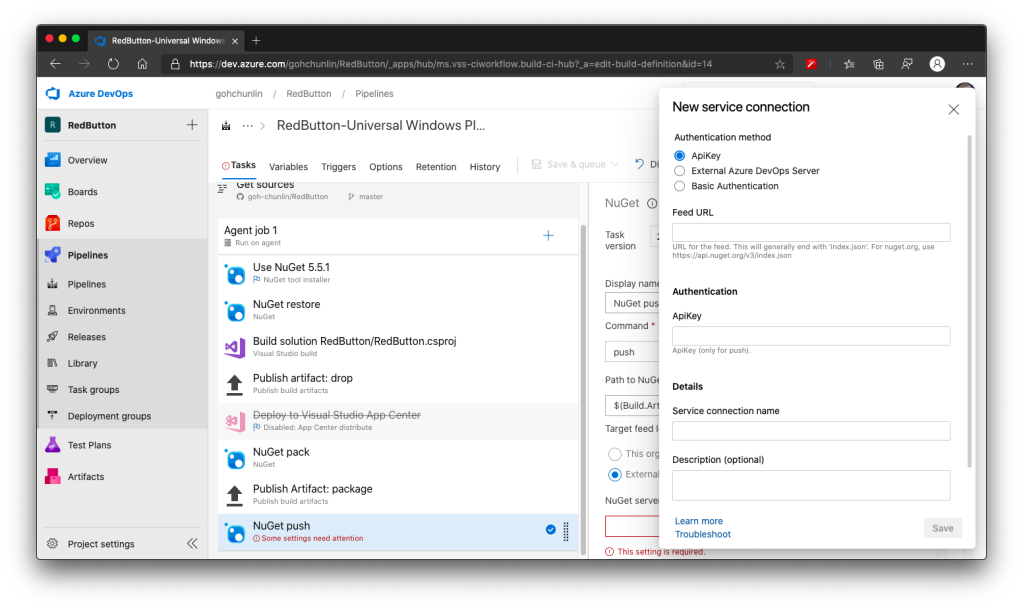
Thirdly, we need to introduce the NuGet push task after the task above to be the eighth task. Here, we need to set its “Path to NuGet package(s) to publish” to “$(Build.ArtifactStagingDirectory)/*.nupkg”.
Then, we need to specify that we will publish our package to the nuget.org server which is an external NuGet server. By clicking on the “+ New” button, we can then see the following popup.
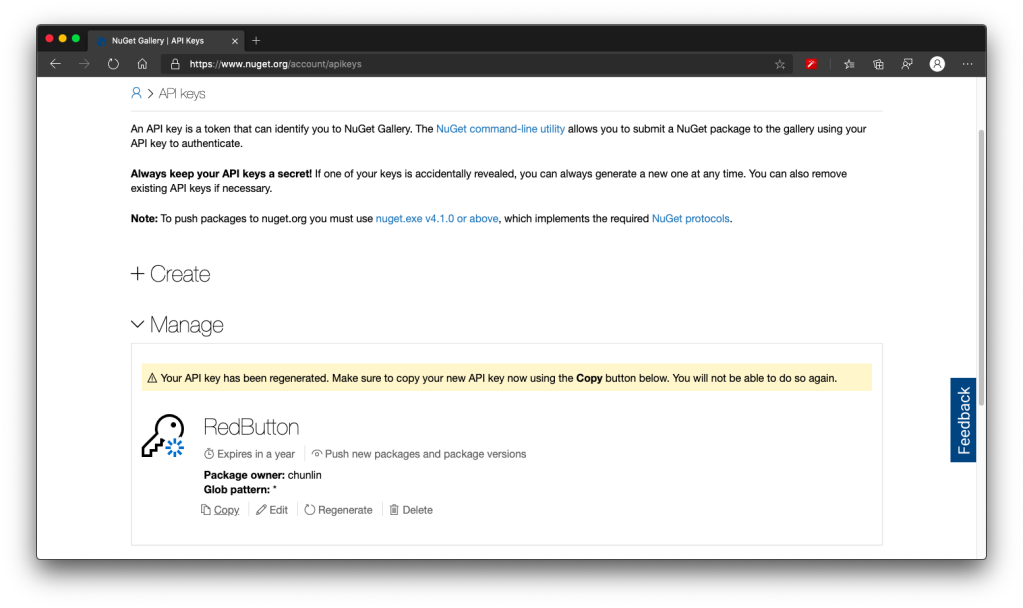
🎨 We will be using the API key that we generate in nuget.org for the NuGet push task. 🎨
With this NuGet push task setup successfully, we can proceed to save and run this pipeline.
After the tasks are all executed smoothly and successfully, we shall see our pre-released NuGet package available on the nuget.org website. Note that it requires an amount of time to do package validating before public can use the new package.
🎨 Yay, this is our first NuGet package. 🎨
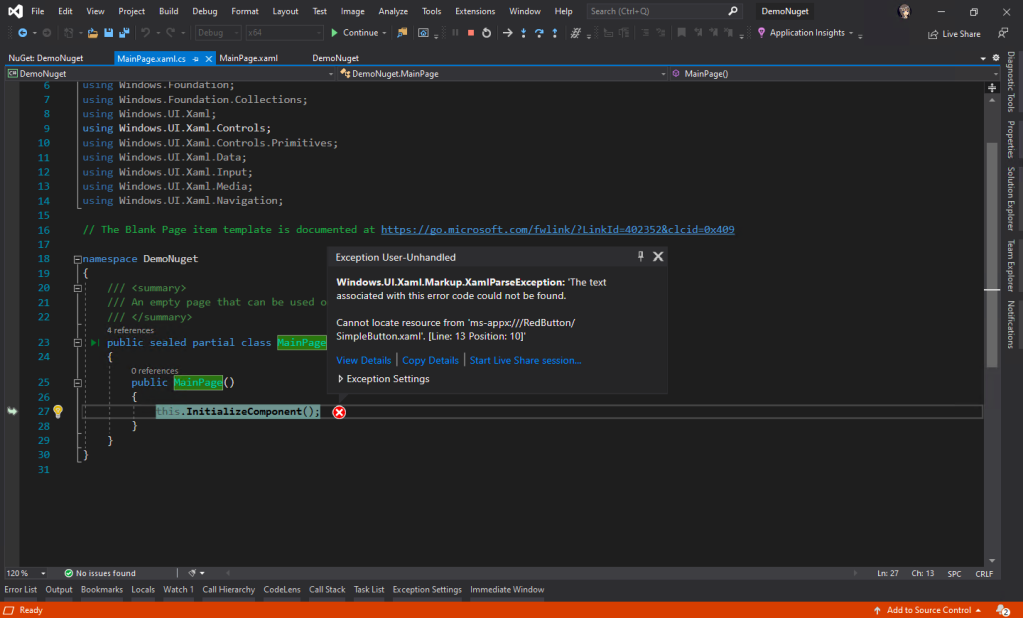
This is not a happy ending yet. In fact, if we try this NuGet package, we will see the following error which states that it “cannot locate resource from ‘ms-appx:///RedButton/SimpleButton.xaml’.”
🎨 Windows.UI.Xaml.Markup.XamlParseException: ‘The text associated with this error code could not be found. 🎨
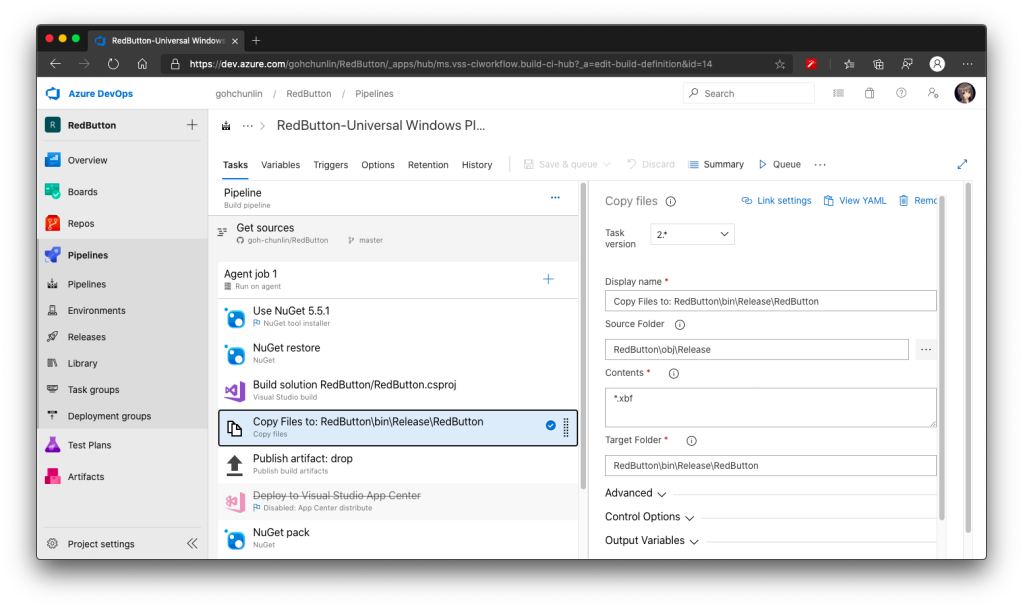
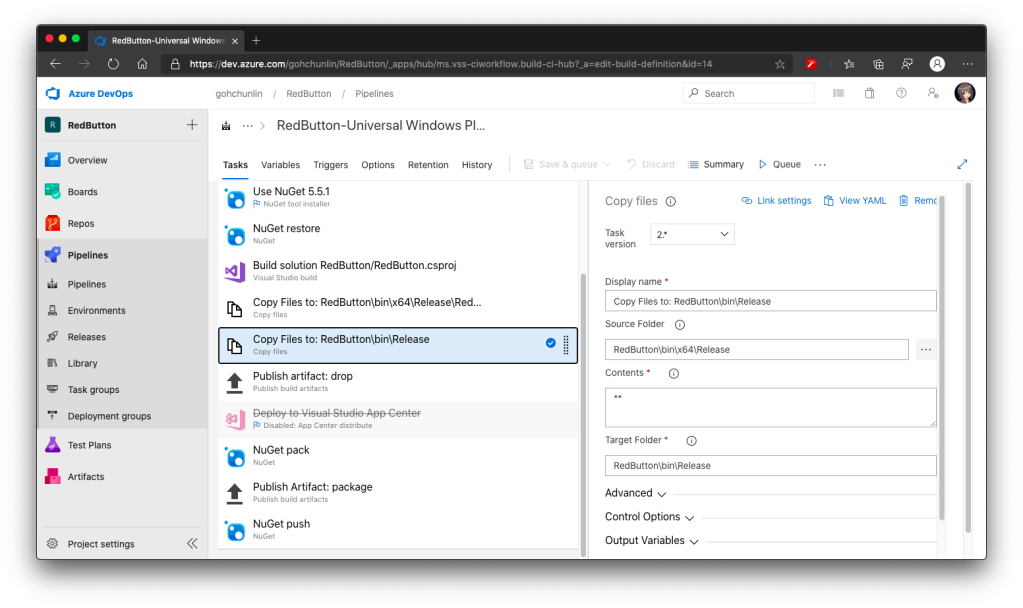
To do so, we have to introduce a new task right after the third task, which is to copy the XBF file from obj folder to the Release folder in the bin folder, as shown in the following screenshot.
🎨 We need to add “Copy Files” task here. 🎨
Step 5: Targeting Framework
Before we make our NuGet package to work, we need to specify the framework it is targeting at. To do so, we need to introduce the <files> to our NuSpec.
So, the NuSpec should look something as follows now.
🎨 Finalised NuSpec. 🎨
Now with this, we can use our prerelease version of our UWP control in another UWP project through NuGet.
🎨 Yay, it works finally! 🎨
Step 6: Platform Release Issues
There will be time which requires us to specify the Platform to be, for example, x64 in the third task of the Azure DevOps pipeline above. That will result in putting the Release folder in both obj and bin to be moved to obj\x64 and bin\x64, respectively. This will undoubtedly make the entire build pipeline fails.
Hence we need to update the paths in the Copy File task (the fourth task) and add another Copy File task to move the Release folder back to be directly under the bin directory. Without doing this, the nuget pack task will fail as well.
🎨 The new task to correct the position of the Release folder in bin. 🎨
Step 7: Dependencies
If our control relies on the other NuGet packages, for example Telerik.UI.for.UniversalWindowsPlatform, then we have to include them too inside the <metadata> in the NuSpec, as shown below.
Okay, after we are happy with the prerelease of our NuGet package, we can officially release our package on the NuGet server. To do so, simply turn off the automatic package versioning on Azure DevOps, as shown in the screenshot below.
🎨 Turning off the automatic package versioning. 🎨
With this step, now when we run the pipeline again, it will generate a new release of the package without the prerelease label. The version number will follow the version we provide in the NuSpec file.
🎨 Now Visual Studio will say our package is “Latest stable” instead of prerelease. 🎨
Journey: 3 Days 3 Nights
The motivation of this project comes from a problem I encounter at workplace because our UWP class library could not be used whenever we consumed it as a NuGet package. This was also the time when Google and StackOverflow didn’t have proper answers on this.
Hence, it took me 1 working day and 2 days during weekend to research and come up with the steps above. Hopefully with my post, people around the world can easily pickup this skill without wasting too much effort and time.
Finally, I’d like to thank my senior Riza Marhaban for encouraging me in this tough period. Step 7 above is actually his idea as well. In addition, I have friend encouraging me online too in this tough Covid-19 lockdown. Thanks to all of them, I manage to learn something new in this weekend.