One of the ways to develop a desktop application for Windows 10/11 is UWP (Universal Windows Platform). UWP app has two fundamental sections, i.e. front-end and back-end. The front-end is developed using XAML (Extensible Markup Language) and back-end can be coded in C# (or even JavaScript back in the old time).
public static class EnumExtension
{
    public static string GetDescription(this Enum value)
    {
        FieldInfo fi = value.GetType().GetField(value.ToString());
        var attributes = (DescriptionAttribute[])fi.GetCustomAttributes(typeof(DescriptionAttribute), false);
        if (attributes.Length > 0) return attributes[0].Description;
        else return value.ToString();
    }
}
ViewModel
Next we will define the ViewModel of our MainPage.xaml which will contains the ComboBox control. We will bind the variable SelectorColor whose type is the enum to the ComboBox control, as shown below.
public class MainViewModel : ViewModelBase
{
    private MyColors _selectedColor = MyColors.Black;

    public MyColors SelectedColor
    {
        get => _selectedColor;
        set
        {
            if (_selectedColor != value)
            {
                SetProperty(ref _selectedColor, value);
            }
        }
    }
}
The data binding will be simple when the source and target properties are of the same type, or when one type can be converted to the other type through an implicit conversion, for example binding a string variable to the Text field of a TextBlock control. However, to bind enum to the dropdown value and text fields of a ComboBox, we will need the help of a value conversion.
Here, we will implement a converter, MyColorValueConverter, that takes an enum value and then return a string value to be used in ComboBox fields, as well as the other way around.
public class MyColorValueConverter : IValueConverter
{
    public object Convert(object value, Type targetType, object parameter, string language)
    {
        if (value is MyColors color) return color.GetDescription();

        return null;
    }

    public object ConvertBack(object value, Type targetType, object parameter, string language)
    {
        if (value is string s) return Enum.Parse(typeof(MyColors), s);

        return null;
    }

    ...

}
After this, in order to provide all available values in the enum as ItemsSource of the ComboBox control, we will need to have a Strings property in the MyColorValueConverter.
public string[] Strings => GetStrings();

public static string[] GetStrings()
{
    List<string> list = new List<string>();

    foreach (MyColors color in Enum.GetValues(typeof(MyColors)))
    {
        list.Add(color.GetDescription());
    }


    return list.ToArray();
}
View: The Front-end
Now in the MainPage.xaml which contains the ComboBox control, we first need to instantiate the value converter in the resource dictionary of the page.
That’s all for the quickstart steps to bind an enum to a ComboBox control in an UWP app.
I have made the source code available on GitHub. The code will have more features where the colour of text in a TextBlock will be based on the colour we pick from the ComboBox, as shown below.
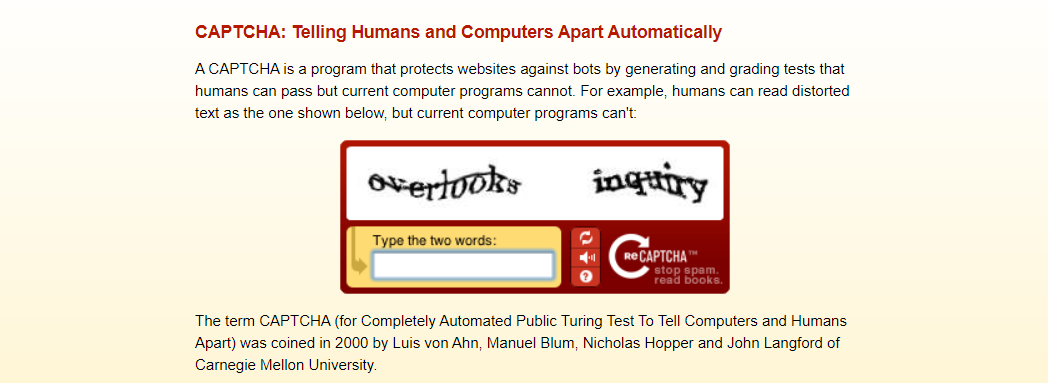
The words shown in reCAPTCHA come directly from old books that are being digitized. Hence, it does not only stop spam, but also help digitise books at the same time. (Source: reCAPTCHA)
A team led by Prof Gao Haichang from Xidian University realised that, with the development of automated computer vision techniques such as OCR, traditional text-based CAPTHCAs are not considered safe anymore for authentication. During the IEEE conference in 2010, they thus proposed a new way, i.e. using an image based CAPTCHA which involves in solving a jigsaw puzzle. Their experiments and security analysis further proved that human can complete the jigsaw puzzle CAPTCHA verification quickly and accurately which bots rarely can. Hence, jigsaw puzzle CAPTCHA can be a substitution to the text-based CAPTCHA.
Xidian University, one of the 211 Project universities and a high level scientific research innovation in China. (Image Source: Shulezetu)
In 2019, on CSDN (Chinese Software Developer Network), a developer 不写BUG的瑾大大 shared his implementation of jigsaw puzzle captcha in Java. It’s a very detailed blog post but there is still room for improvement in, for example, documenting the code and naming the variables. Hence, I’d like to take this opportunity to implement this jigsaw puzzle CAPTCHA in .NET 5 with C# and Blazor. I also host the demo web app on Azure Static Web App so that you all can access and play with the CAPTCHA: https://jpc.chunlinprojects.com/.
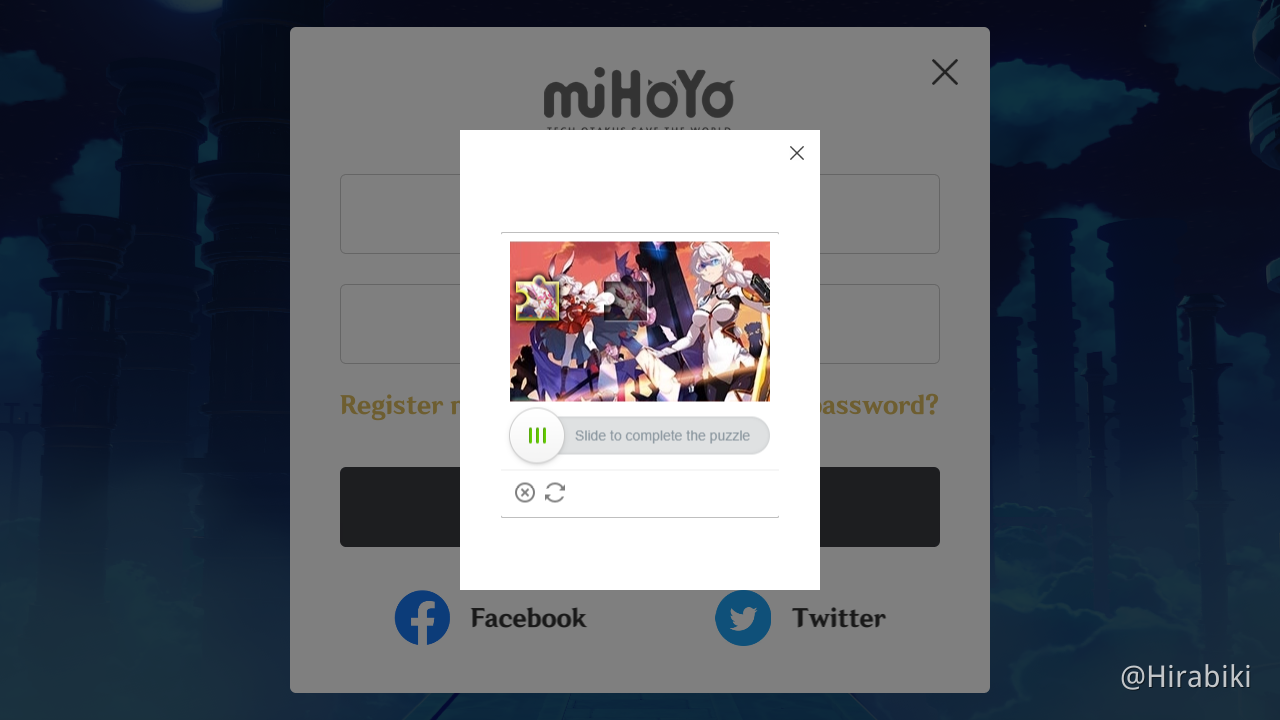
Today, jigsaw puzzle CAPTCHA is used in many places. (Image Credit: Hirabiki at HoYoLAB)
Jigsaw Puzzle CAPTCHA
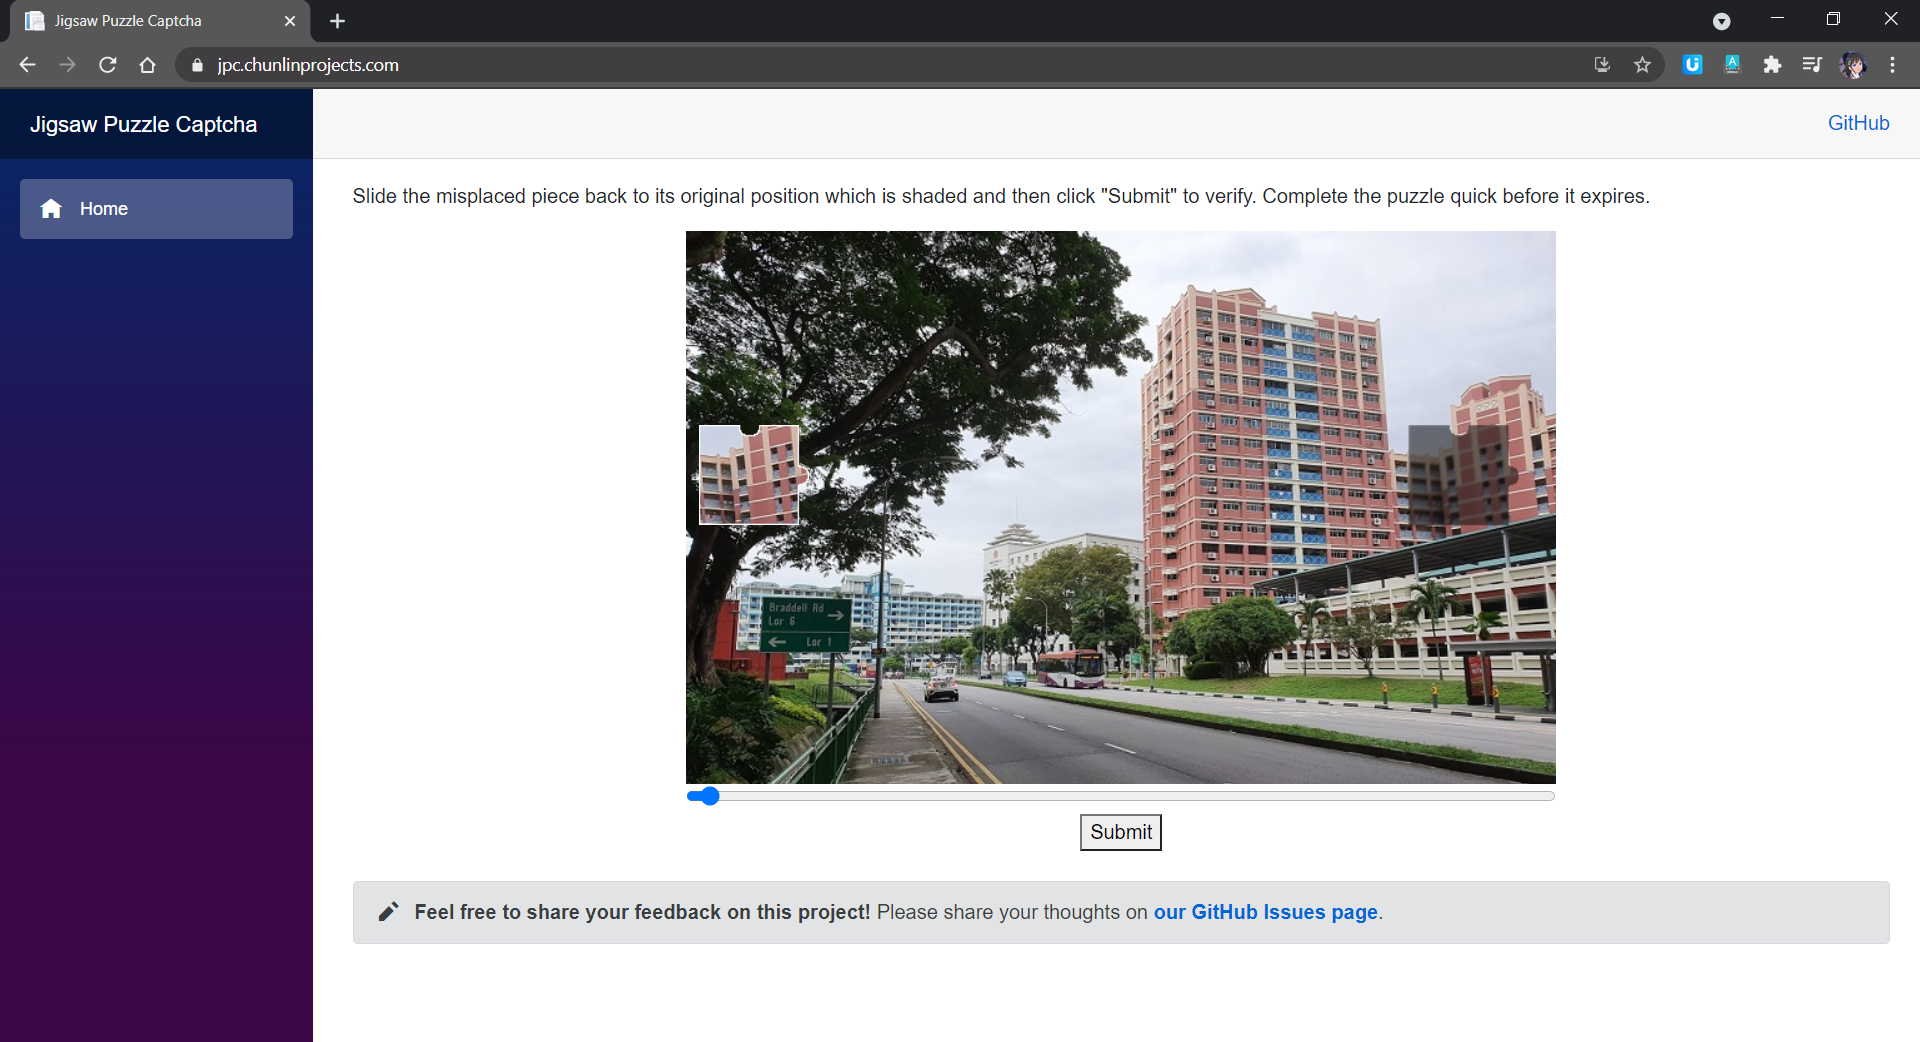
In a jigsaw puzzle CAPTCHA, there is usually a jigsaw puzzle with at least one misplaced piece where users need to move to the correct place to complete the puzzle. In my demo, I have only one misplaced piece that needs to be moved.
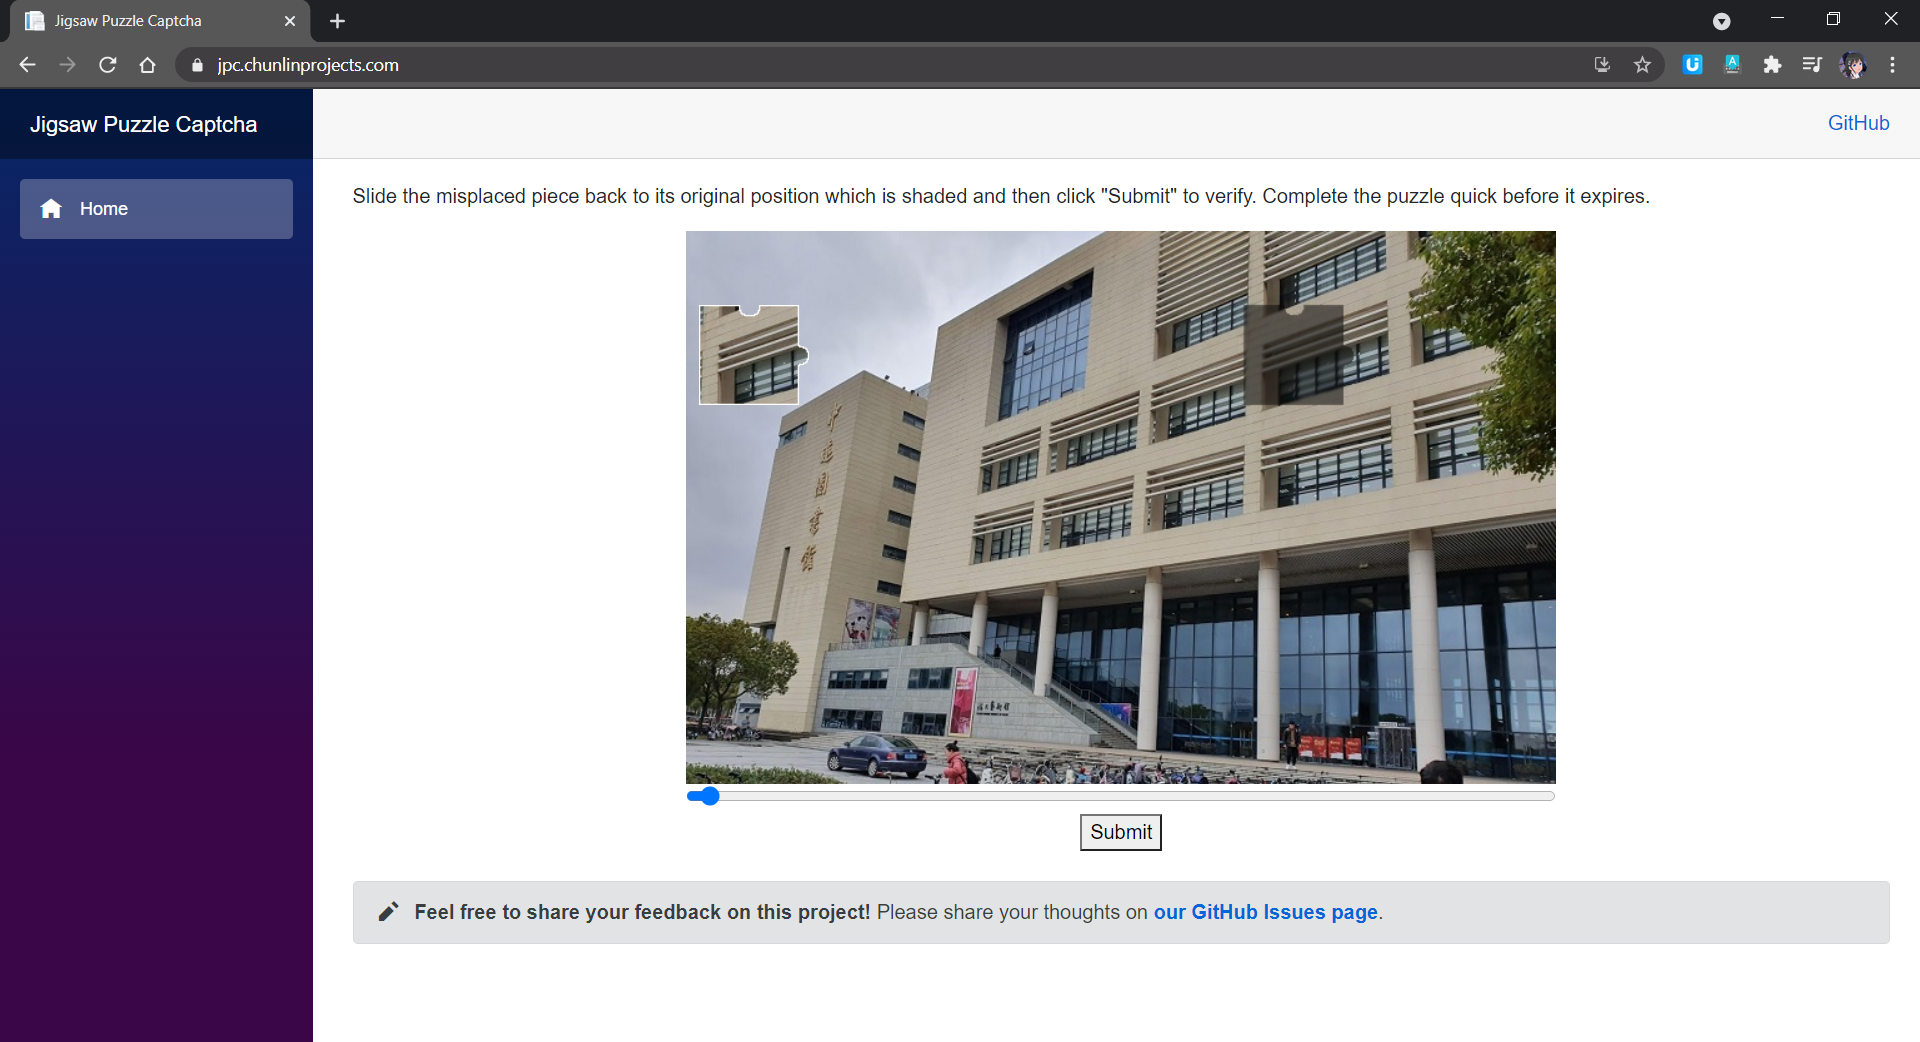
Jigsaw puzzle CAPTCHA implementation on Blazor. (Try it here)
As shown in the screenshot above, there are two necessary images in the CAPTCHA. One of them is a misplaced piece of the puzzle. Another image is the original image with a shaded area indicating where the misplaced piece should be dragged to. What users need to do is just dragging the slider to move the misplaced piece to the shaded area to complete the jigsaw puzzle within a time limit.
In addition, here the CAPTCHA only needs user to drag the missing piece horizontally. This is not only the popular implementation of the jigsaw puzzle CAPTCHA, but also not too challenging for users to pass the CAPTCHA.
Now, let’s see how we can implement this in C# and later deploy the codes to Azure.
Retrieve the Original Image
The first thing we need to do is getting an image for the puzzle. We can have a collection of images that make good jigsaw puzzle stored in our Azure Blob Storage. After that, each time before generating the jigsaw puzzle, we simply need to fetch all the images from the Blob Storage with the following codes and randomly pick one as the jigsaw puzzle image.
public async Task<List<string>> GetAllImageUrlsAsync()
{
    var output = new List<string>();

    var container = new BlobContainerClient(_storageConnectionString, _containerName);

    var blobItems = container.GetBlobsAsync();

    await foreach (var blob in blobItems)
    {
        var blobClient = container.GetBlobClient(blob.Name);
        output.Add(blobClient.Uri.ToString());
    }

    return output;
}
Define the Missing Piece Template
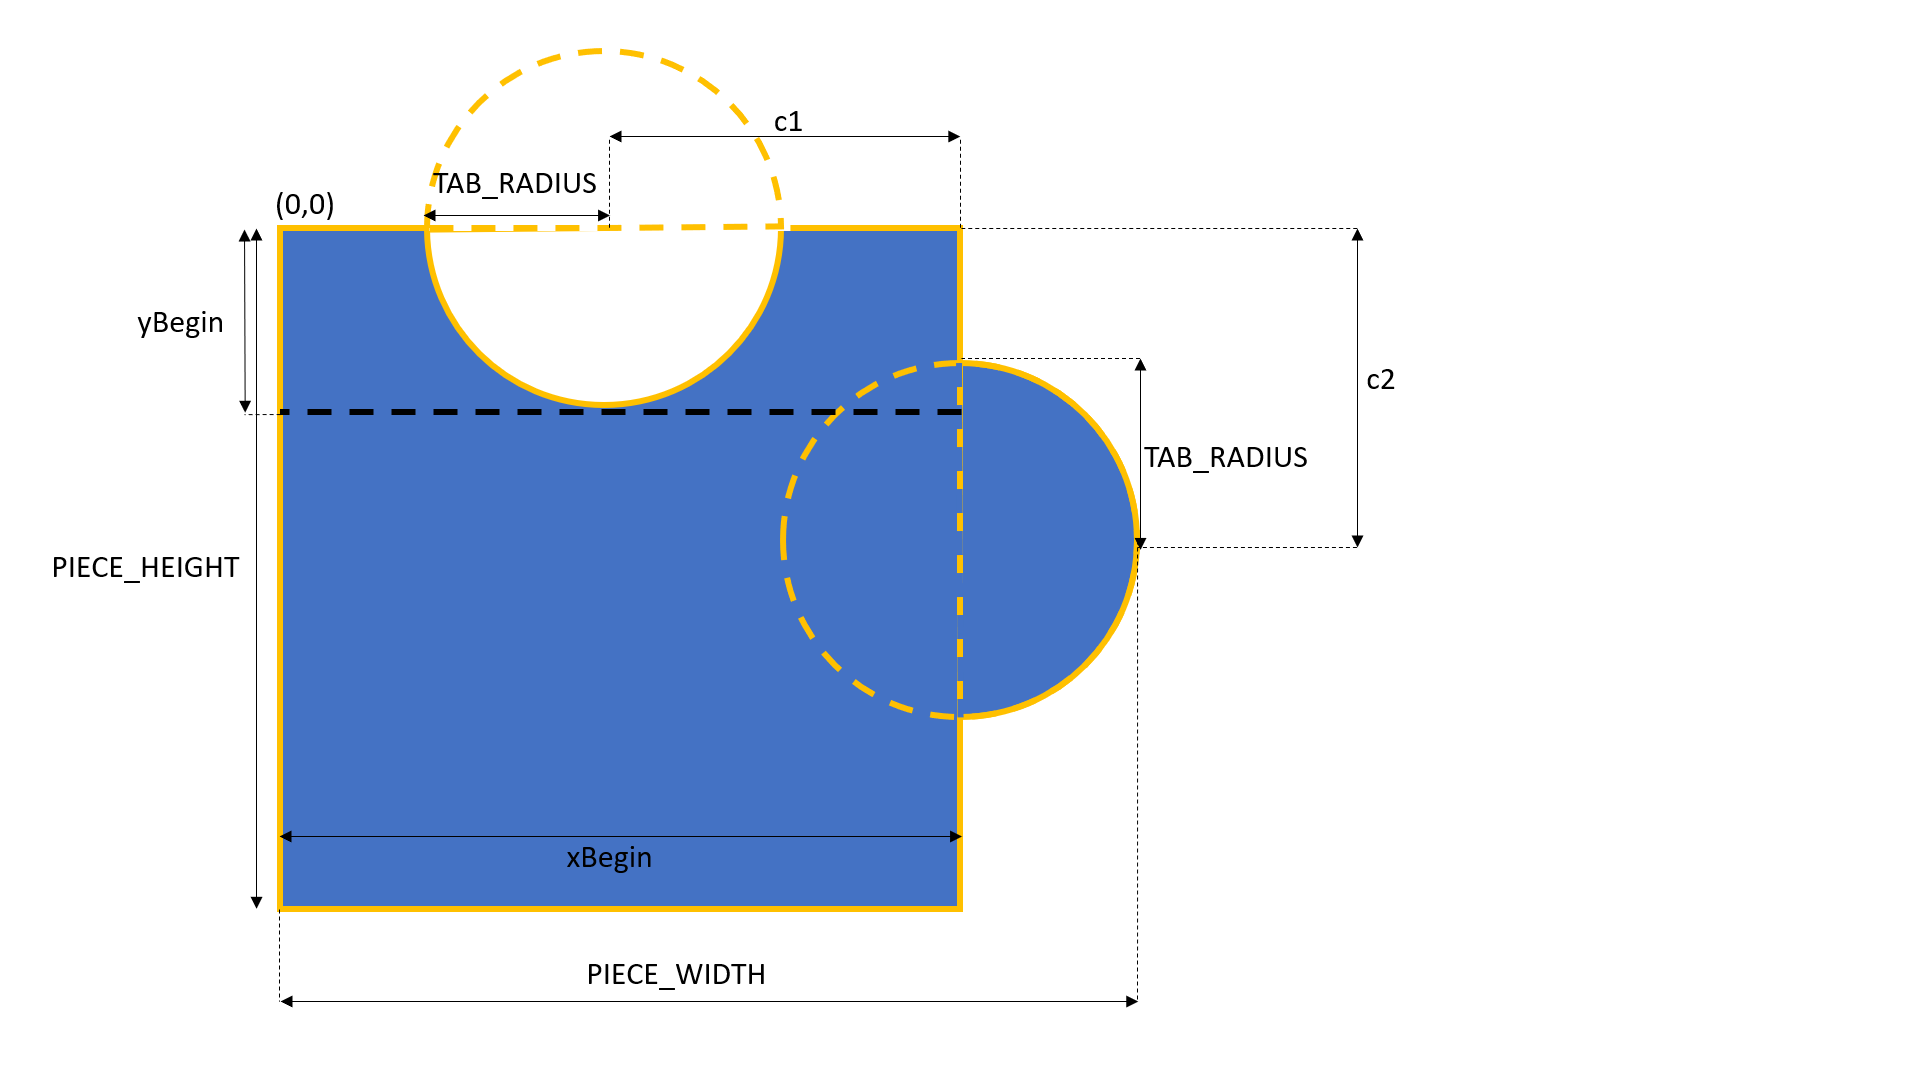
To increase the difficulty of the puzzle, we can have jigsaw pieces with different patterns, such as having tabs appearing on different sides of the pieces. In this demo, I will stick to just one pattern of missing piece, which has tabs on the top and right sides, as shown below.
The missing piece template.
The tabs are basically two circles with the same radius. Their centers are positioned at the middle point of the rectangle side. Hence, we can now build a 2D matrix for the pixels indicating the missing piece template with 1 means inside of the the piece and 0 means outside of the piece.
In addition, we know the general equation of a circle of radius r at origin (h,k) is as follows.
Hence, if there is a point (i,j) inside the circle above, then the following must be true.
If the point (i,j) is outside of the circle, then the following must be true.
With these information, we can build our missing piece 2D matrix as follows.
After that, we can determine the border of the missing piece easily too from just the template data above. We then can draw the border of the missing piece for better user experience when we display it on screen.
Next, we need to tell the user where the missing piece should be dragged to. We will use the template data above and apply it to the original image we get from the Azure Blob Storage.
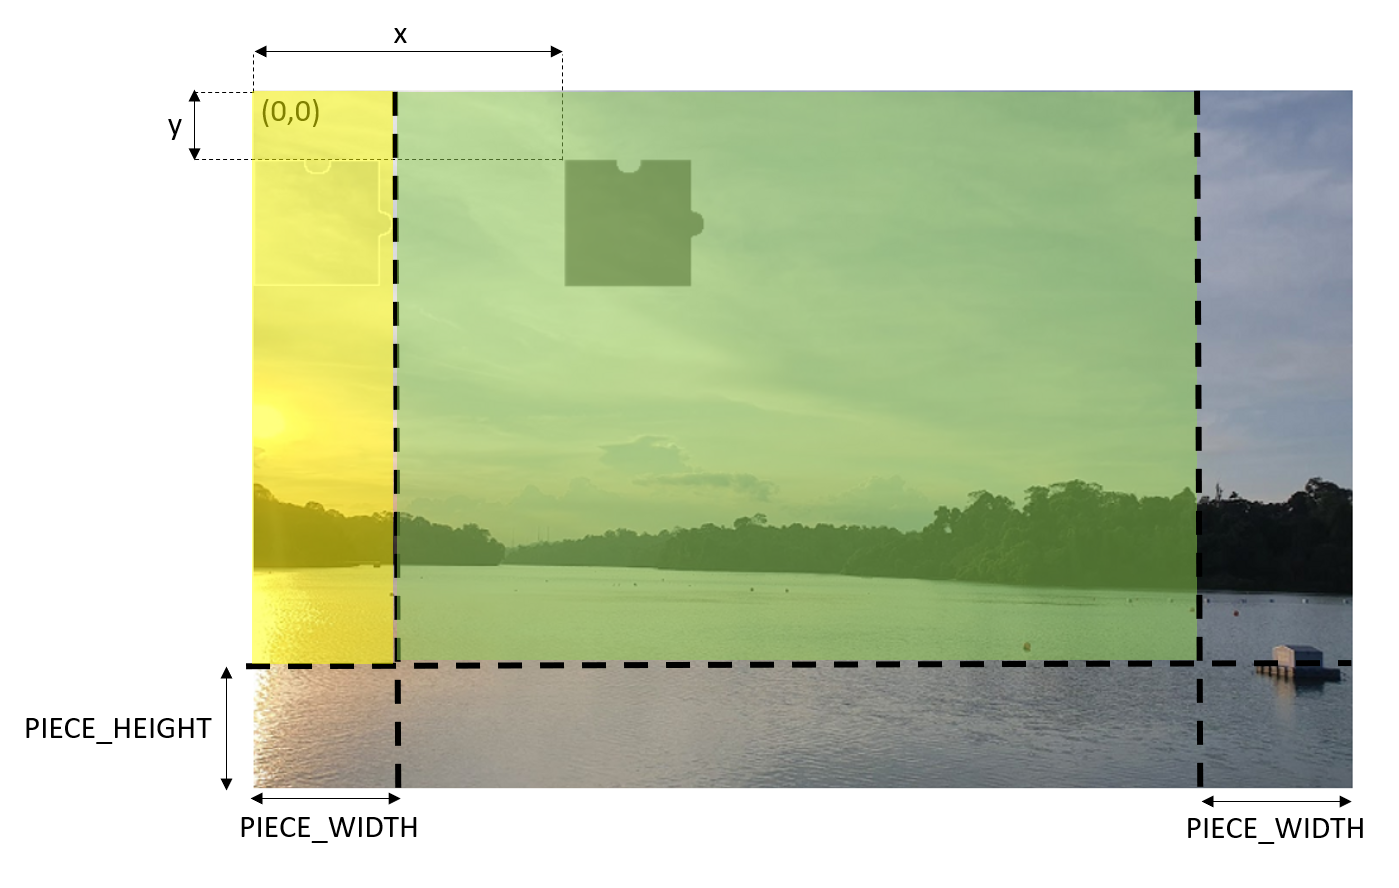
Due to the shape of the missing piece, the proper area to have the shaded area needs to be in the region highlighted in green colour below. Otherwise, the shaded area will not be shown completely and thus give users a bad user experience. The yellow area is okay too but we don’t allow the shaded area to be there to avoid cases where the missing piece covers the shaded area when the images first load and thus confuses the users.
Random random = new Random();

int x = random.Next(originalImage.Width - 2 * PIECE_WIDTH) + PIECE_WIDTH;
int y = random.Next(originalImage.Height - PIECE_HEIGHT);
Green area is where the top left of the shaded area should be positioned at.
Let’s assume the shaded area is at the point (x,y) of the original image, then given the original image in a Bitmap variable called originalImage, we can then have the following code to traverse the area and process the pixels in that area.
...
int[,] missingPiecePattern = GetMissingPieceData();

for (int i = 0; i < PIECE_WIDTH; i++)
{
    for (int j = 0; j < PIECE_HEIGHT; j++)
    {
        int templatePattern = missingPiecePattern[i, j];
        int originalArgb = originalImage.GetPixel(x + i, y + j).ToArgb();

        if (templatePattern == 1)
        {
            ...
            originalImage.SetPixel(x + i, y + j, FilterPixel(originalImage, x + i, y + j));
        }
        else
        {
            missingPiece.SetPixel(i, j, Color.Transparent);
        }
    }
}
...
Kernels used in different types of image processing.
For the kernel, I don’t really follow the official Box Blur kernel or Gaussian Blur kernel. Instead, I dim the generated colour by forcing three pixel to be always black (when i = j). This is to make sure the shaded area is not only blurred but darkened.
private Color FilterPixel(Bitmap img, int x, int y)
{
    const int KERNEL_SIZE = 3;
    int[,] kernel = new int[KERNEL_SIZE, KERNEL_SIZE];

    ...

    int r = 0;
    int g = 0;
    int b = 0;
    int count = KERNEL_SIZE * KERNEL_SIZE;
    for (int i = 0; i < kernel.GetLength(0); i++)
    {
        for (int j = 0; j < kernel.GetLength(1); j++)
        {
            Color c = (i == j) ? Color.Black : Color.FromArgb(kernel[i, j]);
            r += c.R;
            g += c.G;
            b += c.B;
        }
    }

return Color.FromArgb(r / count, g / count, b / count);
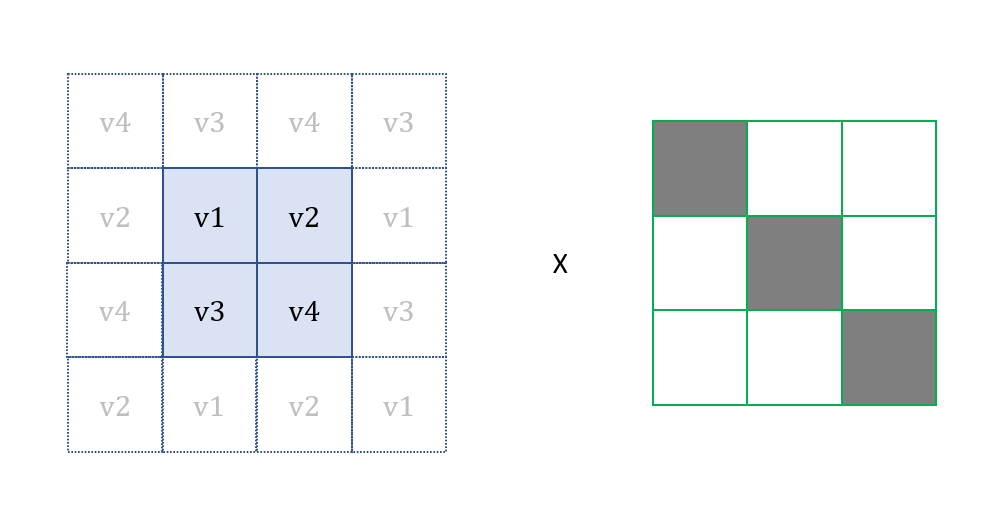
What will happen when we are processing pixel without all 8 neighbouring pixels? To handle this, we will take the value of the pixel at the opposite position which is describe in the following diagram.
Applying kernel on edge pixels.
Since we have two images ready, i.e. an image for the missing piece and another image which shows where the missing piece needs to be, we can convert them into base 64 string and send the string values to the web page.
Now, the next step will be displaying these two images on the Blazor web app.
The purpose of API in this project is to retrieve the jigsaw puzzle images and verify user submissions. We don’t need a full server for our API because Azure Static Web Apps hosts our API in Azure Functions. So we need to implement our API as Azure Functions here.
We will have two API methods here. The first one is to retrieve the jigsaw puzzle images, as shown below.
[FunctionName("JigsawPuzzleGet")]
public async Task<IActionResult> Run(
    [HttpTrigger(AuthorizationLevel.Anonymous, "get", Route = "jigsaw-puzzle")] HttpRequest req,
    ILogger log)
{
    log.LogInformation("C# HTTP trigger function processed a request.");

    var availablePuzzleImageUrls = await _puzzleImageService.GetAllImageUrlsAsync();

    var random = new Random();
    string selectedPuzzleImageUrl = availablePuzzleImageUrls[random.Next(availablePuzzleImageUrls.Count)];

    var jigsawPuzzle = _puzzleService.CreateJigsawPuzzle(selectedPuzzleImageUrl);
    _captchaStorageService.Save(jigsawPuzzle);

    return new OkObjectResult(jigsawPuzzle);
}
The Azure Function first retrieve all the images from the Azure Blob Storage and then randomly pick one to use in the jigsaw puzzle generation.
Before it returns the puzzle images back in a jigsawPuzzle object, it also saves it into Azure Table Storage so that later when users submit their answer back, we can have another Azure Function to verify whether the users solve the puzzle correctly.
In the Azure Table Storage, we generate a GUID and then store it together with the location of the shaded area, which is randomly generated, as well as an expiry date and time so that users must solve the puzzle within a limited time.
...
var tableClient = new TableClient(...);

...

var entity = new JigsawPuzzleEntity
{
    PartitionKey = ...,
    RowKey = id,
    Id = id,
    X = x,
    Y = y,
    CreatedAt = createdAt,
    ExpiredAt = expiredAt
};

tableClient.AddEntity(entity);
...
Here, GUID is used as the RowKey of the Table Storage. Hence, later when user submits his/her answer, the GUID will be sent back to the Azure Function to help locate back the corresponding record in the Table Storage.
[FunctionName("JigsawPuzzlePost")]
public async Task<IActionResult> Run(
    [HttpTrigger(AuthorizationLevel.Anonymous, "post", Route = "jigsaw-puzzle")] HttpRequest req,
    ILogger log)
{
    log.LogInformation("C# HTTP trigger function processed a request.");

    var body = await new StreamReader(req.Body).ReadToEndAsync();
    var puzzleSubmission = JsonSerializer.Deserialize<PuzzleSubmissionViewModel>(body, new JsonSerializerOptions { PropertyNamingPolicy = JsonNamingPolicy.CamelCase });

    var correspondingRecord = await _captchaStorageService.LoadAsync(puzzleSubmission.Id);

    ...

    bool isPuzzleSolved = _puzzleService.IsPuzzleSolved(...);

    var response = new Response
    {
        IsSuccessful = isPuzzleSolved,
        Message = isPuzzleSolved ? "The puzzle is solved" : "Sorry, time runs out or you didn't solve the puzzle"
    };

    return new OkObjectResult(response);
}
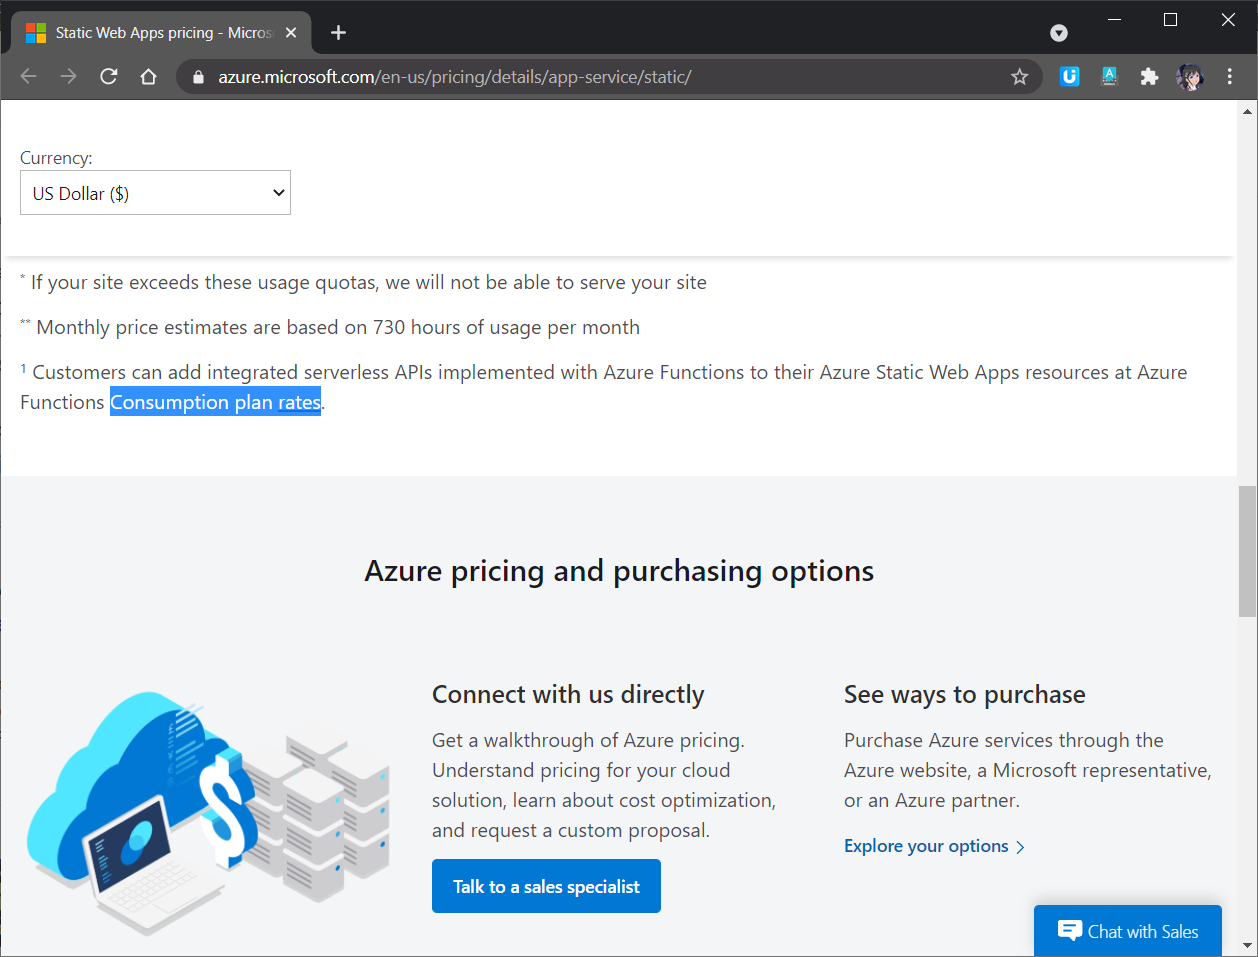
Since our API is hosted as Azure Function in Consumption Plan, as shown in the screenshot below, we need to note that our code in the Function will be in the serverless mode, i.e. it effectively scales out to meet whatever load it is seeing and scales down when code isn’t running.
The Azure Function managed by the Static Web App will be in Consumption Plan.
Latency will be there when Function is cold. (Image Source: Microsoft Azure Blog)
In this project, my friend feedbacked to me that he had encountered at least 15 seconds of latency to have the jigsaw puzzle loaded.
Blazor Frontend
Now we can move on to the frontend.
To show the jigsaw puzzle images when the page is loaded, we have the following code.
protected override async Task OnInitializedAsync()
{
    var jigsawPuzzle = await http.GetFromJsonAsync("api/jigsaw-puzzle");
    id = jigsawPuzzle.Id;
    backgroundImage = "data:image/png;base64, " + jigsawPuzzle.BackgroundImage;
    missingPieceImage = jigsawPuzzle.MissingPieceImage;
    y = jigsawPuzzle.Y;
}
Take note that we don’t only get the two images but also the GUID of the jigsaw puzzle record in the Azure Table Storage so that later we can send back this information to the Azure Function for submission verification.
Here, we only return the y-axis value of the shaded area location because users are only allowed to drag the missing puzzle horizontally as discussed earlier. If you would like to increase the difficulty of the CAPTCHA by allowing users to drag the missing piece vertically as well, you can choose not to return the y-axis value.
We then have the following HTML to display the two images.
The Submit method is as follows which will feedback to users whether they solve the jigsaw puzzle correctly or not. Here I use a toast library for Blazor done by Chris Sainty, a Microsoft MVP.
private async Task Submit()
{
    var submission = new PuzzleSubmissionViewModel
    {
        Id = id,
        X = x
    };

    var response = await http.PostAsJsonAsync("api/jigsaw-puzzle", submission);

    var responseMessage = await response.Content.ReadFromJsonAsync<Response>();

    if (responseMessage.IsSuccessful)
    {
        toastService.ShowSuccess(responseMessage.Message);
    }
    else
    {
        toastService.ShowError(responseMessage.Message);
    }

}
Now we can test how our app works!
Testing Locally
Before we can test locally, we need to provide the secrets and relevant settings to access Azure Blob Storage and Table Storage.
In addition, please remember to exclude local.settings.json from the source control.
In the Client project, since we are going to run our Api at port 7071, we shall let the Client know too. To do so, we first need to specify the base address for local in the Program.cs of the Client project.
builder.Services.AddScoped(sp => new HttpClient { BaseAddress = new Uri(builder.Configuration["API_Prefix"] ?? builder.HostEnvironment.BaseAddress) });
Then we can specify the value for API_Prefix in the appsettings.Development.json in the wwwroot folder.
{
    "API_Prefix": "http://localhost:7071"
}
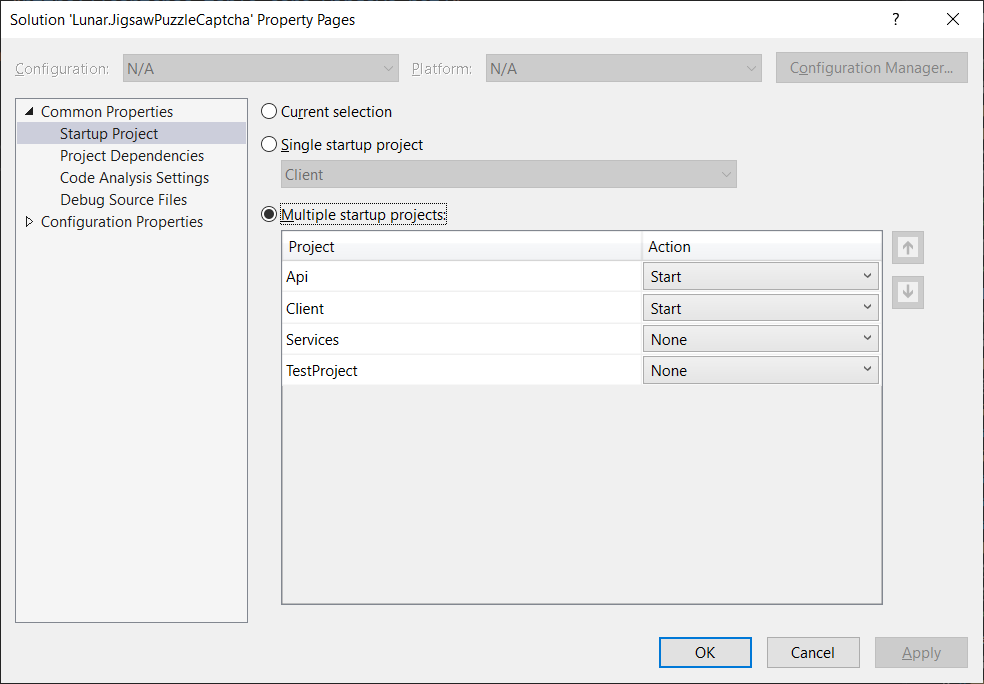
Finally, please also set both Api and Client projects as the Startup Project in the Visual Studio.
Setting multiple startup projects in Visual Studio.
Deploy to Azure Static Web App
After we have created an Azure Static Web Apps resource and bound it with a GitHub Actions which monitors our GitHub repository, the workflow will automatically build and deploy our app and its API to Azure every time we commit or create pull requests into the watched branch. The steps have been described in my previous blog post about Blazor on Azure Static Web App, so I won’t repeat it here.
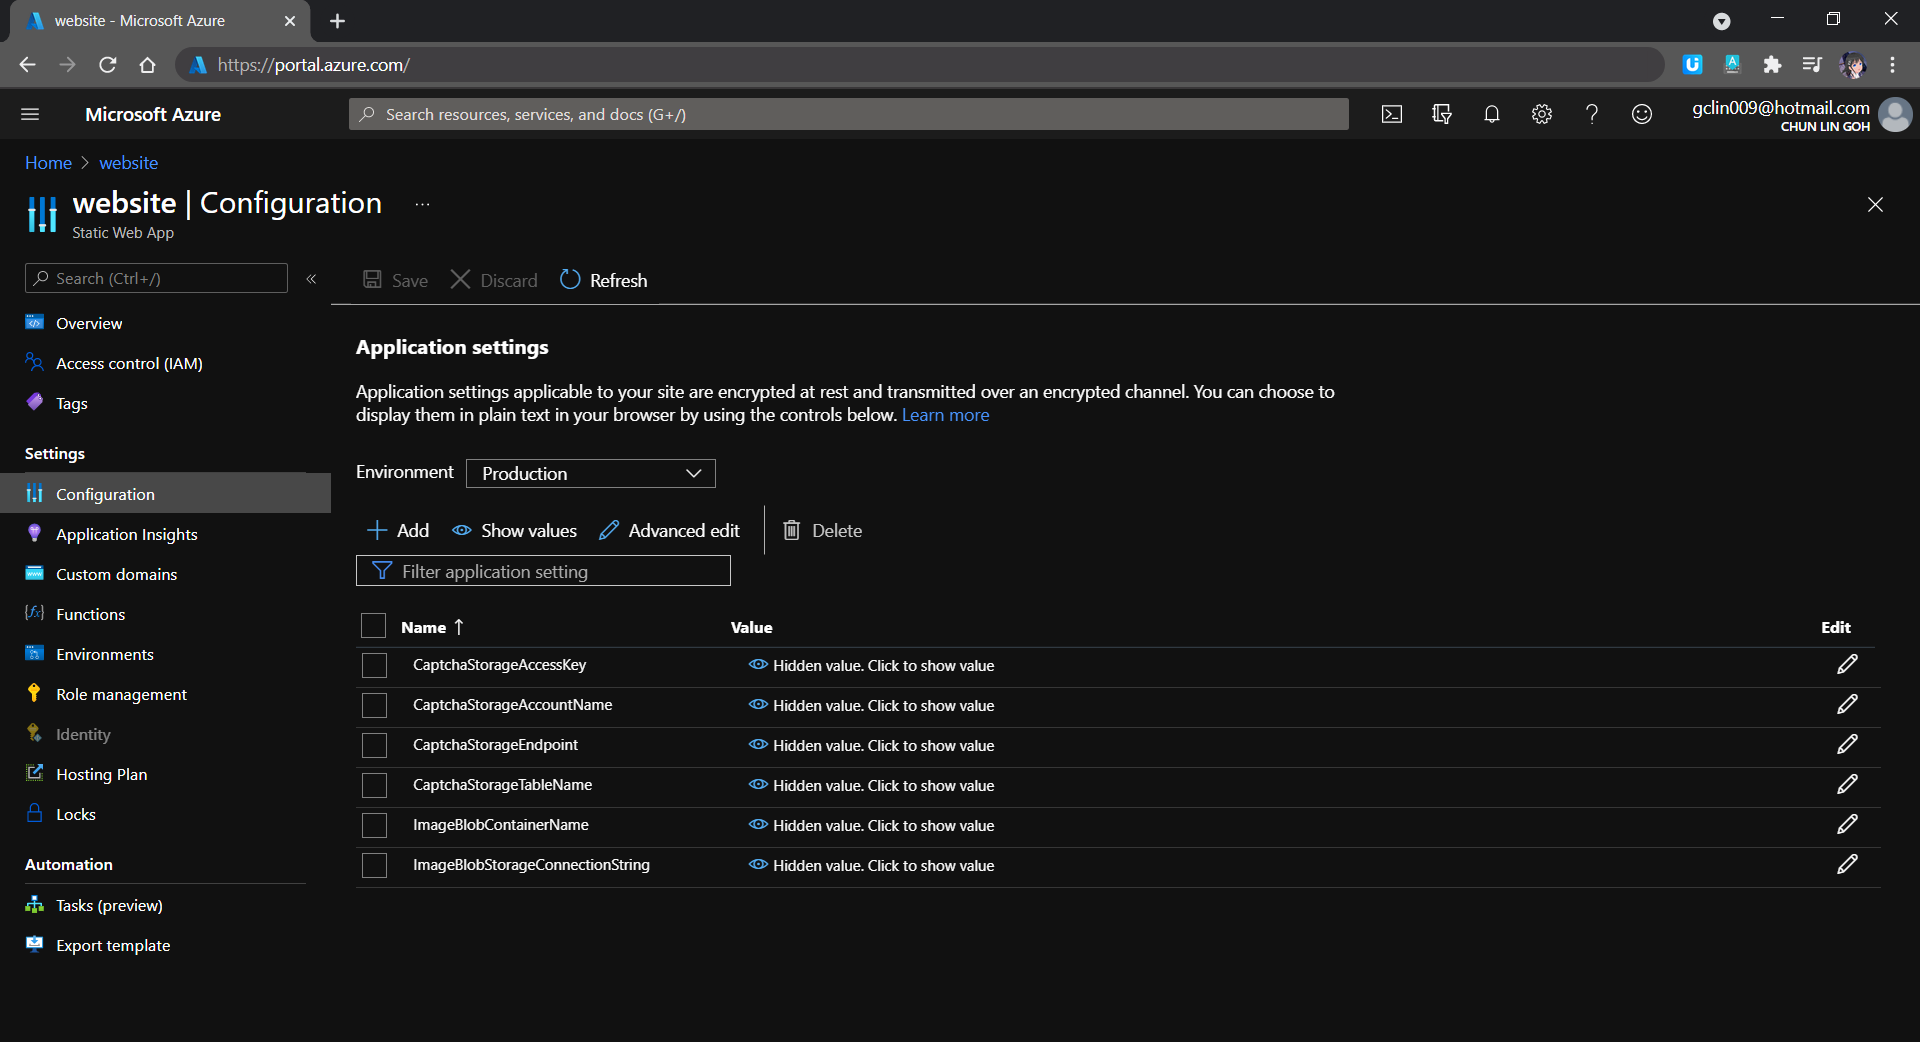
Since our API needs to have the information of secrets and connection settings to the Azure Storage, we need to specify them under Application Settings of the Azure Static Web App as well. The values will be accessible by API methods in the Azure Functions.
Managing the secrets in Application Settings.
Yup, that’s all for implementing a jigsaw puzzle CAPTCHA in .NET. Feel free to try it out on my Azure Static Web App and let me know your thoughts about it. Thank you!
Jigsaw puzzle CAPTCHA implementation on Blazor. (Try it here)
In this article, I will share how the website for Singapore .NET Developers Community and Azure Community is re-built as a Blazor web app and deployed to Azure.
The community website is very simple. It is merely a single-page website with some descriptions and photos about the community. Then it also has a section showing list of meetup videos from the community YouTube channels.
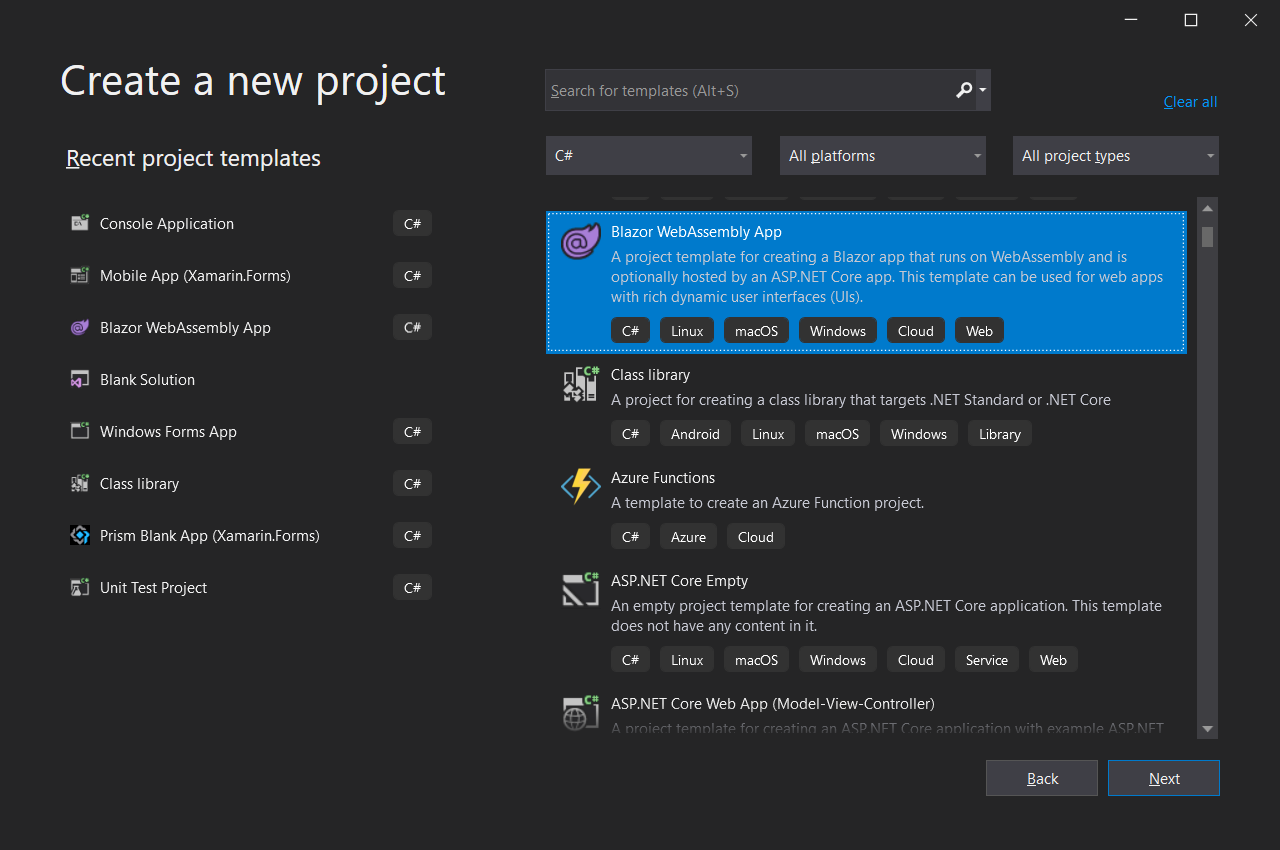
We will build the website as Blazor WebAssembly App.
Secondly, if we hope to have a similar UI template across all the web pages in the website, then we can define the HTML template under, for example, MainLayout.razor, as shown below. This template means that the header and footer sections can be shared across different web pages.
Finally, we simply need to define the @Body of each web page in their own Razor file, for example the Index.razor for the homepage.
In the Index.razor, we will fetch the data from a JSON file hosted on Azure Storage. The JSON file is periodically updated by Azure Function to fetch the latest video list from the YouTube channel of the community. Instead of using JavaScript, here we can simply write a C# code to do that directly on the Razor file of the homepage.
@code {
    private List<VideoFeed> videoFeeds = new List<VideoFeed>();

    protected override async Task OnInitializedAsync()
    {
        var allVideoFeeds = await Http.GetFromJsonAsync<VideoFeed[]>("...");

        videoFeeds = allVideoFeeds.ToList();
    }

    public class VideoFeed
    {
        public string VideoId { get; set; }

        public Channel Channel { get; set; }

        public string Title { get; set; }

        public string Description { get; set; }

        public DateTimeOffset PublishedAt { get; set; }
    }

    public class Channel
    {
        public string Name { get; set; }
    }
}
Publish to Azure Static Web App from GitHub
We will have our codes ready in a GitHub repo with the following structure.
.github/workflows
DotNetCommunity.Singapore
Client
(Blazor client project here)
Next, we can proceed to create a new Azure Static Web App where we will host our website at. In the first step, we can easily link it up with our GitHub account.
We need to specify the deployment details for the Azure Static Web App.
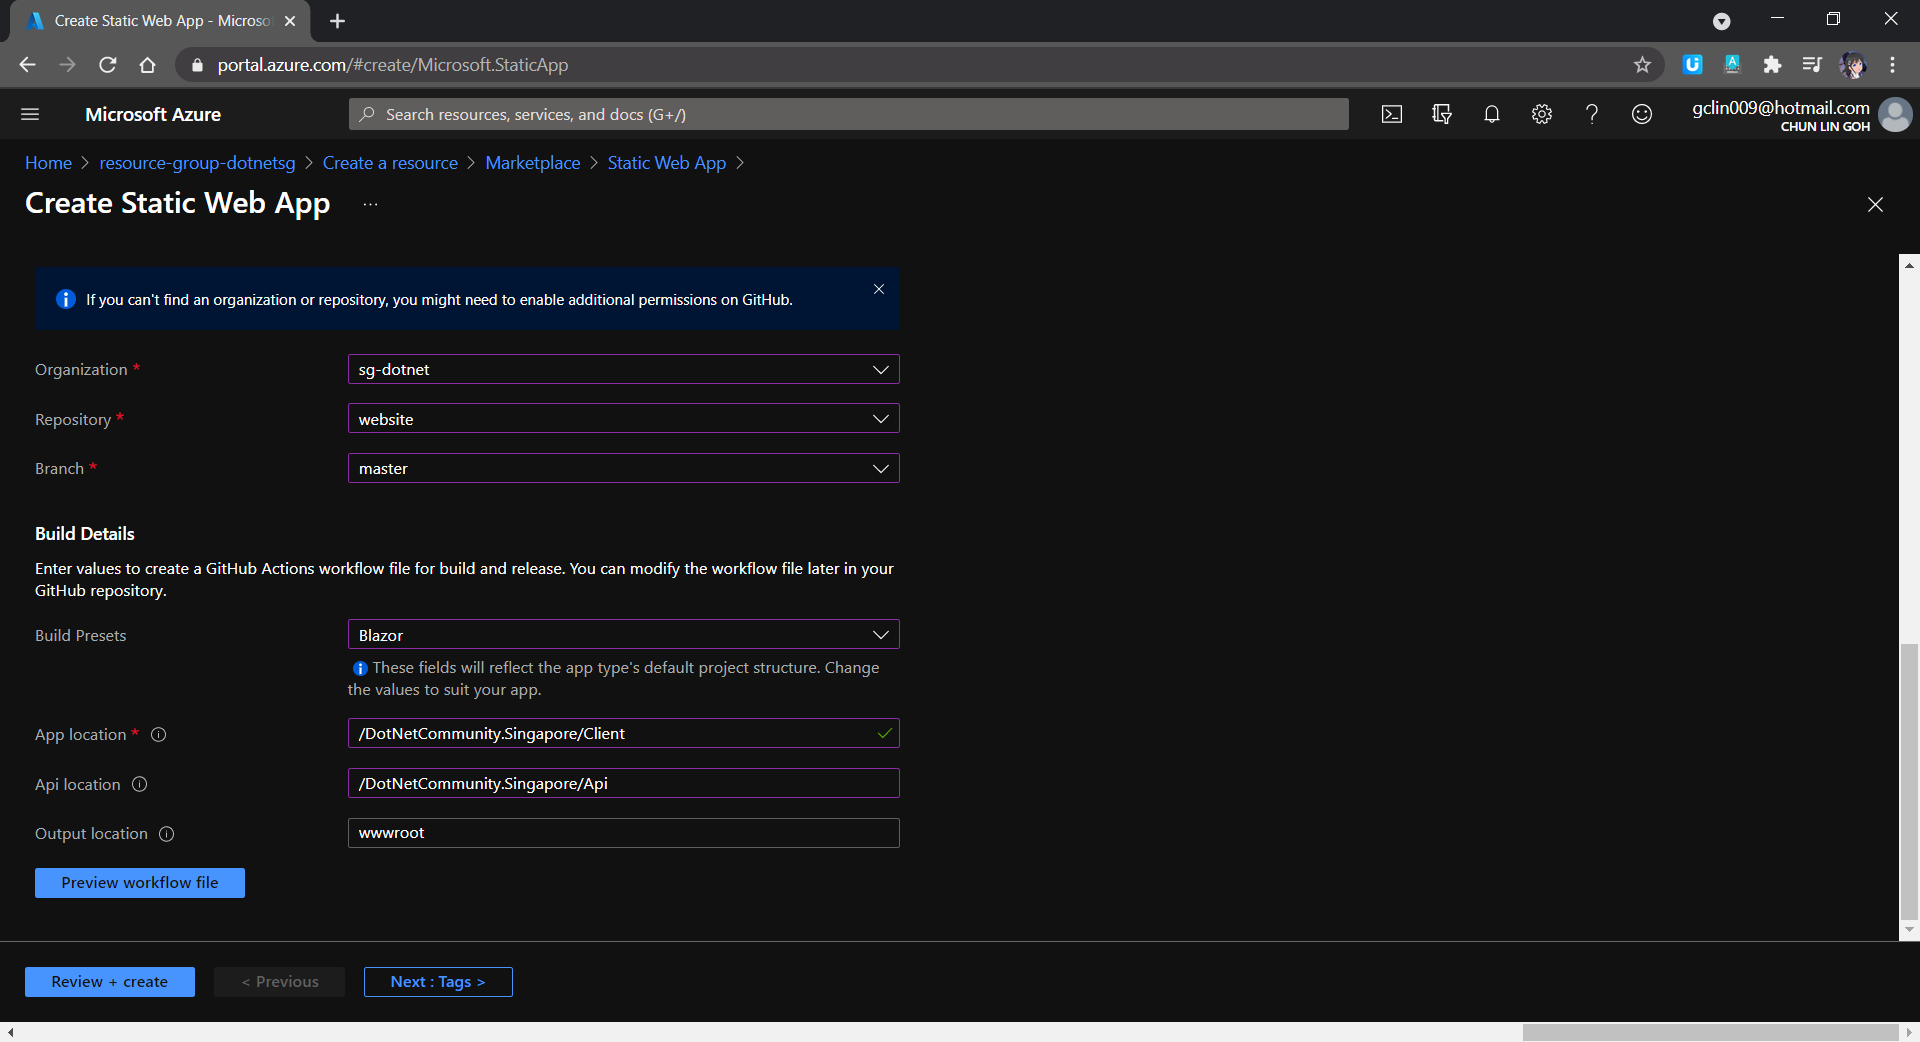
After that, we will need to provide the Build details so that a GitHub workflow will be automatically generated. That is a GitHub Actions workflow that builds and publishes our Blazor web app. Hence, we must specify the corresponding folder paths within our GitHub repo, as shown in the screenshot below.
In the Build Details, we must setup the folder path correctly.
The “App location” is to point to the location of the source code for our Blazor web app. For the “Api location”, although we are not using it in our Blazor project now, we can still set it as follows so that in the future when we can easily setup the Api folder.
With this setup ready, whenever we update the codes in our GitHub repo via commits or pull requests, our Blazor web app will be built and deployed.
Our Blazor web app is being built in GitHub Actions.
For root domain, which is “dotnet.sg” in our case, by right we can do it in Azure Static Web App by using TXT record validation and an ALIAS record.
Take note that we can only create an ALIAS record if our domain provider supports it.
However, since there is currently no support of ALIAS or ANAME records in the domain provider that I am using, I have no choice but to have another Azure Function for binding “dotnet.sg”. This is because currently there is no IP address given in Azure Static Web App but there are IP address and Custom Domain Verification ID available in Azure Function. With these two information, we can easily map an A Record to our root domain, i.e. “dotnet.sg”.
Please take note that A Records are not supported for Consumption-based Function Apps. We must pay for the “App Service Plan” instead.
IP address and Custom Domain Verification ID on Azure Function. The root domain here is also SSL enabled.
With all these ready, we can finally get our community website up and running at dotnet.sg.
Welcome to the Singapore .NET/Azure Developer Community at dotnet.sg.
Export SSL Certificate For Azure Function
This step is optional. I need to go through this step because I have a Azure App Service managed certificate in one subscription but Azure Function in another subscription. Hence, I need to export the SSL certificate out and then import it back to another subscription.
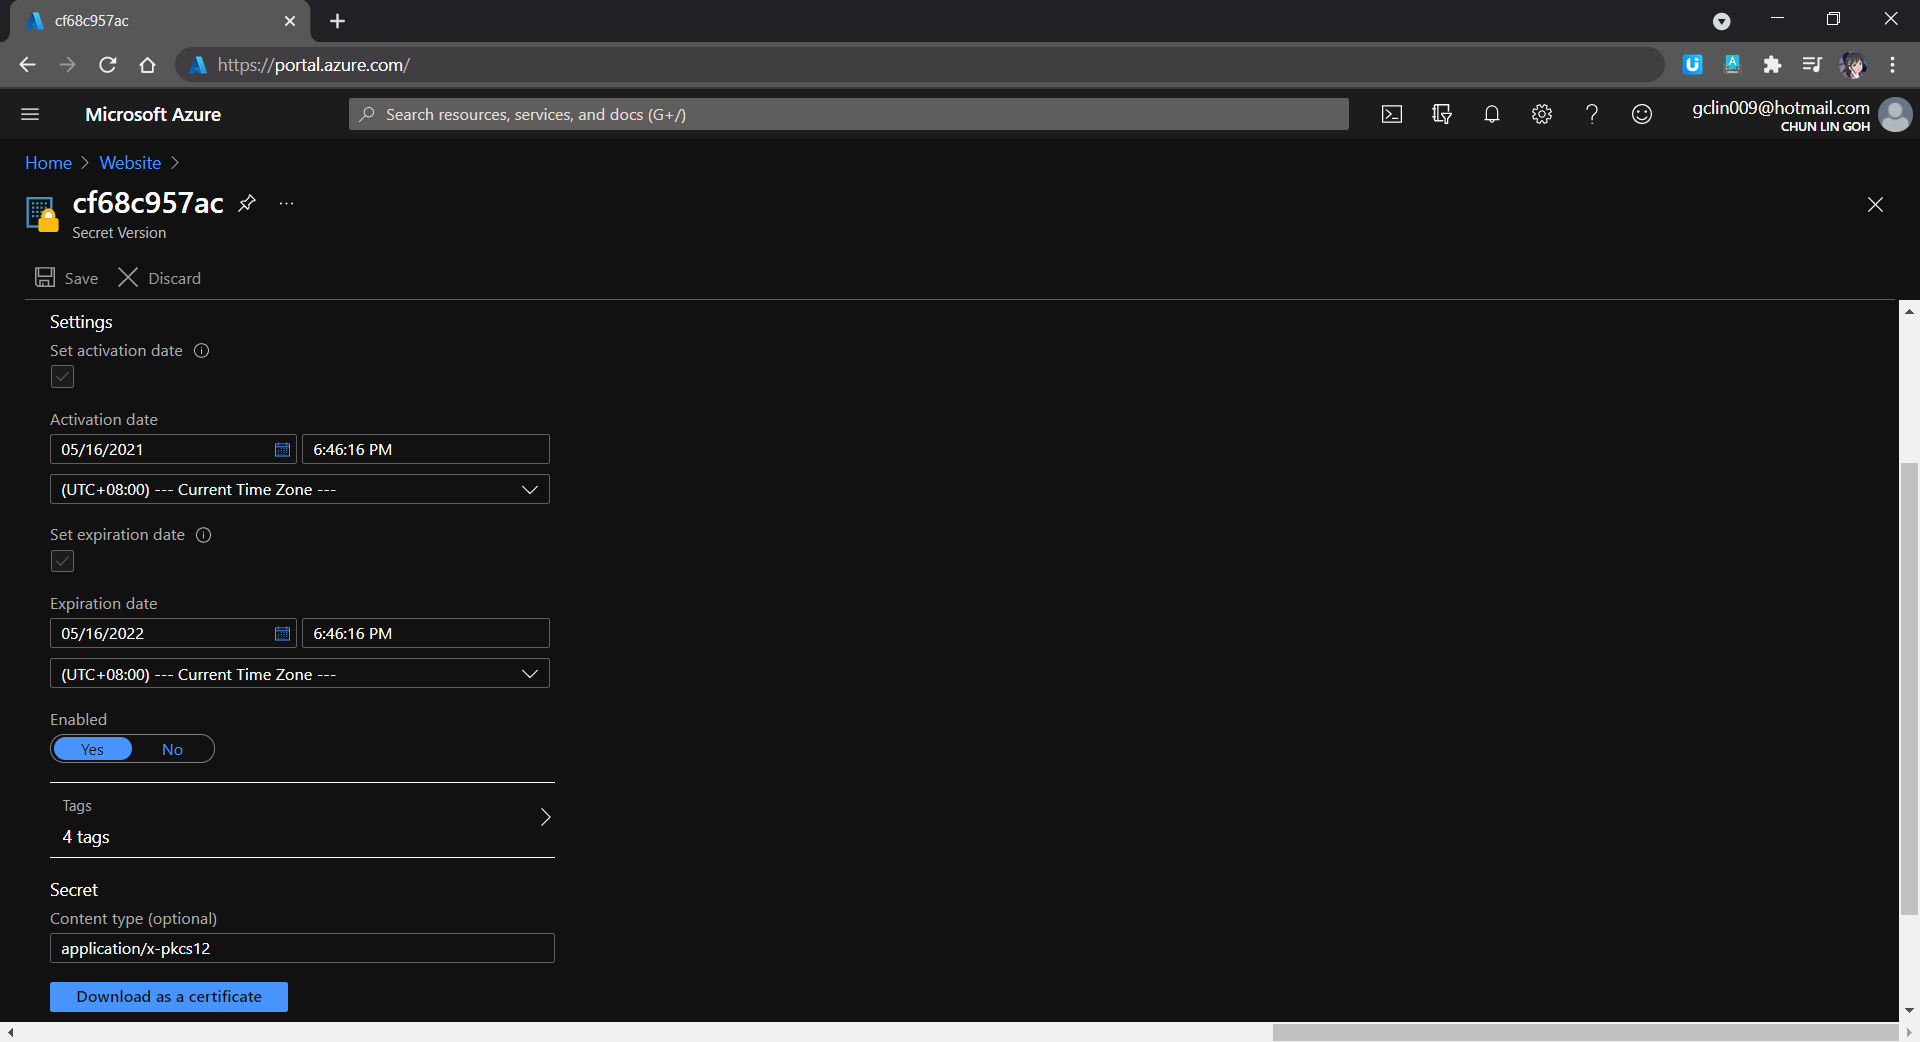
We can export certificate from the Key Vault Secret.
In the Key Vault Secret screen, we then need to choose the correct secret version and download the certificate, as shown in the following screenshot.
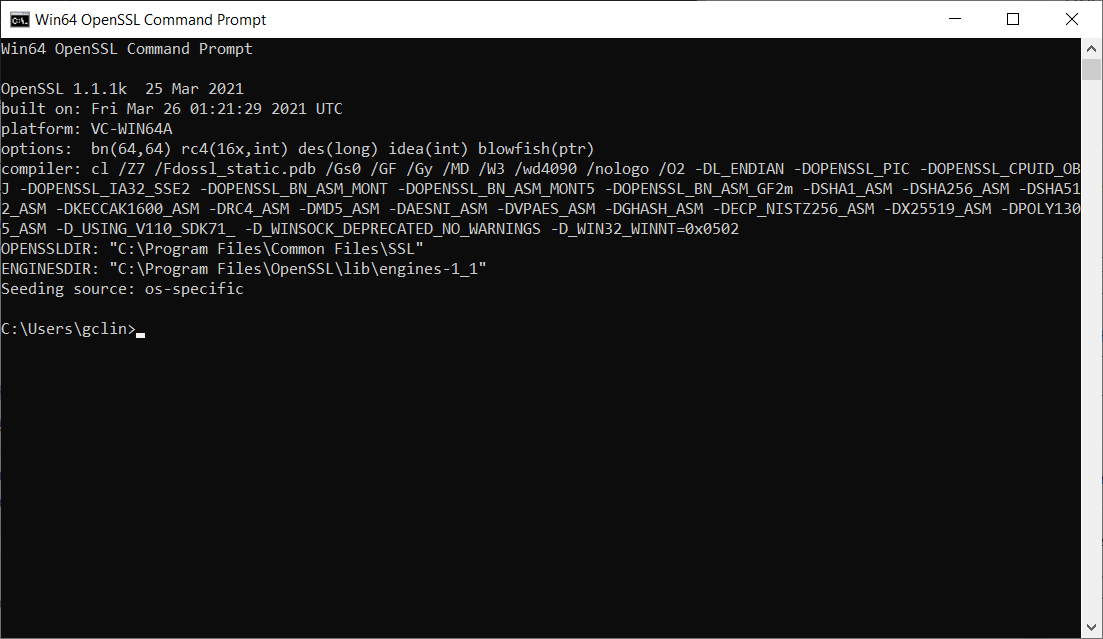
We will be prompted for a password after executing the first command. We simply press enter to proceed because the certificate, as mentioned above, has no password.
OpenSSL command prompt.
With this step done, I finally can import the cert to the Azure Function in another subscription.
Yup, that’s all for hosting our community website as a Blazor web app on Azure Static Web App!
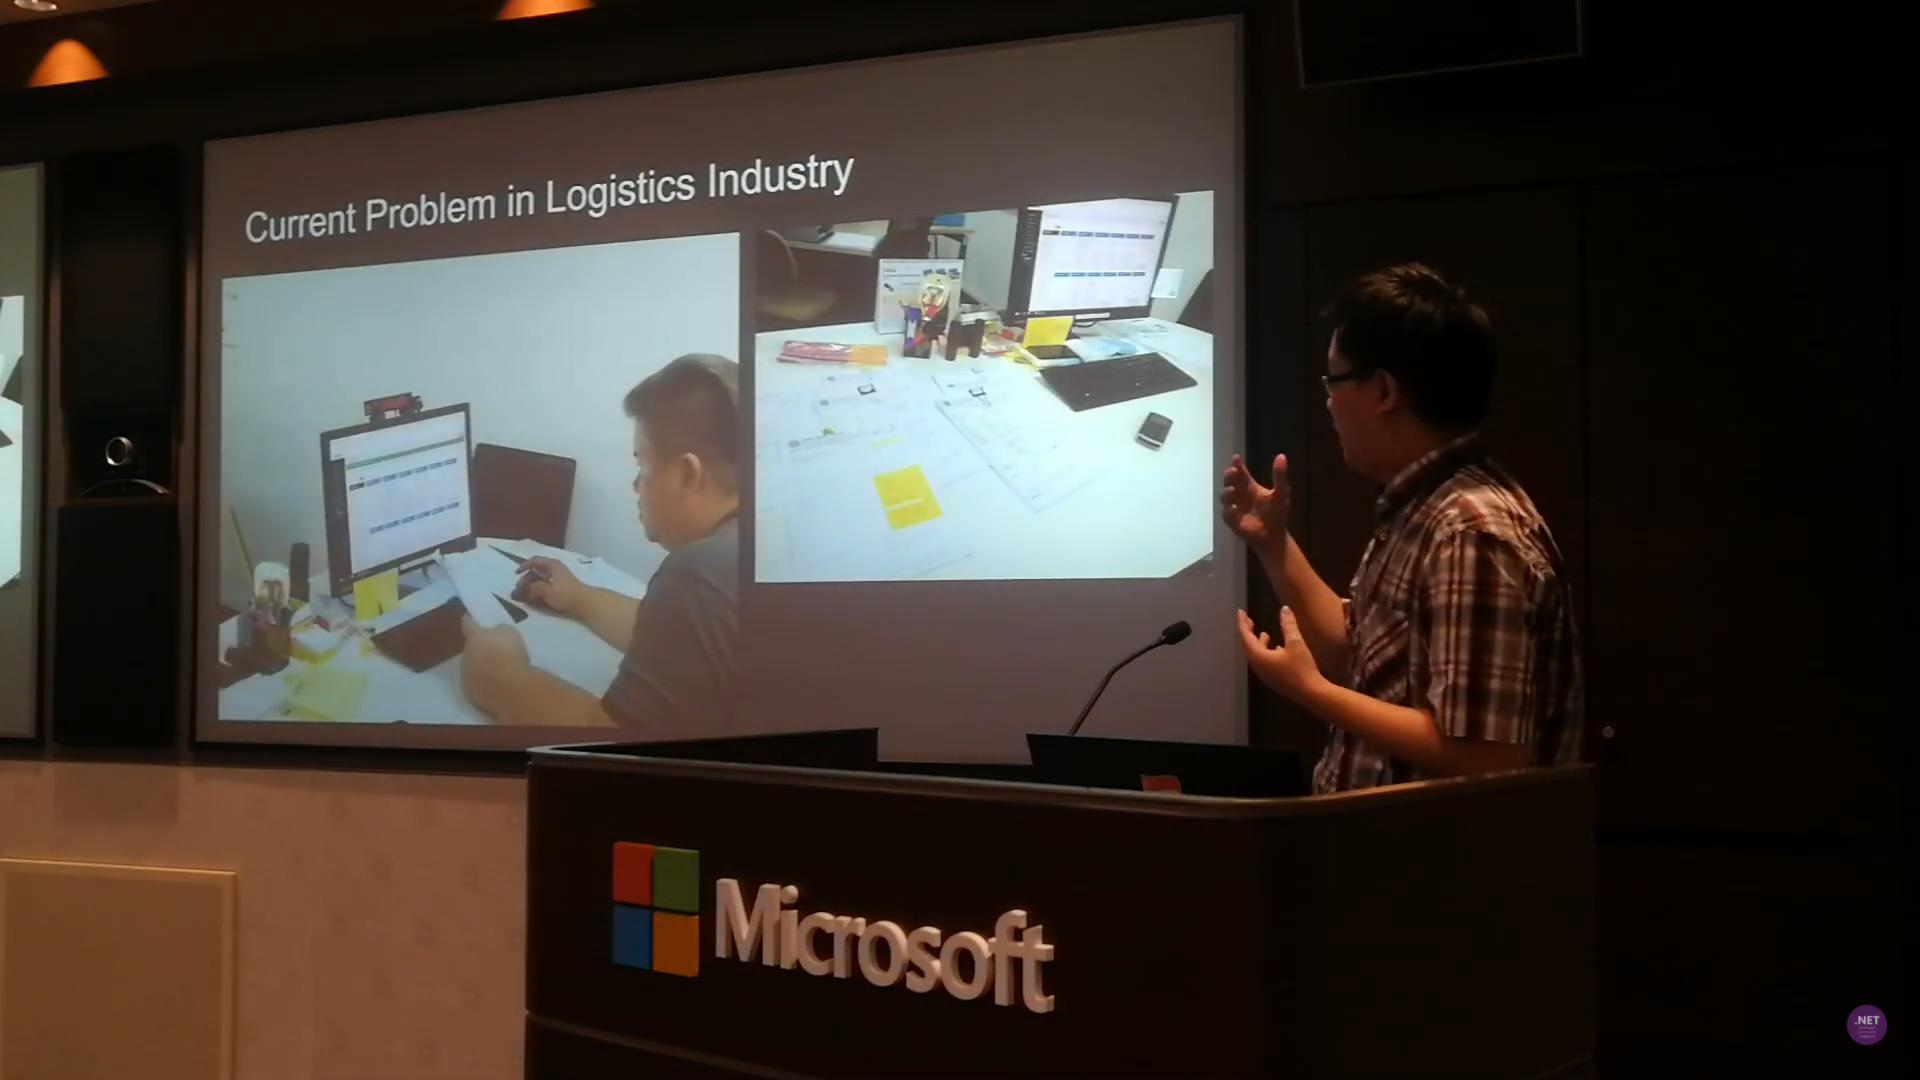
I have been in the logistics and port industry for more than 3 years. I have also been asked by different business owners and managers about implementing OCR in their business solutions for more than 3 years. This is because it’s not only a challenging topic, but also a very crucial feature in their daily jobs.
For example, currently the truck drivers need to manually key in the container numbers into their systems. Sometimes, there will be human errors. Hence, they always have this question about whether there is a feature in their mobile app, for example, that can extract the container number directly from merely a photo of the container.
Tesseract is an open-source OCR engine currently developed and led by Ray Smith from Google. The reason why I choose Tesseract is because there is no Internet connection needed. Hence, OCR can be done quickly without the need to upload images to the cloud to process.
Currently, I have tried out the following two features offered by Tesseract OCR engine.
Reading text from the image with confidence level returned;
Getting the coordinates of the image.
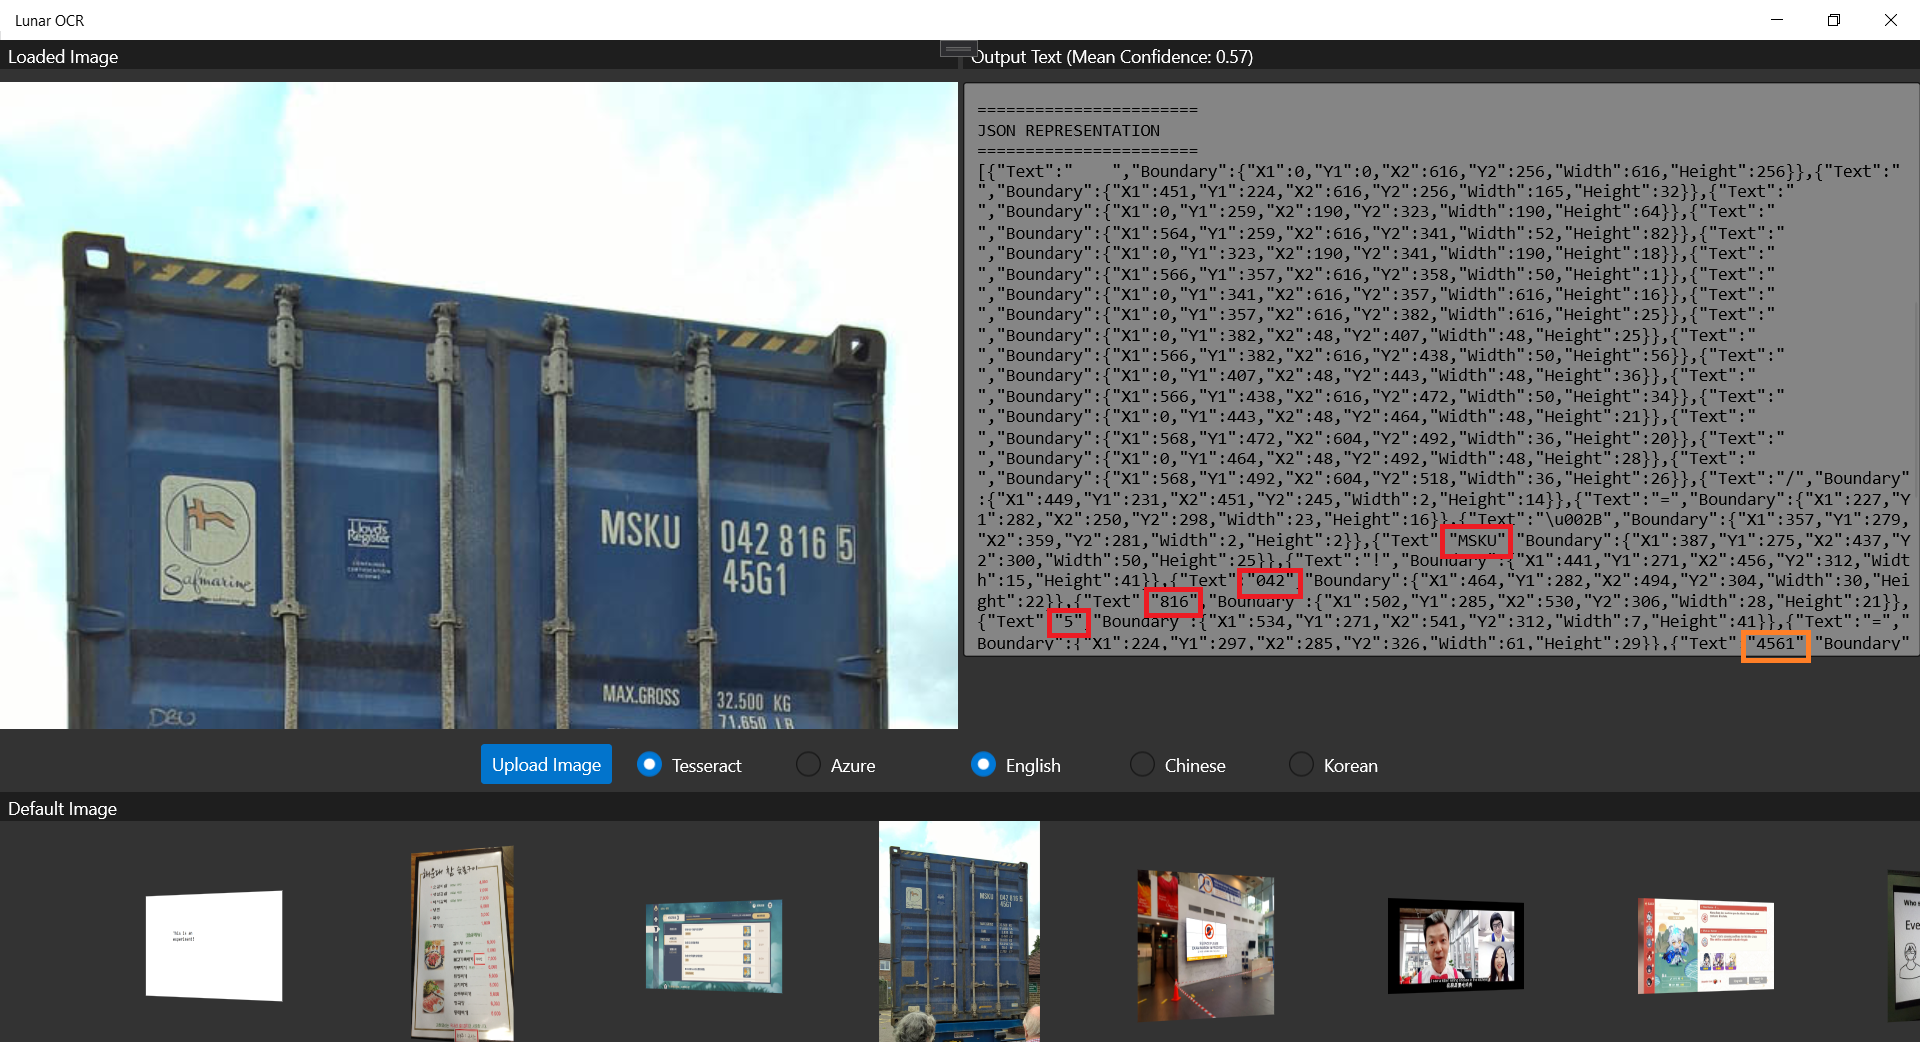
The following screenshot shows that Tesseract is able to retrieve the container number out from a photo of a container.
Only the “45G1” is misread as “4561”m as highlighted by the orange rectangle. The main container number is correctly retrieved from the photo.
Generally, Tesseract is also good at recognizing multiple fonts. However, sometimes we do need to train it based on certain font to improve the accuracy of text recognition. To do so, Bogusław Zaręba has written a very detailed tutorial on how to do it, so I won’t repeat the steps here.
So, let’s see how well Azure OCR engine can recognise the container number shown on the container image above.
Our UWP app can run on the Hololens 2 Emulator.
As shown in the screenshot above, not only the container number, but also the text “45G1” is correctly retrieved by the Computer Vision OCR API. The only downside of the API is that we need to upload the photo to the cloud first and it will then take one to two minutes to process the image.
With Hololens, now I can know what I’m ordering in a Korean restaurant. I want 돼지갈비 (BBQ Pork)~
Conclusion
That’s all for my small little experiment on the two OCR engines, i.e. Tesseract and Azure Computer Vision. Depends on your use cases, you can further update the engine and the UWP app above to make the app works smarter in your business.
Currently I am still having problem of using Tesseract on Hololens 2 Emulator. If you know how to solve this problem, please let me know. Thanks in advance!