IoT Hub First Peek

The Internet of Things (IoT) is here today, and it begins with the data, devices, and services already at work in your organization. When your “things” are connected to each other and to the cloud, you create new ways to improve efficiency, enable innovation, and transform your business.

This line is printed on the front page of a Microsoft booklet distributed during the lunchtime workshop “Connecting and Building the Internet of Things (IoT)” conducted by Gerald Goh, Microsoft Technical Evangelist. Gerald shared with us technologies such as AMQP, MQTT, Message Broker in Azure, Device Explorer, and so on.

gerald-goh.png
Gerald is sharing Azure IoT Hub during the lunchtime workshop.

IoT hasn’t gone totally mainstream, however, and we have yet to feel its impact. In many ways it is roughly where the big data movement was few years ago — consisting mainly of a buzzword that’s not yet widely understood.

Nevertheless, Gerald’s workshop does give me, a web developer who doesn’t know much about this field, a helpful quick start about IoT. After reading and experimenting, I learn more about the capability of Microsoft Azure in IoT and thus I’d like to share with you about what I’ve learnt so far about Azure IoT Hub.
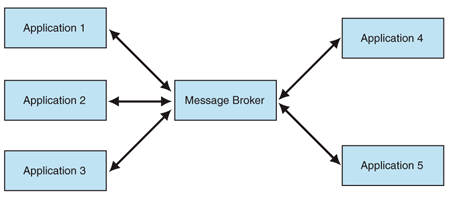
Message Broker

I’m working in Changi Airport. In the airport, we have several shops serving the travelers and visitors. Most of the shops have a back-end system that integrates several systems such as the retail system, e-commerce website, payment system, Changi Rewards system, inventory management system, the finance system.

So there will be cases where, when a customer buys something at the shop, the retail system needs to send as request to the payment system. Then when the purchase is successful, another purchase request will be sent to the inventory management system and the finance system.

I’m not too sure how the shops link different systems, especially this kind of point-to-point integration will cause a large number of connections among the systems. Hence, the developers of their system may find Message Broker useful.

Message Broker is a physical component that handles the communication between systems. A system sends a message to the message broker, providing the logical name of the receiving systems. The message broker will then search for the receiving systems and then passes the message to them.

message-broker
A message broker mediating the communication between systems. (Image Credit: Message Broker – MSDN)

Messaging Protocols: AMQP and MQTT

Sending a message between systems seems to be an easy task, however, doing it in a reliable and secure manner can be a challenging work.

As shown in the article “Scalable Eventing over Mesos!”, Autodesk is using AMQP (Advanced Message Queuing Protocol) as messaging protocols between two parties with the following main characteristics as goals.

  • Security
  • Reliability
  • Interoperability
  • Standard
  • Open
autodesk-messaging-protocol
AMQP communication between two parties (Image Credit: Autodesk)

AMQP 1.0 is the current specification version. It is also the primary protocol of Azure Event Hubs and Azure Service Bus Messaging after the SBMP (Service Bus Messaging Protocol), the TCP-based protocol which is used inside of .NET client library, is phased out.

Besides AMQP, MQTT (Message Queue Telemetry Transport) is another open protocol based on TCP/IP for asynchronous message queuing which has been developed and matured over past few years.

ibm.png
Dr Andy Stanform-Clark from IBM invented the MQTT protocol. (Image Source: IBM – Wikipedia)

While AMQP is designed to provide the full vibrancy of messaging scenarios, MQTT is designed as an extremely lightweight publish/subscribe message transport for small and simple devices sending small messages on low-bandwidth networks. Hence, MQTT is said to be ideal for mobile applications because of its low power usage and minimized data packets.

MQTT is also simple because it just has five API methods:

  • Connect to an MQTT broker;
  • Disconnect from an MQTT broker;
  • Subscribe to an MQTT topic filter;
  • Unsubscribe from an MQTT topic filter;
  • Publish MQTT messages.
facebook-messenger.png
“By maintaining an MQTT connection and routing messages through our chat pipeline, we were able to often achieve phone-to-phone delivery in the hundreds of milliseconds, rather than multiple seconds.” — Lucy Zhang, Facebook software engineer

If you are interested to know more about the comparison of AMQP and MQTT, there is a detailed white paper from StormMQ discussing the difference between AMQP and MQTT.

Brokered Messaging – Service Bus Messaging

When two or more systems want to exchange information, they need a communication facilitator. This is where Microsoft Azure Service Bus comes into picture.

Azure Service Bus is a reliable information delivery service, which is similar to a postal service in the physical world.

One of the messaging patterns offered in Azure Service Bus is called Service Bus Messaging, or Brokered Messaging. By using it, both senders and receivers do not have to be available at the exact same time.

AMQP 1.0 support is available in the Service Bus SDK since its version 2.1. Since the Service Bus .NET client library by default using a dedicated SOAP-based protocol, to use AMQP 1.0, we need to specify in the Service Bus Connection String as highlighted below in bold.

<?xml version="1.0" encoding="utf-8" ?>
<configuration>
    <appSettings>
        <add 
            key="Microsoft.ServiceBus.ConnectionString" 
            value="Endpoint=sb://[namespace].servicebus.windows.net/;SharedAccessKeyName=RootManageSharedAccessKey;SharedAccessKey=[SAS key];TransportType=Amqp" /> 
    appSettings> 
configuration>

In AMQP transport mode, the client library of sender will serialize the brokered message into an AMQP message so that the message can be received and interpreted by a receiver running on a different platform.

Azure Event Hub

When our event-based messaging needs to be handled at a very huge scale, we can either continue to pay even more to use Azure Service Bus or we can switch to use Event Hub. Event Hub is a cheaper way for us to be able to deal with huge bursts of messages and retain messages for a longer period of time.

event-hub-is-cheaper.png
Event Hub is cheaper, reliable and also fully managed. (Full video: Azure Service Bus Event Hubs 101 with Dan Rosanova)

Although Event Hub does not support MQTT, it does support AMQP (and HTTP) where there could be at most 5,000 concurrent AMQP connections.

Event Hubs event and telemetry handling capabilities, such as ingesting millions of events per second, make it especially usefu for IoT scenarios. However, since it is ingestion only thus Event Hub has no facility for sending traffic, for example, from the cloud back to the devices (C2D).

Azure IoT Hub

Since Event Hubs only enable event ingress, i.e. C2D, Azure offers another service, IoT Hub, for both C2D and D2C (Device-to-Cloud) communications which are reliable and secure. Not only allowing bi-directional communication, IoT Hub also supports AMQP, HTTP, and MQTT.

IoT Hub has an identity registry storing information about devices which are given the permission to connect to the IoT Hub. Before a device can connect to an IoT Hub, there must be an entry for that device in the identity registry of the IoT Hub.

In a Hello World tutorial of connecting stimulated device to IoT Hub using C#, there is a way to add device and retrieve device identity programmatically as shown below.

private static async Task AddDeviceAsync()
{
    string deviceId = "gclRasPi2";
    Device device;

    try
    {
        device = await registryManager.AddDeviceAsync(new Device(deviceId));
    }
    catch (DeviceAlreadyExistsException)
    {
        device = await registryManager.GetDeviceAsync(deviceId);
    }

    Console.WriteLine("Generated device key: {0}", device.Authentication.SymmetricKey.PrimaryKey);
}

The Registry Manager, which is connecting to the IoT Hub using a Connection String with proper Policy, will add an device identity with the Device ID “gclRasPi2” to the Device Explorer in Azure.

azure-iot-hub-device-explorer.png
The device “gclRasPi2” is now in the Device Explorer.

After doing so, a message then can be sent from (stimulated) device to the IoT Hub. For example, the device wants to send data about the temperature and humidity at that moment using MQTT, we can use the following code.

var deviceClient = DeviceClient.Create(
    iotHubUri, 
    new DeviceAuthenticationWithRegistrySymmetricKey("gclRasPi2", deviceKey), 
    TransportType.Mqtt);

var telemetryDataPoint = new
{
    deviceId = "gclRasPi2",
    temperature = currentTemperature,
    humidity = currentHumidity
};

var messageString = JsonConvert.SerializeObject(telemetryDataPoint);

var message = new Message(Encoding.ASCII.GetBytes(messageString));
message.Properties.Add("temperatureAlert", (currentTemperature > 30) ? "true" : "false");

await deviceClient.SendEventAsync(message);

To read the message, please follow the steps shared by the tutorial on setting up to read data-point messages.

Message Routing

Besides reading normal data-point messages, what really interests me is another tutorial about message processing with Message Routing.

iot-hub-routing
Message Routing (Image Source: Microsoft Azure Blog)

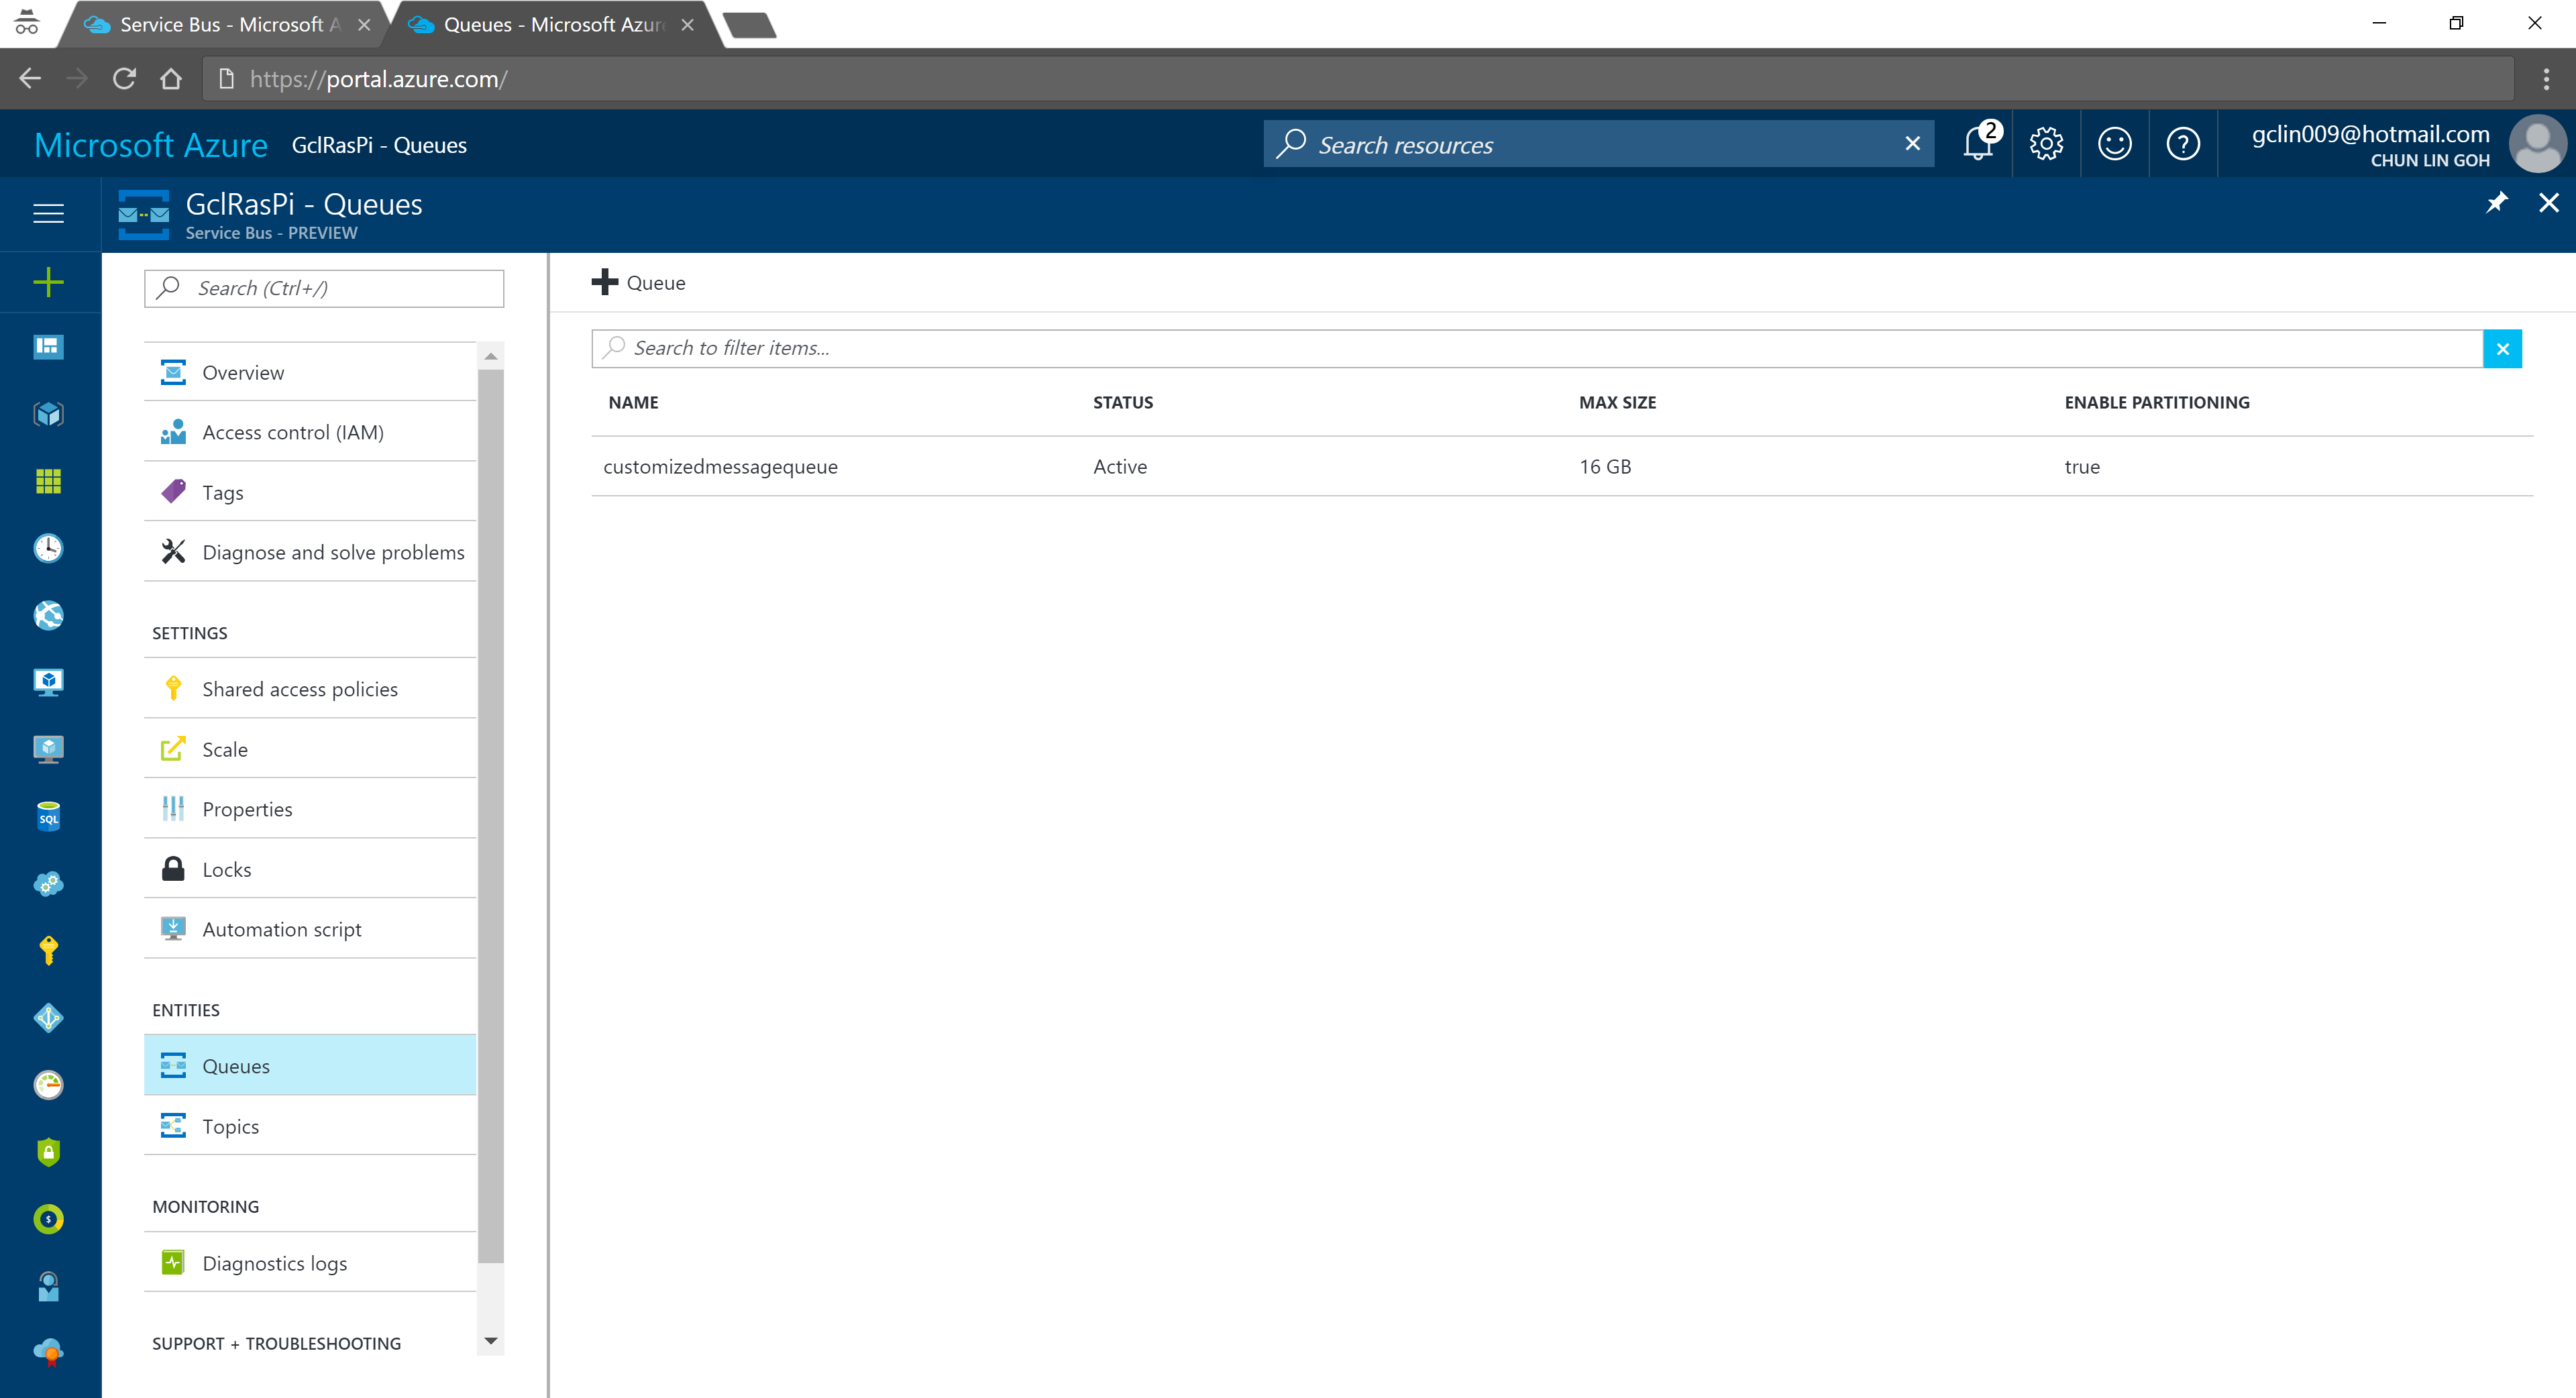
According to the tutorial, we first need to setup a Service Bus queue in the same Azure subscription and region as our IoT Hub.

service-bus-queue.png
Created a Queue in the Service Bus.

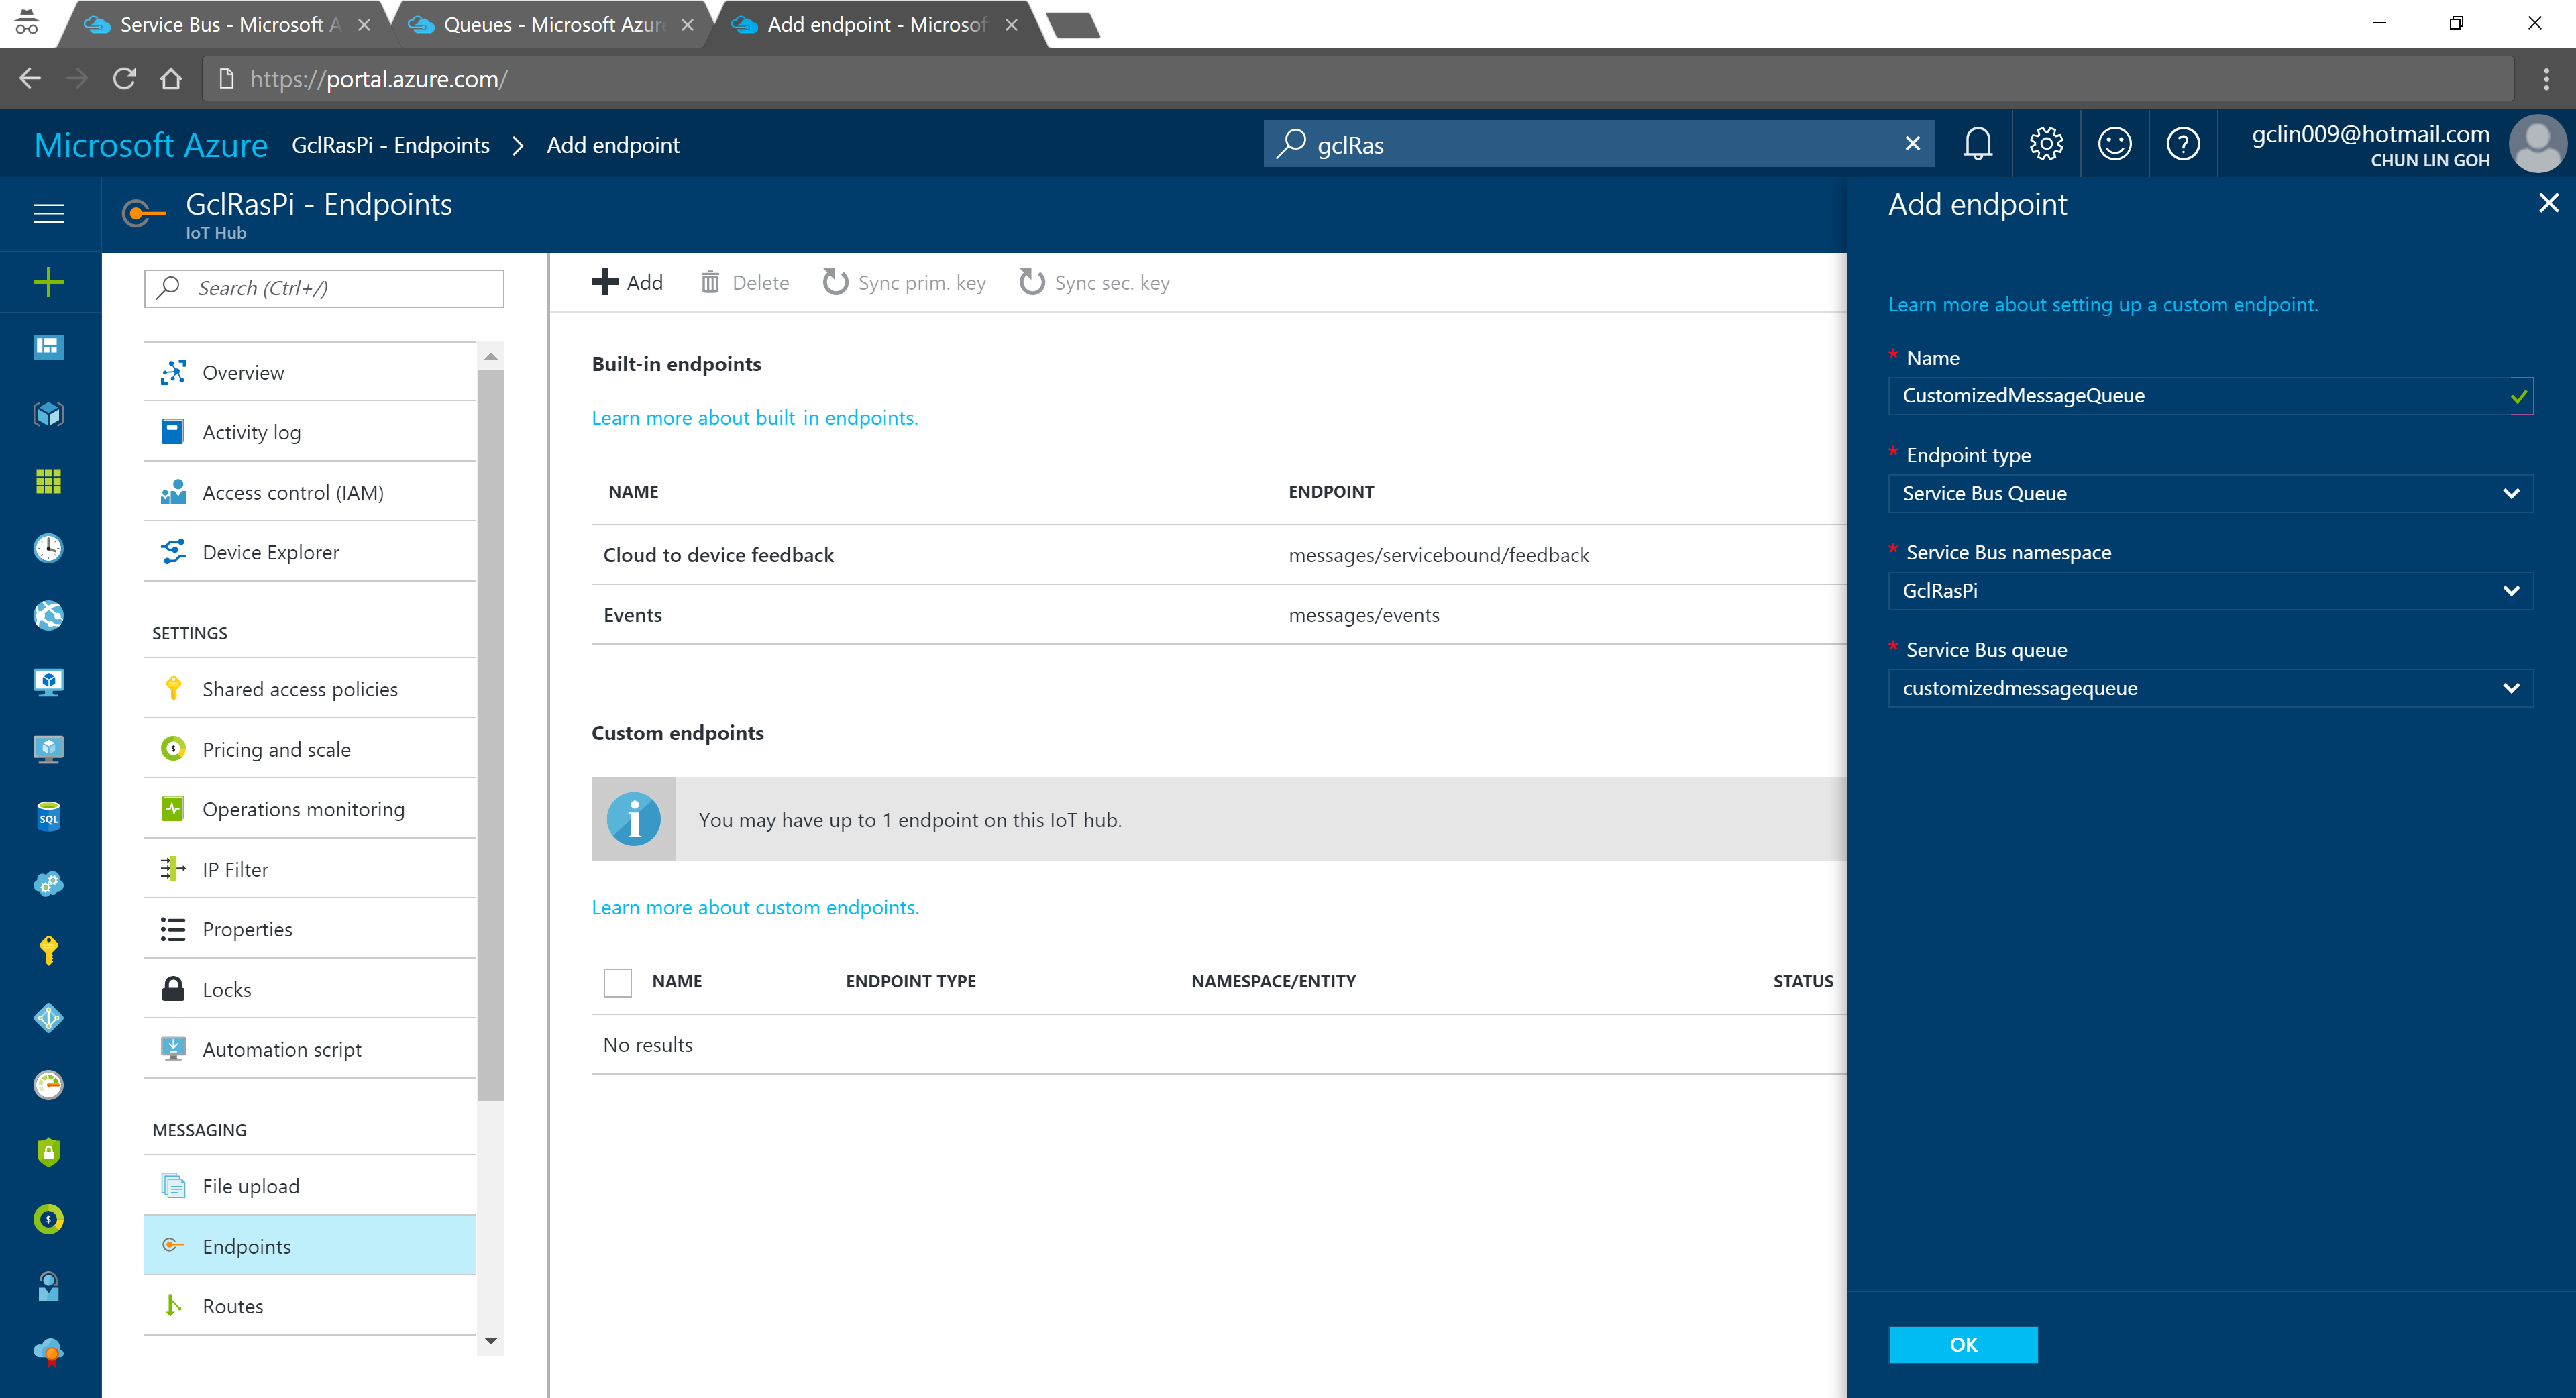
We can then add an Endpoint in the IoT Hub for the queue we just created. As shown in the following screenshot, there is a message saying that “You may have up to 1 endpoint on the IoT hub.” This is because I am using the free IoT Hub. For its paid versions, only at most 10 custom endpoints are allowed.

Interestingly, each Azure subscription can only have at most 10 IoT Hubs, and only 1 free IoT Hub.

iot-hub-endpoint.png
Adding a new endpoint to the IoT Hub.

After adding endpoint, we need to setup the Message Routing. For free version, we can only have 5 routing rules.

iot-hub-route.png
Creating new route with query string following special syntax.

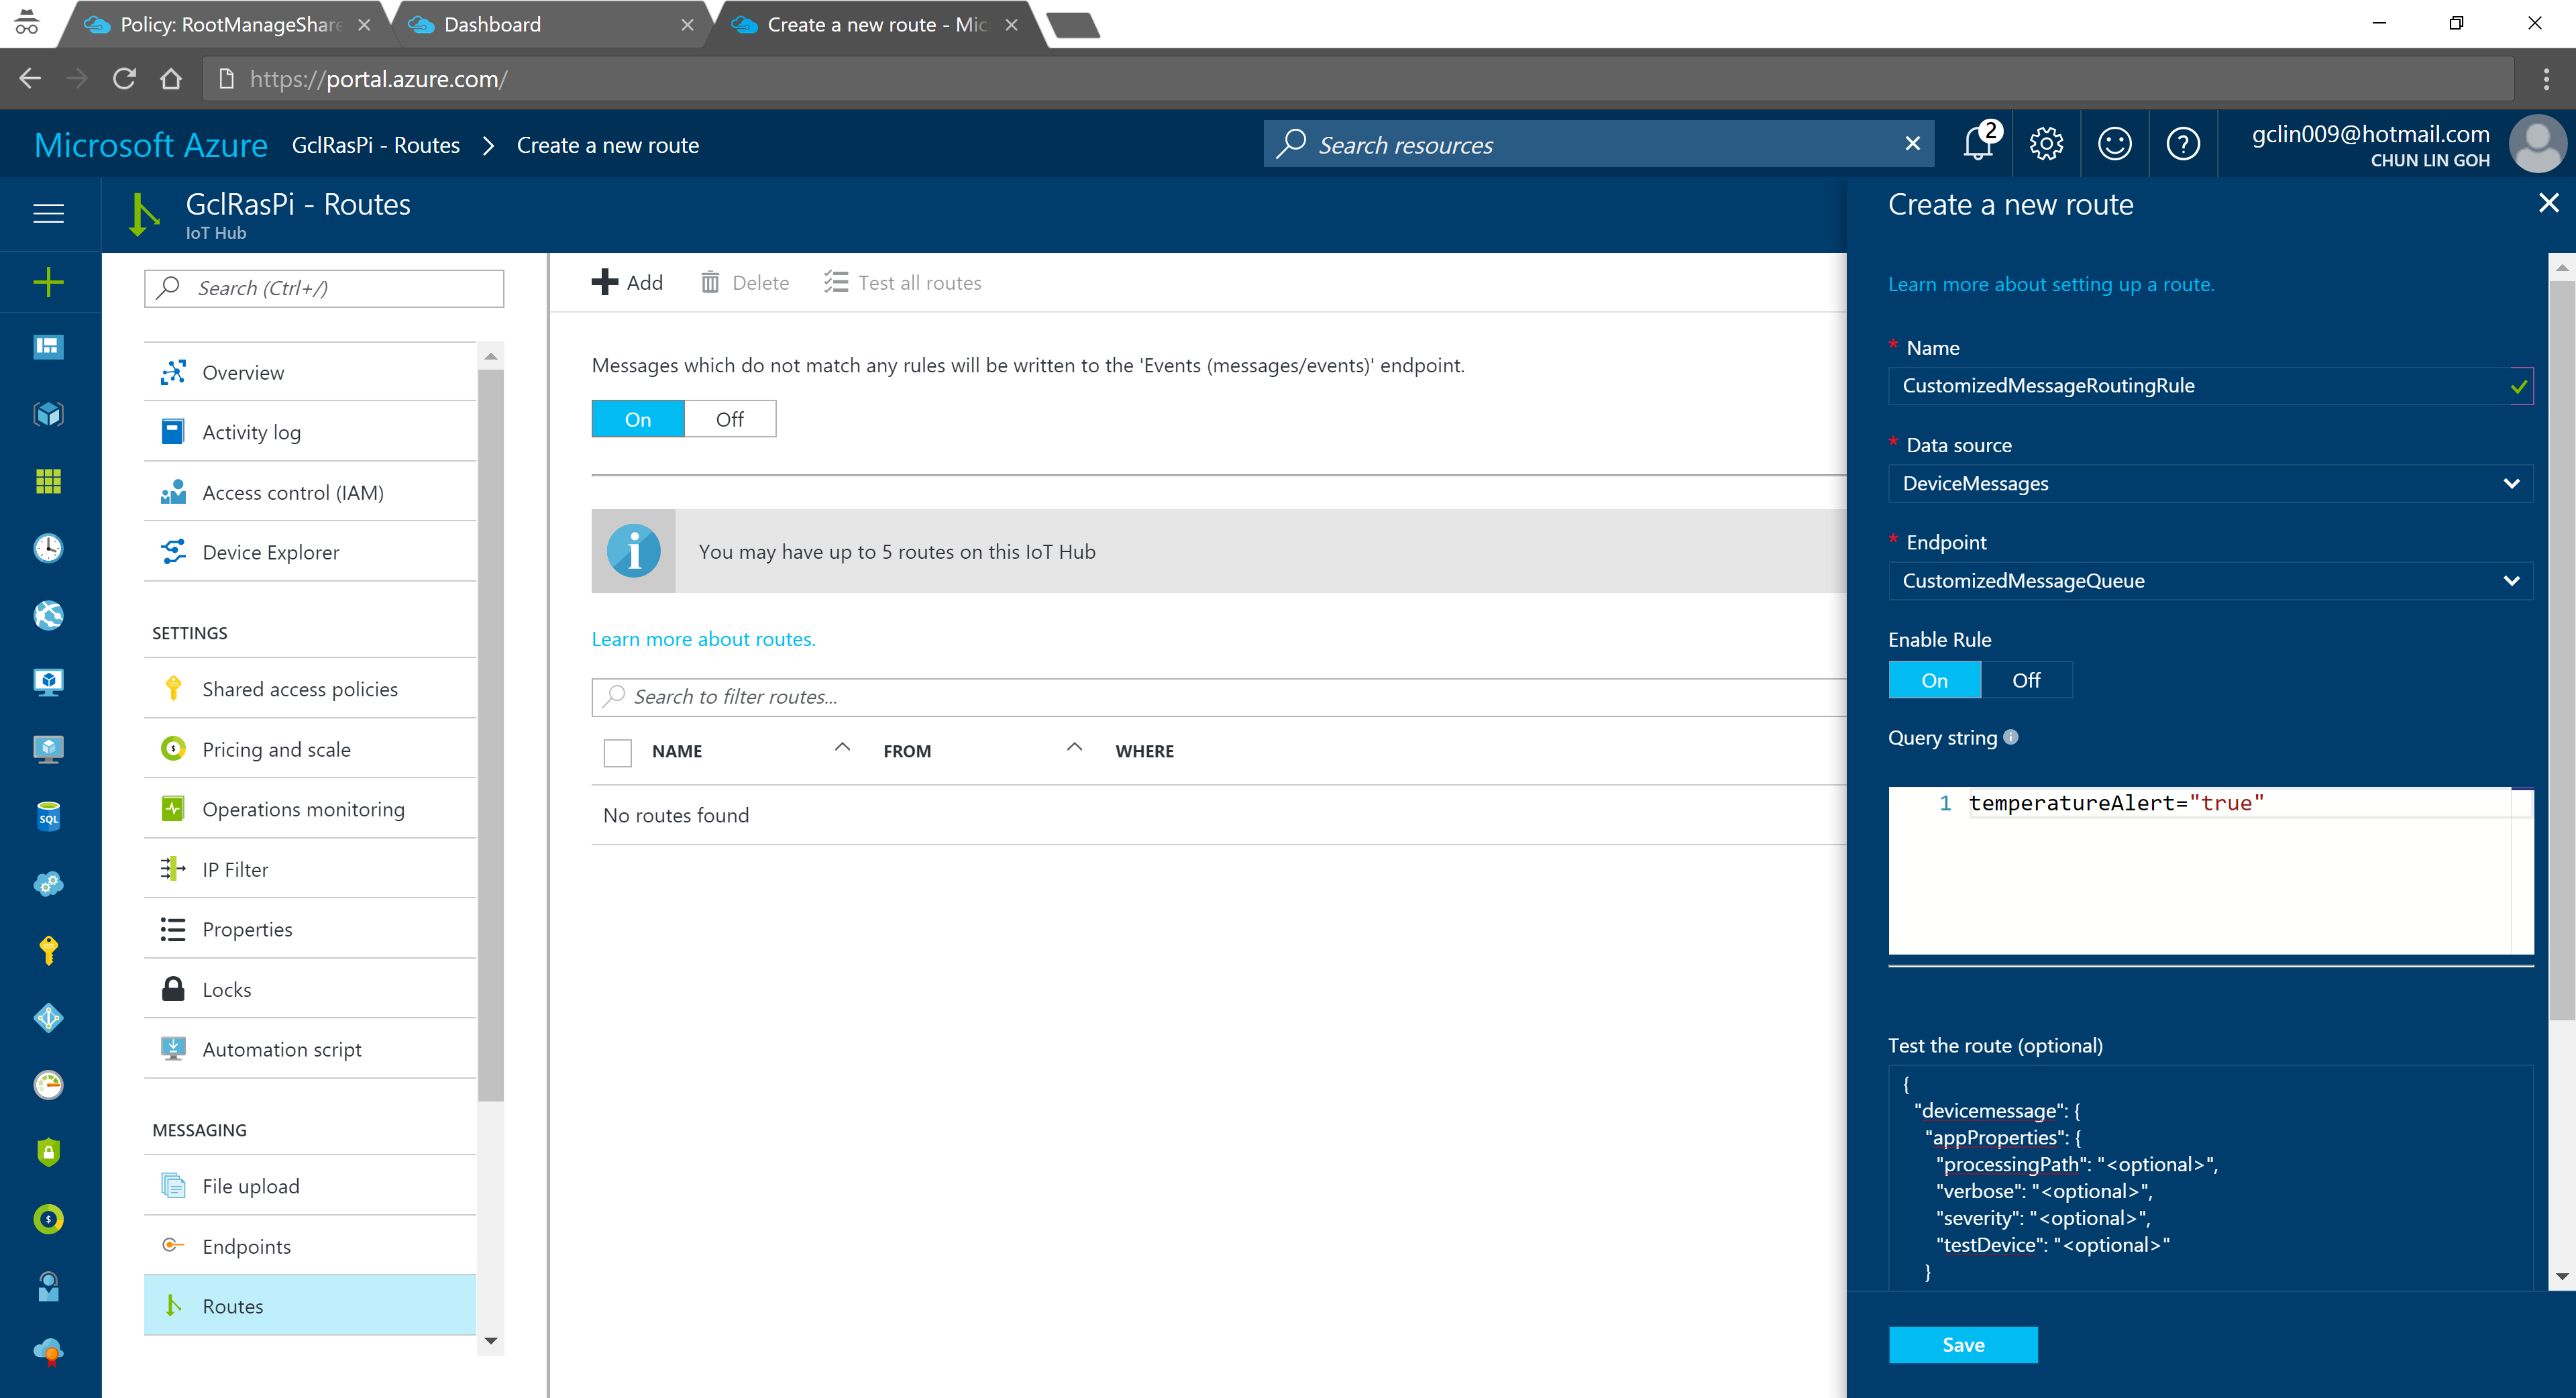
In the query string, I used temperatureAlert = “true” as the condition. Also, as shown on the screenshot above, there is a line saying “Messages which do not match any rules will be written to the ‘Events (messages/events)’ endpoint.” Hence, the following two console applications will show different results: The left one is connecting to the messages/events endpoint while the right one is showing messages that match the CustomizedMessageRoutingRule created above.

consoles-results.png
Only data with temperatureAlert = “true” will be sent to the “CustomizedMessageRoute”.

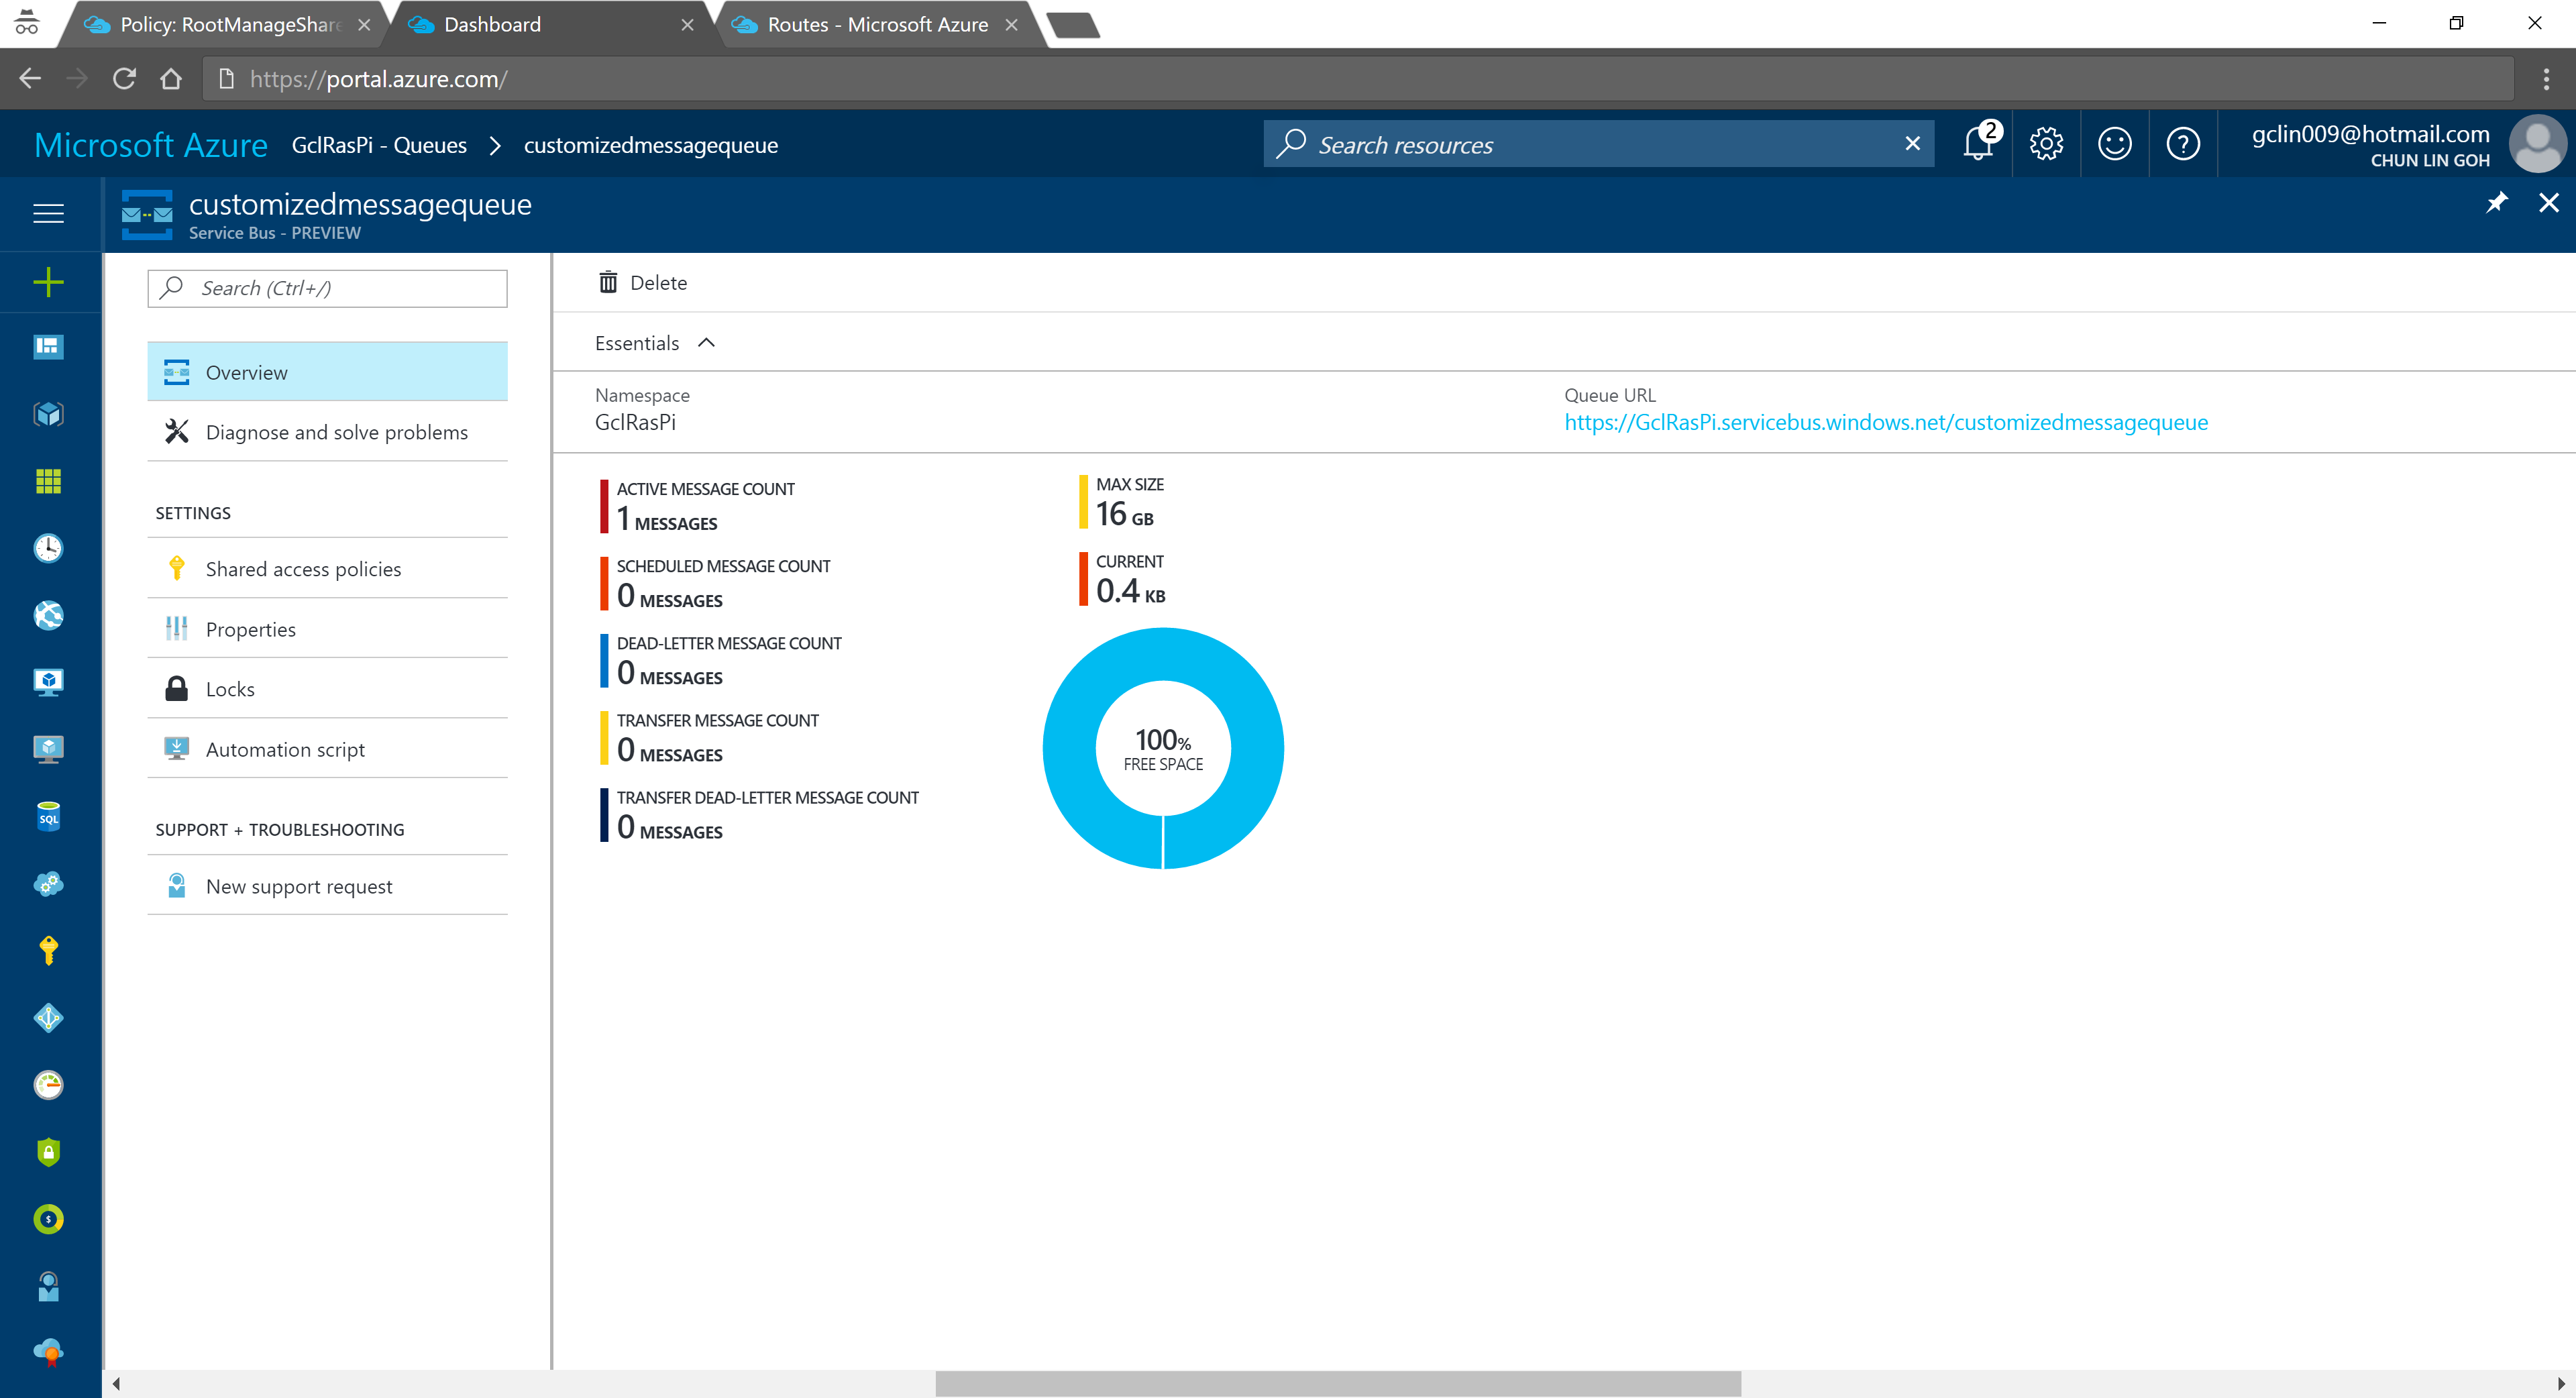
Now if we visit the Service Bus Queue page and IoT Hub page again, we will see some updates on the numbers.

queue-results.png
Usage statistics in Service Bus Queue.
iot-hub-usage.png
2% of 8k messages sent from the stimulated device console application.

Conclusion

That’s all about my first try of Azure IoT Hub after attending the workshop delivered by Gerald. It’s a great lunchtime workshop.

For those who are interested, there is an article on Microsoft sharing the benefits of using Azure IoT Hub service, you can read it to understand more.

This is just the beginning of my IoT learning journey. There are still more things for me to learn, such as Azure Stream Analysis and Microsoft Azure IoT Suite which is briefly brought up in the booklet mentioned above.

If you spot any mistake in this article or you have more to talk about IoT and in particular IoT in Azure ecosystem, please share with me. =)

Rewrite

This is a post about code refactoring, the long journey of removing technical debts in the system I have built at work.

Since late 2015, I have been working on a system which is supposed to be extensible and scalable to support our branches in different countries. With the frequent change of user requirements and business strategies, mistakes and system-wide code refactoring are things that I can’t avoid.

Today, I’m going to list down some key lessons and techniques I learned in this one year plus of journey of clearing technical debts.

…we are not living in a frozen world of requirements and changes. So you can’t and shouldn’t avoid refactoring at all.

The risk in avoiding would definitely bring up messy codes, and tough maintenance of your software, you can leave it behind but somebody else would suffer.

— Nail Yuce, Author of the redbook “Collaborative Application Lifecycle Management”

Databases Organization

Originally, we have three branches in three countries. The branches are selling the same product, laptop. It’s business decision that these three branches should behave individually with different names so that customers generally can’t tell that these three branches are operated by one company.

Let’s say these three branches have names as such, Alpha, Beta, and Gamma. Instead of setting up different databases for the branches, I put the tables of these three branches in the same database for two reasons:

  1. Save cost;
  2. Easy to maintain because there will be only one database and one connection string.

These two points turn out to be invalid few months after I designed the system in such a way.

I’m using Azure SQL, actually separating databases won’t incur higher cost because of the introduction of Elastic Database Pool in Microsoft Azure. It’s also not easy to maintain because to put three business entities in one database, I have two ways to do it.

  1. Have a column in each table specifying the record is from/for which branch;
  2. Prefix the table names.

I chose the 2nd way. Prefix the table names. Hence, instead of a simple table name such as Suppliers, I now have three tables, APSupplier, BTSupplier, and GMSupplier, where AP, BT, and GM are the abbreviation of the branch names.

This design decision leads to the second problem that I am going to share with you next.

Problem of Prefixing Table Names

My senior once told me that experience was what made a software developer valuable. The “experience” here is not about technical experience because technology simply moves forward at a very fast pace, especially in web development.

The experience that makes a software developer valuable is more about system design and decision making in the software development process. For example, now I know prefixing table names in my case is a wrong move.

TooYoungTooSimple
Experience helps in building a better system which is not “too simple and naive”.

There are actually a few obvious reasons of not prefixing.

For those who are using Entity Framework and love intellisense feature in Visual Studio IDE, they will know my pain. When I’m going to search for Supplier table, I have to type the two-letter branch abbreviation first then search for the Supplier table. Hence in the last one year, our team spent lots of man hours going through all these AP, BT, and GM things. Imaging the company starts to grow to 20 countries, we will then have AP, BT, GM, DT (for Delta), ES (for Epsilon), etc.

To make things worse, remember that three branches are actually just selling the laptops with the similar business models? So what would we get when we use inheritance for our models? Many meaningless empty sub-classes.

public abstract class BaseSupplier
{
    public int Id { get; set; }
    public string Name { get; set; }
    public string PersonInCharge { get; set; }
    public string Email { get; set; }
    public bool Status { get; set; }
}

public class APSupplier : BaseSupplier { }

public class BTSupplier : BaseSupplier { }

public class GMSupplier : BaseSupplier { }

So if we have branches in 20 countries (which is merely 10% of the total number of countries in the world), then our software developers’ life is going to be miserable because they need to maintain all these meaningless empty classes.

Factory Design Pattern and Template Methods

However, the design above actually at the same time also makes our system to be flexible. Now, imagine that one of the branches requests for a system change which requires addition of columns in its own Supplier table, we can simply change the corresponding sub-class without affecting the rest.

It-Is-Not-Bad-If-You-Know-How-To-Use_It
Design Patterns are good if we know how to use them properly. (Image Source: Rewrite)

This leads us to the Factory Design Pattern. Factory Design Pattern allows us to standardize the system design for each of the branch in the same system while at the same time allowing for individual branch to define their own business models.

public abstract class SupplierFactory
{
    public static SupplierFactory GetInstance(string portal)
    {
        return Activator.CreateInstance(Type.GetType($"Lib.Factories.Supplier.{portal}SupplierFactory")) as SupplierFactory;
    }

    protected abstract BaseSupplier CreateInstanceOfSupplier();

    protected abstract void InsertSupplierToDatabase(BaseSupplier newSupplier);

    public abstract IQueryable RetrieveSuppliers();

    public async Task AddNewSupplierAsync(SupplierManageViewModel manageVM)
    {
        ...
        var newSupplier = CreateInstanceOfSupplier();
        newSupplier.Name = manageVM.Name;
        newSupplier.PersonInCharge = manageVM.PersonInCharge;
        newSupplier.Email= manageVM.Email;
        newSupplier.Status = manageVM.Status;
        InsertSupplierToDatabase(newSupplier);
    }

    ...
}

For each of the branch, then I define their own SupplierFactory which inherits from this abstract class SupplierFactory.

public class AlphaSupplierFactory : SupplierFactory
{
    private AlphaDbContext db = new AlphaDbContext();

    public override IQueryable RetrieveSuppliers()
    {
        return db.APSuppliers;
    }

    protected override void InsertSupplierToDatabase(BaseSupplier newSupplier)
    {
        db.APSuppliers.Add((APSupplier)newSupplier);
    }

    ...
 }

As shown in the code above, firstly, I no longer use the abbreviation for the prefix of the class name. Yup, having abbreviation hurts.

Secondly, I have also split the big database to different smaller databases which store each branch’s info separately.

The standardization of the workflow is done using Template Method such as AddNewSupplier method shown above. The creation of new supplier will be using the same workflow for all branches.

Reflection

public static SupplierFactory GetInstance(string portal)
{
    return Activator.CreateInstance(Type.GetType($"Lib.Factories.Supplier.{portal}SupplierFactory")) as SupplierFactory;
}

For those who wonder what I am doing with the Activator.CreateInstance in the GetInstance method, I use it to create an instance of the specified type that type’s default constuctor with portal acts as an indicator on which sub-class the code should pick using reflection with the Type.GetType method. So the values for portal will be Alpha, Beta, Gamma, etc. in my case.

This unfortunately adds one more burden to our development team to pay attention to the naming convention of the classes.

Fluent API: ToTable

All these unnecessary complexity is finally coming to an end after my team found out how to make use of the Fluent API. Fluent API provides several important methods to configure entities which help to override Code First conventions. ToTable method is one of them.

ToTable helps mapping entity to the actual table name. Hence, now we can fix our naming issues in our databases with the codes below in each of the branch’s database context class.

protected override void OnModelCreating(DbModelBuilder modelBuilder)
{
    base.OnModelCreating(modelBuilder);

    modelBuilder.Entity().ToTable("APSuppliers");
    ... // mappings for other tables
 }

With this change, we can furthermore standardize the behavior and workflow of the system for each of our branch. However, since we only start to apply this after we have expanded our business to about 10 countries, there will be tons of changes waiting for us if we are going to apply Fluent API to refactor our codes.

Technical Debts

I made a few mistakes in the beginning of system design because of lacking of experience building extensible and scalable systems and lack of sufficient time and spec given to do proper system design.

This naming issue is just one of the debts we are going to clear in the future. Throughout the one year plus of system development, the team also started to realize many other ways to refactor our codes to make it more robust.

As a young team in a non-software-development environment, we need to be keen on self-learning but at the same time understand that we can’t know everything. We will keep on fighting to solve the crucial problems in the system and at the same time improving the system to better fit the changing business requirements.

I will discuss more about my journey of code refactoring in the future posts. Coming soon!

I-Was-Such-An-Idiot-Back-Then.png
Reading my old codes sometimes makes me slap myself. (Image Source: Rewrite)

Never Share Your Secrets (Secret Manager and Azure Application Settings)

secret-manager-tool-azure-app-service-2

It’s important to keep app secrets out of our codes. Most of the app secrets are however still found in .config files. This way of handling app secrets becomes very risky when the codes are on public repository.

Thus, they are people put some dummy text in the .config files and inform the teammates to enter their respective app secrets. Things go ugly when this kind of “common understanding” among the teammates is messed up.

i-made-a-mistake-cannot-be-reversed
The moment when your app secrets are published on Github public repo. (Image from “Kono Aozora ni Yakusoku o”)

Secret Manager Tool

So when I am working on the dotnet.sg website, which is an ASP .NET Core project, I use the Secret Manager tool.It offers a way to store sensitive data such as app secrets in our local development machine.

To use the tool, firstly, I need to add it in project.json as follows.

{
    "userSecretsId": "aspnet-CommunityWeb-...",
    ...
    "tools": {
        ...
        "Microsoft.Extensions.SecretManager.Tools": "1.0.0-preview2-final"
    }
}

Due to the fact that the Secret Manager tool makes use of project specific configuration settings kept in user profile, we need to specify a userSecretsId value in the project.json as well.

After that, I can start storing the app secrets in the Secret Manager tool by entering the following command in the project directory.

$ dotnet user-secrets set AppSettings:MeetupWebApiKey ""

Take note that currently (Jan 2017) the values stored in the Secret Manager tool are not encrypted. So, it is just for development only.

As shown in the example above, the name of the secret is “AppSettings:MeetupWebApiKey”. This is because in the appsettings.json, I have the following.

{
    "AppSettings": {
        "MeetupWebApiKey": ""
    },
    ...
}

Alright, now the API key is stored in the Secret Manager tool, how is it accessed from the code?

By default, appsettings.json is already loaded in startup.cs. However, we still need to add the following bolded lines in startup.js to enable User Secrets as part of our configuration in the Startup constructor.

public class Startup
{
    public Startup(IHostingEnvironment env)
    {
        var builder = new ConfigurationBuilder()
            .SetBasePath(env.ContentRootPath)
            .AddJsonFile("appsettings.json", optional: true, reloadOnChange: true)
            .AddJsonFile($"appsettings.{env.EnvironmentName}.json", optional: true);
            
        if (env.IsDevelopment())
        {
            builder.AddUserSecrets();
        }

        builder.AddEnvironmentVariables();

        Configuration = builder.Build();
    }
    ...
}

Then in the Models folder, I create a new class called AppSettings which will be used later when we load the app secrets:

public class AppSettings
{
    public string MeetupWebApiKey { get; set; }

    ...
}

So, let’s say I want to use the key in the HomeController, I just need to do the following.

public class HomeController : Controller
{
    private readonly AppSettings _appSettings;

    public HomeController(IOptions appSettings appSettings)
    {
        _appSettings = appSettings.Value;
    }

    public async Task Index()
    {
        string meetupWebApiKey = _appSettings.MeetupWebApiKey;
        ...
    }
    
    ...
}

Azure Application Settings

Just now Secret Manager tool has helped us on managing the app secrets in local development environment. How about when we deploy our web app to Microsoft Azure?

For dotnet.sg, I am hosting the website with Azure App Service. What so great about Azure App Service is that there is one thing called Application Settings.

Screen Shot 2017-01-29 at 11.19.42 PM.png
Application Settings option is available in Azure App Service.

For .NET applications, the settings in the “App Settings” will be injected into the AppSettings at runtime and override existing settings. Thus, even though I have empty strings in appsettings.json file in the project, as long as the correct values are stored in App Settings, there is no need to worry.

Thus, when we deploy web app to Azure App Service, we should never put our app secrets, connection strings in our .config and .json files or even worse, hardcode them.

Application Settings and Timezone

Oh ya, one more cool feature in App Settings that was introduced in 2015 is that we can change the server time zone for web app hosted on Azure App Service easily by just having a new entry as follows in the App Settings.

WEBSITE_TIME_ZONE            Singapore Standard Time

The setting above will change the server time zone to use Singapore local time. So DateTime.Now will return the current local time in Singapore.

References

If you would like to read more about the topics above, please refer to following websites.

Azure Blob Storage and File API

Azure Blob Storage - Azure SDK - ASP .NET MVC - Entity Framework - HTML5

When my applications were hosted on Windows Azure Virtual Machines (VM), we stored the images uploaded via our web applications in the hard disks of the VMs (except the temporary disk). However, when we started load balancing, we soon encountered a problem that the uploaded images were only found in one of the VMs. So we needed to find a centralized storage for those images.

Recently, when we are using Azure PaaS (aka Cloud Service), even without load balancing, we already encounter the same issue. That is simply because the hard drives used in Cloud Service instances are not persistent. Hence, a persistent file storage on the cloud is needed.

IaaS vs. PaaS
IaaS vs. PaaS

Blob Storage

Azure Blob Storage, according to Azure Documentation, is a service for storing large amount of unstructured data that can be accessed everywhere via HTTP or HTTPS. Hence, it is an ideal tool that we can use as the persistent image cloud storage.

There are two types of blob, Page Blob and Block Blob. Page Blob is commonly used for storing VHD files for VMs because it is optimized for random read and write operations.

For most of the files uploaded, it’s recommended to store as Block Blobs because large files will be split into smaller blocks and then uploaded concurrently. Hence, Block Blob is designed to give us faster upload and better throughput, which is great for image upload.

The maximum size for a Block Blob is 64 MB. Hence, if the uploaded file is more than 64 MB, we must upload it as a set of blocks; otherwise, we will receive status code 413 (Request Entity Too Large). For my web applications, there is no need for uploading an image which is more than 5MB most of the time. Hence, I can just limit the size of images before the user uploads them.

HttpPostedFileBase imageUpload;
...
if (imageUpload.ContentLength > 0 && imageUpload.ContentLength <= 5242880)
{
    //warn the user to resize the image
}

Let’s Try Uploading Images

I’m going to share how to upload more than one image to the Azure Blob Storage from an ASP .NET MVC 5 application. If you are going to upload just one image, simply remove the for loop and change List to just DBPhoto in the codes below.

First of all, I create a class to handle upload to Azure Storage operation.

public class AzureStorage
{
    public static async Task UploadAndSaveBlobAsync(
        HttpPostedFileBase imageFile, CloudBlobContainer container)
    {
        string blobName = Guid.NewGuid().ToString() + 
            Path.GetExtension(imageFile.FileName);

        CloudBlockBlob imageBlob = container.GetBlockBlobReference(blobName);
        using (var fileStream = imageFile.InputStream) 
        {
            await imageBlob.UploadFromStreamAsync(fileStream);
        }

        return imageBlob;
    }
}

So, in my controller, I have the following piece of code which will be called when an image is submitted via web page.

[HttpPost]
[ValidateAntiForgeryToken]
public async Task Create(
    [Bind(Include = "ImageUpload")] PhotoViewModel model)
{
    var validImageTypes = new string[] { "image/jpeg", "image/pjpeg", "image/png" };
    
    if (ModelState.IsValid) 
    {
        if (model.ImageUpload != null && model.ImageUpload.Count() > 0)
        {
            var storageAccount = CloudStorageAccount.Parse 
                (WebConfigurationManager.AppSettings["StorageConnectionString"]);

            var blobClient = storageAccount.CreateCloudBlobClient();
            blobClient.DefaultRequestOptions.RetryPolicy = 
                new LinearRetry(TimeSpan.FromSeconds(3), 3);  

            var imagesBlobContainer = blobClient.GetContainerReference("images");
            foreach (var item in model.ImageUpload) 
            { 
                if (item != null) {
                    continue;
                }
                
                if (validImageTypes.Contains(item.ContentType) && 
                    item.ContentLength > 0 && item.ContentLength <= 5242880)
                {
                    var blob = await AzureStorage.UploadAndSaveBlobAsync(item, imagesBlobContainer);
                    DBPhoto newPhoto = new DBPhoto(); 
                    newPhoto.URL = blob.Uri.ToString();
                    db.DBPhoto.Add(newPhoto); 
                } 
                else 
                {
                    // Show user error message 
                    return View(model); 
                }
            }
            db.SaveChanges();
            ... 
        } 
        else
        {
            // No image to upload
        } 
    }
    return View(model);
}

In the code above, there are many new cool things.

Firstly, it is the connection string to Azure Blob Storage, which I store in StorageConnectionString in web.config. The format for secure connection string is as follows.

DefaultEndpointsProtocol=https;AccountName=;AccountKey=;
Retrieve the access keys to the Storage Account.

Secondly, it’s LinearRetry. It is basically a retry policy which states how many times the program will retry and how much time needed between retries. In my case, it will only wait for 3 seconds after each try up to 3 tries.

Thirdly, I get the URL of the image on the Azure Blob Storage via blob.Uri.ToString() and store it into the database table. The URL will be used later for displaying the image as well as deleting the image.

Fourthly, I actually check to see if model.ImageUpload has null entries. This is because if I submit the form without any image to upload, model.ImageUpload has one entry. Not zero, but one. The only one entry is actually null. So if I don’t check to see whether the entry in model.ImageUpload is null, there will be an exception thrown.

The controller has such a long code. Luckily the code needed in the model and view is short and simple.

For the model PhotoViewModel, I have the following.

public class PhotoViewModel
{
    ...
    
    [Display(Name = "Current Images")]
    public List AvailablePhotos { get; set; }
}

For view, it is easy to allow selecting multiple files in the same view page. The “multiple = “true”” is to make sure more than one file can be selected in the File Explorer. You can omit this attribute if you only want at most one file being selected.

@Html.LabelFor(model => model.ImageUpload, new { style = "font-weight: bold;" })
@Html.TextBoxFor(model => model.ImageUpload, new { type = "file", multiple = "true" })
@Html.ValidationMessageFor(model => model.ImageUpload)

Image Size and HttpException

The image upload function looks fine. However, when images having size larger than a certain size is uploaded, HttpException will be thrown.

There is no way that having exception would be fun too! (Image Credit: Tari Tari)

In order to prevent DOS attacks which upload huge files to the server, IIS by default only allows files which have size less than 4MB to be uploaded. Hence, although I earlier put a check to prevent image larger than 5MB to be uploaded, the exception will still be thrown if an image of size between 4 to 5MB is uploaded.

What if we just change the if clause above to allow only at most 4MB of image being uploaded? This won’t work because the exception is already thrown before the if condition is reached.

Then, can we just increase the IIS limit from 4MB to, let’s say, 100MB or something bigger? Sure. This can work. However, it still doesn’t stop someone uploads something bigger than the limit. Also, it makes attackers easier to exhaust your server with big files. Hence, expanding the upload size restriction is not really a full solution.

If you are interested, there are many good articles online discussing about this problem. I highlight some interesting ones below.

  1. Use HttpModule to Handle File Uploads;
  2. Use RIA (Rich Internet Application) Services in Silverlight (Seriously, we are talking about Silverlight in year 2015?);
  3. SubStatusCode = 13 in IIS 7;
  4. Catch the Exception in Global.asax.

I don’t really like the methods listed above, especially the 3rd and 4th options. It’s already too late to inform the user when the exception is thrown. Could we do something at client side before the images are being uploaded?

Luckily, we have File API in HTML 5. It allows to loop through the files in JavaScript to check their size. So, after the submit button is clicked, I will call a JavaScript method to check for the size of the images before they are being uploaded.

function IsFileSizeAcceptable() {
    if (typeof FileReader !== "undefined") {
        var filesBeingUploaded = document.getElementById('ImageUpload').files;
        for (var i = 0; i < filesBeingUploaded.length; i++) {
            if (filesBeingUploaded[i].size >= 4194304) { // Less than 4MB only
                alert('The file ' + filesBeingUploaded[i].name + ' is too large. Please remove it from your selection.');
                return false;
            }
        }
    }
    return true;
}
File API is currently supported in major modern browsers. (Image Credit: http://caniuse.com/#feat=fileapi)

Remove from Azure Blob Storage

It’s normal that files uploaded to storage will be removed later. So how are we going to implement this feature in our ASP .NET MVC 5 application?

First of all, I added the following code to my AzureStorage.cs.

public static async Task DeleteBlobAsync(Uri blobUri, CloudBlobContainer container)
{
    string blobName = blobUri.Segments[blobUri.Segments.Length - 1];
    CloudBlockBlob blobToDelete = container.GetBlockBlobReference(blobName);

    await blobToDelete.DeleteAsync(); 
}

Secondly, I just pass in the Azure Storage URL of the image that I would like to remove and then call the DeleteBlobAsync method.

Uri blobUri = new Uri();
await AzureStorage.DeleteBlobAsync(blobUri, imagesBlobContainer);

Then the image will be deleted from the Azure Storage successfully.

Global.asax.cs and Blob Container

In order to have my application to create a blob container automatically if it doesn’t already exist, I add a few lines in Global.asax.cs as follows.

var storageAccount = CloudStorageAccount.Parse(
    WebConfigurationManager.AppSettings["StorageConnectionString"]);
var blobClient = storageAccount.CreateCloudBlobClient();
var imagesBlobContainer = blobClient.GetContainerReference("images");
if (imagesBlobContainer.CreateIfNotExists())
{
    imagesBlobContainer.SetPermissions(new BlobContainerPermissions
        {
            PublicAccess = BlobContainerPublicAccessType.Blob
        });
}

Write a Console Program to Upload File to Azure Storage

So, how is it done if we are developing a console application, instead of web application?

Windows Azure Storage NuGet Package needs to be installed first.

The codes below show how I upload an html file from my local hard disk to Azure Blob Storage. Then I can share the Azure Storage URL of the file to my friends so that they can read the web page.

Similar to what I do in web application, this is how I connect to the Storage account via https.

var azureStorageAccount = new CloudStorageAccount(
    new StorageCredentials("", ""), true);

This is how I access the container.

var blobClient = new CloudBlobClient(azureStorageAccount.BlobStorageUri, azureStorageAccount.Credentials);
var container = blobClient.GetContainerReference("myfiles");

Then the next thing I do is just upload the local file to Azure Storage by specifying the file name, content type, etc.

CloudBlockBlob blob = container.GetBlockBlobReference("mysimplepage.html");
using (Stream file = System.IO.File.OpenRead(@"C:\Users\ChunLin\Documents\mysimplepage.html")) 
{
    blob.Properties.ContentType = "text/html"; 
    blob.UploadFromStream(file); 
}

Yup, that’s all. =)

Pricing

Hosting your files on cloud storage is sure convenience. However, Azure Blob Storage is not free. The following table shows the current pricing of Azure Block Blob Storage in South East Asia region. To get the latest pricing details, please visit Azure Storage Pricing page.

Azure Standard Block Blob Storage in SEA Pricing

Summer 2015 Self-Learning Project

This article is part of my Self-Learning in this summer. To read the other topics in this project, please click here to visit the project overview page.

Summer Self-Learning Banner