Entity Framework and Database

By using Entity Framework, we can save a lot of time on writing SQL ourselves because Entity Framework, a Microsoft-supported ORM for .NET, is able to generate the SQL for us.

I started to use ADO .NET when I was building .NET web applications in my first job. I learnt about how to call stored procedures with ADO .NET. I witnessed how my colleague wrote a 400-line SQL to complete a task which we normally will choose to do it in C#. I also realized the pain of forgetting to update the stored procedure when the C# code is already different.

After that, my friend introduced me Entity Framework when I was working on my first ASP .NET MVC project. Since then, I have been using Entity Framework because it enables me to deliver my web applications faster without writing (and debugging) any SQL myself. I read a very interesting article comparing between Entity Framework and ADO .NET. The author also acknowledged that the performance of Entity Framework was slower than hand-coded ADO .NET. He emphasized that, however, Entity Framework did maximize his productivity.

How I react when I read a 400-line stored procedure submitted by my colleague.

What Is Happening in Database with Entity Framework?

The SQL generated by Entity Framework is believed to be pretty good. However, it’s still nice to be aware of what SQL is being generated. For example, I have the following code to retrieve Singapore weather info.

using (var db = new ApplicationDbContext())
{
    var forecastRecords = db.SingaporeWeathers.ToList();
}

In Visual Studio, I can just mouse-over “SingaporeWeather” to get the following query.

SELECT 
    [Extent1].[RecordID] AS [RecordID], 
    [Extent1].[LocationID] AS [LocationID], 
    [Extent1].[WeatherDescription] AS [WeatherDescription], 
    [Extent1].[Temperature] AS [Temperature], 
    [Extent1].[UpdateDate] AS [UpdateDate]
FROM [dbo].[SingaporeWeathers] AS [Extent1]

If I have the following code which retrieves only records having temperature greater than 37, then I can use ToString().

using (var db = new ApplicationDbContext())
{
    var query = from sw in db.SingaporeWeathers where sw.Temperature > 37 select sw;
    Console.WriteLine(query.ToString());
}
SELECT
     [Extent1].[RecordID] AS [RecordID],
     [Extent1].[LocationID] AS [LocationID],
     [Extent1].[WeatherDescription] AS [WeatherDescription]
     [Extent1].[Temperature] AS [Temperature],
     [Extent1].[UpdateDate] AS [UpdateDate]
FROM [dbo].[SingaporeWeathers] AS [Extent1]
WHERE [Extent1].[Temperature] > cast(37 as decimal(18))

I am using DBContect API, so I can just use ToString(). Alternatively, you can also use ToTraceString(), which is a method of ObjectQuery, to get the generated SQL.

SQL Logging in Entity Framework 6

It is a great news for developer when Entity Framework is announced to have SQL Logging feature added For example, to write database logs to a file, I just need to do as follows.

using (var db = new ApplicationDbContext())
{
    var logFile = new StreamWriter("C:\\temp\\log.txt");
    db.Database.Log = logFile.Write;
    var forecastRecords = db.SingaporeWeathers.Where(x => x.Temperature > 37).ToList();
    logFile.Close();
}

Then in the log file, I can see logs as follows.

...
Closed connection at 6/6/2015 10:59:32 PM +08:00
Opened connection at 6/6/2015 10:59:32 PM +08:00
SELECT TOP (1) 
    [Project1].[C1] AS [C1], 
    [Project1].[MigrationId] AS [MigrationId], 
    [Project1].[Model] AS [Model], 
    [Project1].[ProductVersion] AS [ProductVersion]
FROM ( SELECT 
    [Extent1].[MigrationId] AS [MigrationId], 
    [Extent1].[Model] AS [Model], 
    [Extent1].[ProductVersion] AS [ProductVersion], 
    1 AS [C1]
    FROM [dbo].[__MigrationHistory] AS [Extent1]
    WHERE [Extent1].[ContextKey] = @p__linq__0
) AS [Project1]
ORDER BY [Project1].[MigrationId] DESC
-- p__linq__0: 'MyWeb.Migrations.Configuration' (Type = String, Size = 4000)
-- Executing at 6/6/2015 10:59:32 PM +08:00
-- Completed in 70 ms with result: SqlDataReader

Closed connection at 6/6/2015 10:59:32 PM +08:00
Opened connection at 6/6/2015 10:59:32 PM +08:00
SELECT 
    [Extent1].[RecordID] AS [RecordID], 
    [Extent1].[WeatherDate] AS [WeatherDate], 
    [Extent1].[WeatherDescription] AS [WeatherDescription], 
    [Extent1].[WeatherSecondaryDescription] AS [WeatherSecondaryDescription], 
    [Extent1].[IconFileName] AS [IconFileName], 
    [Extent1].[Temperature] AS [Temperature], 
    [Extent1].[UpdateDate] AS [UpdateDate]
FROM [dbo].[Weathers] AS [Extent1]
WHERE [Extent1].[Temperature] > cast(37 as decimal(18))
-- Executing at 6/6/2015 10:59:33 PM +08:00
-- Completed in 28 ms with result: SqlDataReader
...

So, as you can see, even the Code First migration related activity is logged as well. If you would like to know what are being logged, you can read an article about SQL Logging in EF6 which was written before it’s released.

Migration and the Verbose Flag

Speaking of Code First migration, if you would like to find out the SQL being generated when Update-Database is executed, you can add a Verbose flag to the command.

Update-Database -Verbose

Navigation Property

“I have no idea why tables in our database don’t have any relationship especially when we are using relational database.”

I heard from my friend that my ex-colleague shouted this in the office. He left his job few days after. I think bad codes and bad design do anger some of the developers. So, how do we do “relationship” in Entity Framework Code First? How do we specify the foreign key?

I quit!
I quit!

In Entity Framework, we use the Navigation Property to represent the foreign key relationship inside the database. With Navigation Property, we can define relationship between entities.

If we have a 1-to-1 Relationship between two entities, then we can have the following code.

public class Entity1
{
    [Key]
    public int Entity1ID { get; set; }
    public virtual Entity2 Entity2 { get; set; }
}

public class Entity2
{
    [Key, ForeignKey("Entity1")]
    public int Entity1ID { get; set; }
    public virtual Entity1 Entity1 { get; set; }
}

By default, navigation properties are not loaded. Here, the virtual keyword is used to achieve the lazy loading, so that the entity is automatically loaded from the database the first time a property referring to the entity is accessed.

However, there are people against using virtual keyword because they claim that lazy loading will have subtle performance issue in the application using it. So, what they suggest is to use the include keyword, for example

dbContext.Entity1.Include(x => x.Entity2).ToArray();

By specifying the ForeignKey attribute for Entity1ID in Entity2 class, Code First will then create a 1-to-1 Relationship between Entity1 and Entity2 using the DataAnnotations attributes.

For 1-to-n Relationship, we then need to change the navigation property, for example, in Entity1 class to use collection as demonstrated in the code below.

public class Entity1
{
    [Key]
    public int Entity1ID { get; set; }
    public virtual ICollection<Entity2> Entity2s { get; set; }
}

Finally, how about n-to-m Relationship? We will just need to change the navigation property in both Entity1 and Entity2 classes to use collection.

public class Entity2
{
    [Key]
    public int Entity2ID { get; set; }
    public virtual ICollection<Entity1> Entity1s { get; set; }
}

Together with the following model builder statement.

protected override void OnModelCreating(DbModelBuilder modelBuilder)
{
    modelBuilder.Entity<Entity2>()
        .HasMany(e2 => e2.Entity1s)
        .WithMany(e1 => e1.Entity2s)
        .Map(e12 => 
            {
                e12.MapLeftKey("Entity1ID");
                e12.MapRightKey("Entity2ID");
                e12.ToTable("Entity12");
            });
}

The code above is using Fluent API which won’t be discussed in this post.

Database Context Disposal

When I first used Scaffolding in MVC 5, I noticed the template of controller class it generates look something as follows.

public class MyController : Controller
{
    private MyContext db = new MyContext();
    
    protected override void Dispose(bool disposing)
    {
        if (disposing) 
        {
            db.Dispose(); 
        } 
        base.Dispose(disposing);
    }
}

Before using Scaffolding, I have always been using the Using block, so I only create database context where I have to, as recommended in a discussion on StackOverflow. Also, the Using block will have the Dispose() be called automatically at the end of the block, so I don’t need to worry about forgetting to include the Dispose() method to dispose the database context in my controller.

Azure SQL: Database Backup and Restore

Before ending this post, I would like to share about how DB backup and restore is done in Azure SQL Database.

First of all, Azure SQL Database has built-in backups and even self-service point in time restores. Yay!

For each activate databases, Azure SQL will create a backup and geo-replicate it every hour to achieve 1-hour Recovery Point Objective (RPO).

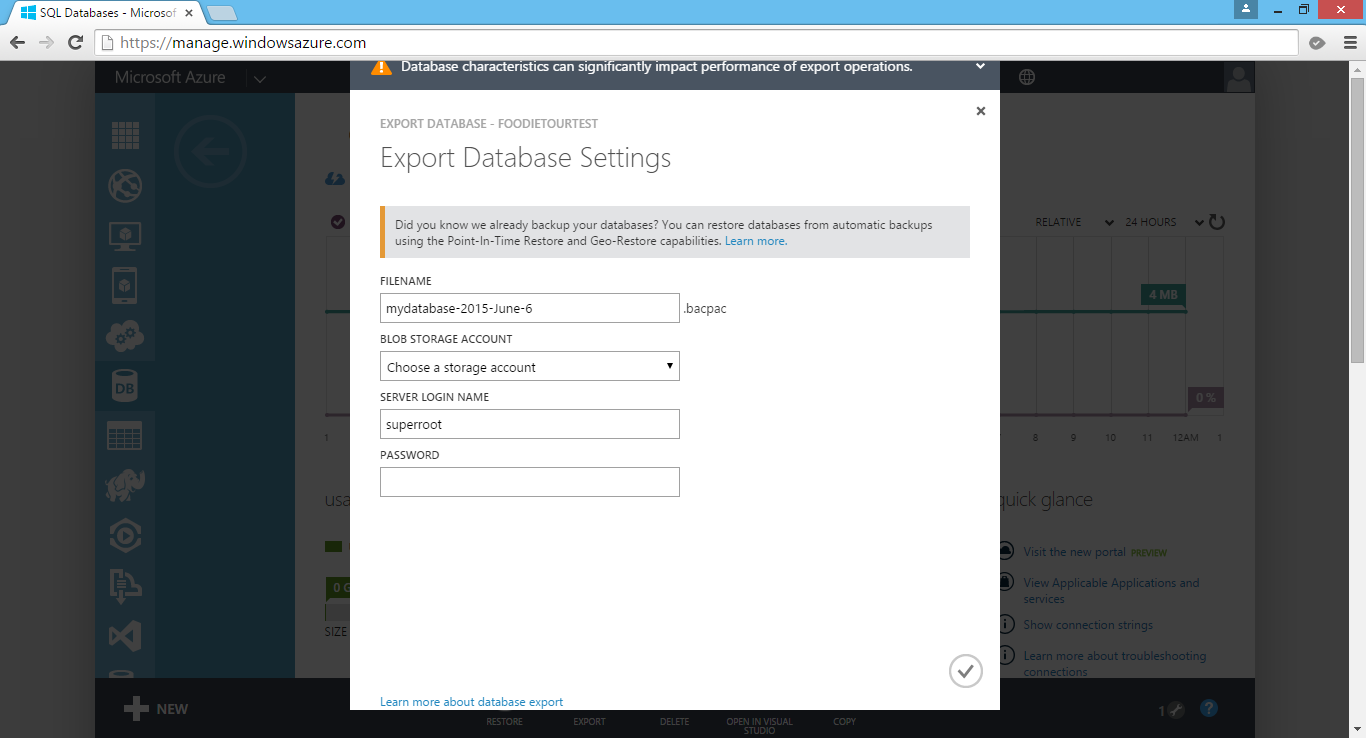
If there is a need to migrate the database or archive it, we can also export the database from Azure SQL Database. Simply click on the Export button in the SQL Databases section of Azure Management Portal and then choose an Azure blob storage account to export the database to.

Finally, just provide the server login name and password to the database and you are good to go.

Export DB from Azure SQL Database.

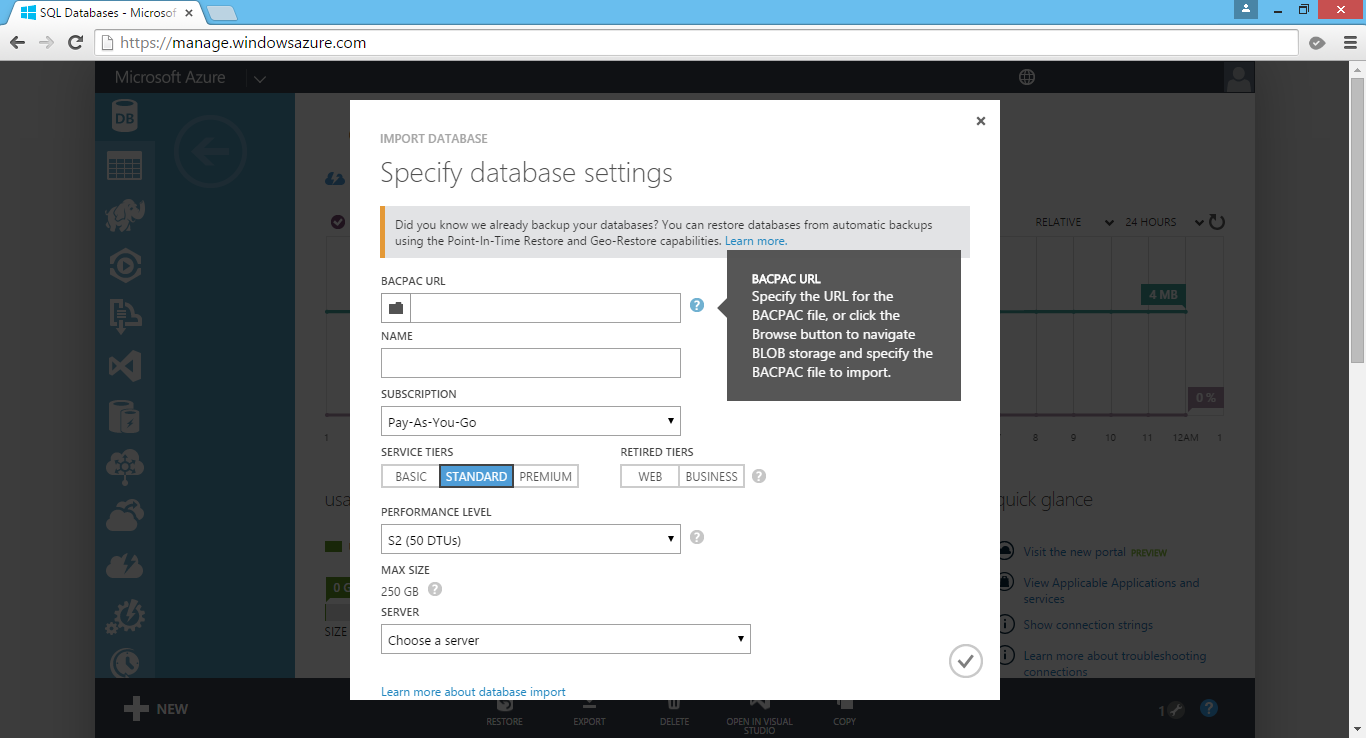
Later, we can also create a new database using the BACPAC file which is being generated by the Export function. In the Azure Management Portal, click New > Data Services > SQL Database > Import. This will open the Import Database dialog, as shown in the screenshot below.

Create a new database in Azure SQL Database by import BACPAC file.

Okai, that’s all for this post on Entity Framework, database, and Azure SQL Database. Thank you for your time and have a nice day!

Summer 2015 Self-Learning Project

This article is part of my Self-Learning in this summer. To read the other topics in this project, please click here to visit the project overview page.

Summer Self-Learning Banner

PageSpeed, Bundling, Minification, and Caching

After deploying our web application, it’s not the end of the story. There are still many tasks to do. One of them is to analyze and optimize our new website. Normally, I start with testing my website in Google PageSpeed Insights to understand about the website performance issues.

Oops, my new website only gets 57/100.

Unfortunately, as shown in the screenshot above, my new website seems having a poor performance. Before finding out the ways to improve the performance, I would like to share what the 3 passed rules are.

The Things Done Right

Improve Server Response Time

Yup, the first thing that affects our web page loading is of course the server response speed. Google recommended to keep the server response time under 200ms.

My homepage loads about 600ms but PageSpeed Insights still let me pass. =)

Avoid Landing Page Redirects

Redirects will increase the loading time of the web page because there will be more HTTP request-response cycle.

In the old days when responsive design was still not popular, redirect is the way we used to bring users from desktop view to the mobile view of our website. So, when users first came in from “www.example.com”, they would be brought to “www.example.com/mobile/index.aspx”.

However, sometimes we still need to do redirects in our website, especially when we have a new web page to replace the old one. We may do redirects also when we are changing the domain name of our website.

There are two major types of HTTP Redirection.

  • 301 (Permanent Redirect): The requested resource has been assigned a new permanent URI and any future references to the resource should be done using the new URI;
  • 302 (Temporary Redirect): The requested resource resides temporarily under different URI.

Hence, 301 Redirect is able to pass the PageRank of the old page to the new page. However, for 302 Redirect, due to the fact that it’s a temporary redirect, the old page will still retain its PageRank and the new page will not accumulate any. So for mobile view redirect, we should use 302 Redirect, as recommended by Google also.

So, how do we do 301 Redirect and 302 Redirect in ASP .NET?

By default, Response.Redirect uses 302 Redirect. This is because the common use of Response.Redirect is just to move users to another page after a postback. Of course, we can change it to use 301 Redirect as follows.

Response.Redirect(newUrl, false);
Response.StatusCode = 301;
Response.End();

In ASP .NET 4.0, we have an alternative way of doing 301 Redirect which is using HttpResponse.RedirectPermanent method.

Besides, we can also do 301 Redirect in URL Rewrite in web.config.

<rewrite>
    <rules>
        <rule name="Redirect to www" stopProcessing="true">
            <match url=".*" />
            <conditions>
                <add input="{HTTP_HOST}" pattern="^domain.com$" />
            </conditions>
            <action type="Redirect" url="http://www.domain.com/{R:0}" redirectType="Permanent" />
        </rule>
    </rules>
</rewrite>

Prioritize Visible Content

One of the key principles of prioritizing visible content is to make sure the above-the-fold content is able to be loaded first.

What does “Above-the-fold Content” (ATF) mean? I found some very interesting explanation about it. ATF Content typically means the content above where the newspaper is folded horizontally. In web design context, ATF Content refers to any content we immediately see without scrolling when the page is first loaded.

Hence, in order to make sure ATF Content to be loaded first, we must have an inline part of the CSS which is responsible for styling the ATF Content.

Thanks, ASP .NET 4.5!

In ASP .NET 4.5, there are two new techniques, Bundling and Minification, introduced to help improving the web page loading time. Hence, a web project done in ASP .NET 4.5 with good back-end design should have all the 3 rules above passed in Google PageSpeed Insights.

The Things Can Be Considered Fixing

Minify CSS and JS

Here I will just use CSS as reference. Minification of JS is actually similar to minifying CSS.

Normally we will have more than one CSS references. If we would like to reference all of them, then we will make one HTTP request for each of them.

<link href='/Content/style1.css' rel='stylesheet' />
<link href='/Content/style2.css' rel='stylesheet' />
...
<link href='/Content/stylen.css' rel='stylesheet' />

In ASP .NET 4.5, we can use Bundling+Minification feature to make the loading time of CSS files shorter.

Bundling is able to improve the load time by reducing the number of requests to the server. Minification will reduce the size of requested CSS files. For example, if we want to reference all the CSS files in the “Content” folder, we will do it as follows. Doing so will tell ASP .NET to scan the “Content” folder, bundle and minify the CSS files within it. A single HTTP response with all of the CSS content will then be sent back to the browser.

<link href='/Content/css' rel='stylesheet' />

By default, CSS files are sorted alphabetically. If there are reset.css and normalize.css, the two files will go before any other files.

Alternatively, we can also do it in C# to tell ASP .NET which CSS files need to be in bundle as well as their ordering.

bundles.Add(new StyleBundle("~/Content/css").Include(
    "~/Content/bootstrap.css",
    "~/Content/animate.css",
    "~/Content/font-awesome.css",
    "~/Content/site.css"));

By default, Bundling will select “.min” file for release when both “style1.css” and “style1.min.css” exist. In debug mode, then it will select non-“.min” version. This is important because Bundling seems to have problem with bootstrap.css.

Bundling doesn’t work well with @import, @keyframes, @-webkit-keyframes that are in the CSS files. Hence, sometimes Bundling+Minification will return some error messages as follows when you view the source of /Content/css on browser.

/* Minification failed. Returning unminified contents.
    (3272,1): run-time error CSS1019: Unexpected token, found '@import'
    (3272,9): run-time error CSS1019: Unexpected token, found 'url("https://fonts.googleapis.com/css?family=Roboto:300,400,500,700")'
    (3278,83211): run-time error CSS1019: Unexpected token, found '@-webkit-keyframes'
    (3278,83255): run-time error CSS1035: Expected colon, found '{'
    (3278,83406): run-time error CSS1019: Unexpected token, found '@keyframes'
    ...
    (3672,3): run-time error CSS1062: Expected semicolon or closing curly-brace, found '0%'
    (4246,11): run-time error CSS1036: Expected expression, found ';'
*/

So one of the solutions suggested on Stack Overflow is to include both bootstrap.css and bootstrap.min.css in the same “Content” folder so that Bundling+Minification will not try (and then fail) to minify bootstrap.css itself. Instead, it will just pickup the existing bootstrap.min.css. However, we don’t need to change anything to the C# code above, so it still looks the same.

bundles.Add(new StyleBundle("~/Content/css").Include(
    "~/Content/bootstrap.css",
    "~/Content/animate.css",
    "~/Content/font-awesome.css",
    "~/Content/site.css"));

One disadvantage of doing so is that if there is any changes done to the bootstrap.css, we have to manually minify it and update the bootstrap.min.css because Minification will not do minification for us but it will just pickup the bootstrap.min.css.

For JavaScript, we will do the same to add multiple JS files into the bundle.

bundles.Add(new ScriptBundle("~/bundles/jquery").Include(
    "~/Scripts/jquery-{version}.js",
    "~/Scripts/jquery-ui.js",
    "~/Scripts/jquery.datetimepicker.js"));

The {version} wildcard above will automatically pick the appropriate version of jQuery available in the “Scripts” folder. Hence, we can happily use NuGet to update jQuery to a newer version without changing our C# code.

In the ASP .NET MVC template, there are actually two JavaScript bundles, “~/bundles/jquery” and “~/bundles/jqueryval”. The reason of doing Bundle Partitioning is to make sure the page doesn’t get the resources that it doesn’t need.

Minify HTML

To minify HTML and Razor views, there are a few options.

One is to use Meleze.Web NuGet Package. It will process the HTML and Razor views on the fly.

Another one is using ASP .NET HTML Minifier which can be included as part of the build process so that the files are minified before being deployed in Visual Studio. The simple command tool is open source and the project can be found on Github.

Enable Compression

It’s great that nowadays all the modern browsers support and automatically negotiate Gzip compression for all HTTP requests. Hence, enabling Gzip compression is able to reduce the size of transferred response.

IIS supports Static Compression and Dynamic Compression. Static Compression is used to compress static resources such as CSS, JS, images. It will compress each file once and then save the compressed file to disk. In IIS 8, Static Compression is enabled by default.

A way to check if the response is Gzipped.

Enabling Dynamic Compression will help to compress the dynamic content and thus always gives us more efficient use of bandwidth (with higher CPU usage). I will not talk about Dynamic Compression here because Google PageSpeed Insights currently emphasizes more on the static file compression. So by using IIS 8, this shouldn’t be an issue.

The reason why I have this compression issue is because of the external files used are not Gzipped. However, I will leave it there first.

The Things That Should Be Fixed

Leverage Browser Caching

Fetching resources over the network is slow. Hence, it is always a good idea to cache our static resources by setting an expiry date in the HTTP headers for static resources.

Bundling in ASP .NET will help to set the HTTP Expire Header of CSS and JS files one year from when the bundle is created.

Bundles set the HTTP Expires Header one year from when the bundle is created.

Alternatively, we can do so in web.config in IIS 7 and above, as shown in the sample below.

<configuration>
    <system.webServer>
        <staticContent>
            <clientCache httpExpires="Fri, 1 Jan 2016 00:00:00 GMT" cacheControlMode="UseExpires" />
        </staticContent>
    </system.webServer>
</configuration>

With this setting, all static content, such as CSS, JS, and images, will now have an expires HTTP header set to next year (2016).

Optimize Image and Eliminate Render-Blocking CSS/JS

I won’t discuss both of them here because to me they are not really good suggestions, especially the CSS Delivery Optimization recommendation from Google.

The document says that “If the external CSS resources are small, you can insert those directly into the HTML document, which is called inlining. Inlining small CSS in this way allows the browser to proceed with rendering the page.” This will actually split the CSS code into multiple files and eventually make the whole project harder to maintain.

For the images, I think there is no need to compress them. Doing image browser caching should be enough to make the web page loads fast already.

So, I will just skip these two parts.

Summer 2015 Self-Learning Project

This article is part of my Self-Learning in this summer. To read the other topics in this project, please click here to visit the project overview page.

Summer Self-Learning Banner

Protect Your ASP .NET Applications

ASP .NET MVC - Entity Framework - reCAPTCHA - OWASP - JSON

Here is a just a few items that I learnt on how to protect and secure my web applications in recent ASP .NET projects.

reCAPTCHA in Razor

CAPTCHA is an acronym for “Completely Automated Public Turing test to tell Computers and Humans Apart”.

CAPTCHA is a program to find out if the current user is whether a human or a robot by asking the user to do some challenge-response tests. This feature is important in some websites to prevent machine to, for example, auto login to the websites, to do online transactions, to register as members, and so on. Luckily, it’s now very easy to include CAPTCHA in our ASP .NET MVC web applications.

Register your website here to use reCAPTCHA: https://www.google.com/recaptcha/admin.

reCAPTCHA is a free Google CAPTCHA service that comes in the form of widget that can be added to websites easily. So, how do we implement reCAPTCHA in our ASP .NET MVC sites?

The library that I use is called ReCaptcha for MVC5, which can be downloaded from Codeplex. With the help of it, I am able to easily plugin reCAPTCHA in my MVC5 web applications.

After adding ReCaptcha.Mvc5.dll in my project, I will need to import its namespace to the Razor view of the page which needs to have reCAPTCHA widget.

@using ReCaptcha.Mvc5;

To render the reCAPTCHA widget in, for example, a form, we will do the following.

< div class="form-group">
    @Html.LabelFor(model => model.recaptcha_response_field, new { @class = "control-label col-md-2" })
    < div class="col-md-10">
        <!--Render the recaptcha-->
        @Html.reCAPTCHA("<public key here>")
    < /div>
 < /div>

The public key can be retrieved from the official reCAPTCHA page after you register your website there.

reCAPTCHA Widget on Website

In the code above, there is a field called recaptcha_response_field, which will be added in our model class as demonstrated below.

public class RegistrationViewModel : ReCaptchaViewModel
{
    ...

    [Display(Name = "Word Verification")]
    public override string recaptcha_response_field { get; set; }
}

To do verification in the controller, we will have the following code to help us.

[HttpPost]
[ValidateAntiForgeryToken]
public async Task<ActionResult> Register(RegistrationViewModel registrationVM)
{
    ...

    if (!string.IsNullOrEmpty(checkoutVM.recaptcha_response_field))
    {
        // Verify the recaptcha response.
        ReCaptchaResponse response = 
            await this.verifyReCAPTCHA(registrationVM, "<private key here>", true);

        if (response.Success)
        {
            // Yay, the user is human!
        } 
        else 
        {
            ModelState.AddModelError("", "Please enter correct verification word.");
        }
    }
}

The private key can also be found in the official reCAPTCHA page after you have submitted your website.

After doing all these, you are now be able to have a working reCAPTCHA widget in your website.

XSRF: Cross-Site Request Forgery

In the controller code above, there is one attribute called ValidateAntiForgeryToken. The purpose of this attribute is to prevent XSRF by adding anti-forgery tokens in both a hidden form field and the cookies to the server.

I draw a graph for me to better explain about what XSRF is.

XSRF (Cross-Site Request Forgery)

Steps are as follows.

  1. The user logs in to, for example, a bank website.
  2. The response header from the bank site will contain the user’s authentication cookie. Since authentication cookie is a session cookie, it will only be cleared when the process ends. Thus, until that time, the browser will always include the cookie with each request to the same bank website.
  3. The attacker sends to the user a link and somehow encourage the user to click on it. This causes sending a request to the attacker’s server.
  4. The attacker website has the following form.
    <body onload="document.getElementById('attack-form').submit()">
        <form id="fm1" action="https://bank.com/TransferMoney" method="post">
            <input name="transferTo" value="attackerAccount" />
            <input name="currency" value="USD" />
            <input name="money" value="7,000,000,000" />
        </form>
    </body>
  5. Because of Step 4, the user will be forced to send a request to the bank website to transfer money to attacker’s account with the user’s authentication cookie.

Hence, the attribute ValidateAntiForgeryToken helps to avoid XSRF by checking both the cookie and form have anti-forgery tokens and their values match.

Mass-Assignment Vulnerability and Over-Posting Attack

Few years ago, Github was found to have Mass-Assignment Vulnerability. The vulnerability allows people to perform Over-Posting Attack to the site so that the attackers can modify data items which are not normally allowed to access. Due to the fact that ASP .NET MVC web application is using Model Binding, the same vulnerability can happen in ASP .NET MVC environment as well.

You want to control what is being passed into the binder.

There are two my personal favourite solutions to avoid Over-Posting Attack.

One is using Bind attribute in the controller method. For example, in order to prevent users editing the value of isAdmin when they update their profile, I can do something as follows.

[HttpPost]
public ViewResult Edit([Bind(Exclude = "IsAdmin")] User user)
{
    ...
}

Alternatively, we can also use “Include” to define those fields that should be included in the binding.

Second solution is using view model. For example, the following class will not contain properties such as IsAdmin which are not allowed to be edited in the form post of profile edit.

public class UserProfileUpdateViewModel
{
    public string FirstName { get; set; }
    public string LastName { get; set; }
    ...
}

XSS: Cross-Site Scripting

According to OWASP (Open Web Application Security Project), XSS attacks

…are a type of injection, in which malicious scripts are injected into otherwise benign and trusted web sites… Flaws that allow these attacks are quite widespread and occur anywhere a web application uses input from a user within the output it generates without validating or encoding it.

Kirill Saltanov from NUS is explaining to guests about XSS during 5th STePS event.

Currently, by default ASP .NET will throw exception if potentially dangerous content is detected in the request. In addition, the Razor view engine protect us against most of the XSS attacks by encoding data which is displayed to web page via the @ tag.

In View, we also need to encode any user-generated data that we are putting into our JavaScript code. Starting from ASP .NET 4.0, we can call HttpUtility.JavaScriptStringEncode. HttpUtility.JavaScriptStringEncode helps to encode a string so that it is safe to display and characters are escaped in a way that JavaScript can understand.

In order to avoid our database to have malicious markup and script, we need to encode the user inputs in the Controller as well using Server.HtmlEncode.

[AllowHtml]

There are some cases where our web application should accept HTML tags. For example, we have a <textarea> element in our blogging system where user can write the content of post, then we need to skip the default checking of ASP .NET.

To post HTML back to our Model, we can simply add the [AllowHtml] attribute to the corresponding property in the Model, for example

public class BlogPost {
    [Key]
    public int ID { get; set; }
    ...
    [AllowHtml]
    public string Content { get; set; }
}

Then in the View, we will need to use @Html.Raw to tell Razor not to encode the HTML markup.

@Html.Raw(post.Content)

Wait… Won’t this make XSS attack possible in our website? Yup, of course. So, we must be very careful whenever we are trying to bypass the Razor encoding. The solution will then be using AntiXSS encoding library from Microsoft.

AntiXSS uses a safe list approach to encoding. With its help, we will then able to remove any malicious script from the user input in the Controller, as demonstrated below.

[HttpPost]
[ValidateAntiForgeryToken]
public ActionResult CreatePost(BlogPost post)
{
    if (ModelState.IsValid)
    {
        ...
        post.Content = Sanitizer.GetSafeHtmlFragment(post.Content);
        ...
        db.BlogPosts.Add(post);
        db.SaveChanges();
        return RedirectToAction("Index");
    }
    return View(post);
}

ASP .NET Request Validation

Previously in the discussion of XSS, we know that by default ASP .NET throws exception if potentially dangerous content is detected in the request. This is because of the existence of ASP .NET Request Validation.

However, according to OWASP, Request Validation should not be used as our only method of XSS protection because it does not guarantee to catch every type of invalid input.

HttpOnly Cookies

In order to reduce the risk of XSS, popular modern browsers have added a new attribute to cookie called HttpOnly Cookie. This new attribute specifies that a cookie is not accessible through script. Hence, it prevents the sensitive data contained in the cookie can be sent to attacker’s side via malicious JavaScript in XSS attack.

When a cookie is labelled as HttpOnly, it tells the browser that the cookie should only be accessed by the server. It is very easy to check which cookies are HttpOnly in the developer tool of modern browsers.

Microsoft Edge F12 Developer Tools can tell which are the HttpOnly cookies.

So, how do we create HttpOnly cookies in ASP .NET web applications? Just add a new line to set HttpOnly attribute of the cookie to true is fine.

HttpCookie myCookie = new HttpCookie("MyHttpOnlyCookie");
myCookie["Message"] = "Hello, world!";
myCookie.Expires = DateTime.Now.AddDays(30);
myCookie.HttpOnly = true;
Response.Cookies.Add(myCookie);

Alternatively, HttpOnly attribute can be set in web.config.

<httpCookies httpOnlyCookies="true" ...>

However, as pointed out in OWASP, if a browser is too old to support HttpOnly cookie, the attribute will be ignored by the browser and thus the cookies will be vulnerable to XSS attack. Also according to MSDN, HttpOnly does not prevent attacker with access to the network channel from accessing the cookie directly, so it recommends the use of SSL in addition of HttpOnly attribute.

HttpOnly Cookie was introduced in 2002 in IE6. Firefox 2.0.0.5 only supported HttpOnly attribute in 2007, 5 years later. However, soon people realized that in Firefox, there was still a bug in the HttpOnly implementation. Firefox allowed attackers to do an XMLHttpRequest to get the cookie values from the HTTP Response headers. 2 years later, in 2009, Mozilla finally fixed the bug. Since then, the XMLHttpRequest can no longer access the Set-Cookie and Set-Cookie2 headers of any response no matter the HttpOnly attribute is set to true or not.

Browserscope provides a good overview about the security functionalities in major browsers.

SQL Injection and Entity SQL

When I first learned SQL in university, I always thought escaping user inputs helped to prevent SQL Injection. This approach doesn’t work actually. I just read an article written by Steve Friedl regarding how escaping the input strings does not protect our applications from being attacked by SQL Injection. The following is the example Steve gave.

SELECT fieldlist
FROM table
WHERE id = 23 OR 1=1;  -- Boom! Always matches!

When I was working in the Summer Fellowship Programme, I started to use Parameterized SQL.

SqlConnection conn = new SqlConnection(connectionString); 
conn.Open(); 
string sql = "SELECT fieldlist FROM table WHERE id = @id";
SqlCommand cmd = new SqlCommand(sql); 
cmd.Parameters.Add("@id", SqlDbType.Int, id); 
SqlDataReader reader = cmd.ExecuteReader();

This approach provides a huge security performance benefits.

In January, I started to learn Entity Framework. In Entity Framework, there are three types of queries:

  • Native SQL
  • Entity SQL
  • LINQ to Entity

In the first two types, there is a risk of allowing SQL Injection if the developers are not careful enough. Hence, it’s recommended to use parameterized queries. In addition, we can also use Query Builder Methods to safely construct Entity SQL, for example

ObjectQuery<Flight> query =
    context.Flights
    .Where("it.FlightCode = @code",
    new ObjectParameter("code", flightCode));

However, if we choose to use LINQ to Entity, which does not compose queries by using string manipulation and concatenation, we will not have the problem of being attacked by traditional SQL Injection.

JsonResult and JSON Hijacking

Using the MVC JsonResult, we are able to make our controller in ASP .NET MVC application to return Json. However, by default, ASP .NET MVC does not allow us to response to an HTTP GET request with a JSON payload (Book: Professional ASP .NET MVC 5). Hence, if we test the controller by just typing the URL directly in the browser, we will receive the following error message.

This request has been blocked because sensitive information could be disclosed to third party web sites when this is used in a GET request. To allow GET requests, set JsonRequestBehavior to AllowGet.

Since the method only accepts POST requests, unless Cross-Origin Resource Sharing (CORS) is implemented, the browser will be able to protect our data from returning the Json result to other domains.

This is actually a feature introduced by ASP .NET MVC team in order to mitigate a security threat known as JSON Hijacking. JSON Hijacking is an attack similar to XSRF where attacker can access cross-domain JSON data which is returned as array literals.

The reason why “returning JSON data as array” is dangerous is that although browsers nowadays stop us from making cross domain HTTP request via JavaScript, we are still able to use a <script> tag to make the browser load a script from another domain.

<script src="https://www.bank.com/Home/AccountBalance/12"></script>

Due to the fact that a JSON array will be treated as a valid JavaScript script and can thus be executed. So, we need to wrap the JSON result in an object, just like what ASP .NET and WCF do. The ASP.NET AJAX library, for example, automatically wraps JSON data with { d: [] } construct to make the returned value to become an invalid JavaScript statement which cannot be executed:

{"d" : ["balance", "$7,000,000,000.00"] }

So, to avoid JSON Hijacking, we need to

  1. never return JSON array
  2. not allow HTTP GET request to get the sensitive data

Nowadays, even though JSON Hijacking is no longer a known problem in modern browsers, it is still a concern because “you shouldn’t stop plugging a security hole just because it isn’t likely to be exploited“.

By the way, GMail was successfully exploited via JSON Hijacking. =)

Summer 2015 Self-Learning Project

This article is part of my Self-Learning in this summer. To read the other topics in this project, please click here to visit the project overview page.

Summer Self-Learning Banner

PRG Design Pattern

PRG stands for Post-Redirect-Get, a web development design pattern which targets to avoid duplicate form submissions because of refreshing the web page.

Currently, in most of the modern browsers, when we refresh the web page right after we submit a form in the page, we will receive a confirmation alert box asking if we confirm want to re-submit the same form.

The warning received when pressing F5 right after submitting a form on the page.

This can happen in an e-commerce website. If the customer accidentally pressed “Continue” button on the box to proceed, then there may be a duplicate online purchase. The confirmation box is good but it does not remove the risk of form re-submission.

To avoid all these issues, PRG web design pattern is introduced.

PRG design pattern can solve the problem of form re-submission.
PRG design pattern can solve the problem of form re-submission. (Image Credit: Wikipedia)

PRG and ASP .NET Web Form

In ASP .NET Web Form context, instead of returning a web page direct, we will do a Response.Redirect (302 Redirect) to a confirmation page (or redirect back to the original same page) first. So now user can safely refresh the result page without causing the form re-submission.

By using PRG design pattern, we will thus need to store the data somewhere so that the two web pages can communicate. For example, if we want to show the Receipt Order Number generated after the POST in the confirmation page, then we can store the number in Session variable.

PRG and ASP .NET MVC

In ASP .NET MVC, instead of using Response.Redirect, we will be using RedirectToAction. Then we will store the data in TempData for the next page to consume, for example.

Thoughts about PRG

PRG design patter is not good for every case having form submission involved. For example, if we have a report module that user can search by providing start date and end date, then it is fine to have form re-submission with every page refresh.

Summer 2015 Self-Learning Project

This article is part of my Self-Learning in this summer. To read the other topics in this project, please click here to visit the project overview page.

Summer Self-Learning Banner