It’s important to keep app secrets out of our codes. Most of the app secrets are however still found in .config files. This way of handling app secrets becomes very risky when the codes are on public repository.
Thus, they are people put some dummy text in the .config files and inform the teammates to enter their respective app secrets. Things go ugly when this kind of “common understanding” among the teammates is messed up.
The moment when your app secrets are published on Github public repo. (Image from “Kono Aozora ni Yakusoku o”)
Secret Manager Tool
So when I am working on the dotnet.sg website, which is an ASP .NET Core project, I use the Secret Manager tool.It offers a way to store sensitive data such as app secrets in our local development machine.
To use the tool, firstly, I need to add it in project.json as follows.
Due to the fact that the Secret Manager tool makes use of project specific configuration settings kept in user profile, we need to specify a userSecretsId value in the project.json as well.
After that, I can start storing the app secrets in the Secret Manager tool by entering the following command in the project directory.
$ dotnet user-secrets set AppSettings:MeetupWebApiKey ""
As shown in the example above, the name of the secret is “AppSettings:MeetupWebApiKey”. This is because in the appsettings.json, I have the following.
{
    "AppSettings": {
        "MeetupWebApiKey": ""
    },
    ...
}
Alright, now the API key is stored in the Secret Manager tool, how is it accessed from the code?
By default, appsettings.json is already loaded in startup.cs. However, we still need to add the following bolded lines in startup.js to enable User Secrets as part of our configuration in the Startup constructor.
public class Startup
{
    public Startup(IHostingEnvironment env)
    {
        var builder = new ConfigurationBuilder()
            .SetBasePath(env.ContentRootPath)
            .AddJsonFile("appsettings.json", optional: true, reloadOnChange: true)
            .AddJsonFile($"appsettings.{env.EnvironmentName}.json", optional: true);

        if (env.IsDevelopment())
        {
            builder.AddUserSecrets();
        }

        builder.AddEnvironmentVariables();

        Configuration = builder.Build();
    }
    ...
}
Then in the Models folder, I create a new class called AppSettings which will be used later when we load the app secrets:
public class AppSettings
{
    public string MeetupWebApiKey { get; set; }

    ...
}
So, let’s say I want to use the key in the HomeController, I just need to do the following.
public class HomeController : Controller
{
    private readonly AppSettings _appSettings;

    public HomeController(IOptions appSettings appSettings)
    {
        _appSettings = appSettings.Value;
    }

    public async Task Index()
    {
        string meetupWebApiKey = _appSettings.MeetupWebApiKey;
        ...
    }

    ...
}
Azure Application Settings
Just now Secret Manager tool has helped us on managing the app secrets in local development environment. How about when we deploy our web app to Microsoft Azure?
For dotnet.sg, I am hosting the website with Azure App Service. What so great about Azure App Service is that there is one thing called Application Settings.
Application Settings option is available in Azure App Service.
The web development team in my office at Changi Airport is a rather small team. We have one designer, one UI/UX expert, and one front-end developer. Sometimes, when there are many projects happening at the same time, I will also work on the front-end tasks with the front-end developer.
In the dotnet.sg project, I have chance to work on front-end part too. Well, currently I am the only one who actively contribute to the dotnet.sg website anyway. =)
Official website for Singapore .NET Developers Community: http://dotnet.sg
Tools
Unlike the projects I have in work, dotnet.sg project allows me to choose to work with tools that I’d like to explore and tools that helps me work more efficiently. Currently, for the front-end of dotnet.sg, I am using the following tools, i.e.
npm;
Yeoman;
Bower;
Gulp.
Getting Started
I am building the dotnet.sg website, which is an ASP .NET Core web app, on Mac with Visual Studio Code. Hence, before I work on the project, I have to download NodeJs to get npm. The npm is a package manager that helps to install tools like Yeoman, Bower, and Gulp.
After these tools are installed, I proceed to get a started template for my ASP .NET Core web app using Yeoman. Bower will then follow up immediately to install the required dependencies in the web project.
Starting a new ASP .NET Core project with Yeoman and Bower.
From Bower with bower.json…
Working on the dotnet.sg project helps me to explore more. Bower is one of the new things that I learnt in this project.
To develop a website, I normally make use of several common JS and CSS libraries, such as jQuery, jQuery UI, Bootstrap, Font Awesome, and so on. With so many libraries to manage, things could be quite messed up. This is where Bower comes to help.
Bower helps me to manage the 3rd party resources, such as Javascript libraries and frameworks, without the need to locate the script files for each resources myself.
For example, we can do a search of a library we want to use using Bower.
Search the Font Awesome library in Bower.
To install the library, for example Font Awesome in this case, then with just one command, we can easily do it.
$ bower install fontawesome
The libraries will be installed in the directory as specified in the Bower Configuration file, .bowerrc. By default, the libraries will be located at the lib folder in wwwroot.
Downloaded libraries will be kept in wwwroot/lib as specified in .bowerrc.
Finally, to check the available versions of a library, simply use the following command to find out more about the library.
$ bower info fontawesome
I like Bower because checking bower.json into the source control ensures that every developer in the team has exactly the same code. On top of that, Bower also allows us to lock the libraries to a specific version. This will thus prevent some developers to download some different version of the same library from different sources themselves.
…to npm with package.json
So, now some of you may wonder, why are we using Bower when we have npm?
For ASP .NET Core project, I face a problem on referring to node_module from the View. Similar as Bower, npm will position the downloaded packages in a local folder also. The folder turns out to be node_module, which is on the same level as wwwroot folder in the project directory.
As ASP .NET Core serves the CSS, JS, and other static files from the wwwroot folder which doesn’t have node_module in it, the libraries downloaded from npm cannot be loaded. One way will be using Gulp Task but that one is too troublesome for my projects so I choose not to go that way.
Please share with me how to do it with npm in an easier way than with Bower, if you know any. Thanks!
However, the SCSS compilation is something I don’t know how to do it without using Gulp (Please tell me if you know a better way. Thanks!).
To add back Gulp to my ASP .NET Core project, I do the following four steps.
Create a package.json with only the two compulsory properties, i.e. name and version (Do this step only when package.json does not exist in the project directory);
After that, I just need to execute the following command to run gulp and changes made to the .scss files in the sass directory will trigger the Gulp Task to compile the SCSS to corresponding CSS.
Oh ya, in case you are wondering what is the difference between –save and –save-dev in the npm commands above, I like how it is summarized on Stack Overflow by Tuong Le, as shown below.
–save-dev is used to save the package for development purpose. Example: unit tests, minification.
–save is used to save the package required for the application to run.
Conclusion
I once heard people saying that web developers were the cheap labour in software development industry because they are still having the mindset that web developers just plug-and-play modules on WordPress.
After working on the dotnet.sg project and helping out in front-end development at work, I realize that web development is not an easy plug-and-play job at all.
When my applications were hosted on Windows Azure Virtual Machines (VM), we stored the images uploaded via our web applications in the hard disks of the VMs (except the temporary disk). However, when we started load balancing, we soon encountered a problem that the uploaded images were only found in one of the VMs. So we needed to find a centralized storage for those images.
Recently, when we are using Azure PaaS (aka Cloud Service), even without load balancing, we already encounter the same issue. That is simply because the hard drives used in Cloud Service instances are not persistent. Hence, a persistent file storage on the cloud is needed.
There are two types of blob, Page Blob and Block Blob. Page Blob is commonly used for storing VHD files for VMs because it is optimized for random read and write operations.
The maximum size for a Block Blob is 64 MB. Hence, if the uploaded file is more than 64 MB, we must upload it as a set of blocks; otherwise, we will receive status code 413 (Request Entity Too Large). For my web applications, there is no need for uploading an image which is more than 5MB most of the time. Hence, I can just limit the size of images before the user uploads them.
HttpPostedFileBase imageUpload;
...
if (imageUpload.ContentLength > 0 && imageUpload.ContentLength <= 5242880)
{
    //warn the user to resize the image
}
Let’s Try Uploading Images
I’m going to share how to upload more than one image to the Azure Blob Storage from an ASP .NET MVC 5 application. If you are going to upload just one image, simply remove the for loop and change List to just DBPhoto in the codes below.
First of all, I create a class to handle upload to Azure Storage operation.
public class AzureStorage
{
    public static async Task UploadAndSaveBlobAsync(
        HttpPostedFileBase imageFile, CloudBlobContainer container)
    {
        string blobName = Guid.NewGuid().ToString() +
            Path.GetExtension(imageFile.FileName);

        CloudBlockBlob imageBlob = container.GetBlockBlobReference(blobName);
        using (var fileStream = imageFile.InputStream)
        {
            await imageBlob.UploadFromStreamAsync(fileStream);
        }

        return imageBlob;
    }
}
So, in my controller, I have the following piece of code which will be called when an image is submitted via web page.
[HttpPost]
[ValidateAntiForgeryToken]
public async Task Create(
    [Bind(Include = "ImageUpload")] PhotoViewModel model)
{
    var validImageTypes = new string[] { "image/jpeg", "image/pjpeg", "image/png" };

    if (ModelState.IsValid)
    {
        if (model.ImageUpload != null && model.ImageUpload.Count() > 0)
        {
            var storageAccount = CloudStorageAccount.Parse
                (WebConfigurationManager.AppSettings["StorageConnectionString"]);

            var blobClient = storageAccount.CreateCloudBlobClient();
            blobClient.DefaultRequestOptions.RetryPolicy =
                new LinearRetry(TimeSpan.FromSeconds(3), 3);

            var imagesBlobContainer = blobClient.GetContainerReference("images");
            foreach (var item in model.ImageUpload)
            {
                if (item != null) {
                    continue;
                }

                if (validImageTypes.Contains(item.ContentType) &&
                    item.ContentLength > 0 && item.ContentLength <= 5242880)
                {
                    var blob = await AzureStorage.UploadAndSaveBlobAsync(item, imagesBlobContainer);
                    DBPhoto newPhoto = new DBPhoto();
                    newPhoto.URL = blob.Uri.ToString();
                    db.DBPhoto.Add(newPhoto);
                }
                else
                {
                    // Show user error message
                    return View(model);
                }
            }
            db.SaveChanges();
            ...
        }
        else
        {
            // No image to upload
        }
    }
    return View(model);
}
In the code above, there are many new cool things.
Firstly, it is the connection string to Azure Blob Storage, which I store in StorageConnectionString in web.config. The format for secure connection string is as follows.
Secondly, it’s LinearRetry. It is basically a retry policy which states how many times the program will retry and how much time needed between retries. In my case, it will only wait for 3 seconds after each try up to 3 tries.
Thirdly, I get the URL of the image on the Azure Blob Storage via blob.Uri.ToString() and store it into the database table. The URL will be used later for displaying the image as well as deleting the image.
Fourthly, I actually check to see if model.ImageUpload has null entries. This is because if I submit the form without any image to upload, model.ImageUpload has one entry. Not zero, but one. The only one entry is actually null. So if I don’t check to see whether the entry in model.ImageUpload is null, there will be an exception thrown.
The controller has such a long code. Luckily the code needed in the model and view is short and simple.
For the model PhotoViewModel, I have the following.
public class PhotoViewModel
{
    ...

    [Display(Name = "Current Images")]
    public List AvailablePhotos { get; set; }
}
For view, it is easy to allow selecting multiple files in the same view page. The “multiple = “true”” is to make sure more than one file can be selected in the File Explorer. You can omit this attribute if you only want at most one file being selected.
@Html.LabelFor(model => model.ImageUpload, new { style = "font-weight: bold;" })
@Html.TextBoxFor(model => model.ImageUpload, new { type = "file", multiple = "true" })
@Html.ValidationMessageFor(model => model.ImageUpload)
Image Size and HttpException
The image upload function looks fine. However, when images having size larger than a certain size is uploaded, HttpException will be thrown.
There is no way that having exception would be fun too! (Image Credit: Tari Tari)
What if we just change the if clause above to allow only at most 4MB of image being uploaded? This won’t work because the exception is already thrown before the if condition is reached.
Then, can we just increase the IIS limit from 4MB to, let’s say, 100MB or something bigger? Sure. This can work. However, it still doesn’t stop someone uploads something bigger than the limit. Also, it makes attackers easier to exhaust your server with big files. Hence, expanding the upload size restriction is not really a full solution.
If you are interested, there are many good articles online discussing about this problem. I highlight some interesting ones below.
I don’t really like the methods listed above, especially the 3rd and 4th options. It’s already too late to inform the user when the exception is thrown. Could we do something at client side before the images are being uploaded?
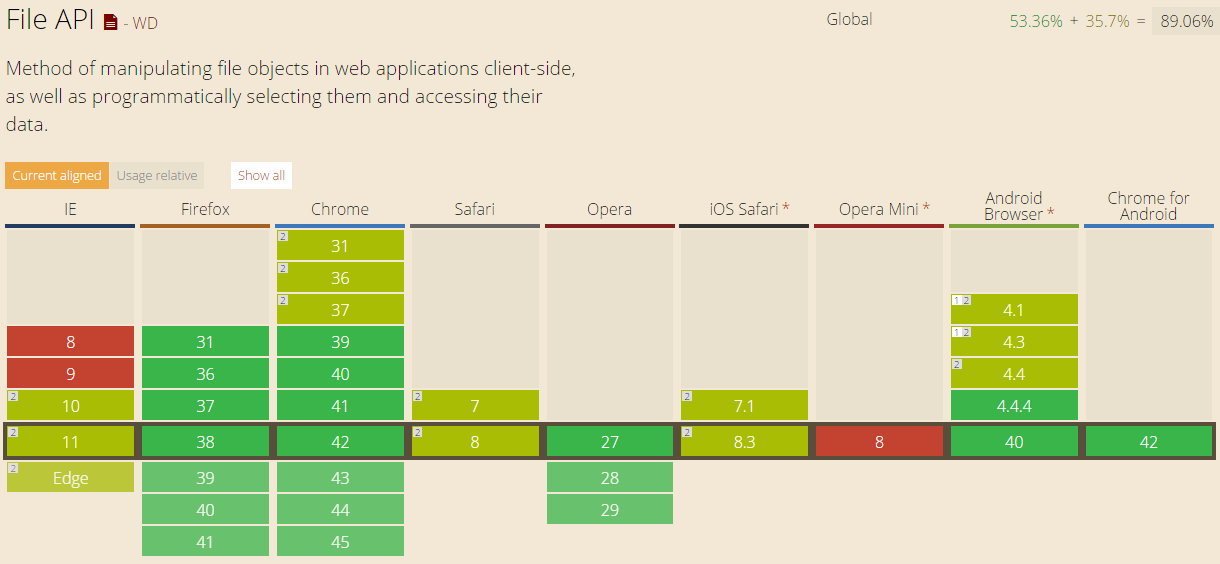
Luckily, we have File API in HTML 5. It allows to loop through the files in JavaScript to check their size. So, after the submit button is clicked, I will call a JavaScript method to check for the size of the images before they are being uploaded.
function IsFileSizeAcceptable() {
    if (typeof FileReader !== "undefined") {
        var filesBeingUploaded = document.getElementById('ImageUpload').files;
        for (var i = 0; i < filesBeingUploaded.length; i++) {
            if (filesBeingUploaded[i].size >= 4194304) { // Less than 4MB only
                alert('The file ' + filesBeingUploaded[i].name + ' is too large. Please remove it from your selection.');
                return false;
            }
        }
    }
    return true;
}
Secondly, I just pass in the Azure Storage URL of the image that I would like to remove and then call the DeleteBlobAsync method.
Uri blobUri = new Uri();
await AzureStorage.DeleteBlobAsync(blobUri, imagesBlobContainer);
Then the image will be deleted from the Azure Storage successfully.
Global.asax.cs and Blob Container
In order to have my application to create a blob container automatically if it doesn’t already exist, I add a few lines in Global.asax.cs as follows.
var storageAccount = CloudStorageAccount.Parse(
    WebConfigurationManager.AppSettings["StorageConnectionString"]);
var blobClient = storageAccount.CreateCloudBlobClient();
var imagesBlobContainer = blobClient.GetContainerReference("images");
if (imagesBlobContainer.CreateIfNotExists())
{
    imagesBlobContainer.SetPermissions(new BlobContainerPermissions
        {
            PublicAccess = BlobContainerPublicAccessType.Blob
        });
}
Write a Console Program to Upload File to Azure Storage
So, how is it done if we are developing a console application, instead of web application?
Windows Azure Storage NuGet Package needs to be installed first.
The codes below show how I upload an html file from my local hard disk to Azure Blob Storage. Then I can share the Azure Storage URL of the file to my friends so that they can read the web page.
Similar to what I do in web application, this is how I connect to the Storage account via https.
var azureStorageAccount = new CloudStorageAccount(
    new StorageCredentials("", ""), true);
This is how I access the container.
var blobClient = new CloudBlobClient(azureStorageAccount.BlobStorageUri, azureStorageAccount.Credentials);
var container = blobClient.GetContainerReference("myfiles");
Then the next thing I do is just upload the local file to Azure Storage by specifying the file name, content type, etc.
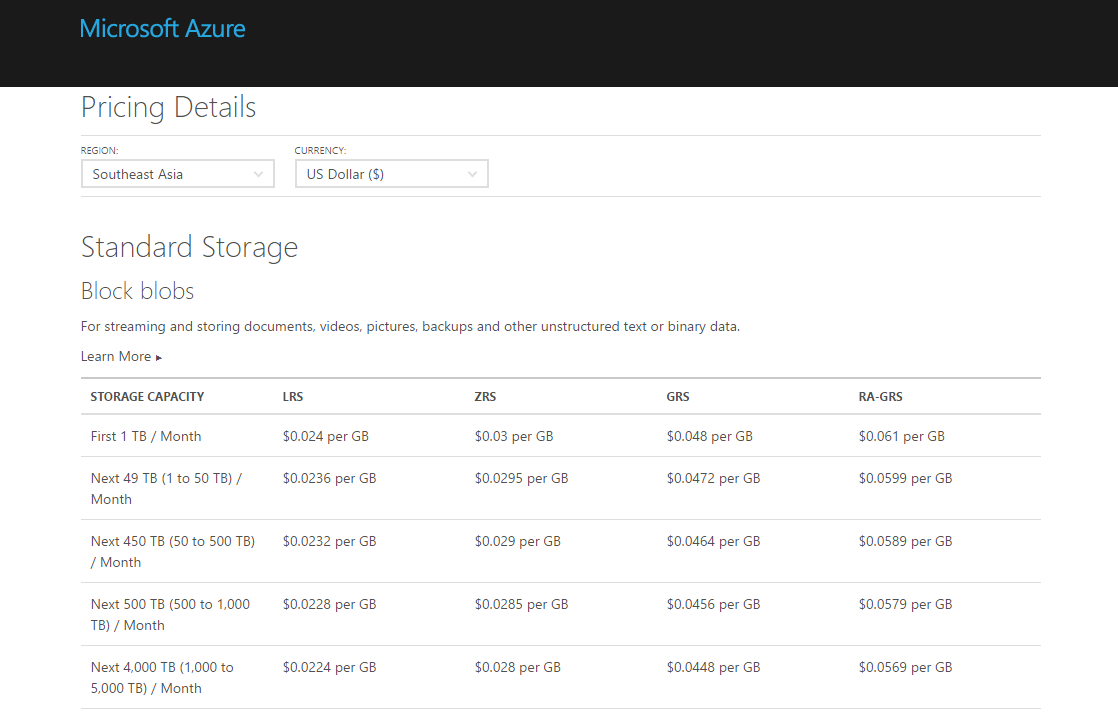
Hosting your files on cloud storage is sure convenience. However, Azure Blob Storage is not free. The following table shows the current pricing of Azure Block Blob Storage in South East Asia region. To get the latest pricing details, please visit Azure Storage Pricing page.
Often, we need to specify the resources users in our web application are allowed to access. For example, the sales report can only be seen by managers. The control panel can only be accessed by admin of the company.
Individual User Account
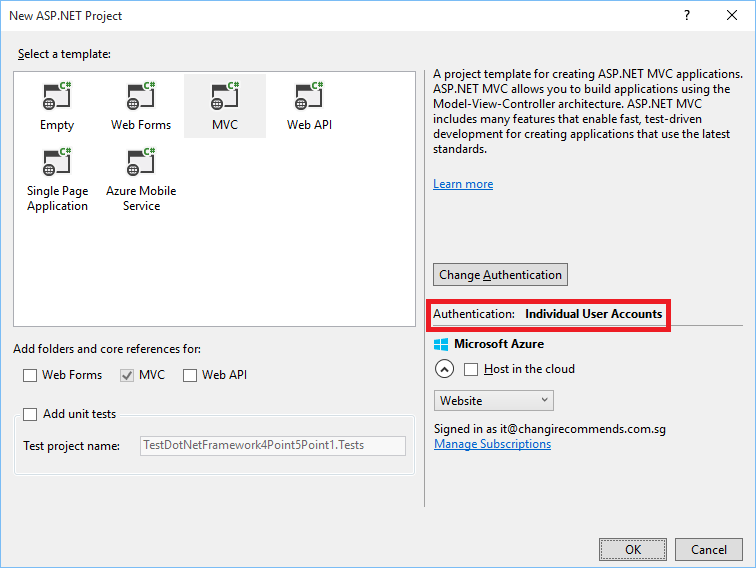
In Visual Studio 2013, when we first create an ASP .NET MVC5 project, we will always have the option to choose authentication mode. One of the available modes is Individual User Account.
Individual User Account is the default Authentication method.
Firstly, user can register on the web application by entering email and password. The application will then create an account with the password hashed and stored in the database. Next time, the user can just log in with email and password which will be verified by the ASP .NET Identity.
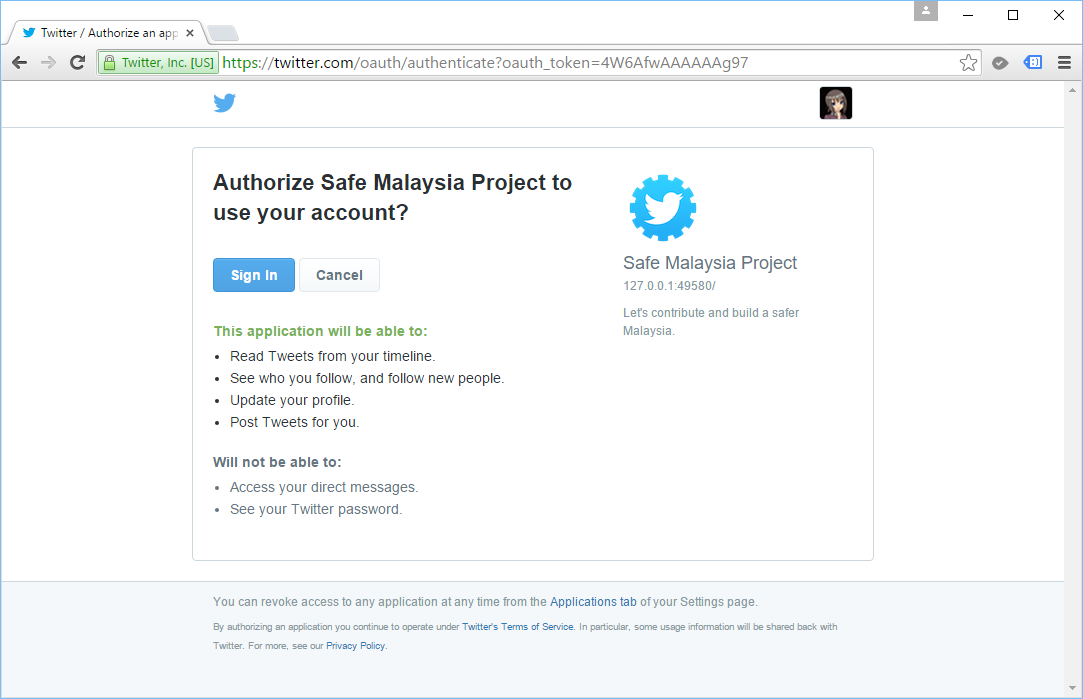
Secondly, user can also register and log in with external service, such as Facebook, Twitter, and Google+. Interestingly, no password will be stored in our database for this method. Instead, the user will be authenticated by signing in to the external service.
Login to our ASP .NET web application via Twitter.
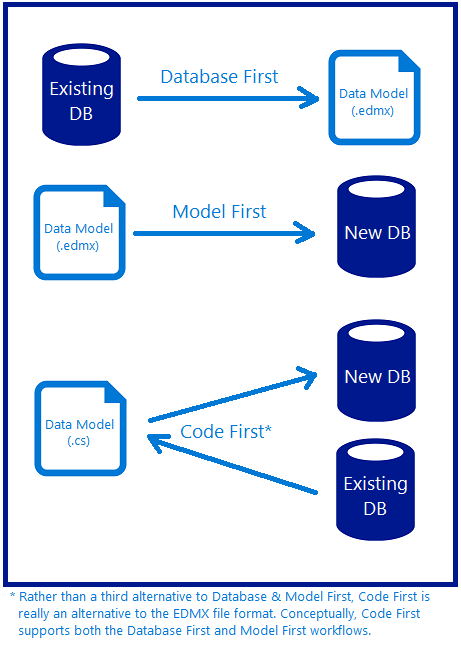
Because of Code First, in the first run of the application which has no database attached to it, EF6 will automatically create a database. If we have attempted to access any Identity functionality, there will be following 5 tables created automatically.
AspNetRoles
AspNetUserClaims
AspNetUserLogins
AspNetUserRoles
AspNetUsers
Role Based Security
Besides AspNetUserClaims table, the other four tables will be used in the role based security in our ASP .NET web application.
AspNetUsers table stores the profile information of a user, such as Email, Password, and Phone Number. To add more fields to the table, simply add the new fields in ApplicationUser class in IdentityModels.cs.
public class ApplicationUser : IdentityUser
{
    ...

    public string FirstName { get; set; }
    public string LastName { get; set; }
    public DateTime DateOfBirth { get; set; }
}
using Microsoft.AspNet.Identity;
using Microsoft.AspNet.Identity.EntityFramework;
...

internal sealed class Configuration : DbMigrationsConfiguration<ApplicationDbContext>
{
    ...

    protected override void Seed(ApplicationDbContext context)
    {
        var roleManager =
            new RoleManager<IdentityRole>(new RoleStore<IdentityRole>(context));

        //Create Role Admin if it does not exist
        if (!roleManager.RoleExists("Admin"))
        {
            roleManager.Create(new IdentityRole("Admin"));
        }
    }
}
var roleManager =
    new RoleManager<IdentityRole>(new RoleStore<IdentityRole>(context));
var roles = roleManager.Roles.ToList();

foreach(var role in roles) {
    var isInRole = await UserManager.IsInRoleAsync(userId, role);
    if(!isInRole)
    {
         await UserManager.AddToRoleAsync(userId, role);
    }
}
So, when user is accessing a page which is allowed for members having a certain role, we first need to check if the user is logging in with the following code.
if (Request.IsAuthenticated)
{
    ...
}
Inside the IF statement, we can continue to check if the user is having a certain role, as shown in the following code.
if (Request.IsAuthenticated && User.IsInRole("Admin"))
{
    ...
}
Alternatively, if we only allow the page to be accessed by Admin user, then we can use AuthorizeAttribute.
[Authorize(Roles="Admin")]
public ActionResult Report()
{
    . . .
}
Facebook OAuth2 Authentication
As said earlier, Individual User Account allows user to log in to the web application via external service, such as Facebook, as well. Before we can use the Facebook OAuth2 authentication, we need to register as a Facebook developer (Instruction here). I have already registered as a Facebook developer few years ago, so I just start directly from the Facebook Developers page.
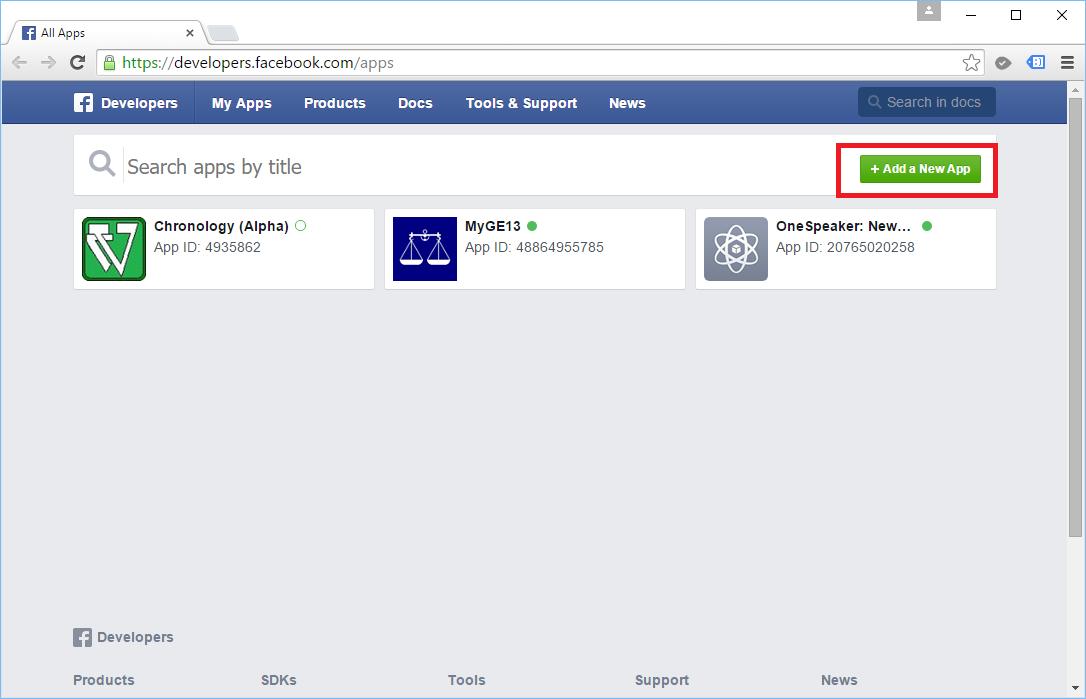
First of all, we will click on the “Add a New App” button to begin. Then we will choose “Website” as our platform.
Adding a new app in Facebook Developers.
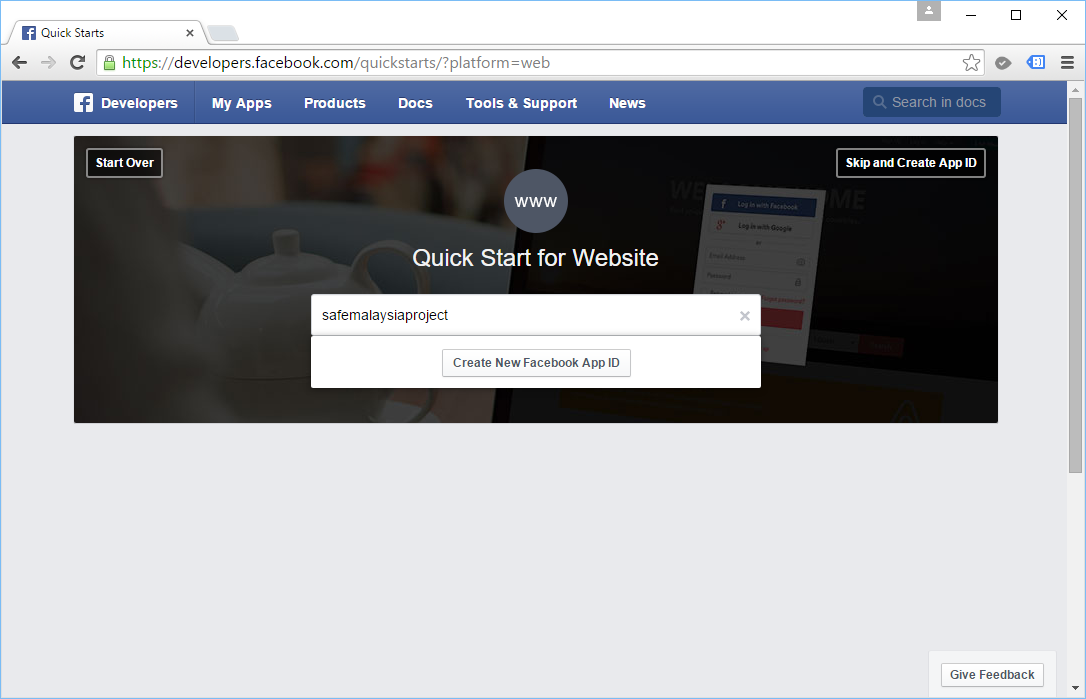
Secondly, we will key in name of our web application before we can create a new Facebook App ID. After that, we will select a category for our app.
Entering app name.
Thirdly, we have to provide the URL of our website. Fortunately, Facebook allows us to key in non-https localhost URL. =)
Yup, tell them about our site!
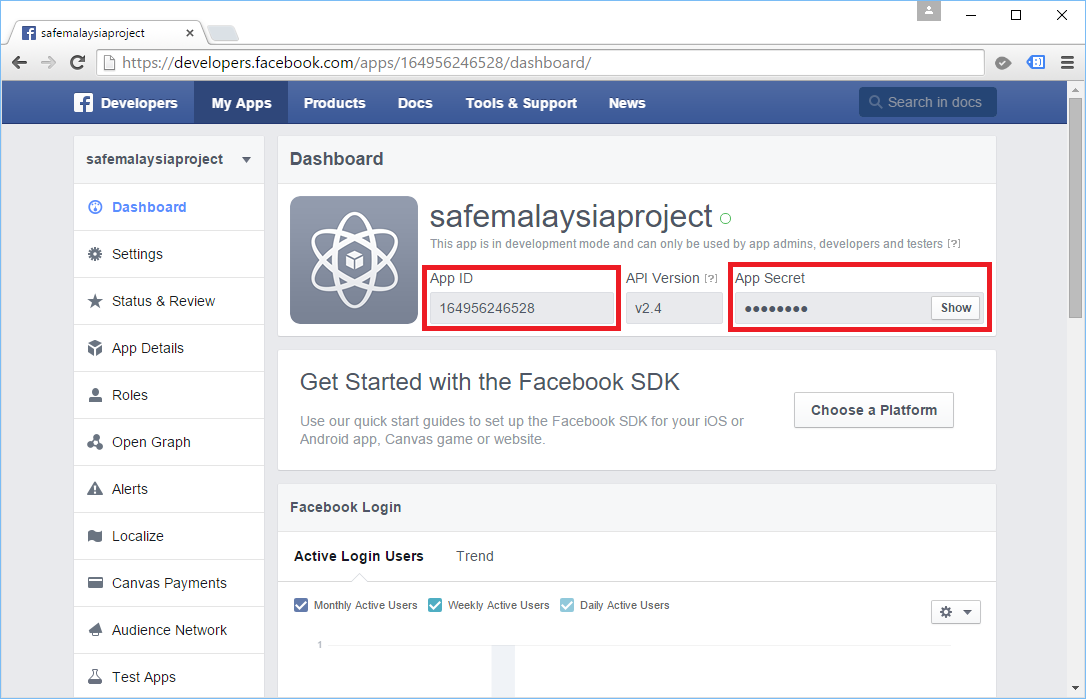
After that, we just scroll up to the top of the page and then click on the “Skip Quick Start” button. It will then bring us to a page with more details about the new Facebook App that we have just created.
Facebook App ID and App Secret can be found in the Dashboard of our app.
With the App ID and App Secret, we can now put in these values to the sample codes in Startup.Auth.cs to activate Facebook login. Yup, now user can just log in to our web application with their Facebook account!
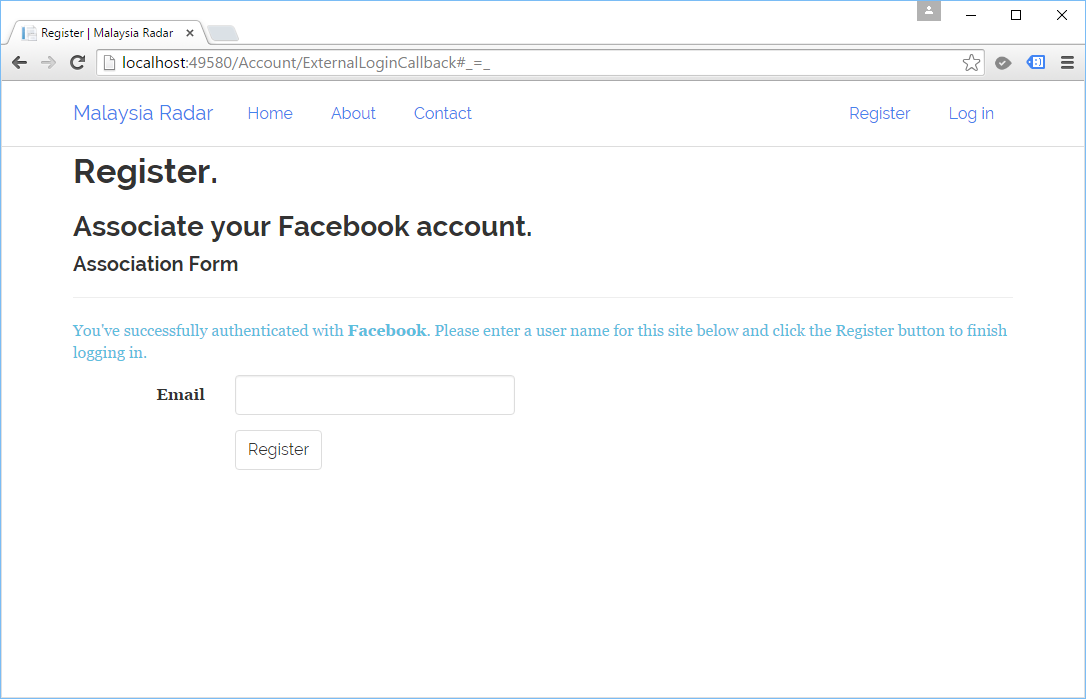
After logging in, user still need to enter their email address in order to finish the new user registration process on our website. Without doing this step, both the AspNetUserLogins and AspNetUsers tables in our database will have no record of this user.
Once the user finishes the registration, we will be able to see their info in both of the tables mentioned above. The AspNetUserLogins table will keep data such as Login Provider (Facebook), Provider Key (a reference key to Facebook users table), and UserId (which is a reference key to AspNetUsers table).
Interestingly, as Facebook says, “(The web app) may still have the data you share with them” even though we unlink the app from our Facebook account.
Link with Google
To enable user to log in to our ASP .NET website using Google account, we will head towards the Google Developers Console to configure.
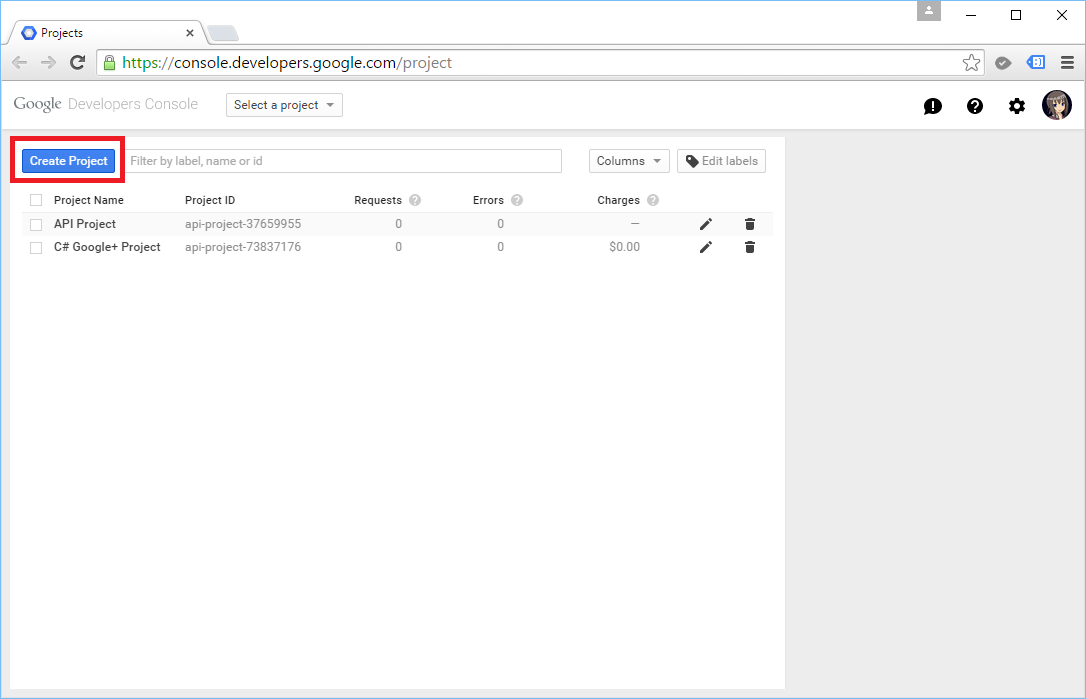
In the first step, we need to give a name to our project. Next, we can just click on the “Create” button to add the project to the console.
Adding a new project in Google Developers Console.
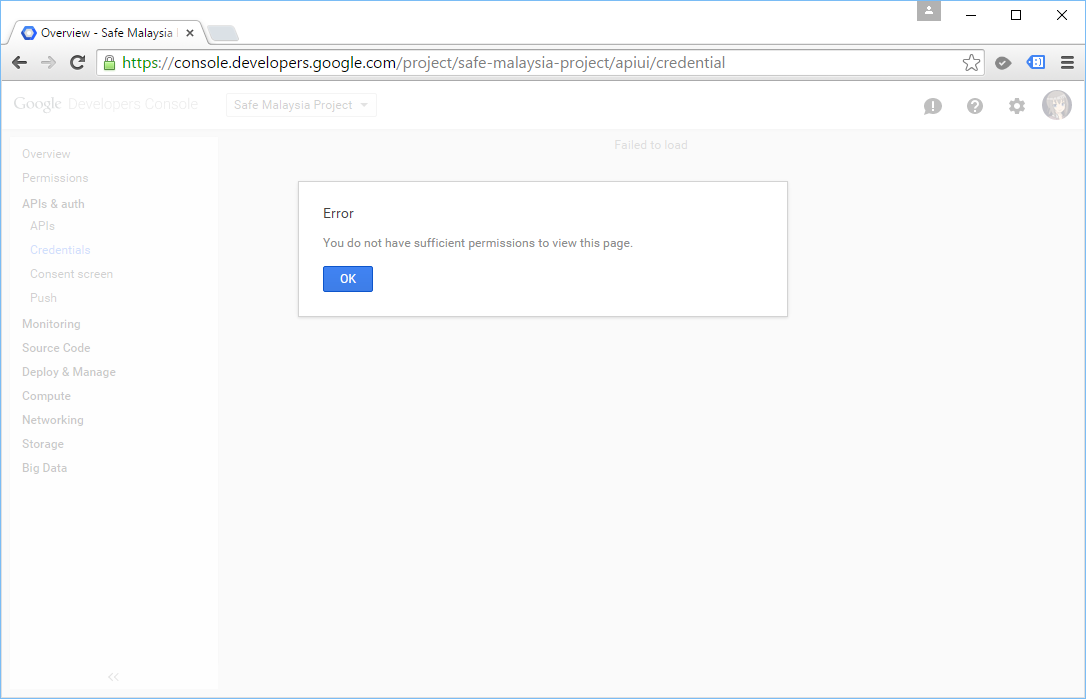
After the project is created, we will proceed to the Credentials under the APIs & Auth section.
“You do not have sufficient permissions to view this page.” What?
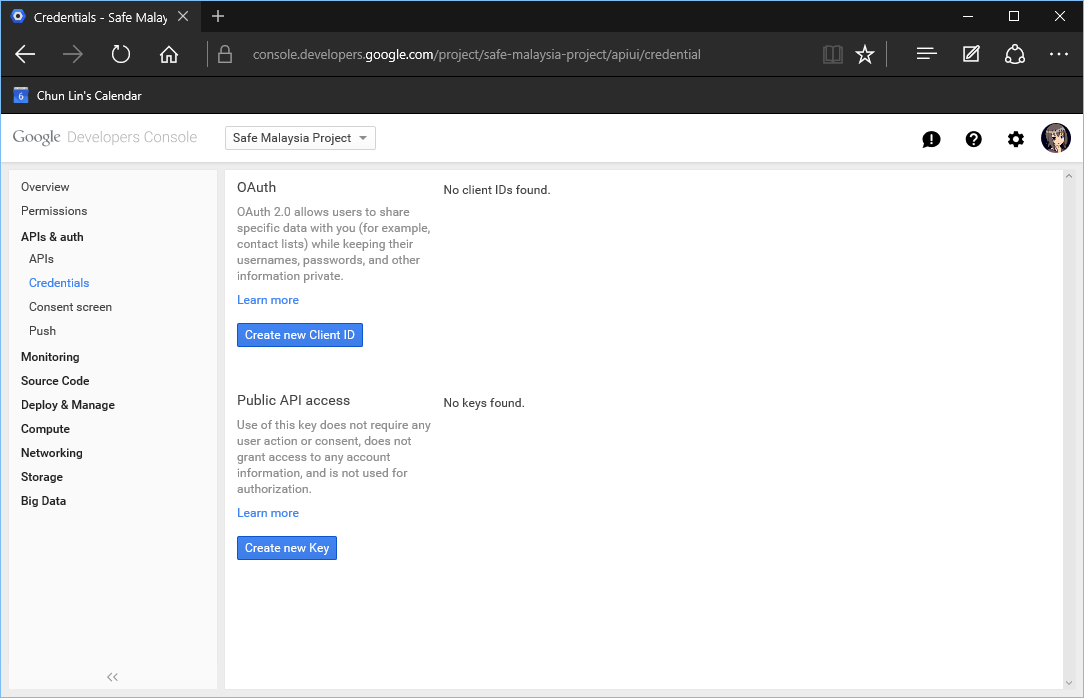
Click on the “Create New Client ID” button under OAuth. It will then ask for Application Type. For our case, it will be the default option, “Web application”.
Select application type.
Do you notice the little warning there saying we need to provide a Product Name? So after that, we will be brought to the Consent Screen page to fill in our Product Name. In the same page, we can also key in URL to our homepage, product logo, Google+ page, privacy policy, and ToS.
After saving the updates on Consent Screen page, we will be prompted to key in two important information: Authorized JS Origins and Authorized Redirect URIs. For local testing purpose, it accepts non-https localhost URL as well.
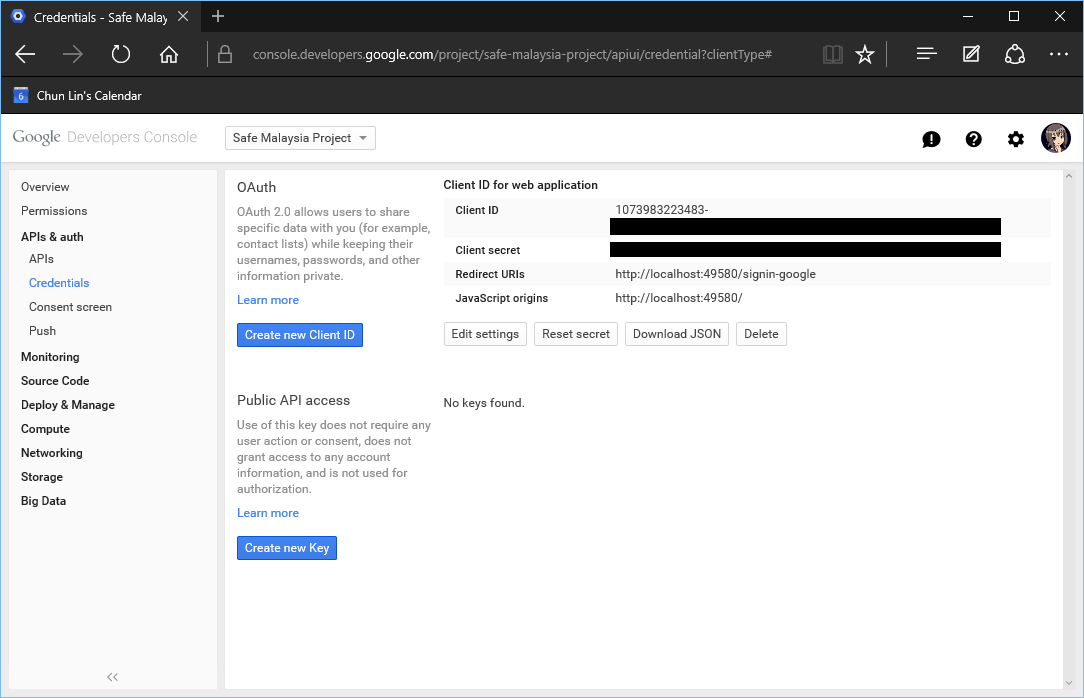
After that, we should receive a Client ID for our web application.
Google Client ID and Client Secret.
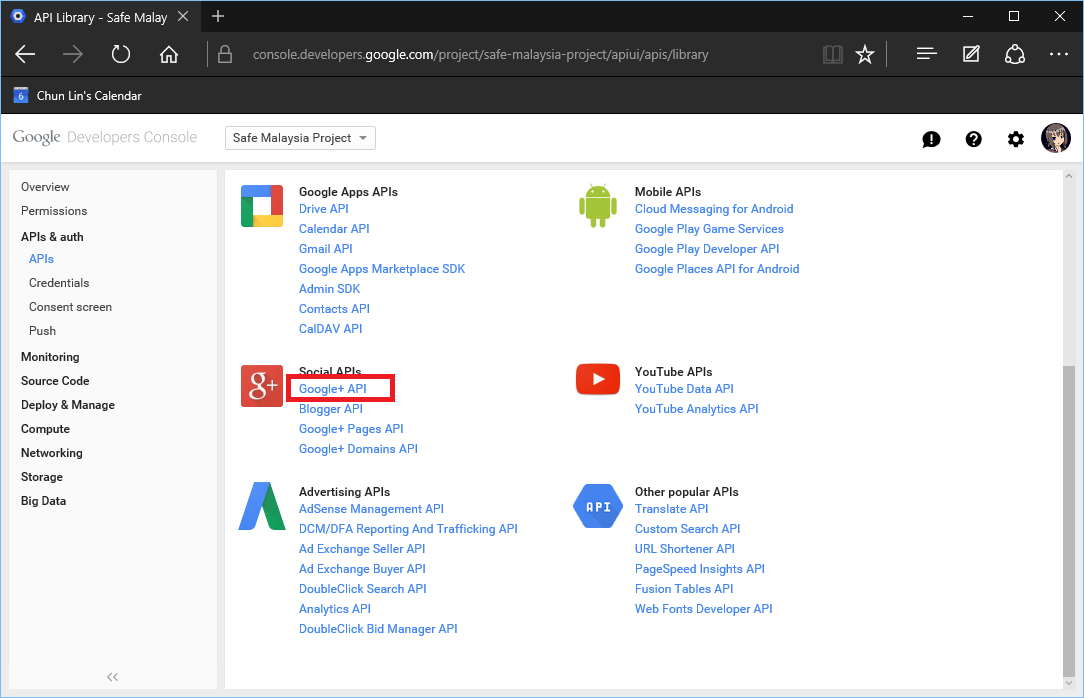
Before going back to Visual Studio, we will proceed to the APIs section under the APIs & Auth. There, we can enable the Google+ API.
Enabling Google+ API.
Same as Facebook, with the Client ID and Client Secret, we can now put in these values to the sample codes in Startup.Auth.cs to activate Google login. Yup, now user can just log in to our web application with their Google account!
Interestingly, I am not able to access the Credentials page after this again. =P
Logging In with Twitter
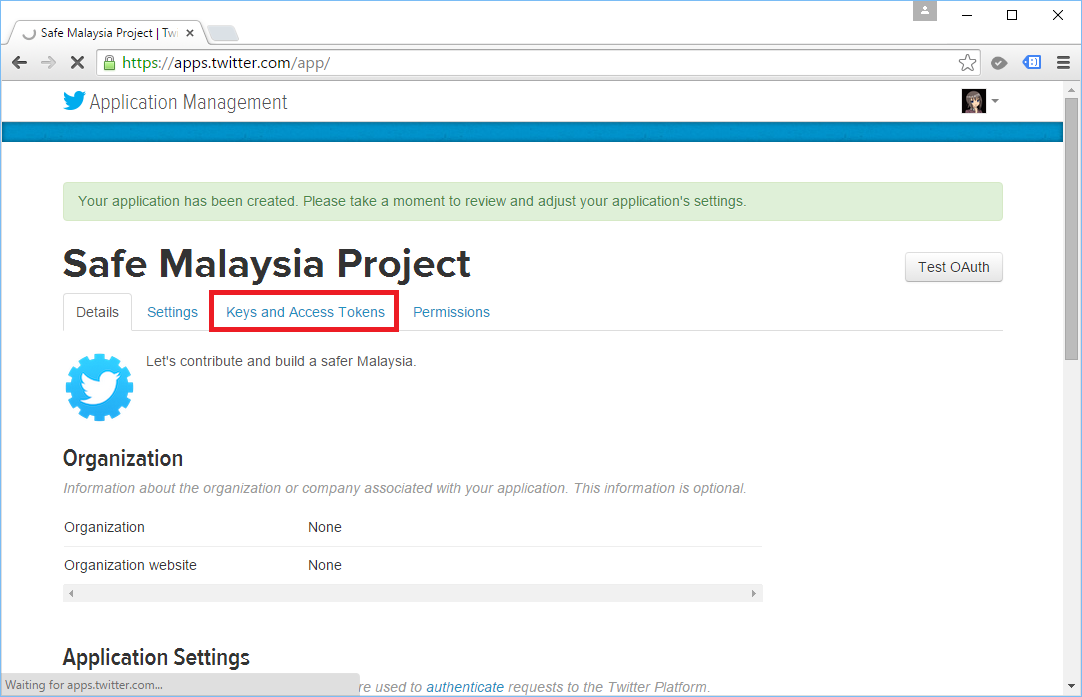
To get the Consumer Key and Consumer Secret from Twitter, we first need to login to the Twitter Apps.
After creating the new app, we will be given the Consumer Key and Consumer Secret that we can use to put in our Startup.Auth.cs.
Twitter Customer Key and Customer Secret.
More External Services Providing Login
If you would like to read more about allowing user to login to your ASP .NET website with 3rd party services, I would like to suggest a few articles to you.
As mentioned earlier, we can modify the AspNetUsers table to store other profile information of a user by adding new fields in ApplicationUser class in IdentityModels.cs.
public class ApplicationUser : IdentityUser
{
    ...

    public string FirstName { get; set; }
    public string LastName { get; set; }
    public DateTime DateOfBirth { get; set; }
}
Association Form
For external login, we need to update the fields to the Association Form as well so that no matter where the user comes from, we will always capture the same set of user info.
Firstly, in the AccountViewModels.cs, we need to add the three new fields to the ExternalLoginConfirmationViewModel.
public class ExternalLoginConfirmationViewModel
{
    [Required]
    [Display(Name = "Email")]
    public string Email { get; set; }

    [Required]
    [Display(Name = "First Name")]
    public string FirstName { get; set; }

    [Required]
    [Display(Name = "Last Name")]
    public string LastName { get; set; }

    [Required]
    [Display(Name = "Date of Birth")]
    public DateTime DateOfBirth { get; set; }
}
Then we will update the Views accordingly to enable user to key in those info.
In AccountController.cs, we will then add in logic to ExternalLoginConfirmation HttpPost method to store data of the three new fields into the AspNetUsers table.
var user = new ApplicationUser {
    ...
    FirstName = model.FirstName,
    LastName = model.LastName,
    DateOfBirth = model.DateOfBirth
};