This afternoon, I decided to take a look at Orchard Core, an open-source CMS (Content Management System) built on top of an ASP .NET Core application framework.
Since it is open-source, I easily forked its repository from Github and then checked out its dev branch.
After waiting for less than one minute to get all the Nuget packages restored in the project, I set OrchardCore.Cms.Web as the default project. Then I tried to run it but it failed with tons of errors. One of the major errors is “Assembly location for Razor SDK Tasks was not specified”. According to online discussion, it turns out that .NET Core 2.2 is needed.
After downloading the correct SDK, the projects are now successfully built with the following web page pops out as a result.
Take note that, as shown in the screenshot above, when I fill in Table Prefix, it will throw me exception saying that “SqlException: Invalid object name ‘OrchardroadDocument’” during the setup stage, as shown in the following screenshot.
Hence, the best way to proceed is to not enter anything to the Table Prefix textbox. Then we will be able to setup our CMS successfully. Once we log in to the system as Super User, we can proceed to configure the CMS.
Yup, this concludes my first attempt with the new Orchard Core CMS. =)
For those ASP .NET web developers, Identity Server should be quite familiar to them especially they are looking for SSO solution.
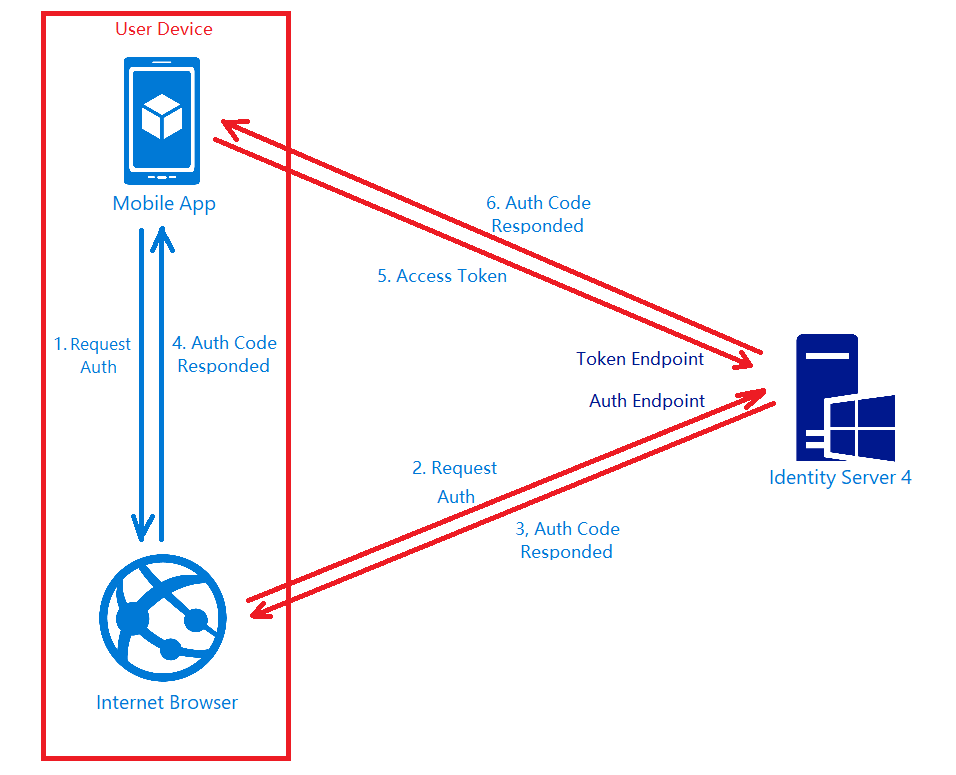
After successfully integrating Identity Server in our ASP .NET Core MVC web applications, it is now time for us to research about how our mobile app can be integrating with IdentityServer4 too.
Background
We have two types of users. The admin will be logging in to the system via our web application. The normal staff will log in to the system via mobile app. Different sets of features are provided for both web and mobile apps.
Setting up Client on Identity Server
To begin, we need to add new client to the MemoryClients of Identity Server.
The version of AppAuth for Android is v0.7.0 at the point of time this post is written. To install it for our app, we first need to set it in build.gradle (Module: app).
Android Setup: Post Authorization and Refresh Token
According to the code in the LoginAuthActivity.java, if the login fails, the user will be brought back to the Login Activity. However, if it succeeds, the user can then reach to another activities in the app which require user to login first. We can also then get Access Token, Refresh Token, and ID Token from authManager. With the Access Token, we then can access our backend APIs.
private class TokenTimer extends TimerTask {
    ...

    @Override
    public void run() {

        if(MyApp.Token == null)
            return;

        final AuthManager authManager = AuthManager.getInstance(TokenService.this);

        final AuthState authState = authManager.getAuthState();


        if(authState.getNeedsTokenRefresh()) {
            //Get New Token

            ClientSecretPost clientSecretPost = new ClientSecretPost("driver008!");
            final TokenRequest request = authState.createTokenRefreshRequest();
            final AuthorizationService authService = authManager.getAuthService();

            authService.performTokenRequest(request, clientSecretPost, new AuthorizationService.TokenResponseCallback() {
                @Override
                public void onTokenRequestCompleted(@Nullable TokenResponse response, @Nullable AuthorizationException ex) {
                    if(ex != null){
                        ex.printStackTrace();
                        return;
                    }
                    authManager.updateAuthState(response,ex);
                    MyApp.Token = authState.getIdToken();
                }
            });

        }

    }
}
Conclusion
Yup, that’s all for integrating the Identity Server in an Android App to provide a seamless login experience to our users. If you find any mistake in this article, kindly let me know in the comment section. Thanks in advance!
KOSD, or Kopi-O Siew Dai, is a type of Singapore coffee that I enjoy. It is basically a cup of coffee with a little bit of sugar. This series is meant to blog about technical knowledge that I gained while having a small cup of Kopi-O Siew Dai.
Last year, Riza shared a very interesting topic twice during Singapore .NET Developers Community in Microsoft office. For those who attended the meetups, do you still remember? Yes, it’s about IdentityServer.
IdentityServer 4 is a middleware, an OpenID Connect provider built to spec, which provides user identity and access control in ASP .NET Core applications.
In my example, I will start with the simplest setup where there will be one Authenticate Server and one Application Server. Both of them in my example will be using ASP .NET Core.
How an application uses JWT to authenticate a user.
In the Authenticate Server, I register the minimum required dependencies in ConfigureServices method of its Startup.cs as follows.
I won’t be talking about how IdentityServer works here. Instead, I will be focusing on the “AddDeveloperSigningCredential” method here.
JSON Web Token (JWT)
By default, IdentityServer issues access tokens in the JWT format. According to the abstract definition in RCF 7519 from Internet Engineering Task Force (IETF) , JWT is a compact, URL-safe means of representing claims between two parties where claims are encoded as JSON objects which can be digitally signed or encrypted.
In the diagram above, the Application Server receives the secret key used in signing the JWT from the Authentication Server when the app sets up its authentication process. Hence, the app can verify whether the JWT comes from an authentic source using the secret key.
During development, we normally don’t have cert prepared yet. Hence, AddTemporarySigningCredential can be used to auto-generate certificate to sign JWT. However, this method has a disadvantage. Every time the IdentityServer is restarted, the certificate will change. Hence, all tokens that have been signed with the previous certificate will fail to validate.
Anyway, as documented, we are only allowed to use AddDeveloperSigningCredential in development environments. In addition, AddDeveloperSigningCredential can only be used when we host IdentityServer on single machine. What should we do when we are going to deploy our code to the production environment? We need a signing key service that will provide the specified certificate to the various token creation and validation services. Thus now we need to change to use AddSigningCredential method.
Production Code
For production, we need to change the code earlier to be as follows.
X509Certificate2 cert = null;
using (X509Store certStore = new X509Store(StoreName.My, StoreLocation.CurrentUser))
{
    certStore.Open(OpenFlags.ReadOnly);
    var certCollection = certStore.Certificates.Find(
        X509FindType.FindByThumbprint,
        Configuration["AppSettings:IdentityServerCertificateThumbprint"],
        false);

    // Get the first cert with the thumbprint
    if (certCollection.Count > 0)
    {
        cert = certCollection[0];
    }
}

services.AddIdentityServer()
     .AddSigningCredential(cert)
     .AddInMemoryIdentityResources(...)
     .AddInMemoryApiResources(...)
     .AddInMemoryClients(...)
     .AddAspNetIdentity();
We use AddSigningCredential to replace the AddDeveloperSigningCredential method. Now, AddSigningCredential requires a X509Certificate2 cert as parameter.
Key-in and remember the password for the private key;
Import the certificate to the Current User Certificate Store on developer’s local machine by double-clicking on the newly generated .pfx file. We will be asked to key in the password used in Step 4 above again.
Importing certificate.
Now, we need to find out the Thumbprint of it. This is because in our production code above, we are using Thumbprint to look for the cert.
Thumbprint and Microsoft Management Console (MMC)
To retrieve the Thumbprint of a certificate, we need help from a tool called MMC.
Using MMC to view certificates in the local machine store for current user account.
We will then be able to find the new certificate that we have just created and imported. To retrieve its Thumbprint, we first need to open it, as shown in the screenshot below.
Open the new cert in MMC.
A popup window called Certificate will appear. Simply copy the value of the Thumbprint under the Details tab.
Thumbprint!
After keeping the value of the cert thumbprint in the appsettings.Development.json of the IdentityServer project, we can now build and run the project on localhost without any problem.
Deployment to Microsoft Azure Web App
Before we talk about how to deploy the IdentityServer project to Microsoft Azure Web App, do you realize how come in the code above, we are looking cert only My/Personal store of the CurrentUser registry, i.e. “StoreName.My, StoreLocation.CurrentUser”? This is because this is the place where Azure will load the certificate from.
So now, we will first proceed to upload the certificate as Private Certificate that we self-sign above to Azure Web App. After selecting the .pfx file generated above and keying-in the password, the cert will appear as one of the Private Certificates of the Web App.
To upload the cert, we can do it in “SSL certificates” settings of our Web App on Azure Portal.
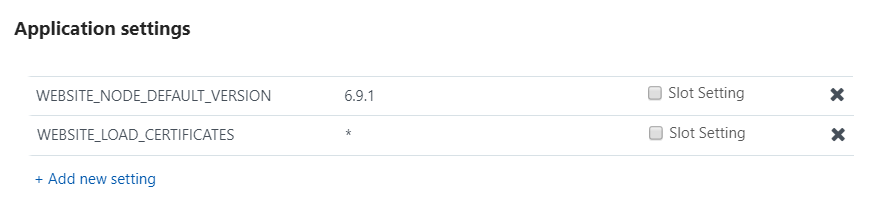
Last but not least, in order to make the cert to be available to the app, we need to have the following setting added under “Application settings” of the Web App.
WEBSITE_LOAD_CERTIFICATES setting is needed to make the cert to be available to the app.
Brock also provided a link in the discussion to his blog post on how to create signing cert using makecert instead of OpenSSL as discussed earlier. In fact, during Riza’s presentation, he was using makecert to self-sign his cert too. Hence, if you are interested about how to use makecert to do that, please read his post here: https://brockallen.com/2015/06/01/makecert-and-creating-ssl-or-signing-certificates/.
Conclusion
This episode of KOSD series is a bit long such that drinking a large cup of hot KOSD while reading this post seems to be a better idea. Anyway, I think this post will help me and other beginners who are using IdentityServer in their projects to understand more about the framework bit by bit.
There are too many things that we can learn in the IdentityServer project and I hope to share what I’ve learnt about this fantastic framework in my future posts. Stay tuned.
KOSD, or Kopi-O Siew Dai, is a type of Singapore coffee that I enjoy. It is basically a cup of coffee with a little bit of sugar. This series is meant to blog about technical knowledge that I gained while having a small cup of Kopi-O Siew Dai.
During a late dinner with my friend on 12 January last month, he commented that he encountered a very serious performance problem in retrieving data from Cosmos DB (pka DocumentDB). It’s quite strange because, in our IoT project which also stores millions of data in Cosmos DB, we never had this problem.
Two weeks later, on 27 January, he happily showed me his improved version of the code which could query the data in about one to two seconds.
Yesterday, after having a discussion, we further improved the code. Hence, I’d like to write down this learning experience here.
Due to the fact that we couldn’t demonstrate using the real project code, I thus created a sample project getting data from database and collection on my personal Azure Cosmos DB account. The database contains one collection which has 23,967 records of Student data.
The Student class and the BaseEntity class that it inherits from are as follows.
public class Student : BaseEntity
{
    public string Name { get; set; }

    public int Age { get; set; }

    public string Description { get; set; }
}
public abstract class BaseEntity
{
    [JsonProperty(PropertyName = "id")]
    public string Id { get; set; }

    public string Type { get; set; }

    public DateTime CreatedAt { get; set; } = DateTime.Now;
}
You may wonder why I have Type defined.
Type and Cost Saving
The reason of having Type is that, before DocumentDB was rebranded as Cosmos DB in May 2017, the DocumentDB pricing is based on collections. Hence, the more collection we have in the database, the more we need to pay.
DocumentDB was billed per collection in the past. (Source: Stack Overflow)
To overcome that, we squeeze the different types of entities in the same collection. So, in the example above, let’s say we have three classes — Students, Classroom, Teacher that inherit from BaseEntity, then we will put the data of the three classes in the same collection.
Then here comes a problem: How do we know which document in the collection is Student, Classroom or Teacher? There is where the property Type will help us. So in our example above, the possible value for Type will be Student, Classroom, and Teacher.
Hence, when we add a new document through repository design pattern, we have the following method.
We used the following code to retrieve data of a class from the collection.
public async Task<IEnumerable<T>> GetAllAsync(Expression<Func<T, bool>> predicate = null)
{
    var query = _documentDbClient.CreateDocumentQuery<T>(UriFactory.CreateDocumentCollectionUri(_databaseId, _collectionId));

    var documentQuery = (predicate != null) ?
        (query.Where(predicate)).AsDocumentQuery():
        query.AsDocumentQuery();

    var results = new List<T>();
    while (documentQuery.HasMoreResults)
    {
        results.AddRange(await documentQuery.ExecuteNextAsync<T>());
    }

    return results.Where(x => x.Type == typeof(T).Name).ToList();
}
This query will run very slow because the line where it filters the class is after querying data from the collection. Hence, in the documentQuery, it may already contain data of three classes (Student, Classroom, and Teacher).
Improved Version of Query
So one obvious way is to move the line of filtering by Type above. The improved version of code now looks as such.
public async Task<IEnumerable<T>> GetAllAsync(Expression<Func<T, bool>> predicate = null)
{
    var query = _documentDbClient
        .CreateDocumentQuery<T>(UriFactory.CreateDocumentCollectionUri(_databaseId, _collectionId))
        .Where(x => x.Type == typeof(T).Name);

    var documentQuery = (predicate != null) ?
        (query.Where(predicate)).AsDocumentQuery():
        query.AsDocumentQuery();

    var results = new List<T>();
    while (documentQuery.HasMoreResults)
    {
        results.AddRange(await documentQuery.ExecuteNextAsync<T>());
    }

    return results;
}
By doing so, we managed to reduce the query time significantly because all the actual filtering will be done at Cosmos DB side. For example, there was one query I managed to reduce the query time of it from 1.38 minutes to 3.42 seconds using the 23,967 records of Student data.
Multiple Predicates
The code above however has a disadvantage. It cannot accept multiple predicates.
I thus changed it to be as follows so that it returns IQueryable.
This has another inconvenience is there whenever I call GetAll, I need to remember to load the data with HasMoreResults as shown in the code below.
var studentDocuments = _repoDocumentDb.GetAll()
    .Where(s => s.Age == 8)
    .Where(s => s.Name.Contains("Ahmad"))
    .AsDocumentQuery();

var results = new List<T>();
while (studentDocuments.HasMoreResults)
{
    results.AddRange(await studentDocuments.ExecuteNextAsync<T>());
}
Conclusion
This is just an after-dinner discussion about Cosmos DB between my friend and me. If you have any better idea of designing repository for Cosmos DB (pka DocumentDB), please let us know. =)