Building a Healthcare Dashboard with FAST Framework and Azure API for FHIR

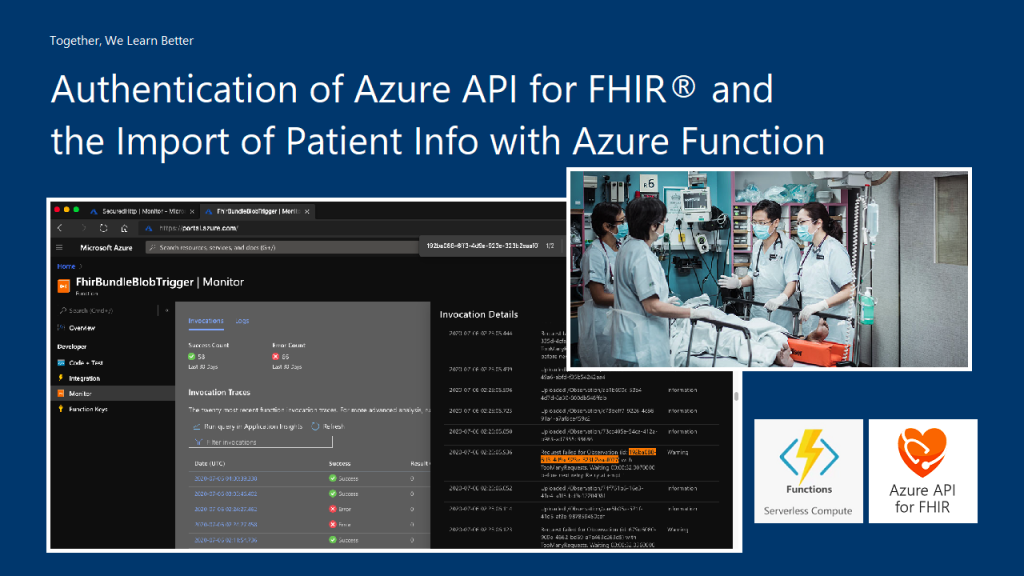
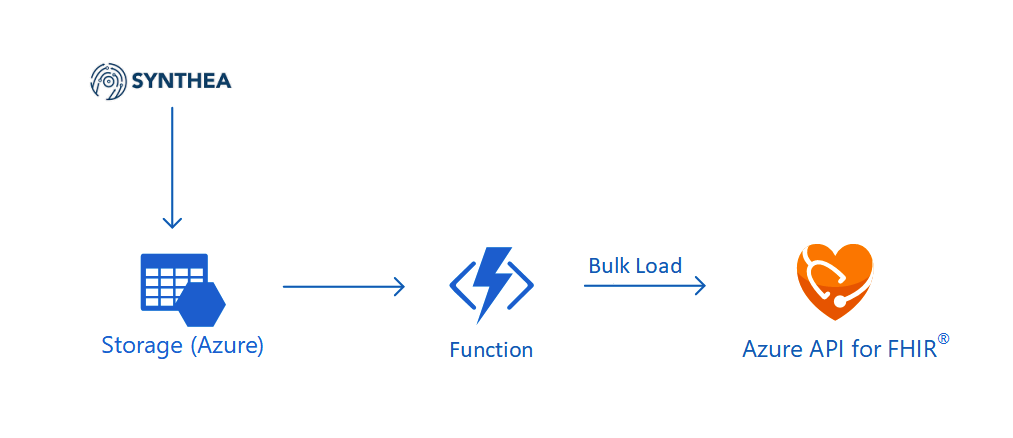
In our previous article, we have successfully imported realistic but not real patient data into the database in our Azure API for FHIR. Hence, the next step we would like to go through in this article is how to write a user-friendly dashboard to show those healthcare data.

For frontend, there are currently many open-source web frontend frameworks for us to choose from. For example, in our earlier project of doing COVID-19 dashboard, we used the Material Design from Google.

In this project, in order to make our healthcare dashboard to be consistent with other Microsoft web apps, we will be following Microsoft design system.

For the backend of the dashboard, we will be using ASP .NET Core 3.1 because even though Michael Hansen provided a sample on GitHub about how to write client app to consume Azure API for FHIR, it is a JavaScript app. So I think another sample on how to do it with ASP .NET Core will be helpful to other developers as well.

🎨 The architecture of the system we are going to setup in this article. 🎨

FAST Framework and Web Components

Last week on 7th July, Rob Eisenberg from Microsoft introduced the FAST Framework during the .NET Community Standup. The FAST Framework, where FAST stands for Functional, Adaptive, Secure, and Timeless, is an adaptive interface system for modern web experiences.

In web app development projects, we always come to situations where we need to add a button, a dropdown, a checkbox to our web apps. If we are working in a large team, then issues like UI consistency across different web apps which might be built using different frontend frameworks are problems that we need to solve. So what FAST Framework excites me is solving the problem with Web Components that can be used with any different frontend frameworks.

🎨 Rob Eisenberg’s (left most) first appearance on Jon Galloway’s (right most) .NET Community Standup with Daniel Roth (top most) and Steve Sanderson from the Blazor team. (Source: YouTube) 🎨

All modern browsers now support Web Components. The term Web Components basically refers to a suite of different technologies allowing us to create reusable custom elements — with their functionality encapsulated away from the rest of our code — and utilise them in our web apps. Hence, using Web Components in our web app increases reusability, testability, and reliability in our codes.

Web Components can be integrated well with major frontend frameworks, such as Angular, Blazor, Vue, etc. We can drop Web Components easily to ASP .NET web projects too and we are going to do that in our healthcare dashboard project.

FAST Design System Provider

Another cool thing in FAST Framework is that it comes with a component known as the Design System Provider which provides us a convenient mechanisms to surface the design system values to UI components and change values where desired.

In the FAST Framework, the Web Component that corresponds to the design system provider is called the FASTDesignSystemProvider. Its design system properties can be easily overridden by just setting the value of the corresponding property in the provider. For example, by simply changing the background of the FASTDesignSystemProvider from light to dark, it will automatically switch from the light mode to the dark mode where corresponding colour scheme will be applied.

🎨 FAST Framework allows our web apps to easily switch between light and dark modes. 🎨

UI Fabric and Fluent UI Core

In August 2015, Microsoft released the GA of Office UI Fabric on GitHub. The goal of having Office UI Fabric is to provide the frontend developers a mobile-first responsive frontend framework, similar like Bootstrap, to create the web experiences.

The Office UI Fabric speaks the Office Design Language. As long as you use any Office-powered web app, such as Outlook or OneDrive, the Office web layout should be very familiar to you. So by using the Office UI Fabric, we can easily make our web apps to have Office-like user interface and user experience.

🎨 OneDrive web with the Office design. 🎨

In order to deliver a more coherent and productive experience, Microsoft later released Fluent Framework, another cross-platform design system. Also, to move towards the goal of simplified developer ecosystem, Office UI Fabric later evolved into Fluent UI as well in March 2020.

Fluent UI can be used in both web and mobile apps. For web platform, it comes with two options, i.e. Fabric UI React and Fabric Core.

Fabric UI React is meant for React application while Fabric Core is provided primarily for non-React web apps or static web pages. Since our healthcare dashboard will be built on top of ASP .NET Core 3.1, Fabric Core is sufficient in our project.

However, due to some components, such as ms-Navbar and ms-Table, are still only available in Office UI Fabric but not the Fabric Core, our healthcare dashboard will use both the CSS libraries.

Azure CDN

A CDN (Content Delivery Network) is a distributed network of servers that work together to provide fast delivery of the Internet content. Normally, they are distributed across the globe so that the content can be accessed by the users based on their geographic locations so that users around the world can view the same high-quality content without slow loading time. Hence, it is normally recommended to use CDN to serve all our static files.

Another reason of us not to host static files in our web servers is that we would like to avoid extra HTTP requests to our web servers just to load only the static files such as images and CSS.

Fortunately, Azure has a service called Azure CDN which will be able to offer us a global CDN to store cached content on edge servers in the point-of-presence locations that are close to end users, to minimise latency.

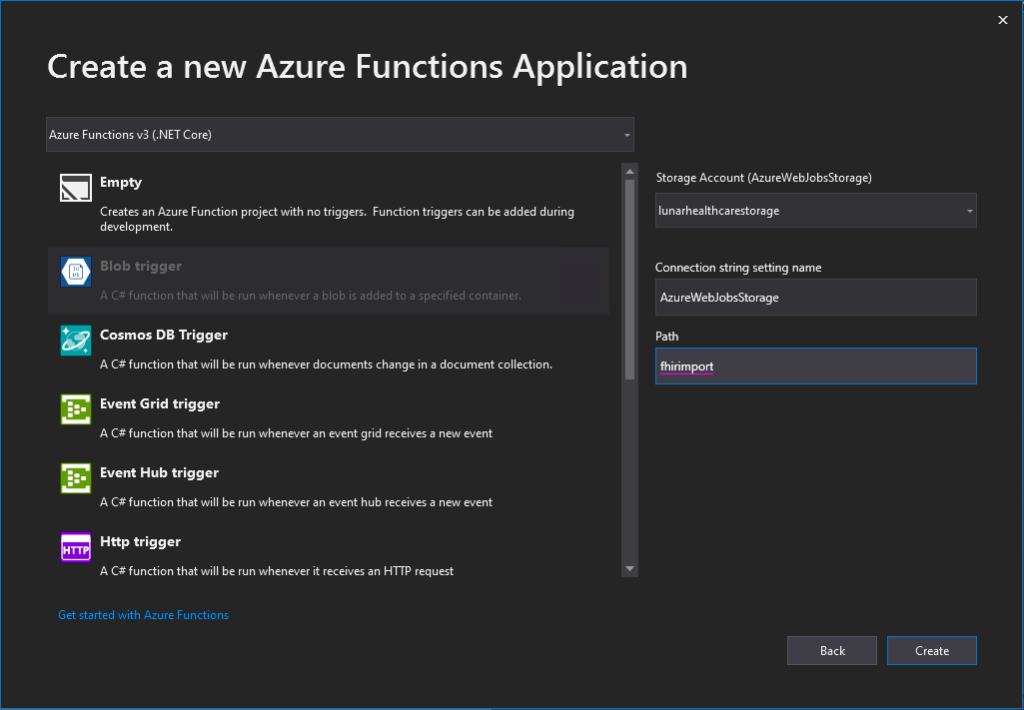
To use Azure CDN, firstly, we need to store all the necessary static files in the container of our Storage account. We will be using back the same Storage account that we are using to store the realistic but not real patient data generated by Synthea(TM).

Secondly, we proceed to create Azure CDN.

Thirdly, we add an endpoint to the Azure CDN, as shown in the following screenshot, to point to the container that stores all our static files.

🎨 The origin path of the CDN endpoint is pointing to the container storing the static files. 🎨

Finally, we can access the static files with the Azure CDN endpoint. For example, to get the Office Fabric UI css, we will use the following URL.

https://lunar-website-statics.azureedge.net/fabric.min.css

There is already a very clear quick-start tutorial on Microsoft Docs that you can refer to if you are interested to find out more about the integration of Azure CDN with Azure Storage.

Options Pattern in ASP .NET Core

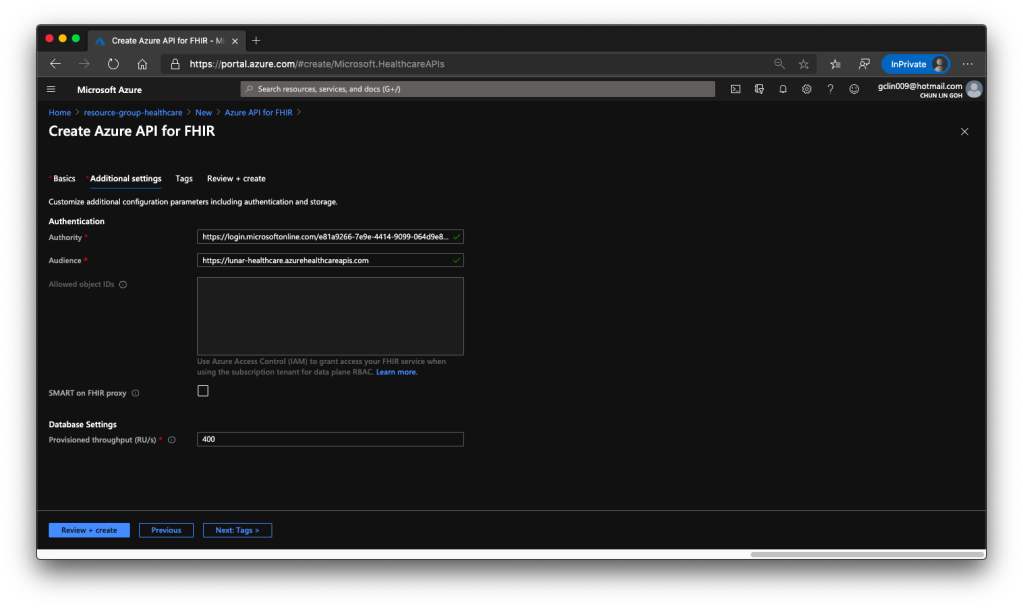
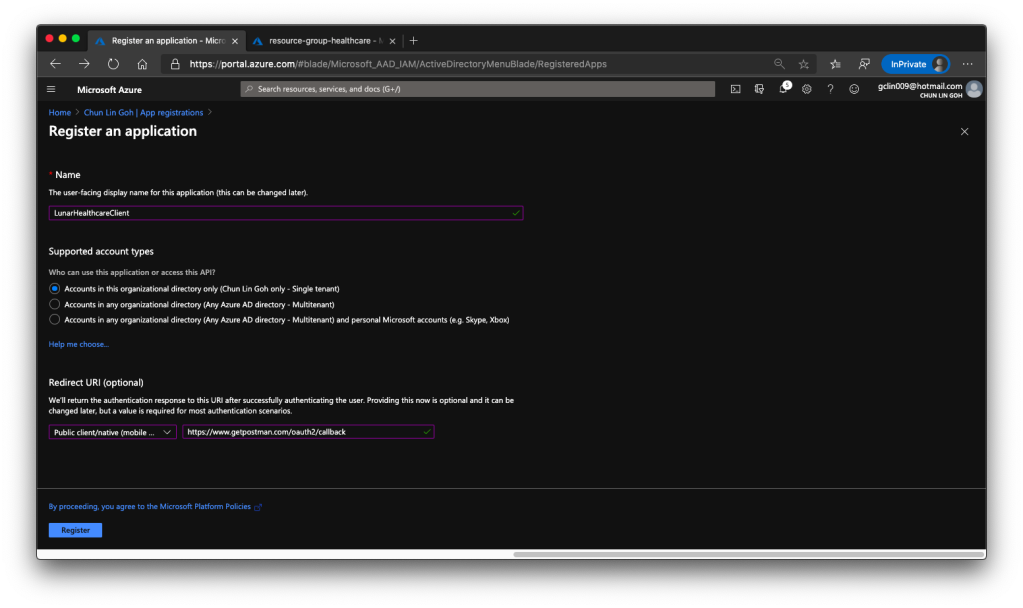
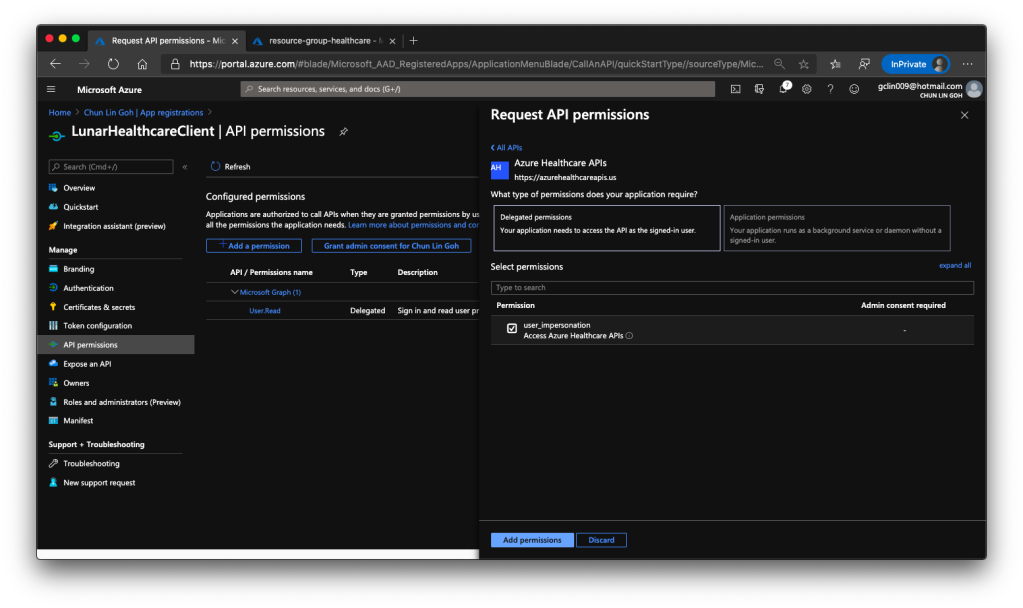
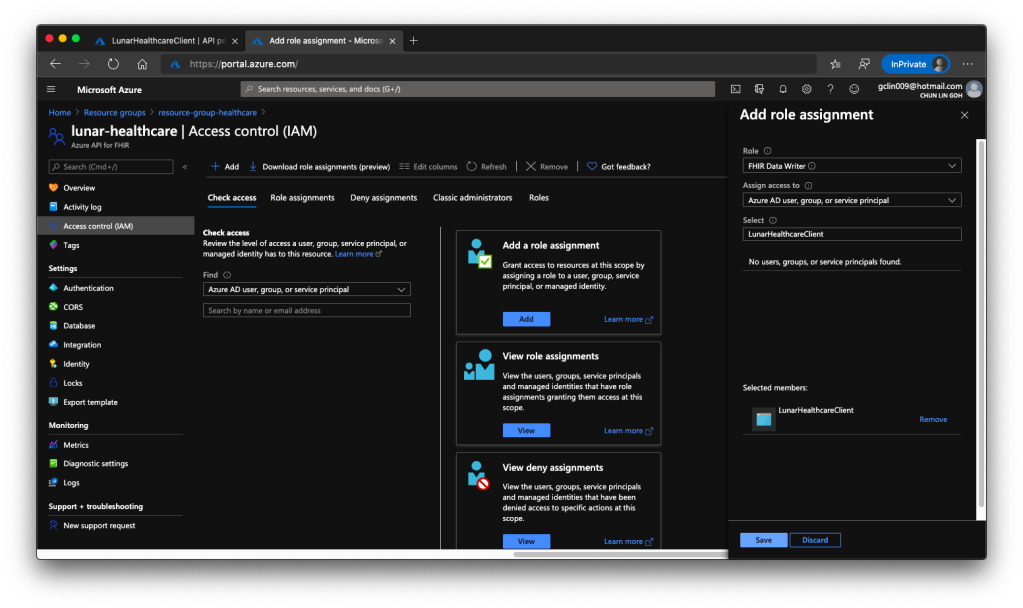
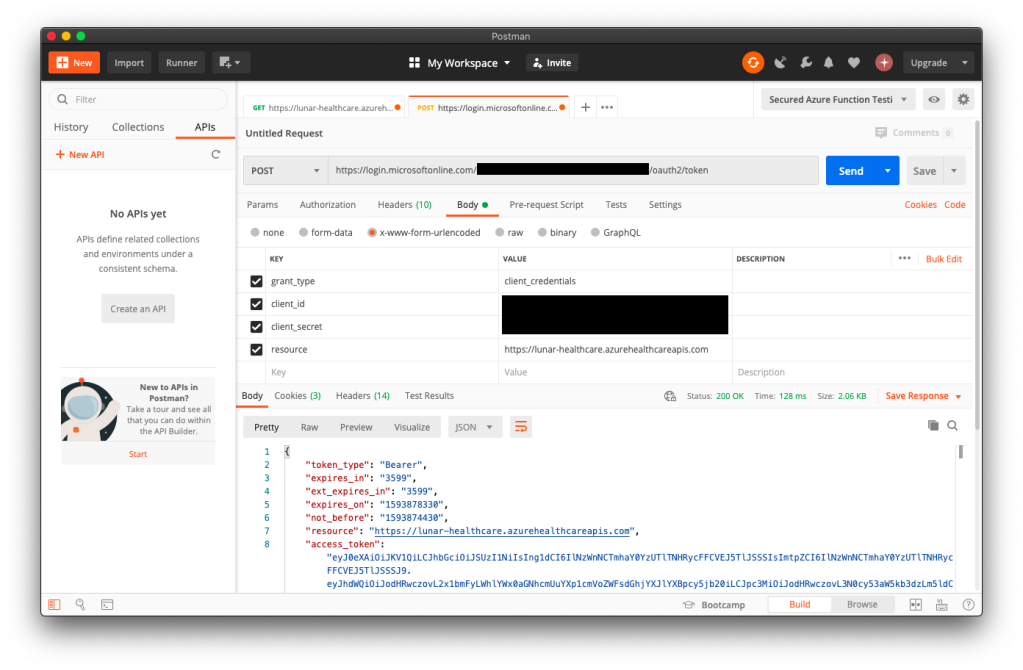
Similar as the Azure Function we deployed in the previous article, we will send GET request to different endpoints in the Azure API for FHIR to request for different resources. However, before we are able to do that, we need to get Access Token from the Azure Active Directory first. The steps to do so have been summarised in the same previous article as well.

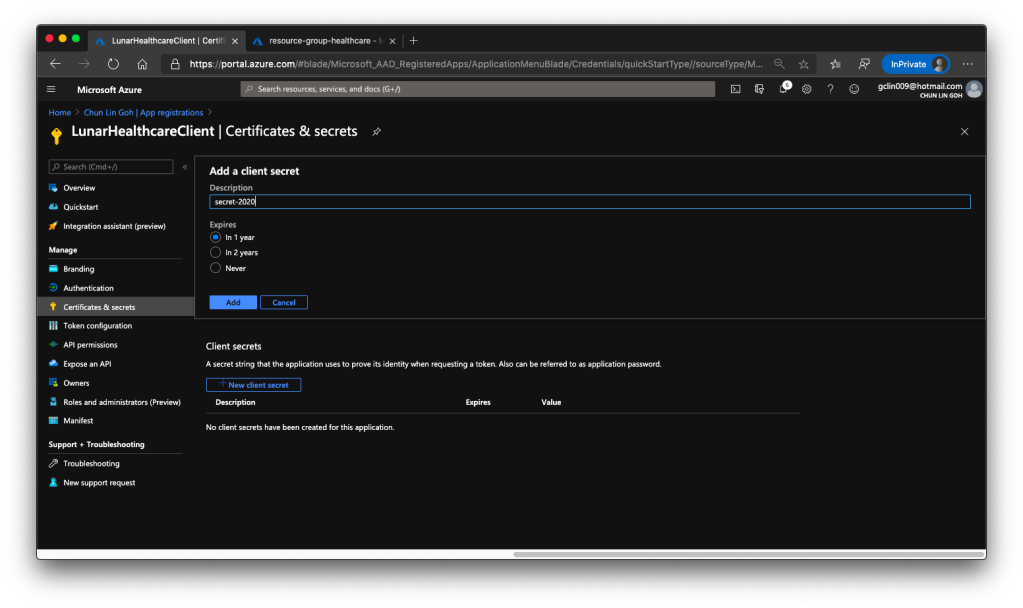
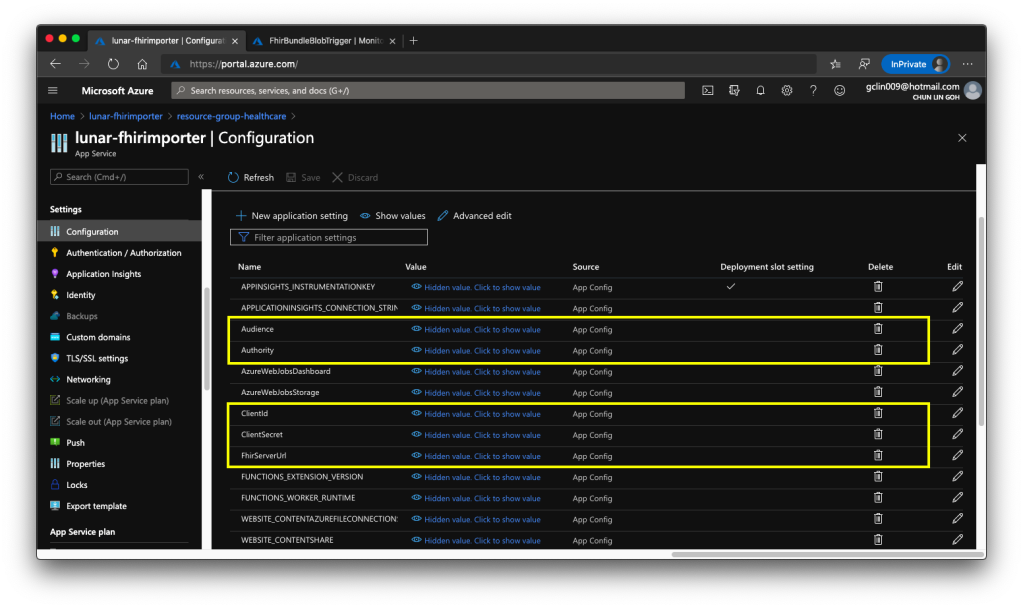
Since we need application settings such as Authority, Audience, Client ID, and Client Secret to retrieve the access token, we will store them in appsettings.Development.json for local debugging purpose. When we later deploy the dashboard web app to Azure Web App, we will store the settings in the Application Settings.

Then instead of reading from the setting file directly using the IConfiguration, here we would choose to use Options pattern which enable us to provide strongly typed access to groups of related settings and thus provide also a mechanism to validate the configuration data. For example, the settings we have in our appsettings.Development.json is as follows.

{ 
    "Logging": { 
        ...
    }, 
    "AzureApiForFhirSetting": { 
        "Authority": "...", 
        "Audience": "...", 
        "ClientId": "...", 
        "ClientSecret": "..." 
    }, 
    ...
}

We will then create a class which will be used to bind to the AzureApiForFhirSettings.

public class AzureApiForFhirSetting { 
    public string Authority { get; set; }
    public string Audience { get; set; }
    public string ClientId { get; set; }
    public string ClientSecret { get; set; } 
}

Finally, to setup the binding, we will need to add the following line in Startup.cs.

// This method gets called by the runtime. Use this method to add services to the container. 
public void ConfigureServices(IServiceCollection services) 
{ 
    services.AddOptions();
    services.Configure<AzureApiForFhirSetting>(Configuration.GetSection("AzureApiForFhirSetting")); 
    ...
    services.AddControllersWithViews(); 
}

After that, we will apply dependency injection of IOption to the classes that we need to use the configuration, as shown in the following example.

public class AzureApiForFhirService : IAzureApiForFhirService 
{ 
    private readonly AzureApiForFhirSetting _azureApiForFhirSetting; 

    public AzureApiForFhirService(IOptions<AzureApiForFhirSetting> azureApiForFhirSettingAccessor) 
    { 
        _azureApiForFhirSetting = azureApiForFhirSettingAccessor.Value; 
    }

    ...
}

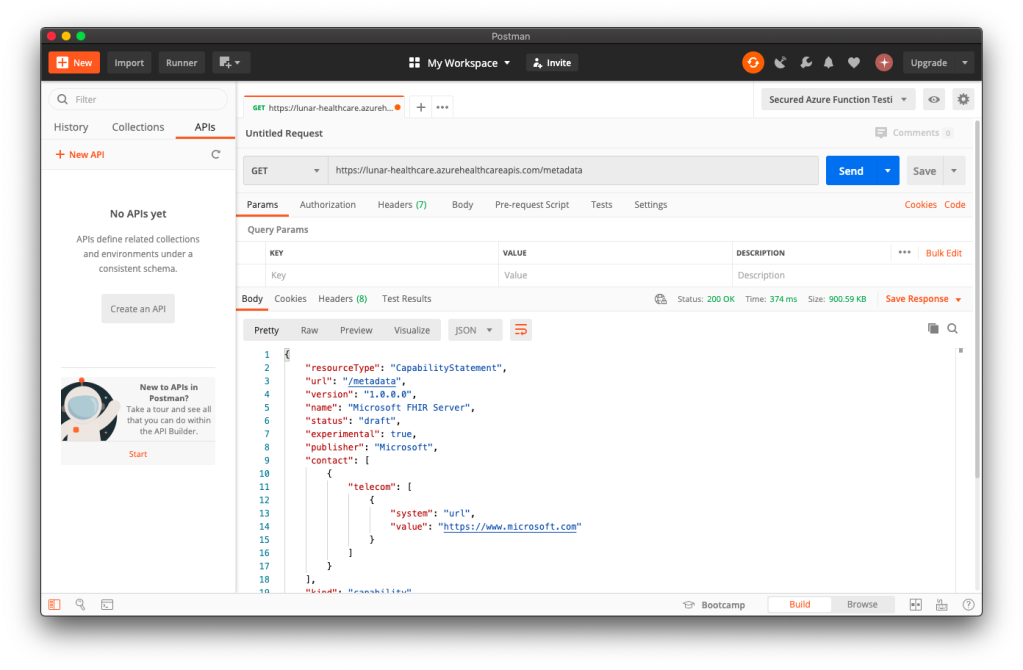
Once we can get the access token, we will be able to access the Azure API for FHIR. Let’s see some of the endpoints the API has.

Azure API for FHIR: The Patient Endpoint

To retrieve all the patients in the database, it’s very easy. We simply need to send a GET request to the /patient endpoint. By default, the number of records returned by the API is 10 at most. To retrieve the next 10 records, we need to send another GET request to another URL link returned by the API, as highlighted in the red box in the following example screenshot.

🎨 The “self” URL is the API link for the current 10 records. 🎨

Once we have all the patients, we then can list them out in a nice table designed with Office UI Fabric, as shown in the following screenshot.

🎨 Listing all the patients in the Azure API for FHIR database. 🎨

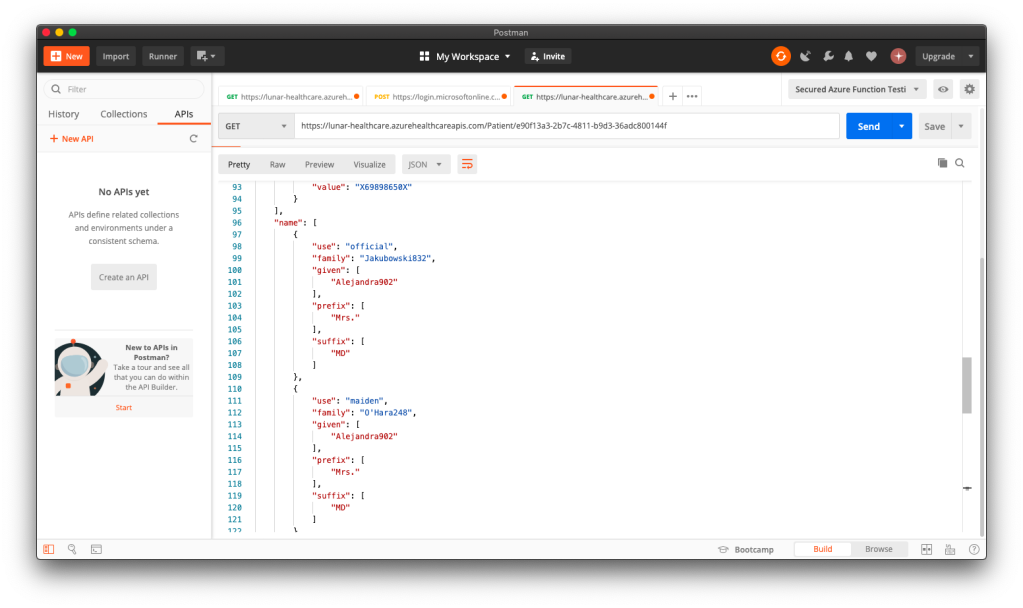
When we click on the link “View Profile” of a record, we then can get more details about the selected patient. To retrieve the info of a particular patient, we need to pass the ID to the /patient endpoint, as shown in the following screenshot, which is highlighted in a red box.

🎨 Getting the info of a patient with his/her ID. 🎨

Where can we get the patient’s ID? The ID is returned, for example, when we get the list of all patients.

So after we click on the “View Profile”, we will then be able to reach a Patient page which shows more details about the selected patient, as shown in the following screenshot.

🎨 We can also get the address together with its geolocation data of a patient. 🎨

Azure API for FHIR: The Other Endpoints

There are many resources available in the Azure API for FHIR. Patient is one of them. Besides, we also have Condition, Encounter, Observation, and so on.

To get entries from the endpoints corresponding to the three resources listed above is quite straightforward. However, if we directly send a GET request to, let’s say, /condition, what we will get is all the Condition records of all the patients in the database.

In order to filter based on the patient, we need to add a query string called patient to the endpoint URL, for example /condition?patient=, and then we append the patient ID to the URL.

Then we will be able to retrieve the resources of that particular patient, as shown in the following screenshot.

🎨 It’s interesting to see COVID-19 test record can already be generated in Synthea. 🎨

So far I have only tried the four endpoints. The /observation endpoint is very tricky because the values that it return can be most of the time a single number for a measurement. However, it will also returns two numbers or text for some other measurement. Hence, I have to do some if-else checks on the returned values from the /observation endpoint.

🎨 The SARS-Cov-2 testing result is returned as a text instead of number. 🎨

Source Code of the Dashboard

That’s all for the healthcare dashboard that I have built so far. There are still many exciting features we can expect to see after we have integrated with the Azure API for FHIR.

So, if you would like to check out my codes, the dashboard project is now available on GitHub at https://github.com/goh-chunlin/Lunar.HealthcareDashboard. Feel free to raise issue or PR to the project.

Together, we learn better.

Development and DevOps of Desktop Apps with .NET Core 3.0

In September, .NET Core 3.0 was announced in the official .NET Conf 2019. Happily, I’m invited to be speaker in .NET Conf Singapore happening in BLOCK71. I am one the organisers of the event, so theoretically speaking, I invited myself.

The topic that I delivered in the event is “Development and DevOps of Desktop Apps with .NET Core 3.0”. It is a 45-minute talk combining the content from the following three talks.

From coding, converting, to deploying. (Image Credit: .NET Conf 2019)

If you watch the videos above, the total length is about 70 minutes. So covering three of them in a 45-minute talk is a challenge to me. Luckily, I have Sabrina to help me out by co-speaking with me.

If you have missed our session, don’t worry, I have uploaded the recordings of the .NET Conf Singapore 2019 to the YouTube: https://www.youtube.com/watch?v=5VX-bAcBOWw&list=PLJEtXrSgWKZqkaYgY3PxBjRbA8O2vKEL7

If you have watched our session, you will realise it’s quite different from the official .NET Conf. In this post, I am going to brief you through about my thoughts and development process of our talk content.

Let’s Hashtag Together!

In order to make the conference to be more engaging, after discussing with Sabrina, I came out with a desktop app which will shows the recent tweets having #dotnetconfsg hashtag, which looks like the following.

Participants tweeting about our sessions.

To make this “game” more interesting, I announced that the top four participants who earn the highest scores would receive prizes from me. The formula to calculate the score is basically

  • +1 point for one tweet;
  • +5 point for one retweet of the tweet;
  • +5 point for one like of the tweet.

Throughout the conference, we thus had seen a huge number of tweets about our event and speakers. Some of them even tweeted with great photos (I should have given 5 points for great photos too).

In our talk, we used this desktop app as our sample. The app is built in .NET Framework 4.7. Sabrina started the demo with showing how we can modernise it to a .NET Core desktop app. I then covered a bit about Hot Reload, the runtime tools (the small little black bar on top of locally launched WPF app), and DevOps part of desktop app.

Starting from .NET Framework 4.7

After the talk, I redo the project to make it nicer. I have also published the code on GitHub: https://github.com/goh-chunlin/DotNetConfSgTweetsDashboard

I am using the Tweetinvi library to retrieve the tweets easily. I originally tried calling the Tweeter APIs directly from C# and it’s a painful experience. Instead of wasting resources on researching the Tweeter APIs, I change to use Tweetinvi because it allows me to easily get the tweets in just two lines of codes.

To improve the GUI, I use the Material Design in XAML Toolkit. So, I can easily change the WPF application to have dark mode. This is very important to me because I realise light mode isn’t displayed well on the projected screen during the event. So, it now looks as shown in the following screenshot.

New look with Material Design.

By clicking on the “Show Ranking” button at the top-right corner, we can easily tell the scores received by the participants.

The participants are sorted according to the score they receive.

Migrating to .NET Core 3.0

Now with many third-party libraries used in our WPF application, is the desktop app still compatible with .NET Core? Well, to answer this question, there is a tool from Microsoft called Portability Analyzer can give us a detail report on the set of APIs referenced in our apps that are not yet available in NET Core 3.0.

After downloading it and using it to check our application above, we received the following report.

This says that our WPF application is 100% portable to the .NET Core.

The Excel report comes with three tabs, i.e. Portability Summary (the one shown above), Details (empty), and Missing assemblies. There is one item in the report Missing assemblies though, as shown below.

There is one unresolved assembly.

Interestingly, if we refer to the .NET API Portability GitHub repo, we will see an issue filed by Alicia Li. There are many doubts over this tab.

However, if we proceed to use try-convert to migrate our WPF application from .NET Framework to .NET Core, it will be a successful conversion, as shown in the screenshot below.

Converted a .NET Framework project to .NET Core 3.0.

The try-convert tool is an open-source tool that helps us to migrate .NET Framework projects to .NET Core. After installing it, we need to restart the Command Prompt to use it.

The following screenshot shows how the app looks like after being migrated to .NET Core 3.0. Nothing significant is changed. If you would like to find out what have been changed, please visit the commit of this project on GitHub.

This is a WPF app in .NET Core 3.0.

XAML Islands

There is another thing that I shared in my talk is about XAML Islands. In fact, I talked about XAML Islands in Microsoft Insider Dev Tour too when I was sharing about WinUI.

Image may contain: 10 people, people sitting
Microsoft Insider Dev Tour (Image Credit: Microsoft Malaysia – Insider Dev Tour Kuala Lumpur)

XAML Islands is a feature that allows us to host UWP controls in non-UWP desktop applications. The reason of having it is to improve the UX of existing Win32 apps by leveraging UWP controls.

Although the documentation says it is enabled only starting from Windows 10, version 1903. However, if you are using version 1809, XAML Islands feature is also available already, just that not yet stable. So, the best choice is still using version 1903 and above.

In my presentation, since I was using the Windows 10 image hosted on Microsoft Azure VM, the best version I could get is 1809.

Windows 10 Pro, version 1809 on Microsoft Azure.

The quick-start way to use an XAML Island inside a WPF app is to use the NuGet packages from Microsoft. The one I am using is Microsoft.Toolkit.Wpf.UI.Controls, which has wrapper classes for 1st party controls, such as the InkCanvas, InkToolbar, MapControl, and MediaPlayerElement, all for WPF.

Installed with Microsoft.Toolkit.Wpf.UI.Controls.

You may ask why I am using version 5.1.1 of the Microsoft.Toolkit.Wpf.UI.Controls. On the day of .NET Conf Singapore, the version 6.0 (Preview 9.1) of it is already out. However, when I try to use the library, it threw the exception, as shown in the screenshot below.

Oops, app crashes with Microsoft.Toolkit.Wpf.UI.Controls 6.0 (Preview 9.1).

I could only demonstrated how I used the MapControl in a WPF app with XAML Islands.

Such a beautiful map displayed on WPF app!

Creating Build Pipeline in Azure DevOps

Now, with the codes of our WPF application on GitHub, we can create a Build pipeline for the app on Azure DevOps. This is not a new feature but it is nice to see how we can now build a .NET Core WPF app on Azure DevOps.

Benefits of DevOps (Image Credit: .NET Conf 2019)

There is a template available on Azure DevOps to build .NET Desktop app.

We can apply this template to build .NET Desktop app on Azure DevOps.

However, before we proceed to start the build, we need to make a few changes to it.

Since we will be using dotnet publish later, so the BuildPlatform variable is not necessary and can be removed.

Removing BuildPlatform variable from the pipeline.

Instead, we need to add a new variable called DOTNET_SKIP_FIRST_TIME_EXPERIENCE and set it to true. This is to speed up the build process because by default when we run any .NET Core SDK command on Azure DevOps, it does some caching. However, now we are running this on a hosted build agent, so this caching will never be useful because the agent will be discarded right after the build is completed. Thanks Daniel Jacobson for highlighting this in his video.

Daniel Jacobson (right) explains about Azure DevOps and .NET Core SDK commands. (Image source: YouTube video)

After that, we need to remove all the default steps because we need to start from scratch for .NET Core.

The first step is to install .NET Core SDK 3.0. Remember to state “3.0.x” as the version otherwise if there is a minor update to .NET Core 3.0, we will still be using the outdated one to build.

Step 1: Use .NET Core SDK 3.0

After that, we are going to do dotnet publish.

Starting with .NET Core 2.0, we don’t have to run dotnet restore because it’s run implicitly by all commands that require a restore to occur. Also dotnet publish will build the project, so we do not need to run dotnet build.

Since this is a WPF project, so we have to uncheck the “Publish Web Projects” checkbox, together with the other two checkboxes “Zip Published Projects” and “Add project name to publish path”, as shown in the screenshot below.

Step 2: dotnet publish

We also need to specify the output of the artifacts. We will put it in a directory known as $(Build.ArtifactStagingDirectory). This is actually a pre-defined variable that we can find in the Azure DevOps documentation. There is a link to this document in the Variables tab.

Now we proceed to add the next step, which is to publish the artifact. Here we specify $(Build.ArtifactStagingDirectory) as the path of the directory to publish. Then we also specify a user friendly name for the artifact.

Step 3: Publish Pipeline Artifact

Now we can click the “Save & queue” to run this pipeline.

In the published artifact, we will see the following.

Published artifact in our first attempt.

Wow, there are a lot of DLLs! The .exe file alone is only 157KB.

Fortunately, starting from .NET Core 3.0, as long as we specify the following in our csproj file, it will produce a single .exe file.

<PublishSingleFile>true</PublishSingleFile>

However, there is one more thing to take note is that if we miss out the <RuntimeIdentifier>, there will be an error NETSDK1097 which says, “It is not supported to publish an application to a single-file without specifying a RuntimeIdentifier. Please either specify a RuntimeIdentifier or set PublishSingleFile to false.”

<RuntimeIdentifier>win-x86</RuntimeIdentifier>

With this change, when we run the Build pipeline again, we get the following.

Published artifact with <PublishSingleFile>.

We now only have one .exe file but its size has grown from 157KB to 145MB!

There is mixed feeling for developers in .NET CoreRT project. In their discussion about CoreRT future, they’re disappointed about CoreRT not being mentioned, instead PublishSingleFile was mentioned in the .NET Conf 2019.

“CoreRT is the only right approach” (Image Soure: .NET CoreRT Issue #7200)

In fact, according to Scott Hanselmen’s blog post “Making a tiny .NET Core 3.0 entirely self-contained single executable”, he suggested to set <PublishTrimmed> to be true to trim out unused codes so that now the .exe will be smaller.

Published artifact with additional <PublishTrimmed>.

Cool, now we have a .exe file with 89MB, instead of the one over 100MB.

With this .exe file, we can proceed to the release of our application.

Releasing WPF Application in VS App Center

VS App Center was launched in 2017, which was previously known as VS Mobile Center. When it was first launched, it was mainly for Android, iOS, macOS, and Windows apps. The “Windows apps” here refer to UWP apps. Only in August 2019, WinForm and WPF applications are supported.

WinForms and WPF are now available on VS App Center but still in preview.

So, the artifact generated in Azure DevOps Build pipeline cannot be automatically delivered to VS App Center even after .NET Conf 2019. We now have to do it manually.

Firstly, we need to download the actifact as a zipped file in Azure DevOps.

Secondly, we need to upload the zipped file to the VS App Center in its Releases tab, as shown in the following screenshot.

Setting Build version to 1 because this is our first release of the app.

After keying the release notes, we will be landed on a page to choose who we should distribute the app to. Normally they are our developers, business analysts, and testers. Here, in my example, I only have one group called Collaborator and I am the only one in the group.

We are not allowed to add those who are not in our App Center as testers.

Finally, we will hit the “Distribute” button to release our app to testers. As tester, I will receive the email notifying about the new release.

Yay, new release available for in-house testing.

Analytics with App Center SDK

We can also integrate our WPF desktop app with App Center SDK to further collect data to find out how people use our app as well as the crashes in our app.

To do so, firstly, we need to install the following two Nuget packages. As the support for WPF SDK is still in preview, please remember to check the “Include prerelease” checkbox.

  • Microsoft.AppCenter.Analytics;
  • Microsoft.AppCenter.Crashes.
SQLitePLCRaw is being installed when we install the App Center SDK.

Now we can proceed to put the following code in the first window that will be launched in our app. In my case, it is the MainWindow. So, right after the InitializeComponent() is called, the following codes will be executed.

AppCenter.Start("<app-secret>", 
    typeof(Analytics), typeof(Crashes)); 

The App Secret can be found in the code sample of the Overview page in VS App Center.

However, if we run the WPF app now, the Analytics Overview page in VS App Center will still say there is no data. Why is it so?

No analytics, how come?

It turns out that, as highlighted in .NET Conf 2019, there is a bug in the preview SDK.

Daniel Jacobson mentions about the bug. (Image source: YouTube video)

So what we need to do is simply to add the following line in <ItemGroup> in the .csproj file.

<PackageReference Include="SQLitePCLRaw.lib.e_sqlite3.v110_xp" Version="1.1.14" />

Yup, if you have noticed earlier when we’re installing the App Center SDK, SQLitePCLRaw was being installed also. Just because of the bug in the SDK, this line was not added to the project file and thus we have to manually reference it. Hopefully this bug gets fixed soon.

Now when we launch our WPF app again, the nice dashboard will show there is 1 user. Yay!

+1 active user in our app!

Conclusion

That’s all so far for what I’d like to share in addition to what I have shared in .NET Conf Singapore 2019.

Happy .NET Conf 2019 from Singapore! (Image Credit: .NET Developers Community Singapore)

If you spot any mistake or you have any suggestion to make, please let me know in the Comments section below. Thank you!

References

Handwritten Text Recognition, OCR, and Key Vault

Recently, I am glad to have help from Marvin Heng, the Microsoft MVP in Artificial Intelligence category, to work with me on building an experiment tool, FutureNow, to recognize handwritten texts as well as apply OCR technology to automate forms processing.

In January 2019, we also successfully presented our solution during the Singapore .NET Developers Community meetup. Taking the opportunity, I also presented how Azure Key Vault is used in our project to centralize our key and secret management.

Marvin is sharing with the audience about Custom Vision during the meetup.

Hence, in this article, I’d like to share about this project in terms of how we use Cognitive Services and Key Vault.

Code Repository

The code of our project is available in both Azure DevOps and Github. I will update both places to make sure the codes are updated.

The reason I have my codes in both places because the project is originally collaborated in Azure DevOps. However, during meetup, I realized majority of the audience still prefer us to have our codes on Github. Well…

Azure DevOps: https://dev.azure.com/gohchunlin/JobCreationAutomation
Github: https://github.com/sg-dotnet/text-recognition-ocr

Our “FutureNow” tool where user can use it to analyze text on images.

Custom Vision

What Marvin has contributed fully is to implement a function to detect and identify the handwritten texts in the uploaded image.

To do so, he first created a project in Custom Vision to train the model. In the project, he uploaded many images of paper documents and then labelled the handwritten texts found on the paper.

The part where the system analyzes the uploaded image and finds the handwriting part is in the TagAndAnalyzeService.cs.

In the AnalyzeImageAsync method, we first use the Custom Vision API which is linked to Marvin’s project to identify which parts in the image are “probably” handwritten.

At this point of time, the system still cannot be hundred-percent sure the parts it identifies as handwritten text really contain handwritten text. Hence, the result returns from the API contains a probability value. That’s why we have a percentage bar on our front-end to control the threshold for this probability value to accept only those results having a higher probability value will be accepted.

Handwritten Text Extraction with Computer Vision

After the previous step is done, then we will crop those filtered sections out from the uploaded image and then send each of the smaller image to the text recognition API in Cognitive Service to process the image and to extract out the text.

Hence in the code, the HandwrittenRecognitionService will be called to perform the image processing with the Computer Vision API version 1.0 recognizeText method.

There is an interesting do…while loop in the method. The loop is basically used to wait for the API to return the image processing results. It turns out that most of the time, the API will not directly return the result. Instead, it will return a JSON object telling us that it’s still processing the image. Only when it returns the JSON object with status set to “Succeeded”, then we know that the analysis result is returned together in the JSON object.

do
{
var textOperation = response.Headers.GetValues("Operation-Location").FirstOrDefault();

var result = await client.GetAsync(textOperation);

string jsonResponse = result.Content.ReadAsStringAsync().Result;

var handwrittenAnalyzeResult = JsonConvert.DeserializeObject(jsonResponse);

isAnalizying = handwrittenAnalyzeResult.Status != "Succeeded";

if (!isAnalizying)
{
return handwrittenAnalyzeResult;
}
} while (isAnalizying);

In order to display to the user in front-end the results, we will store the cropped images in Azure Blob Storage and then display both the images and their corresponding extracted texts on the web page.

Unfortunately, the reading of handwritten text from images is a technology which is still currently in preview and is only available for English text. Hence, we need to wait a while until we can deploy it for production use.

OCR with Computer Vision

Using Computer Vision to perform OCR can better detect and extract text in an image especially when the image is a screenshot of a computer generated PDF file.

In OpticalCharacterRecognitionService, we simply call the Computer Vision API OCR method with the uploaded image and language set to English by default, then we can easily get the result of the OCR back in JSON format.

Key Vault

Key Vault in this project is mainly for managing the keys and connection string to the Azure Blob Storage.

Secrets of the FutureNow project in the Azure Key Vault.

To retrieve any of the secrets, we simply make use of the Microsoft.Azure.KeyVault Nuget package, as shown below.

var azureServiceTokenProvider = new AzureServiceTokenProvider();

var keyVaultClient = new KeyVaultClient(new KeyVaultClient.AuthenticationCallback(azureServiceTokenProvider.KeyVaultTokenCallback));

var secret = await keyVaultClient.GetSecretAsync($"https://futurenow.vault.azure.net/secrets/{ secretName }").ConfigureAwait(false);

According to Microsoft Azure documentation, there are service limits in Key Vault to ensure quality of service provided. Hence, when a service threshold is exceeded, any further requests from the client will not get successful response from Key Vault. Instead, HTTP status code 429 (Too many requests) will be returned.

There is an official guidance to handle Key Vault throttling. Currently, the code sample provided in the sample is not correct because the retry and waitTime variables are not used.

Incorrect sample code provided in Microsoft Docs.

Regarding this problem, I have raised issues (#22859 and #22860) and submitted a pull request to Microsoft on Github. Currently the PR is not yet approved but both Bryan Lamos and Prashanth Yerramilli have agreed that the code is indeed incorrect. Anyway, in our KeyVaultService class, the code has already been corrected.

EDIT (26 January 2019): The pull request has been approved. =)

Conclusion

Even though this project is just an experimental project for us to understand more about the power of Custom Vision and Computer Vision, I am glad that through this project, I manage to learn additional knowledge about Blob Storage, Azure DevOps, Key Vault, etc. and then later share it with the Singapore .NET Developers Community members.

Special thanks to Marvin for helping me in this project.