Protect Your ASP .NET Applications

ASP .NET MVC - Entity Framework - reCAPTCHA - OWASP - JSON

Here is a just a few items that I learnt on how to protect and secure my web applications in recent ASP .NET projects.

reCAPTCHA in Razor

CAPTCHA is an acronym for “Completely Automated Public Turing test to tell Computers and Humans Apart”.

CAPTCHA is a program to find out if the current user is whether a human or a robot by asking the user to do some challenge-response tests. This feature is important in some websites to prevent machine to, for example, auto login to the websites, to do online transactions, to register as members, and so on. Luckily, it’s now very easy to include CAPTCHA in our ASP .NET MVC web applications.

Register your website here to use reCAPTCHA: https://www.google.com/recaptcha/admin.

reCAPTCHA is a free Google CAPTCHA service that comes in the form of widget that can be added to websites easily. So, how do we implement reCAPTCHA in our ASP .NET MVC sites?

The library that I use is called ReCaptcha for MVC5, which can be downloaded from Codeplex. With the help of it, I am able to easily plugin reCAPTCHA in my MVC5 web applications.

After adding ReCaptcha.Mvc5.dll in my project, I will need to import its namespace to the Razor view of the page which needs to have reCAPTCHA widget.

@using ReCaptcha.Mvc5;

To render the reCAPTCHA widget in, for example, a form, we will do the following.

< div class="form-group">
    @Html.LabelFor(model => model.recaptcha_response_field, new { @class = "control-label col-md-2" })
    < div class="col-md-10">
        <!--Render the recaptcha-->
        @Html.reCAPTCHA("<public key here>")
    < /div>
 < /div>

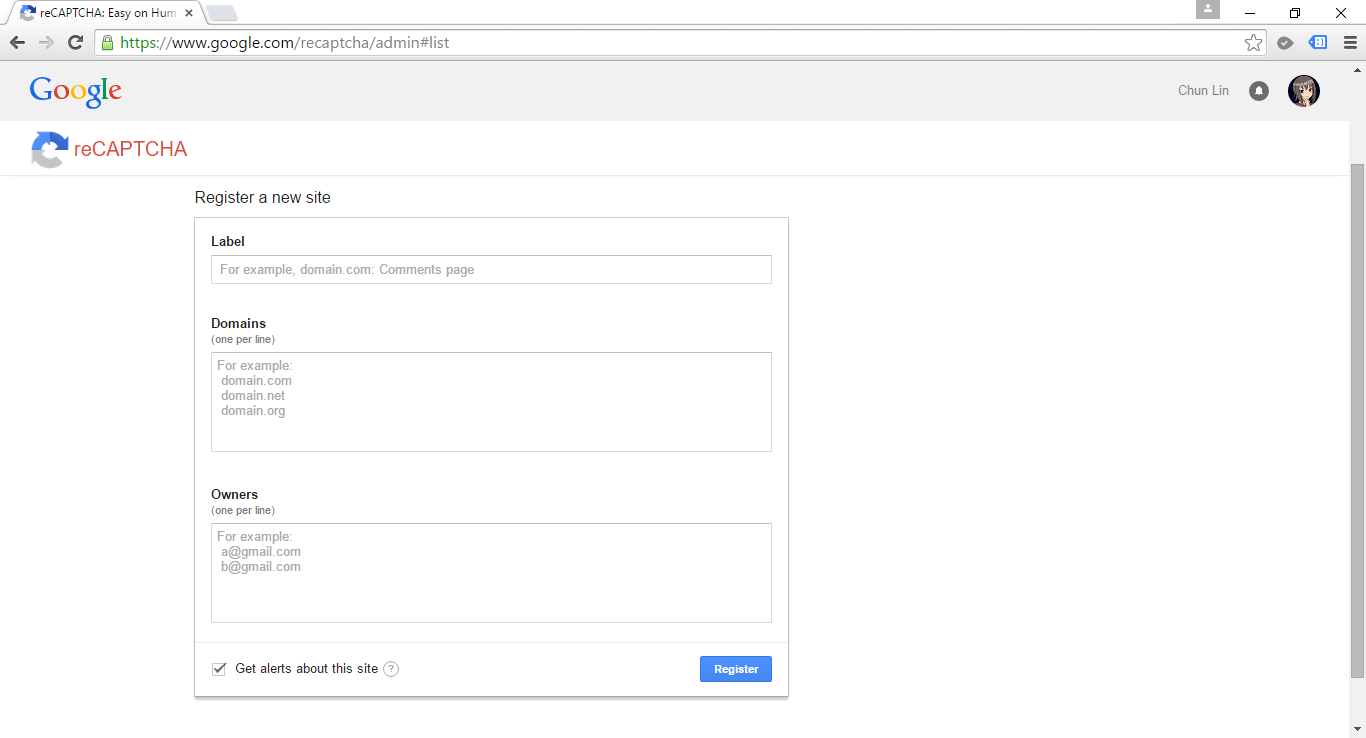
The public key can be retrieved from the official reCAPTCHA page after you register your website there.

reCAPTCHA Widget on Website

In the code above, there is a field called recaptcha_response_field, which will be added in our model class as demonstrated below.

public class RegistrationViewModel : ReCaptchaViewModel
{
    ...

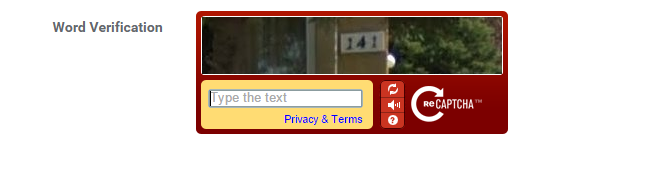
    [Display(Name = "Word Verification")]
    public override string recaptcha_response_field { get; set; }
}

To do verification in the controller, we will have the following code to help us.

[HttpPost]
[ValidateAntiForgeryToken]
public async Task<ActionResult> Register(RegistrationViewModel registrationVM)
{
    ...

    if (!string.IsNullOrEmpty(checkoutVM.recaptcha_response_field))
    {
        // Verify the recaptcha response.
        ReCaptchaResponse response = 
            await this.verifyReCAPTCHA(registrationVM, "<private key here>", true);

        if (response.Success)
        {
            // Yay, the user is human!
        } 
        else 
        {
            ModelState.AddModelError("", "Please enter correct verification word.");
        }
    }
}

The private key can also be found in the official reCAPTCHA page after you have submitted your website.

After doing all these, you are now be able to have a working reCAPTCHA widget in your website.

XSRF: Cross-Site Request Forgery

In the controller code above, there is one attribute called ValidateAntiForgeryToken. The purpose of this attribute is to prevent XSRF by adding anti-forgery tokens in both a hidden form field and the cookies to the server.

I draw a graph for me to better explain about what XSRF is.

XSRF (Cross-Site Request Forgery)

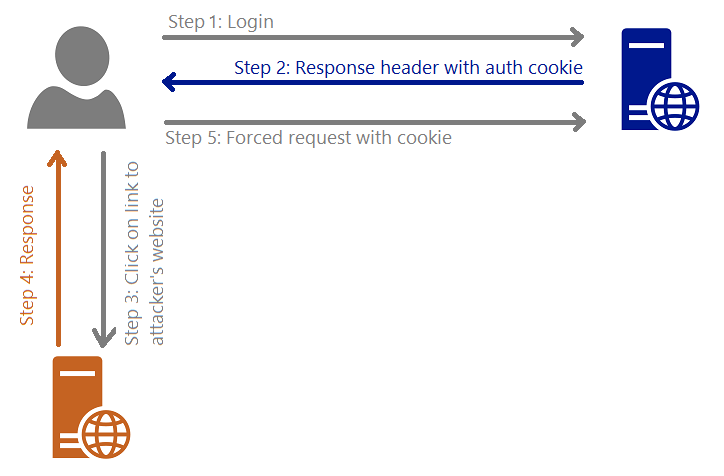
Steps are as follows.

  1. The user logs in to, for example, a bank website.
  2. The response header from the bank site will contain the user’s authentication cookie. Since authentication cookie is a session cookie, it will only be cleared when the process ends. Thus, until that time, the browser will always include the cookie with each request to the same bank website.
  3. The attacker sends to the user a link and somehow encourage the user to click on it. This causes sending a request to the attacker’s server.
  4. The attacker website has the following form.
    <body onload="document.getElementById('attack-form').submit()">
        <form id="fm1" action="https://bank.com/TransferMoney" method="post">
            <input name="transferTo" value="attackerAccount" />
            <input name="currency" value="USD" />
            <input name="money" value="7,000,000,000" />
        </form>
    </body>
  5. Because of Step 4, the user will be forced to send a request to the bank website to transfer money to attacker’s account with the user’s authentication cookie.

Hence, the attribute ValidateAntiForgeryToken helps to avoid XSRF by checking both the cookie and form have anti-forgery tokens and their values match.

Mass-Assignment Vulnerability and Over-Posting Attack

Few years ago, Github was found to have Mass-Assignment Vulnerability. The vulnerability allows people to perform Over-Posting Attack to the site so that the attackers can modify data items which are not normally allowed to access. Due to the fact that ASP .NET MVC web application is using Model Binding, the same vulnerability can happen in ASP .NET MVC environment as well.

You want to control what is being passed into the binder.

There are two my personal favourite solutions to avoid Over-Posting Attack.

One is using Bind attribute in the controller method. For example, in order to prevent users editing the value of isAdmin when they update their profile, I can do something as follows.

[HttpPost]
public ViewResult Edit([Bind(Exclude = "IsAdmin")] User user)
{
    ...
}

Alternatively, we can also use “Include” to define those fields that should be included in the binding.

Second solution is using view model. For example, the following class will not contain properties such as IsAdmin which are not allowed to be edited in the form post of profile edit.

public class UserProfileUpdateViewModel
{
    public string FirstName { get; set; }
    public string LastName { get; set; }
    ...
}

XSS: Cross-Site Scripting

According to OWASP (Open Web Application Security Project), XSS attacks

…are a type of injection, in which malicious scripts are injected into otherwise benign and trusted web sites… Flaws that allow these attacks are quite widespread and occur anywhere a web application uses input from a user within the output it generates without validating or encoding it.

Kirill Saltanov from NUS is explaining to guests about XSS during 5th STePS event.

Currently, by default ASP .NET will throw exception if potentially dangerous content is detected in the request. In addition, the Razor view engine protect us against most of the XSS attacks by encoding data which is displayed to web page via the @ tag.

In View, we also need to encode any user-generated data that we are putting into our JavaScript code. Starting from ASP .NET 4.0, we can call HttpUtility.JavaScriptStringEncode. HttpUtility.JavaScriptStringEncode helps to encode a string so that it is safe to display and characters are escaped in a way that JavaScript can understand.

In order to avoid our database to have malicious markup and script, we need to encode the user inputs in the Controller as well using Server.HtmlEncode.

[AllowHtml]

There are some cases where our web application should accept HTML tags. For example, we have a <textarea> element in our blogging system where user can write the content of post, then we need to skip the default checking of ASP .NET.

To post HTML back to our Model, we can simply add the [AllowHtml] attribute to the corresponding property in the Model, for example

public class BlogPost {
    [Key]
    public int ID { get; set; }
    ...
    [AllowHtml]
    public string Content { get; set; }
}

Then in the View, we will need to use @Html.Raw to tell Razor not to encode the HTML markup.

@Html.Raw(post.Content)

Wait… Won’t this make XSS attack possible in our website? Yup, of course. So, we must be very careful whenever we are trying to bypass the Razor encoding. The solution will then be using AntiXSS encoding library from Microsoft.

AntiXSS uses a safe list approach to encoding. With its help, we will then able to remove any malicious script from the user input in the Controller, as demonstrated below.

[HttpPost]
[ValidateAntiForgeryToken]
public ActionResult CreatePost(BlogPost post)
{
    if (ModelState.IsValid)
    {
        ...
        post.Content = Sanitizer.GetSafeHtmlFragment(post.Content);
        ...
        db.BlogPosts.Add(post);
        db.SaveChanges();
        return RedirectToAction("Index");
    }
    return View(post);
}

ASP .NET Request Validation

Previously in the discussion of XSS, we know that by default ASP .NET throws exception if potentially dangerous content is detected in the request. This is because of the existence of ASP .NET Request Validation.

However, according to OWASP, Request Validation should not be used as our only method of XSS protection because it does not guarantee to catch every type of invalid input.

HttpOnly Cookies

In order to reduce the risk of XSS, popular modern browsers have added a new attribute to cookie called HttpOnly Cookie. This new attribute specifies that a cookie is not accessible through script. Hence, it prevents the sensitive data contained in the cookie can be sent to attacker’s side via malicious JavaScript in XSS attack.

When a cookie is labelled as HttpOnly, it tells the browser that the cookie should only be accessed by the server. It is very easy to check which cookies are HttpOnly in the developer tool of modern browsers.

Microsoft Edge F12 Developer Tools can tell which are the HttpOnly cookies.

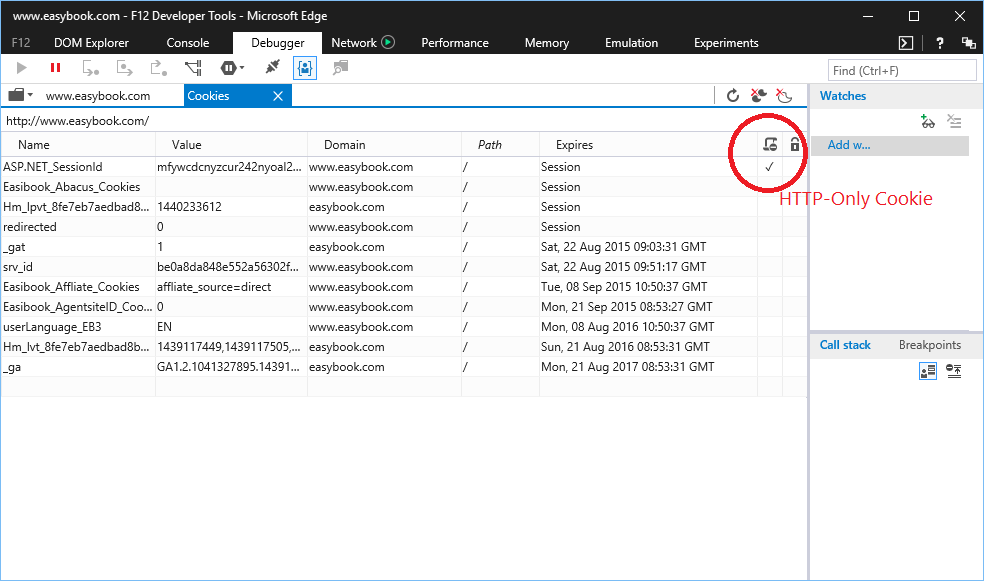
So, how do we create HttpOnly cookies in ASP .NET web applications? Just add a new line to set HttpOnly attribute of the cookie to true is fine.

HttpCookie myCookie = new HttpCookie("MyHttpOnlyCookie");
myCookie["Message"] = "Hello, world!";
myCookie.Expires = DateTime.Now.AddDays(30);
myCookie.HttpOnly = true;
Response.Cookies.Add(myCookie);

Alternatively, HttpOnly attribute can be set in web.config.

<httpCookies httpOnlyCookies="true" ...>

However, as pointed out in OWASP, if a browser is too old to support HttpOnly cookie, the attribute will be ignored by the browser and thus the cookies will be vulnerable to XSS attack. Also according to MSDN, HttpOnly does not prevent attacker with access to the network channel from accessing the cookie directly, so it recommends the use of SSL in addition of HttpOnly attribute.

HttpOnly Cookie was introduced in 2002 in IE6. Firefox 2.0.0.5 only supported HttpOnly attribute in 2007, 5 years later. However, soon people realized that in Firefox, there was still a bug in the HttpOnly implementation. Firefox allowed attackers to do an XMLHttpRequest to get the cookie values from the HTTP Response headers. 2 years later, in 2009, Mozilla finally fixed the bug. Since then, the XMLHttpRequest can no longer access the Set-Cookie and Set-Cookie2 headers of any response no matter the HttpOnly attribute is set to true or not.

Browserscope provides a good overview about the security functionalities in major browsers.

SQL Injection and Entity SQL

When I first learned SQL in university, I always thought escaping user inputs helped to prevent SQL Injection. This approach doesn’t work actually. I just read an article written by Steve Friedl regarding how escaping the input strings does not protect our applications from being attacked by SQL Injection. The following is the example Steve gave.

SELECT fieldlist
FROM table
WHERE id = 23 OR 1=1;  -- Boom! Always matches!

When I was working in the Summer Fellowship Programme, I started to use Parameterized SQL.

SqlConnection conn = new SqlConnection(connectionString); 
conn.Open(); 
string sql = "SELECT fieldlist FROM table WHERE id = @id";
SqlCommand cmd = new SqlCommand(sql); 
cmd.Parameters.Add("@id", SqlDbType.Int, id); 
SqlDataReader reader = cmd.ExecuteReader();

This approach provides a huge security performance benefits.

In January, I started to learn Entity Framework. In Entity Framework, there are three types of queries:

  • Native SQL
  • Entity SQL
  • LINQ to Entity

In the first two types, there is a risk of allowing SQL Injection if the developers are not careful enough. Hence, it’s recommended to use parameterized queries. In addition, we can also use Query Builder Methods to safely construct Entity SQL, for example

ObjectQuery<Flight> query =
    context.Flights
    .Where("it.FlightCode = @code",
    new ObjectParameter("code", flightCode));

However, if we choose to use LINQ to Entity, which does not compose queries by using string manipulation and concatenation, we will not have the problem of being attacked by traditional SQL Injection.

JsonResult and JSON Hijacking

Using the MVC JsonResult, we are able to make our controller in ASP .NET MVC application to return Json. However, by default, ASP .NET MVC does not allow us to response to an HTTP GET request with a JSON payload (Book: Professional ASP .NET MVC 5). Hence, if we test the controller by just typing the URL directly in the browser, we will receive the following error message.

This request has been blocked because sensitive information could be disclosed to third party web sites when this is used in a GET request. To allow GET requests, set JsonRequestBehavior to AllowGet.

Since the method only accepts POST requests, unless Cross-Origin Resource Sharing (CORS) is implemented, the browser will be able to protect our data from returning the Json result to other domains.

This is actually a feature introduced by ASP .NET MVC team in order to mitigate a security threat known as JSON Hijacking. JSON Hijacking is an attack similar to XSRF where attacker can access cross-domain JSON data which is returned as array literals.

The reason why “returning JSON data as array” is dangerous is that although browsers nowadays stop us from making cross domain HTTP request via JavaScript, we are still able to use a <script> tag to make the browser load a script from another domain.

<script src="https://www.bank.com/Home/AccountBalance/12"></script>

Due to the fact that a JSON array will be treated as a valid JavaScript script and can thus be executed. So, we need to wrap the JSON result in an object, just like what ASP .NET and WCF do. The ASP.NET AJAX library, for example, automatically wraps JSON data with { d: [] } construct to make the returned value to become an invalid JavaScript statement which cannot be executed:

{"d" : ["balance", "$7,000,000,000.00"] }

So, to avoid JSON Hijacking, we need to

  1. never return JSON array
  2. not allow HTTP GET request to get the sensitive data

Nowadays, even though JSON Hijacking is no longer a known problem in modern browsers, it is still a concern because “you shouldn’t stop plugging a security hole just because it isn’t likely to be exploited“.

By the way, GMail was successfully exploited via JSON Hijacking. =)

Summer 2015 Self-Learning Project

This article is part of my Self-Learning in this summer. To read the other topics in this project, please click here to visit the project overview page.

Summer Self-Learning Banner

PRG Design Pattern

PRG stands for Post-Redirect-Get, a web development design pattern which targets to avoid duplicate form submissions because of refreshing the web page.

Currently, in most of the modern browsers, when we refresh the web page right after we submit a form in the page, we will receive a confirmation alert box asking if we confirm want to re-submit the same form.

The warning received when pressing F5 right after submitting a form on the page.

This can happen in an e-commerce website. If the customer accidentally pressed “Continue” button on the box to proceed, then there may be a duplicate online purchase. The confirmation box is good but it does not remove the risk of form re-submission.

To avoid all these issues, PRG web design pattern is introduced.

PRG design pattern can solve the problem of form re-submission.
PRG design pattern can solve the problem of form re-submission. (Image Credit: Wikipedia)

PRG and ASP .NET Web Form

In ASP .NET Web Form context, instead of returning a web page direct, we will do a Response.Redirect (302 Redirect) to a confirmation page (or redirect back to the original same page) first. So now user can safely refresh the result page without causing the form re-submission.

By using PRG design pattern, we will thus need to store the data somewhere so that the two web pages can communicate. For example, if we want to show the Receipt Order Number generated after the POST in the confirmation page, then we can store the number in Session variable.

PRG and ASP .NET MVC

In ASP .NET MVC, instead of using Response.Redirect, we will be using RedirectToAction. Then we will store the data in TempData for the next page to consume, for example.

Thoughts about PRG

PRG design patter is not good for every case having form submission involved. For example, if we have a report module that user can search by providing start date and end date, then it is fine to have form re-submission with every page refresh.

Summer 2015 Self-Learning Project

This article is part of my Self-Learning in this summer. To read the other topics in this project, please click here to visit the project overview page.

Summer Self-Learning Banner

Summer 2015 Self-Learning

Summer Self-Learning
It has been about half a year since I started to learn ASP .NET MVC and Entity Framework (EF). In this period of time, I have learnt about not just MVC and EF, but also Azure PaaS, Google Maps API, web application security, cool jQuery plugins, Visual Studio Online, etc.

In the beginning of May, I started to note down useful things I’d learned in my learning journey. Months of bringing together information in this summer has helped me compile my notes about what I’ve learned in the past 6 months. I have currently completed compiling notes for 17 topics that I’ve learnt in this summer.

I listed down the title of the 17 posts below to give you a quick overview about all the 17 topics.

Contents

ASP .NET MVC and Entity Framework

Security

Microsoft Azure

Google APIs

Web Development Tools

Learning After Work

I’m working in Changi Airport. The office working hour is from 8:30am to 6pm. In addition, I am staying quite far from the airport which will take about one hour for me to travel from home to office. Hence, the only time that I can have sufficient time to work on personal projects is weekends.

This summer self-learning project is originally planned to be done by the end of May. Normally, it takes me about one day to finish writing a post. After that, if I find any new materials about the topics, I will then modify the post again. Sometimes, however, I am just too tired and I would not write anything even though it’s weekend. Hence, I end up finishing all the 17 topics three months later.

This summer learning project covers not only what I’ve learnt in my personal projects, but also new skills that I learn in my workplace. I always enjoy having a chat with my colleagues about the new .NET technology, app development, Azure hosting, and other interesting development tools. So yup, these 17 articles combine all the new knowledge I acquire.

I’m also very happy that that I am able to meet developers from both .NET Developers Community Singapore and Azure Community Singapore and share with them what I’ve learnt. That gives me a great opportunity to learn from those experienced .NET developers. =)

Azure Community March Meetup in Microsoft Singapore office.

I am not that hardworking to work on personal projects every day. Sometimes, I will visit family and friends. Sometimes, I will travel with friends to overseas. Sometimes, I will play computer games or simply just sleep at home. So ya, this self-learning project takes a longer time to complete. =D

Working on personal projects after work is stressful also. Yup, so here is a music that helps reducing my stress. =)

Journey to ASP .NET MVC 5 (Episode 2)

ASP .NET MVC - Google Search - Automapper - Excel - Amazon SES

Previous Episode: https://cuteprogramming.wordpress.com/2015/03/01/journey-to-asp-net-mvc-5/

I first said hi to ASP .NET MVC in the beginning of this year. On 28th January, I attended the .NET Developers Singapore meetup and listened to Nguyen Quy Hy’s talk about ASP .NET MVC. After that, I have been learning ASP .NET MVC and applying this new knowledge in both my work and personal projects.

After 6 months of learning ASP .NET MVC, I decided to again write down some new things that I have learnt so far.

URL in ASP .NET MVC and Google Recommendation

According to Google recommendation on URLs, it’s good to have URLs to be as simple as possible and human-readable. This can be easily done with the default URL mapping in ASP .NET MVC. For example, the following code allows to have human-readable URL such as http://www.example.com/Ticket/Singapore-Airlines.

routes.MapRoute(
    name: "Customized",
    url: "Ticket/{airlineName}",
    defaults: new { controller = "Booking", action = "Details", airlineName = UrlParameter.Optional }
);

In addition, Google also encourages us to use hyphens instead of underscores in our URLs as punctuation to separate the words. However, by default, ASP .NET MVC doesn’t support hyphens. One of the easy solutions is to extend the MvcRouteHandler to automatically replace underscores with hyphens.

public class HyphenatedRouteHandler : MvcRouteHandler
{
    protected override IHttpHandler GetHttpHandler(RequestContext requestContext)
    {
        requestContext.RouteData.Values["controller"] =
        requestContext.RouteData.Values["controller"].ToString().Replace("-", "_");

        requestContext.RouteData.Values["action"] =
        requestContext.RouteData.Values["action"].ToString().Replace("-", "_");
 
        return base.GetHttpHandler(requestContext);
    }
}

Then in the RouteConfig.cs, we will replace the default route map to the following mapping.

routes.Add(
    new Route("{controller}/{action}/{id}",
    new RouteValueDictionary(
        new { controller = "Home", action = "Index", id = UrlParameter.Optional }),
        new HyphenatedRouteHandler())
);

By doing this, we can name our controllers and actions using underscores and then we set all the hyperlinks and links in sitemap to use hyphens.

There are actually many discussions about this online. I have listed below some of the online discussions that I found to be interesting.

  1. Allow Dashes Within URLs using ASP.NET MVC 4
  2. ASP .NET MVC Support for URL’s with Hyphens
  3. Asp.Net MVC: How Do I Enable Dashes in My URLs?
  4. Automate MVC Routing

MVC-ViewModel

Previously when I was working on WPF projects, I learnt the MVVM design pattern. So, it confused me when there was also a “View Model” in MVC. I thought with the use of View Model in ASP .NET MVC, I would be using MVVM too. It later turns out to be not the case.

In MVC, the View Model is only a class and is still considered part of the M (Model). The reason of having ViewModel is for the V (View) to have a single object to render. With the help of ViewModel, there won’t be too much of UI logic code in the V and thus the job of the V is just to render that single object. Finally, there will also be a cleaner separation of concerns.

Why is ViewModel able to provide the V a single object? This is because ViewModel can shape multiple entities from different data models into a single object.

public class CartViewModel
{
    ...

    public List<CartItems> items { get; set; }
 
    public UserProfile user { get; set; }
}

Besides, what I like about ViewModel is that it contains only fields that are needed in the V. Imagine the following model Song, we need to create a form to edit everything but the lyrics, what should we do?

The Song model.
The Song model.

Wait a minute. Why do we need to care about this? Can’t we just remove the Lyrics field from the edit form? Well, we can. However, generally we do not want to expose domain entities to the V.

If people manage to do a form post directly to your server, then they can add in the Lyrics field themselves and your server will happily accept the new Lyrics value. There will be a bigger problem if we are not talking about Lyrics, but something more critical, for example price, access rights, etc.

You want to control what is being passed into the binder.
You want to control what is being passed into the binder. (Image Credit: Microsoft Virtual Academy)

Please take note that the default model binder in ASP .NET MVC automatically binds all inbound properties.

The first simple solution is to use the bind attribute to indicate which properties to bind.

Edit([Bind(Include = "SongID,Title,Length")] Song song)

I don’t like this approach because it’s just a string. There are many mistakes can happen just because of having typo in a string.

So the second solution that I use often is creating a ViewModel which we can use to define only the fields that are needed in the edit form (V).

Same as M (Model), ViewModel also has validation rules using data annotation or IDataErrorInfo.

AutoMapper

By using ViewModel, we need to having mapping code to map between the view model and the domain model. However, writing mapping code is very troublesome especially when there are many properties involved.

Luckily, there is AutoMapper. AutoMapper performs object-object mapping by transforming an input object of one type into an output object of another type.

Mapper.CreateMap<Location, LocationViewModel>();

AutoMapper has a smart way to map the properties from view model and the domain model. If there is a property called “LocationName” in the domain model, AutoMapper will automatically map to a property with the same name “LocationName” in the view model.

Session, ViewData, ViewBag, and TempData

In my first e-commerce project which is using ASP .NET, Session is widely used. From small things like referral URL to huge cart table, all are stored in Session. Everyone in the team was satisfied with using Session until the day we realized we had to do load balancing.

There is a very interesting discussion on Stack Overflow about the use of Session in ASP .NET web applications. I like how one of them described Session as follows.

Fundamentally, session pollutes HTTP. It makes requests (often containing their own state) dependent on the internal state of the receiving server.

In the e-commerce project, we are using In-Process Session State. That means the session has “affinity” with the server. So in order to use load balancing in Microsoft Azure, we have to use Source IP Affinity to make sure the connections initiated from the same client computer goes to the same Datacenter IP endpoint. However, that will cause an imbalanced distribution of traffic load.

Another problem of using In-Process Session State is that once there is a restart on IIS or the server itself, the session variables stored on the server will be gone. Hence, for every deploy to the server, the customers will be automatically logged out from the e-commerce website.

Then you might wonder why we didn’t store session state in a database. Well, this won’t work because we store inserialisable objects in session variables, such as HtmlTable. Actually, there is another interesting mode for Session State, called StateServer. I will talk more about it in my another post about Azure load balancing.

Source IP Affinity
Source IP Affinity

When I was learning ASP .NET MVC in the beginning, I always found creating view model to be not intuitive. So, I used ViewBag and ViewData a lot. However, this caused headaches for code maintenance. Hence, in the end, I started to use ViewModel in MVC projects to provide better Separation of Concern and easily maintainable code. Nevertheless, I am still using ViewBag and ViewData to provide extra data from controller to view.

So what is ViewData? ViewData is a property allowing data to be passed from a controller to a view using a dynamic-bound dictionary API. In MVC3, a new dynamic property called ViewBag was introduced. ViewBag enables developers to use simpler syntax to do what ViewData can do. For example, instead of writing

ViewData["ErrorMessage"] = "Please enter your name";

, we can now write

 ViewBag.ErrorMessage = "Please enter your name";

.

ViewData and ViewBag help to pass data from a controller to a view. What if we want to pass data from a controller to another controller, i.e. redirection. Both ViewData and ViewBag will contain null values once the controller redirects. However, this is not the case for TempData.

There is one important feature in TempData is that anything stored in it will be discarded after it is accessed in the next request. So, it is useful to pass data from a controller to another controller. Unfortunately, TempData is backed by Session in ASP .NET MVC. So, we need to be careful when to use TempData as well and how it will behave in load balancing servers.

JsonResult

Sometimes, I need to return JSON-formatted content to the response. To do so, I will use JsonResult class, for example

[AllowCrossSiteJson]
public JsonResult GetAllMovies()
{
    Response.CacheControl = "no-cache";
    try
    {
        using (var db = new ApplicationDbContext())
        {
            var availableMovies = db.Movies.Where(m => m.Status).ToList();
            
            return Json(new 
            { 
                success = true, 
                data = availableMovies
            }, 
            JsonRequestBehavior.AllowGet);
        }
    }
    catch (Exception ex)
    {
        return Json(new 
        { 
            success = false, 
            message = ex.Message 
        }, 
        JsonRequestBehavior.AllowGet);
    }
}

There are a few new things here.

(1) [AllowCrossSiteJson]

This is my custom attribute to give access to requests coming from different domains. The following code shows how I define the class.

public class AllowCrossSiteJsonAttribute : ActionFilterAttribute
{
    public override void OnActionExecuting(ActionExecutingContext filterContext)
    {
        filterContext.RequestContext.HttpContext.Response.AddHeader(
            "Access-Control-Allow-Origin", "*");
       
        base.OnActionExecuting(filterContext);
    }
}

(2) Response.CacheControl = “no-cache”;

This is to prevent caching to the action. There is a great post on Stack Overflow which provides more alternatives to prevent caching.

(3) return Json()

This is to return an instance of the JsonResult class.

(4) success

If you are calling the GetAllMovies() through AJAX, probably you can do something as follows to check if there is any exception or error thrown.

$.ajax({
    url: '/GetAllMovies',
    success: function(data) {
        // No problem
    },
    error: function(XMLHttpRequest, textStatus, errorThrown) {
        var obj = JSON.parse(jqXHR.responseText);
        alert(obj.error);
    }
});

The error callback above will only be triggered when the server returns non-200 status code. I thus introduced another status field to tell the caller more info, for example an exception raised in C# code or any invalid value being passed to GetAllMovies method through AJAX. Hence, in the AJAX call, we just need to update it to

$.ajax({
    url: '/GetAllMovies',
    success: function(data) {
        if (data.success) {
            // No problem
        } else {
            alert(data.message);
        }
    },
    error: function(XMLHttpRequest, textStatus, errorThrown) {
        var obj = JSON.parse(jqXHR.responseText);
        alert(obj.error);
    }
});

(5) JsonRequestBehavior.AllowGet

To give permission to GET request for GetAllMovies method. This has thing to do with JSON Hijacking which will be discussed in my another post.

ActionResult

Other than JsonResult, there are many other ActionResult classes which represent the result of an action method and their respective helper methods.

Currently, I use the following frequently.

  1. ViewResult and View: Render a view as a web page;
  2. RedirectToRouteResult and RedirectToAction: Redirect to another action (TempData is normally used here);
  3. JsonResult and Json: Explained above;
  4. EmptyResult and null: Allow action method to return null.

Export Report to Excel

Two years ago, I wrote a post about how to export report to Excel in ASP .NET Web Form project. So, how do we export report to Excel in MVC project? There are two ways available.

First one can be done using normal ViewResult, as suggested in a discussion on Stack Overflow.

public ActionResult ExportToExcel()
{
    var sales = new System.Data.DataTable("Sales Report");
    sales.Columns.Add("col1", typeof(int));
    sales.Columns.Add("col2", typeof(string));

    sales.Rows.Add(1, "Sales 1");
    sales.Rows.Add(2, "Sales 2");
    sales.Rows.Add(3, "Sales 3");
    sales.Rows.Add(4, "Sales 4");

    var grid = new GridView();
    grid.DataSource = sales;
    grid.DataBind();

    Response.ClearContent();
    Response.Buffer = true;
    Response.AddHeader("content-disposition", "attachment; filename=Report.xls");
    Response.ContentType = "application/ms-excel";
    Response.Charset = "";
 
    StringWriter sw = new StringWriter();
    HtmlTextWriter htw = new HtmlTextWriter(sw);
    grid.RenderControl(htw);

    Response.Output.Write(sw.ToString());
    Response.Flush();
    Response.End();

    return View("Index");
}

Second way will be using FileResult, as suggested in another discussion thread on Stack Overflow. I simplified the code by removing the styling related codes.

public sealed class ExcelFileResult : FileResult
{
    private DataTable dtReport;

    public ExcelFileResult(DataTable dt) : base("application/ms-excel")
    {
        dtReport = dt;
    }

    protected override void  WriteFile(HttpResponseBase response)
    {
        // Create HtmlTextWriter
        StringWriter sw = new StringWriter();
        HtmlTextWriter tw = new HtmlTextWriter(sw);

        tw.RenderBeginTag(HtmlTextWriterTag.Table);

        // Create Header Row
        tw.RenderBeginTag(HtmlTextWriterTag.Tr);
        DataColumn col = null;
        for (int i = 0; i < dtReport.Columns.Count; i++)
        {
            col = dtReport.Columns[i];
            tw.RenderBeginTag(HtmlTextWriterTag.Th);
            tw.RenderBeginTag(HtmlTextWriterTag.Strong);
            tw.WriteLineNoTabs(col.ColumnName);
            tw.RenderEndTag();
            tw.RenderEndTag();
        }
        tw.RenderEndTag();

        // Create Data Rows
        foreach (DataRow row in dtReport.Rows)
        {
            tw.RenderBeginTag(HtmlTextWriterTag.Tr);
            for (int i = 0; i <= dtReport.Columns.Count - 1; i++)
            {
                tw.RenderBeginTag(HtmlTextWriterTag.Td);
                tw.WriteLineNoTabs(HttpUtility.HtmlEncode(row[i]));
                tw.RenderEndTag();
            }
            tw.RenderEndTag();
        }

        tw.RenderEndTag();

        // Write result to output-stream
        Stream outputStream = response.OutputStream;
        byte[] byteArray = Encoding.Default.GetBytes(sw.ToString());
        response.OutputStream.Write(byteArray, 0, byteArray.GetLength(0));
    }
}

To use the code above, we just need to do the following in our controller.

public ExcelFileResult ExportToExcel()
{
    ...
    ExcelFileResult actionResult = new ExcelFileResult(dtSales) 
    { 
        FileDownloadName = "Report.xls" 
    };

    return actionResult;
}

Sending Email

To send email from my MVC project, I have the following code to help me out. It can accept multiple attachments too. So I also use it to send email with report generated using the code above attached. =)

In the code below, I am using Amazon Simple Email Service (SES) SMTP.

public Task SendEmail(
    string sentTo, string sentCC, string sentBCC,  string subject, string body, 
    string[] attachments = null) 
{
    // Credentials:
    var credentialUserName = "<username provided by Amazon SES>;
    var sentFrom = "no-reply@mydomain.com";
    var pwd = "<password provided by Amazon SES>";

    // Configure the client:
    System.Net.Mail.SmtpClient client = 
        new System.Net.Mail.SmtpClient("email-smtp.us-west-2.amazonaws.com");
    client.Port = 25;
    client.DeliveryMethod = System.Net.Mail.SmtpDeliveryMethod.Network;
    client.UseDefaultCredentials = false;

    // Create the credentials:
    System.Net.NetworkCredential credentials = 
        new System.Net.NetworkCredential(credentialUserName, pwd);
    client.EnableSsl = true;
    client.Credentials = credentials;

    // Create the message:
    var mail = new System.Net.Mail.MailMessage(sentFrom, sentTo);
    string[] ccAccounts = sentCC.Split(new char[] { ';' }, StringSplitOptions.RemoveEmptyEntries);
 
    foreach (string ccEmail in additionalCcAccounts)
    {
        mail.CC.Add(ccEmail);
    }
    
    string[] bccAccounts = sentBCC.Split(new char[] { ';' }, StringSplitOptions.RemoveEmptyEntries);

    foreach (string bccEmail in additionalBccAccounts) 
    {
        mail.Bcc.Add(bccEmail); 
    }
    
    mail.Subject = subject;
    mail.Body = body;
    mail.IsBodyHtml = true;

    if (attachments != null) 
    {
        for (int i = 0; i < attachments.Length; i++)
        {
            mail.Attachments.Add(new System.Net.Mail.Attachment(attachments[i]));
        }
    }

    client.SendComplete += (s, e) => client.Dispose();
    return client.SendMailAsync(mail);
}

To send an email without attachment, I just need to do the following in action method.

var emailClient = new Email();
await emailClient.SendEmail(
    "to@mydomain.com", "cc1@mydomain.com;cc2@domain.com", "bcc@mydomain.com", 
    "Email Subject", "Email Body");

To send email with attachment, I will then use the following code.

string[] attachmentPaths = new string[1];

var reportServerPath = Server.MapPath("~/report");

attachmentPaths[0] = reportServerPath + "\\Report.xls";

var emailClient = new Email();
await emailClient.SendEmail(
    "admin@mydomain.com", "", "", 
    "Email Subject", "Email Body", attachmentPaths);

Yup, that’s all what I have learnt so far in my MVC projects. I know this post is very, very long. However, I am still new to MVC and thus I am happy to be able to share with you what I learn in the projects. Please correct me if you find anything wrong in the post. Thanks! =)

Summer 2015 Self-Learning Project

This article is part of my Self-Learning in this summer. To read the other topics in this project, please click here to visit the project overview page.

Summer Self-Learning Banner