In the previous article, we talked about using the S3 Object Lambda to transform the medical records, which are stored in a JSON file, into a presentable web page. However, maintaining medical records in JSON files could be challenging. In this article, we will further investigate how we can generate those JSON files.
We’re going to explore Pkl—pronounced “Pickle”—a configuration-as-code language renowned for its robust validation features and tooling. It was first introduced by Apple as an open-source project in February 2024. Pkl allows us to write configurations as code, validate them, and convert them to existing static formats.

About Pkl
Pkl streamlines the creation of JSON scripts, enhancing maintainability and reducing verbosity through reuse, templating, and abstraction, all supported seamlessly right out of the box.
As we can expect from our medical records in JSON, the JSON files will grow larger over time. Hence it will be increasingly difficult to maintain. Pkl can help reduce the size and complexity of our JSON files by introducing abstractions for common elements and describing similar elements in terms of their differences.
A .pkl file describes a module. Modules are objects that can be referred to from other modules.
Pkl comes with basic types, such as Numbers, Strings, Durations, etc. Having a notation for basic types, we can thus write typed objects. For example, the following module shows how we will define our medical records structure in Pkl.
module medicalVisitTemplate

class MedicalVisit {

    medicalCentreName: String

    centreType: "clinic"|"specialist"|"hospital"

    visitStartDate: Date

    visitEndDate: Date

    remark: String

    treatments: Listing<Treatment>

}

class Treatment {

    name: String

    type: "medicine"|"operation"|"scanning"

    amount: String

    startDate: Date

    endDate: Date

}

class Date {

    year: Int(isBetween(2000, 2100))

    month: Int(isBetween(1, 12))

    day: Int(isBetween(1, 31))
}

visits: Listing<MedicalVisit>
Listing is a collection in Pkl. It contains exclusively Elements, i.e., object members. In the code above, we define visits to be a collection of MedicalVisits. The MedicalVisit class contains information about the visit, for example type and name of the medical centres the patient visited, visiting period, remark, etc. The visiting period is then defined by Date class which stores year, month, and day.
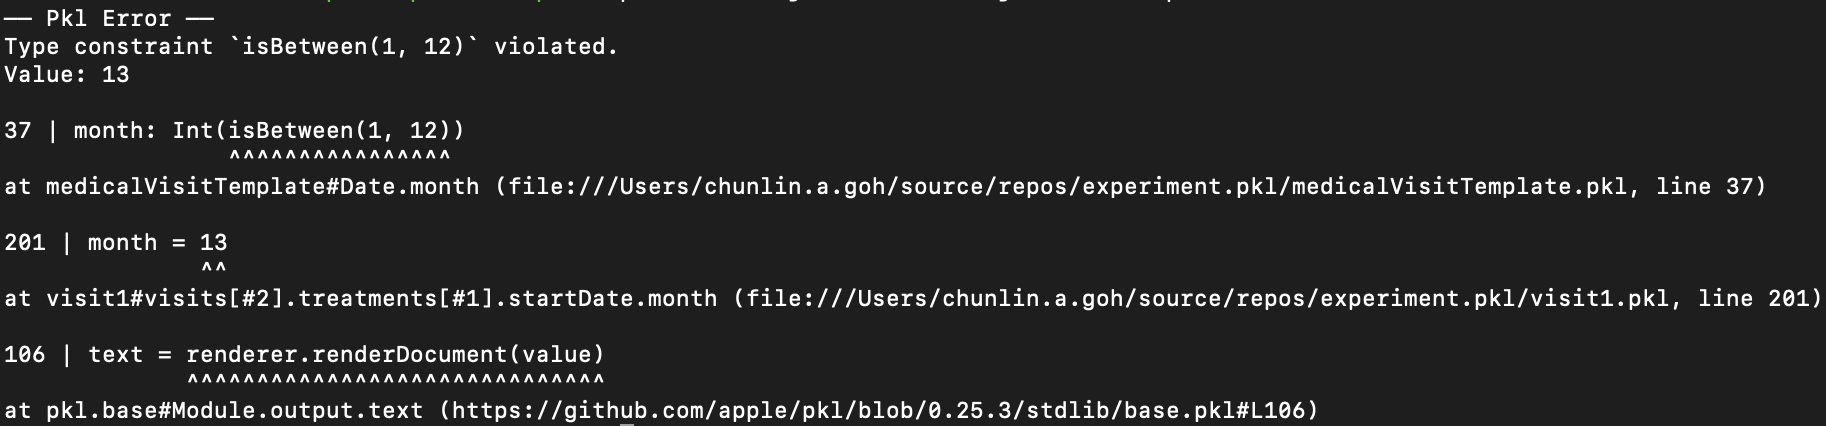
In the Date class, since the month can only be an integer from 1 to 12, so we can restrict it to an integer range by using Int and isBetween constraint. Later, as Pkl evaluates our configuration, if there is an invalid value, for example 13, provided to the month, there will be an error shown to us, as demonstrated below.
Generate JSON with Pkl
So now how do we generate JSON with the module above?
Before we can generate a JSON file, we need to understand the Amending concept in Pkl. As a first intuition, think of “amending a module” as “filling out a form.”
So, to generate the chunlin.json file that was shown in the previous blog post, we can amend the medicalVisitTemplate module above with another Pkl file called chunlin.pkl as shown below.
amends "medicalVisitTemplate.pkl"

visits = new Listing<MedicalVisit> {

    ...
    // Omitted for brevity

    new {

        medicalCentreName = "Tan Tock Seng Hospital"

        centreType = "hospital"

        visitStartDate {

            year = 2024

            month = 3

            day = 24

        }

        visitEndDate {

            year = 2024

            month = 4

            day = 19

        }

        remark = ""

        treatments = new Listing<Treatment> {

            ...
            // Omitted for brevity

            new {

                name = "Betamethasone (Valerate) 0.025% Cream 15g - Dermasone"

                type = "medicine"

                amount = "Applied after shower"

                startDate {

                    year = 2024

                    month = 3

                    day = 26

                }

                endDate {

                    year = 2024

                    month = 4

                    day = 19

                }

            }

            new {

                name = "Betamethasone (Valerate) 0.1% Cream 15g - Uniflex(TM)"

                type = "medicine"

                amount = "Applied after shower"

                startDate {

                    year = 2024

                    month = 3

                    day = 26

                }

                endDate {

                    year = 2024

                    month = 4

                    day = 19

                }

            }

        }

    }

}
Now if we execute the command below on Pkl CLI to evaluate the given modules and render the
$ ./pkl eval -f json -o ./output/chunlin.json ./input/chunlin.pkl
With the command above, we can get the same output as we see in chunlin.json.
Maintain Pkl in GitHub
Static files like Pkl or JSON can be easily maintained in code repositories such as GitHub. Using GitHub for version control allows us to track changes to our PKL files over time. This makes it easy to revert to previous versions if something goes wrong, compare changes, and understand the evolution of our configuration files. Additionally, we can use GitHub Actions to automate various tasks related to our PKL files, enhancing efficiency and reliability in our workflow.
GitHub Actions is an automation tool that allows us to create workflows triggered by events within our repository. These workflows can automate tasks like testing, building, and deploying code, or even running scripts. By using GitHub Actions, we can streamline the development and transformation process of our Pkl files, ensure consistency, and improve efficiency.
Thus, our mission is now to configure GitHub Actions so that a JSON file can be produced from the Pkl file and sent to the Amazon S3 bucket that we setup in another article earlier.
Configure GitHub Actions Workflow
Firstly, we need to give permission to GitHub Actions to access our S3 bucket. To do so, we will create a new user in AWS Console with appropriate rights.
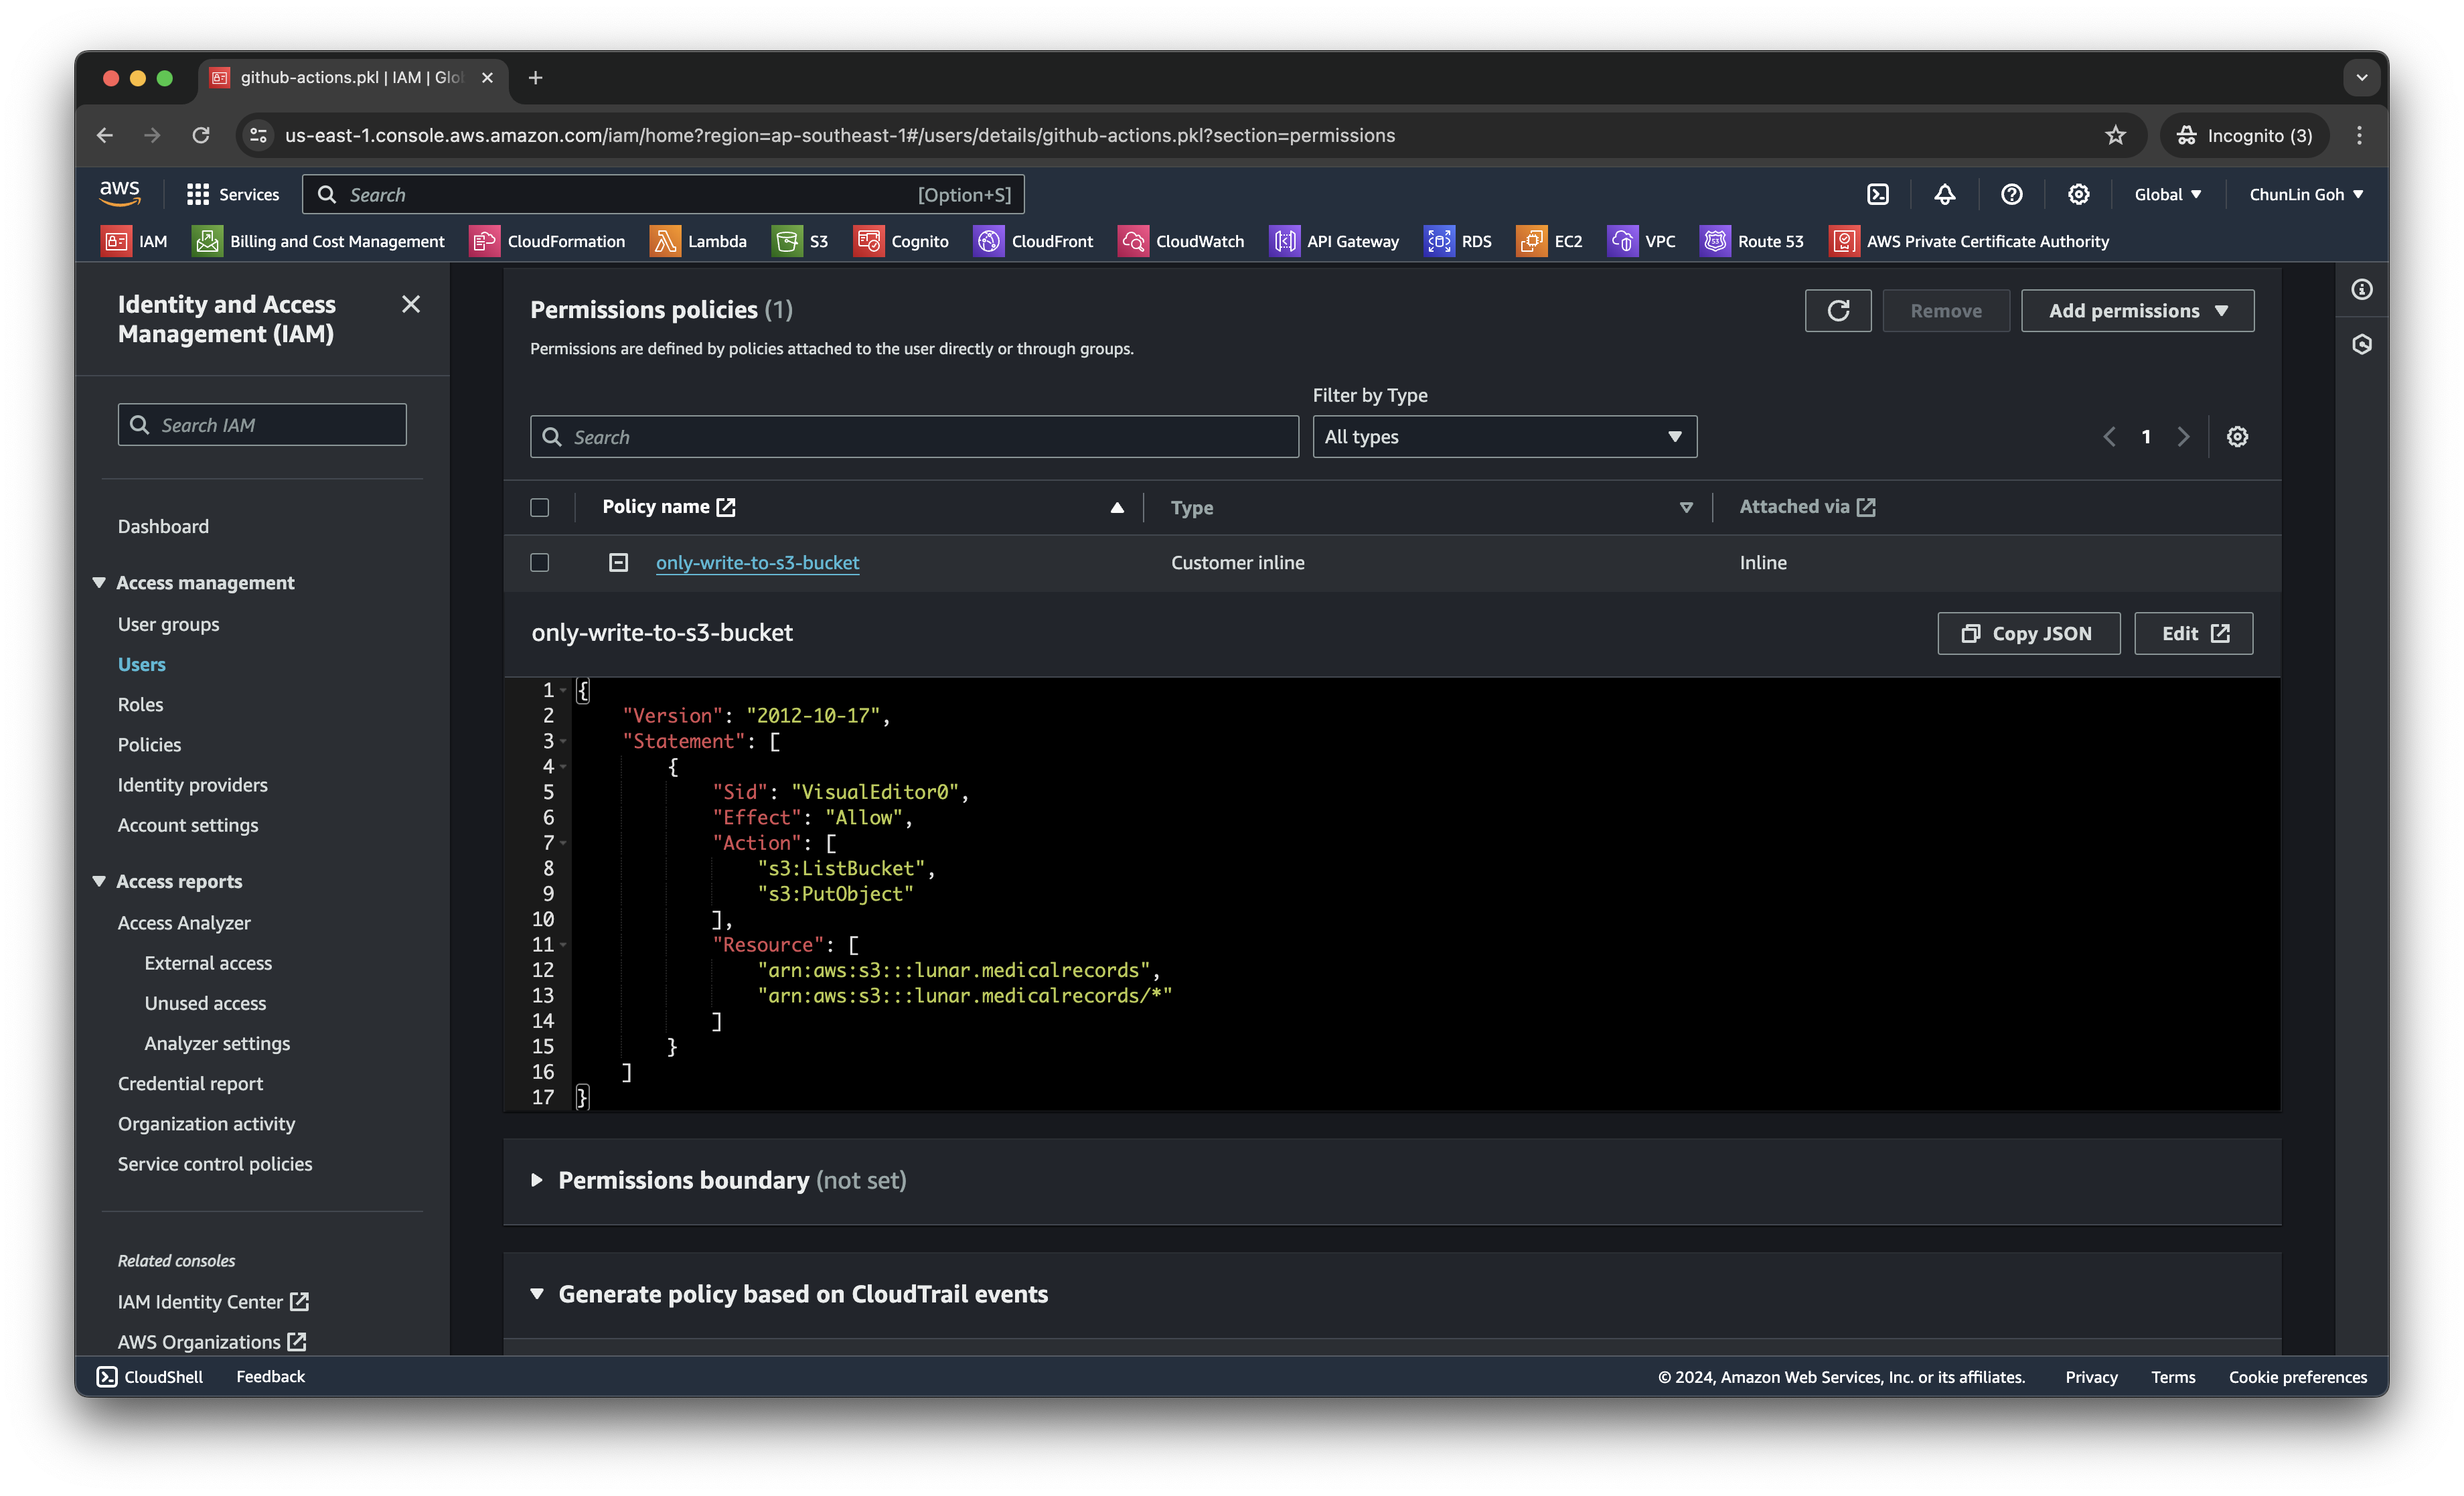
s3:ListBucket and s3:PutObject, to copy files from local to the S3 bucket.After attaching the policy, we proceed to generate an access key for this newly created user.
Secondly, we need to navigate to our repository and then click on the Actions tab to create a new simple workflow, as shown below.
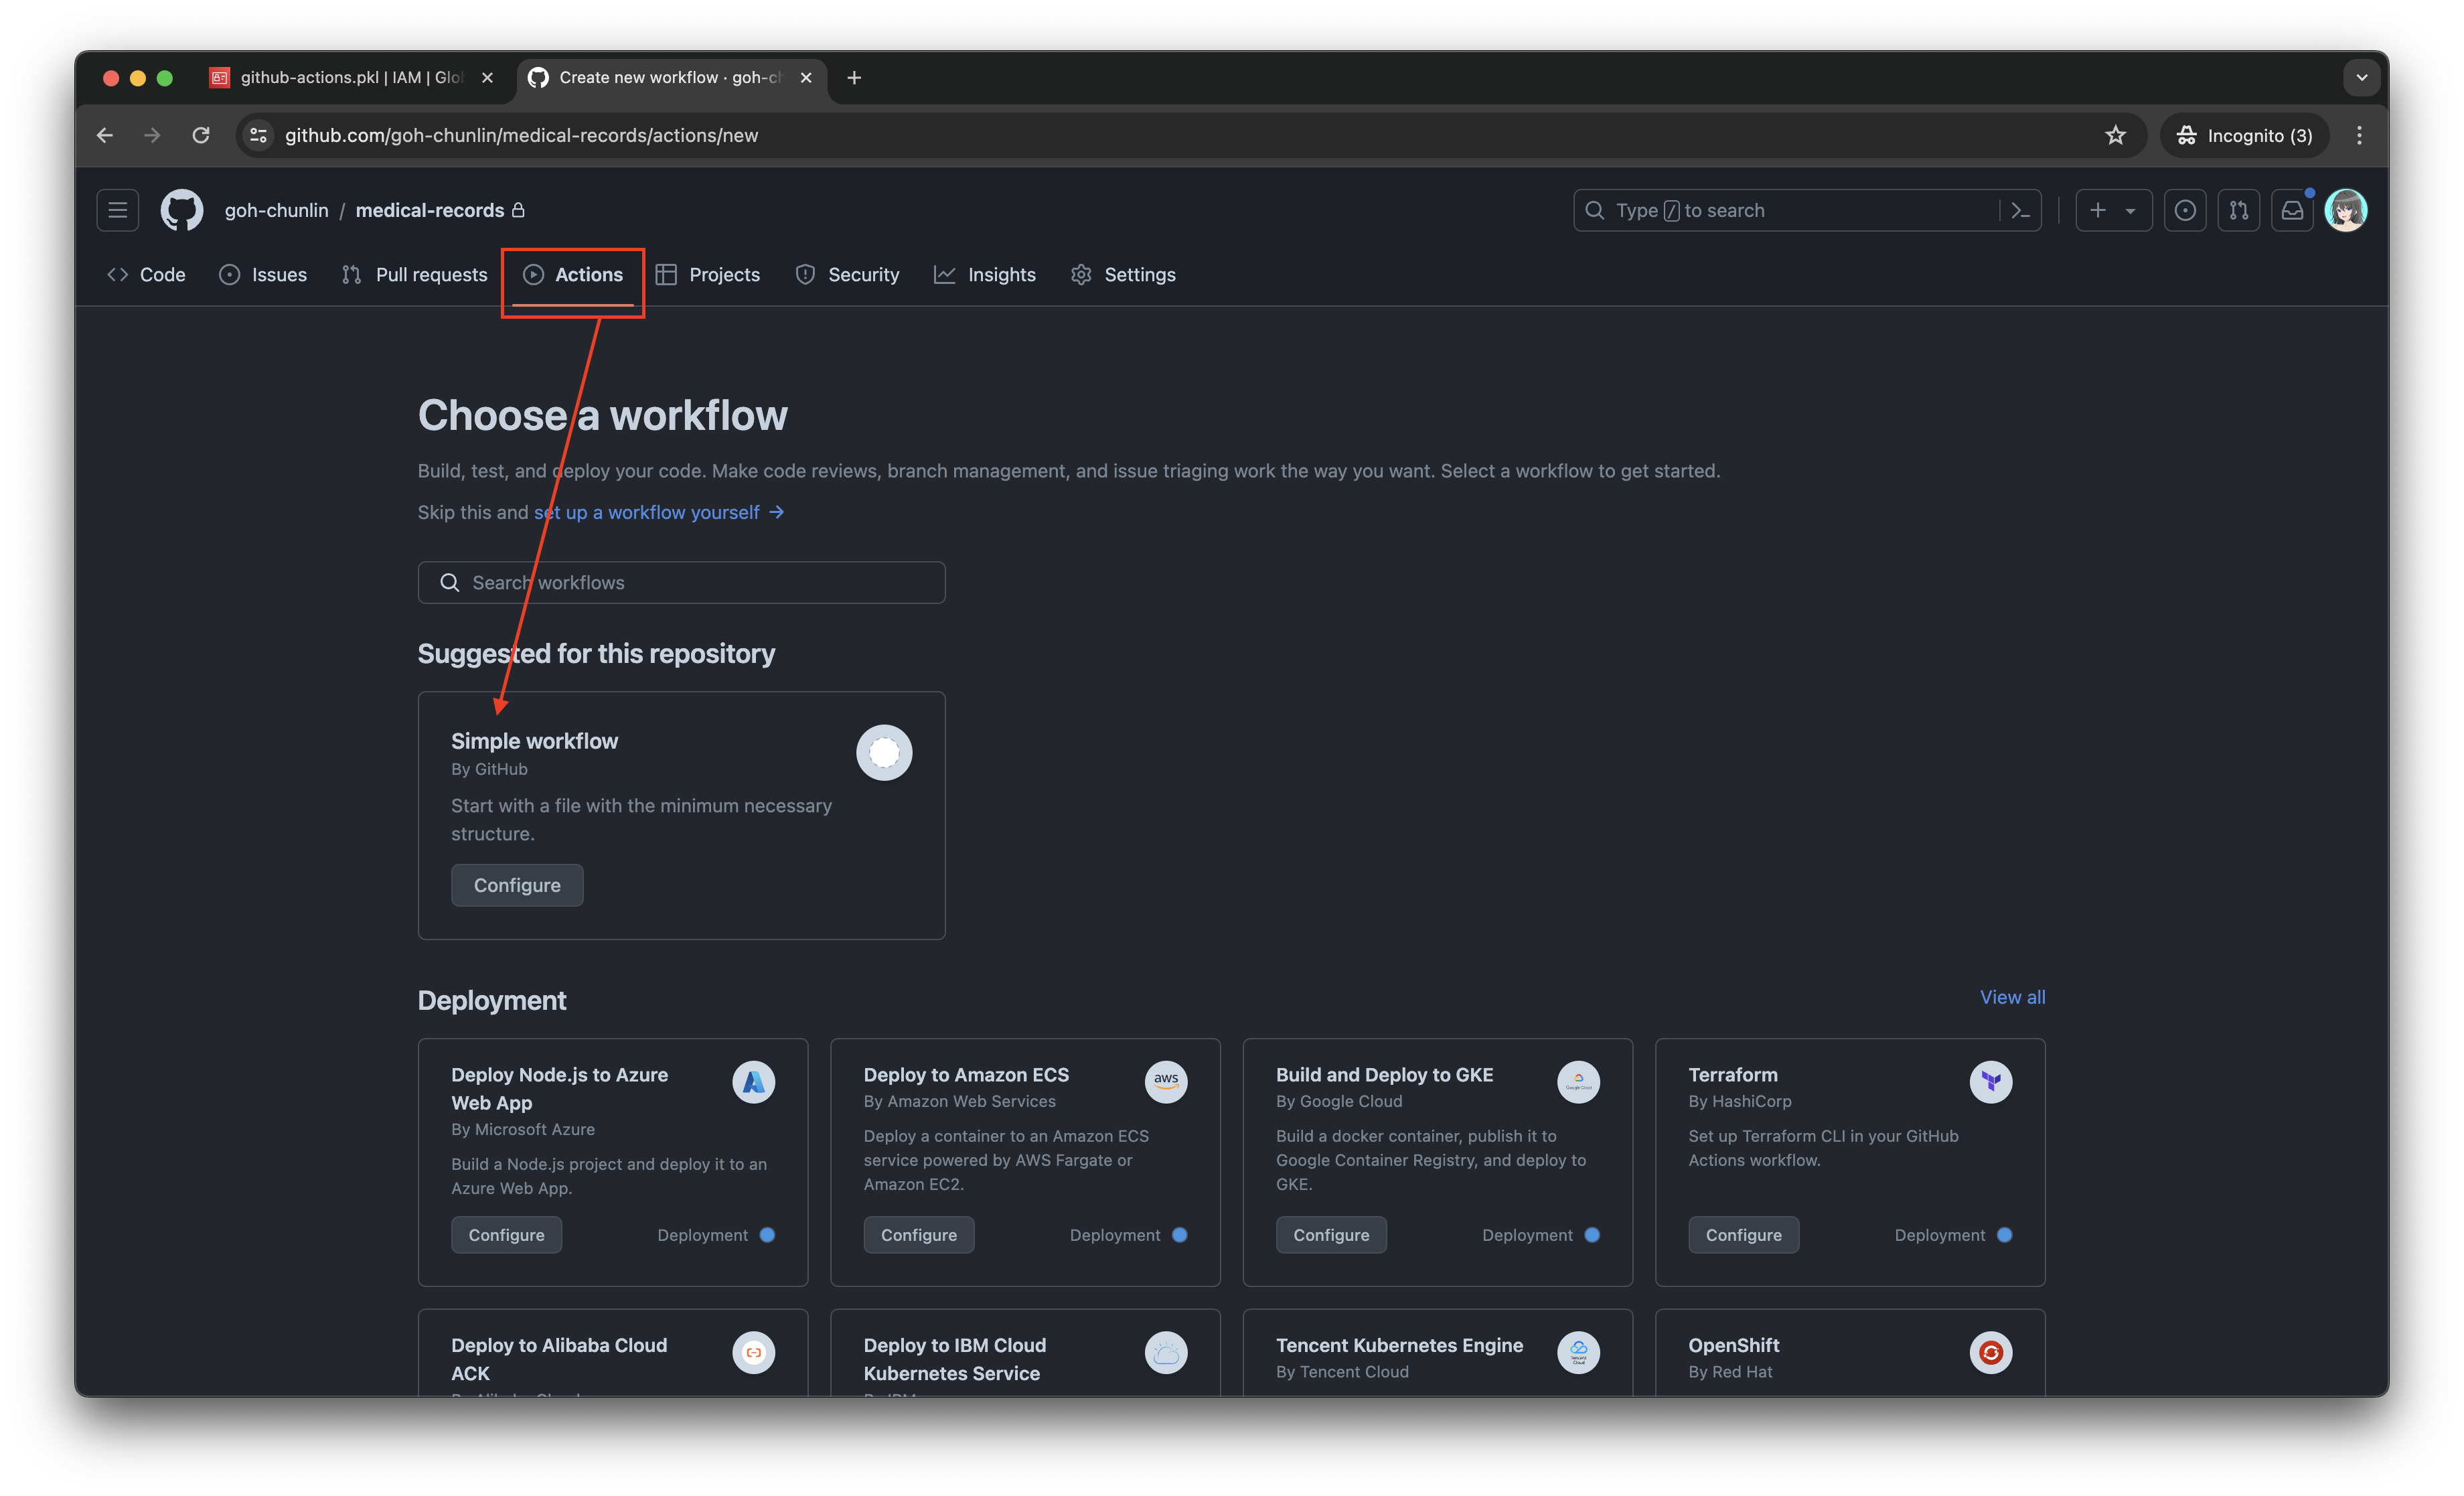
To begin, let’s download a new Linter available for Pkl files in the workflow. The linter is known as pkl-linter done by Eduardo Aguilar Yépez, a senior software engineer at Draftea.
name: Evaluate Pkl and store it in S3 as JSON

on:
  push:
    branches: [ "main" ]

  # Allows us to run this workflow manually from the Actions tab
  workflow_dispatch:

jobs:
  build:
    runs-on: ubuntu-latest

    steps:
      - uses: actions/checkout@v4

      - uses: actions/setup-go@v5
        with:
          go-version: '>=1.17.0'

      - name: Get Go Version
        run: go version

      - name: Install Linter
        run: go install github.com/Drafteame/pkl-linter@latest

      - name: Run pkl-linter
        run: pkl-linter medical-records

Next, we need to install the Pkl CLI to evaluate Pkl modules and write their output to a file. There are native executables available for us to use. As shown in the workflow above, the GitHub Actions runner is ubuntu-latest, which uses the Ubuntu 22.04 LTS image as of Jun 2024. It uses the amd64 architecture. Hence, we can download the Pkl Linux executable for amd64 architecture.
name: Evaluate Pkl and store it in S3 as JSON

...
# Omitted for brevity

jobs:
  build:
    runs-on: ubuntu-latest

    steps:
      ...
      # Omitted for brevity

      - name: Install Pkl CLI
        run: curl -L -o pkl https://github.com/apple/pkl/releases/download/0.25.3/pkl-linux-amd64

      - name: Grant execute permission to Pkl CLI
        run: chmod +x pkl

      - name: Get Pkl CLI version
        run: ./pkl --version

      - name: Eval the Pkl files
        run: |
          cd medical-records
          files=$(find . -name "*.pkl")
          count=0
          for file in $files; do
            output_filename="${file%.pkl}.json"
            ../pkl eval -f json -o ../output/$output_filename $file
          done
          cd ..
When my workflow is executed in June 2024, the version of the Pkl CLI is “Pkl 0.25.3 (Linux 5.15.0-1053-aws, native)”.
As shown in the last step above, it will loop through the JSON file in the medical-records folder and evaluate them one-by-one using the Pkl CLI. The JSON files generated will be stored in the output folder.
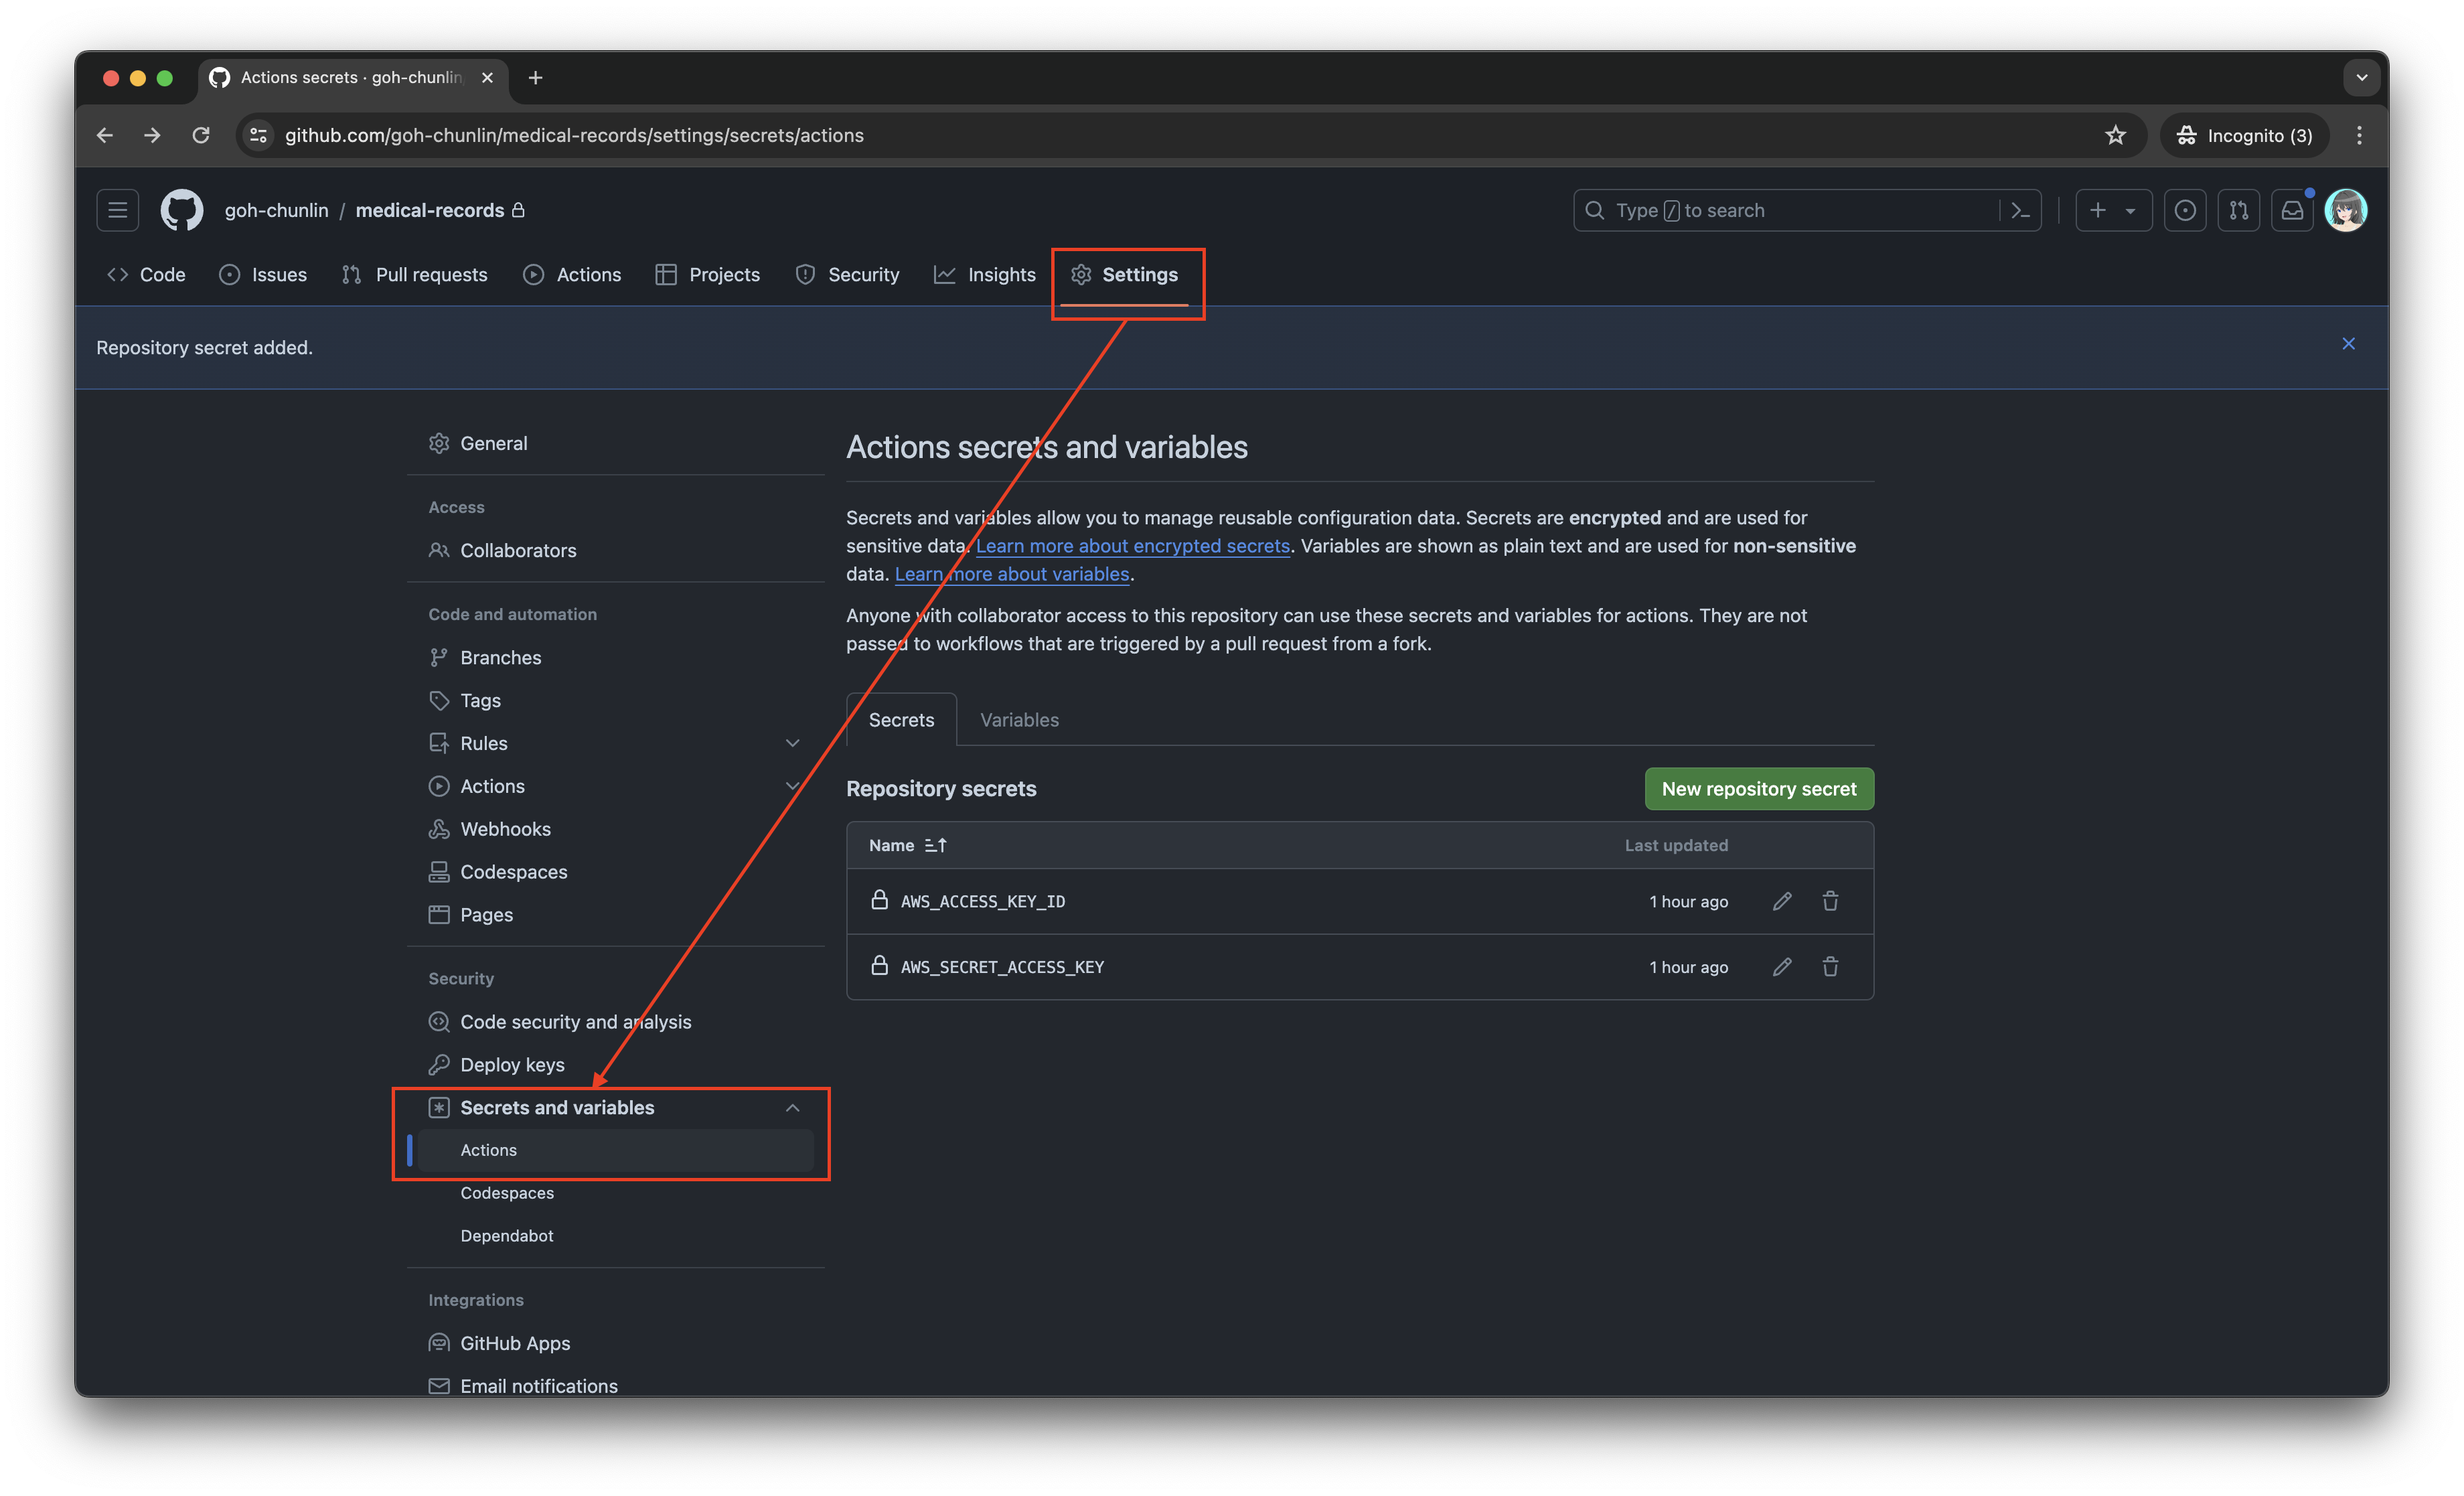
Eventually, what we need to do is to upload the file over to our AWS S3 bucket. However, before that, let’s make sure the AWS access key and secret access key we generated earlier are stored securely on GitHub Actions, a shown in the screenshot below.
Now, we can easily setup AWS CLI with the secrets above and use the s3 cp command to move the generated JSON files over to our S3 bucket. To do so, we only need to complete our workflow with the following.
name: Evaluate Pkl and store it in S3 as JSON

...
# Omitted for brevity

jobs:
  build:
    runs-on: ubuntu-latest

    steps:
      ...
      # Omitted for brevity

      - name: Setup AWS CLI
        uses: aws-actions/configure-aws-credentials@v1
        with:
          aws-access-key-id: ${{ secrets.AWS_ACCESS_KEY_ID }}
          aws-secret-access-key: ${{ secrets.AWS_SECRET_ACCESS_KEY }}
          aws-region: ap-southeast-1

      - name: Copy files to S3 bucket
        run: |
          aws s3 cp output s3://lunar.medicalrecords --exclude "*" --include "*.json" --recursive
Please take note that the s3 cp command performs operation only on single file, hence we need to apply the --recursive flag to indicate that the command should run on all files under the specified directory, i.e. output.
Wrap-Up
In conclusion, utilising Pkl for generating and maintaining JSON files offers significant advantages in terms of reducing complexity and enhancing maintainability. By abstracting common elements and leveraging typed objects, Pkl simplifies the management of large and evolving datasets. The structured approach provided by Pkl not only minimises redundancy but also ensures that configurations remain consistent and error-free through its robust validation features.
Additionally, by using GitHub Actions, we can automate the process of evaluating Pkl files, generating the corresponding JSON files as output, and uploading these JSON files to our S3 bucket. This automation not only enhances efficiency but also ensures that changes are tracked and managed effectively.
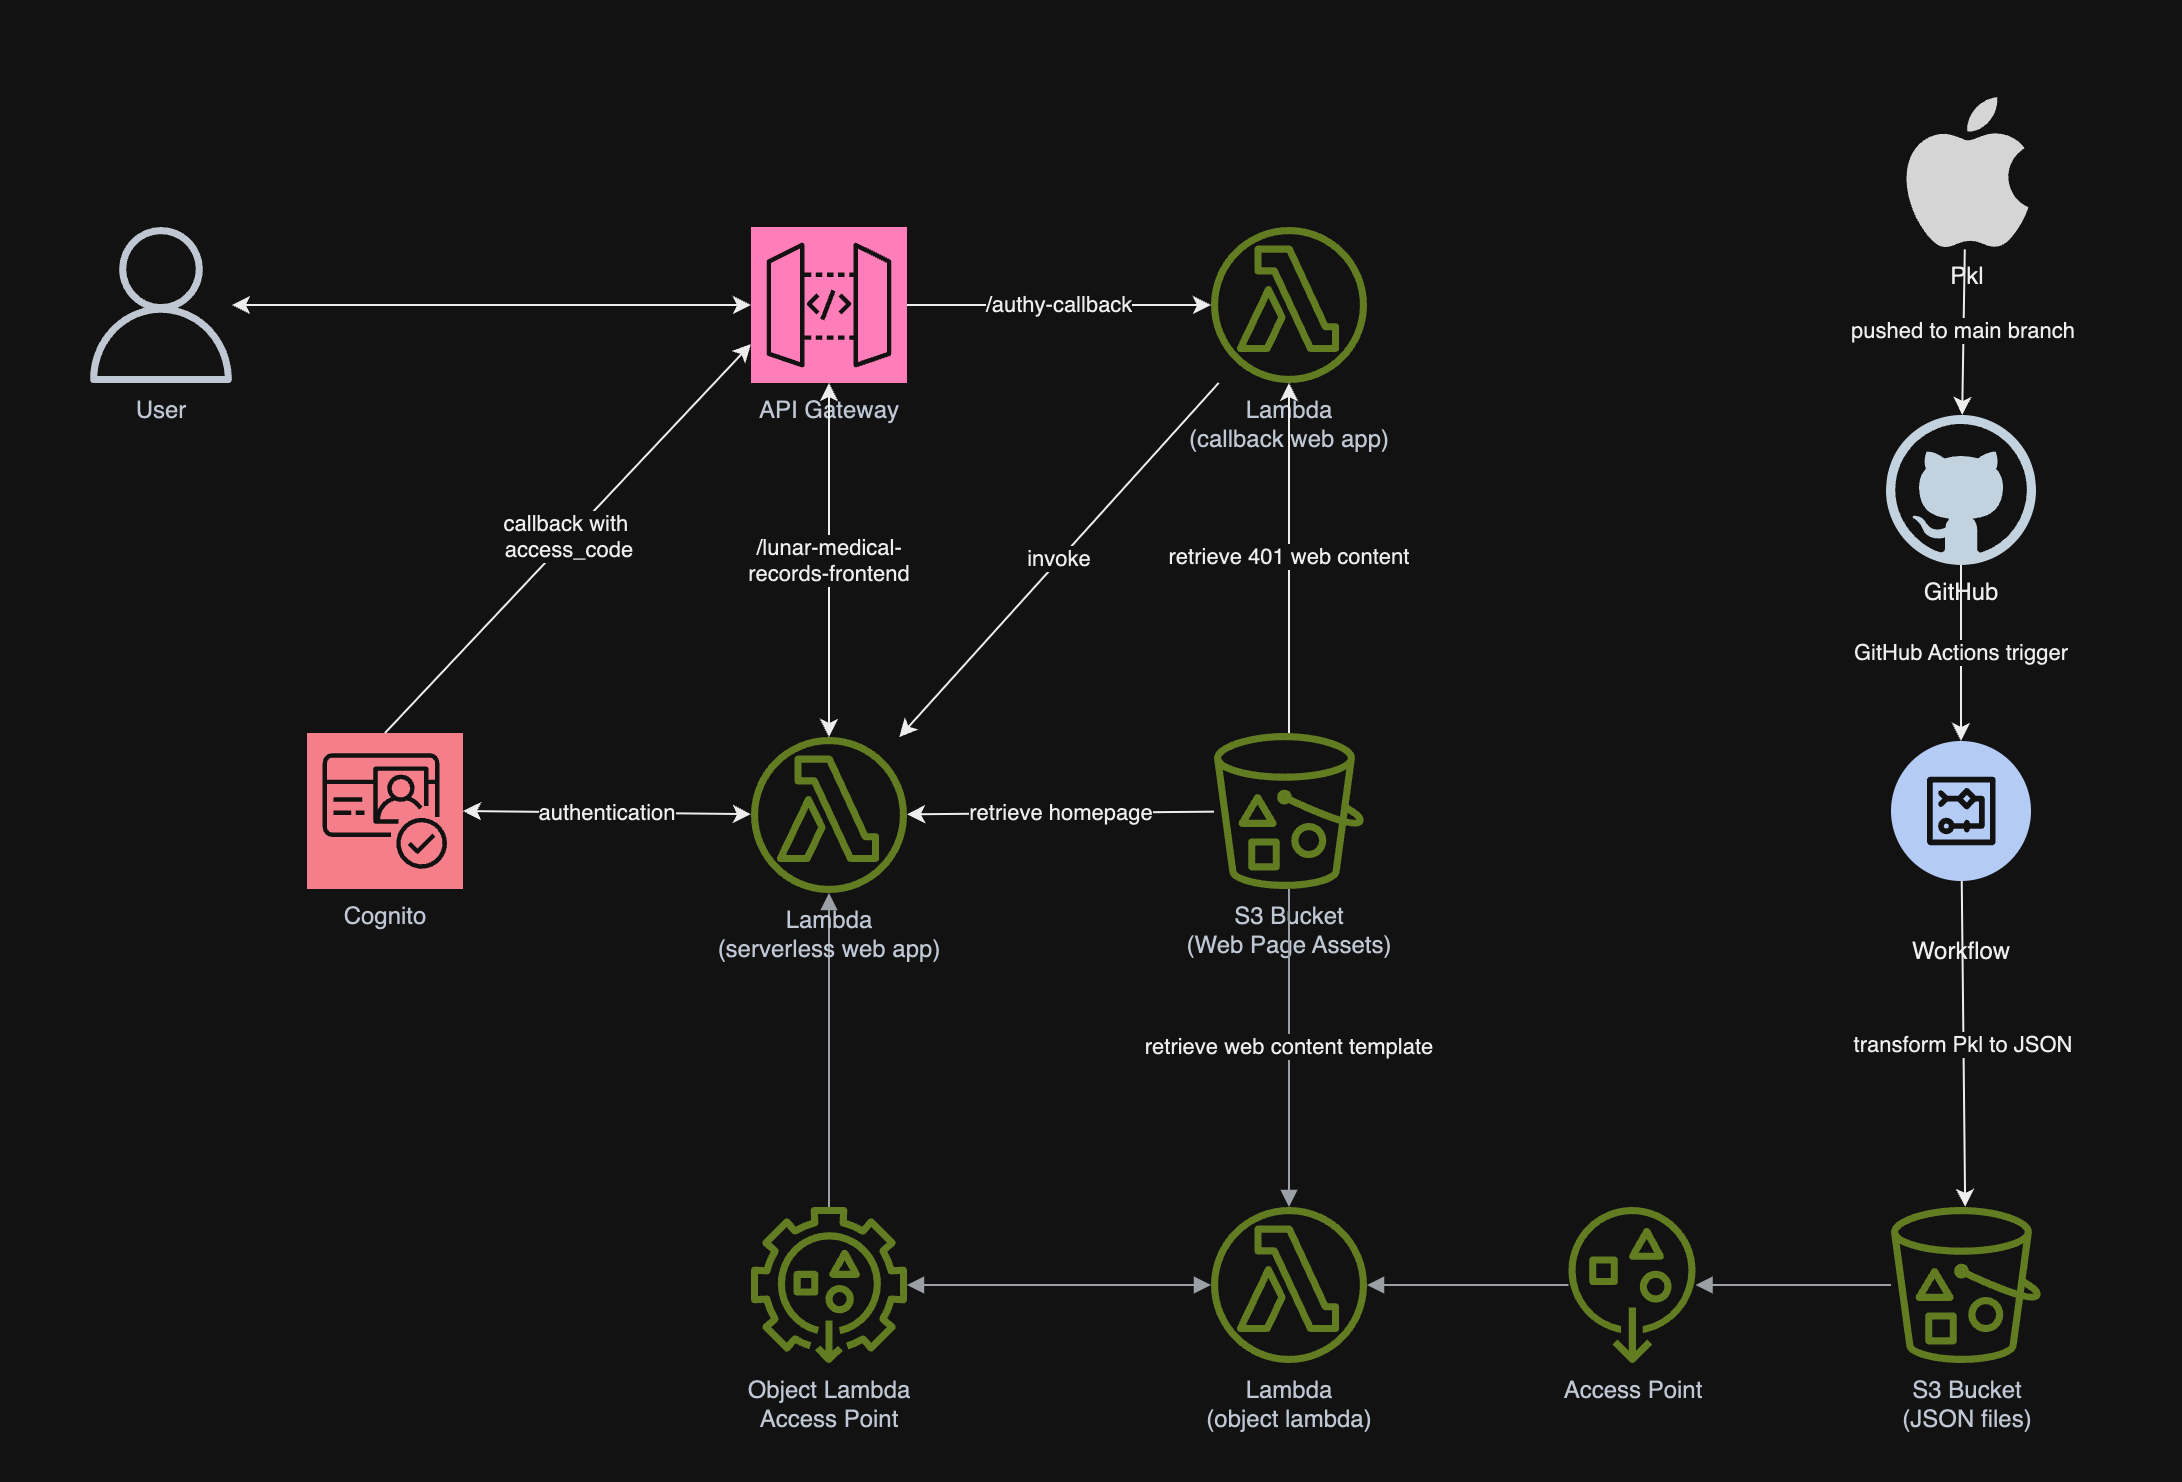
In summary, we can conclude the infrastructure that we have gone through above and our previous article in the following diagram.