
[This post is updated on 19th July 2020 to reflect the latest UI of both Azure Portal and Postman. I’d like to take this chance to correct some of my mistakes made in earlier post, as friendly pointed out by readers in the comment section.]
Today is the first working day of a new year. Today is the second half of year 2020 where I have been instructed to work from home for months. I thus decided to work on a question raised previously by the senior developer in my previous job back in 2018: How do we authenticate an Azure Function?
The authentication tool that I am using is the Azure Active Directory (Azure AD). Azure AD provides an identity platform with enhanced security, access management, scalability, and reliability for connecting users with all our apps.
Setting up Azure Function
The Azure Function that I’m discussing here is the Azure Function app with .NET Core 3.1 runtime stack and published as Code instead as Docker Container.
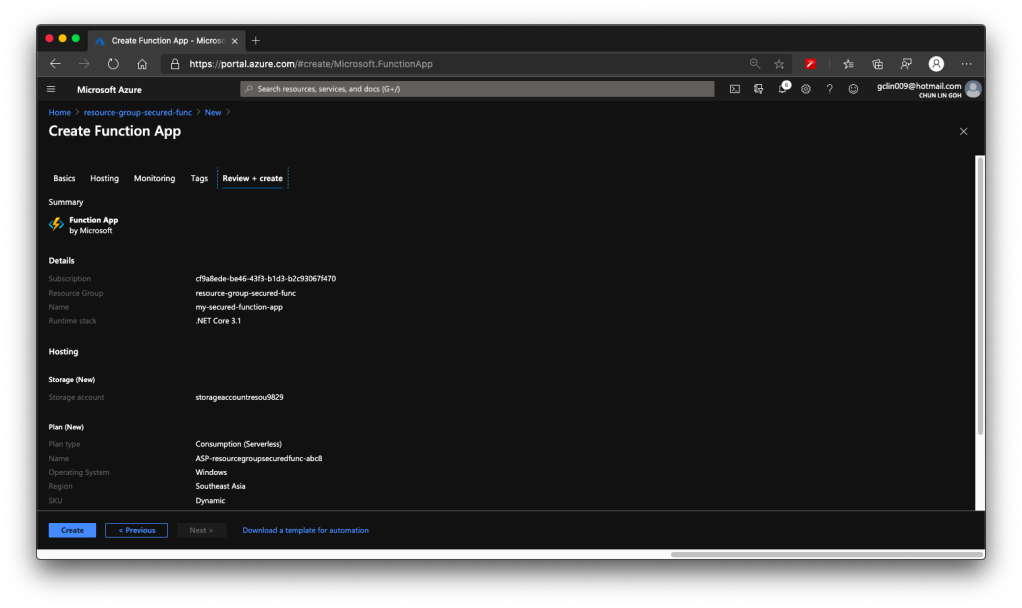
The whole Function creation process takes about 2 minutes. Once it is successfully created, we can proceed to add a new function to it. In this case, we are going to choose a HTTP trigger, as shown in the screenshot below. We choose to use a HTTP trigger function because later we will show only authenticated users can get the results when sending a POST request to this function.

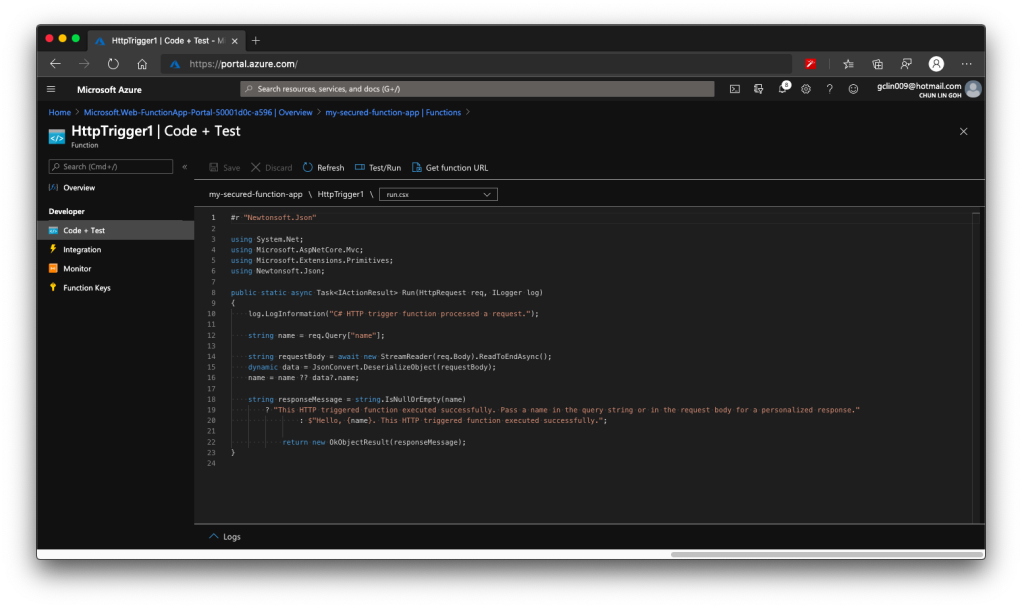
Once the trigger is created, we will see that there is a default C# code template given which will return the caller a greeting message if a name is provided in the body of HTTP request (or through query string).
HTTP Methods and Function Keys
Before we continue, there are a few things we need to handle. The steps below are optional but I think they are useful for the readers.
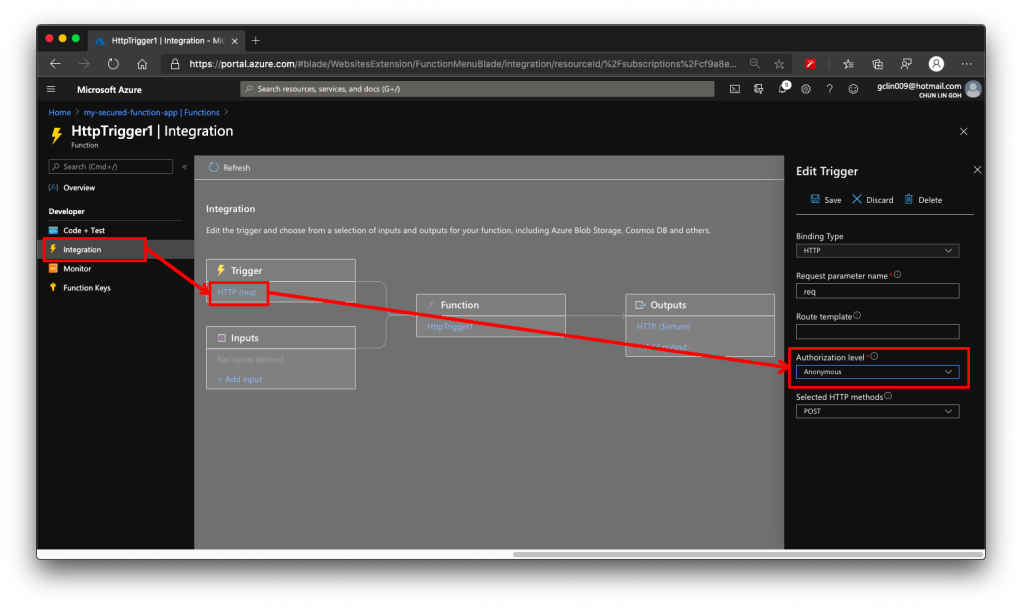
Firstly, by default, the Function accepts both GET and POST requests. If you would like to only allow POST request, changing only the C# codes above is not going to help much. The correct way is to choose the accepted HTTP methods for this Function under its “Integration” section, as shown in the screenshot below.
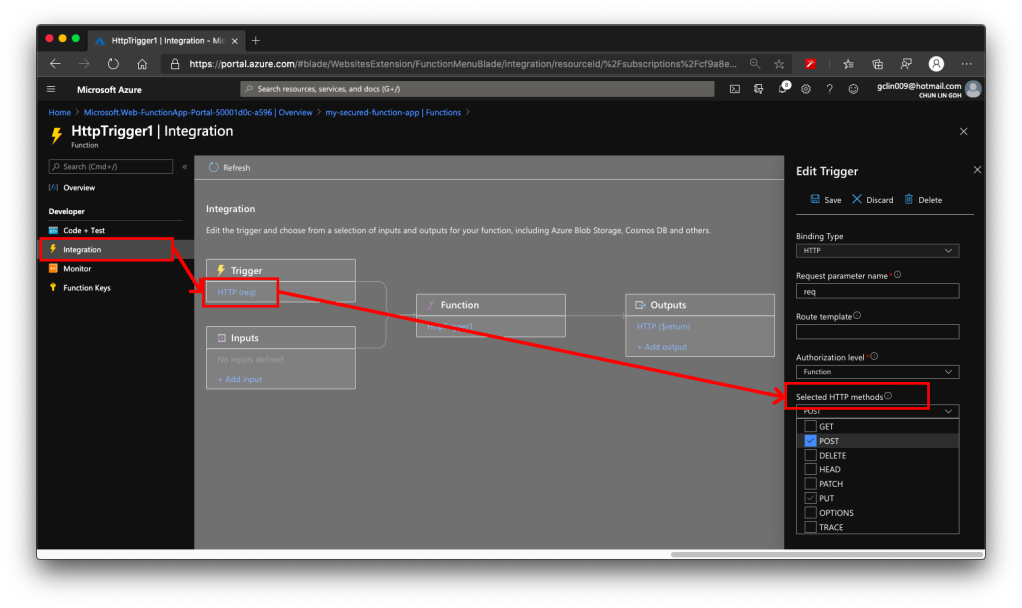
In our case, since we will only accept POST request, we will tick only the POST option.
As you notice in the “Authorization level” dropdown which is right above the “Selected HTTP methods”, it currently says “Function”. Later we must change this but for now we keep it as it is. If you would like to manage the Function Key, or checkout the default one, you can find the keys in the “Function Keys” section of the Function.
Secondly, what is the URL of this Function? Unlike the previous version of Azure Function, the URL of the Function can be retrieved at both the Overview section and the Code + Test section of the Function. However, the URL in the Overview section has no HTTPS, so we will be using the HTTPS URL found in Code + Test, as shown in the screenshot below.
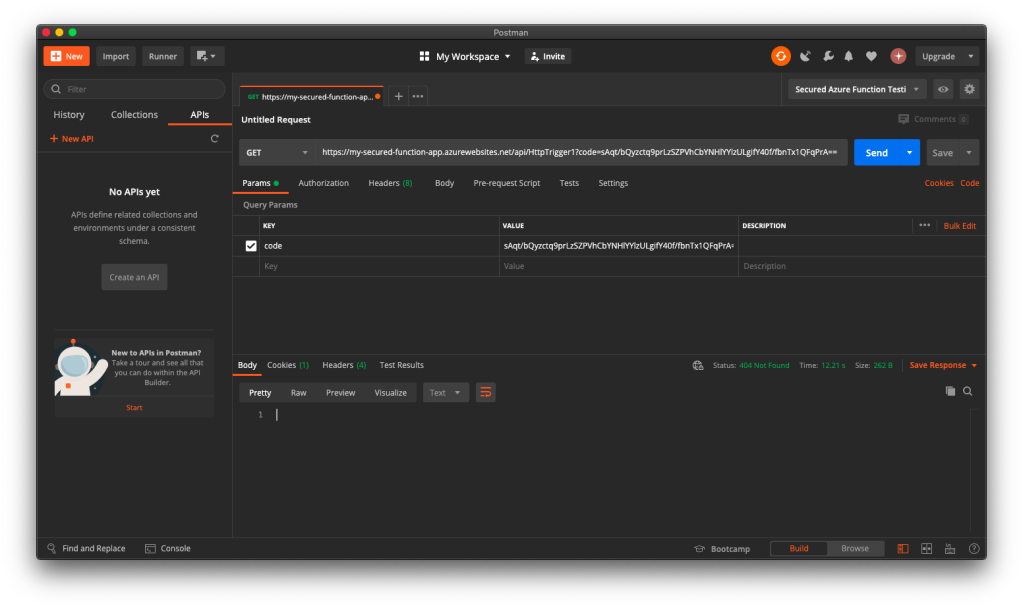
Now if we send a GET request to the Function, we shall receive 404 Not Found, as shown in the following screenshot, because we only open for POST requests.
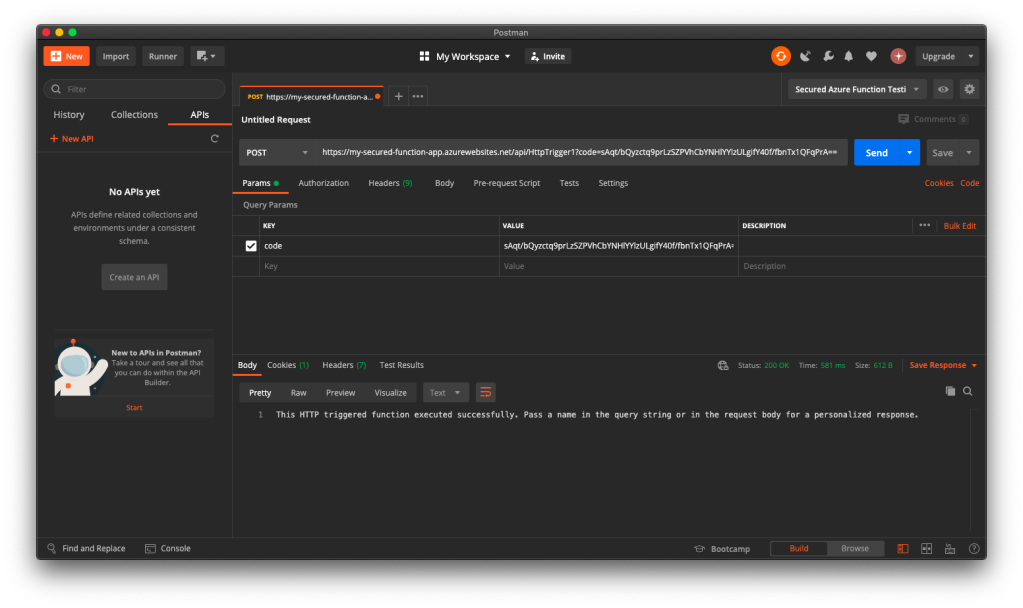
Thus, when we send another HTTP request but make it to be a POST request, we will receive the message that is found in the C# codes in the Function, as shown in the following screenshot.
Now, everyone can send a POST request and get the message as long as they know the Function Key. So how do we add Authentication to this Function?
Authorization Level for the Function
Remember in the earlier section above, we talked about the Authorization Level of the Function? It has three options: Function, Admin, and Anonymous.
We must change the Authorization Level of the Function to be “Anonymous”, as shown in the screenshot below. This is because for both “Function” and “Admin” levels, they are using keys. What we need here is user-based authentication, hence we must choose “Anonymous” instead.
This step is very important because if we forgot to change the Authorization Level to “Anonymous”, the Function will still need the Function Key as the query string even though the request comes in with a valid access token.
Enable App Service Authorization
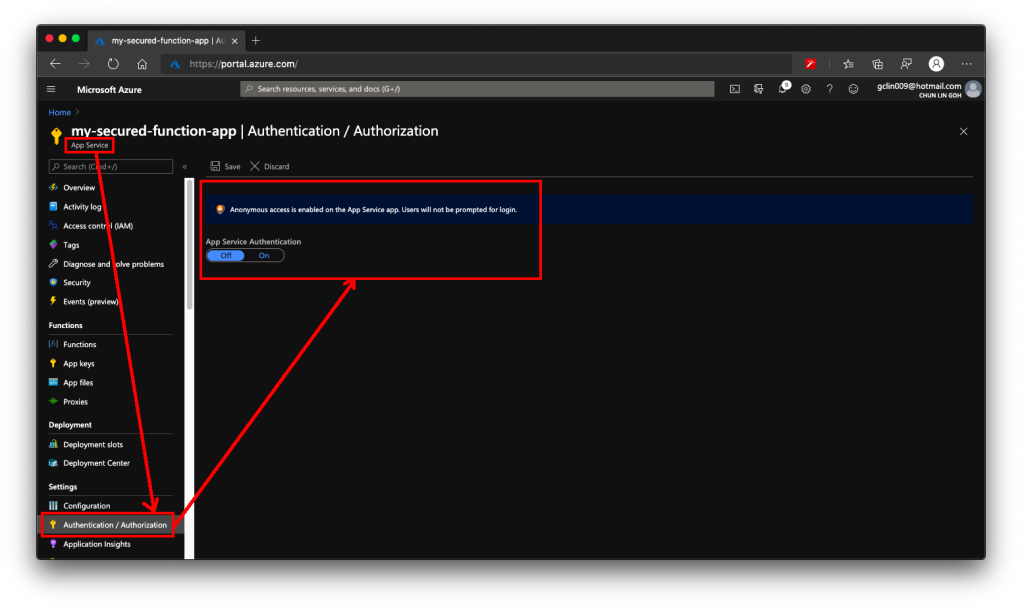
After that, we need to visit the App Service of the Function App to turn on App Service Authentication. This feature is at App Service level instead of the Function itself. So please pay attention to where to look for the feature.
After the Authentication is turned on, we need to specify “log in with Azure Active Directory” as the action to be taken when the request is not authenticate, as illustrated below. This step is also very important because if we forgot to change it and “Allow Anonymous requests (no action)”, then no matter whether we set the Authentication Providers or not, people can still access the Function. Hence, please remember to change this setting accordingly.
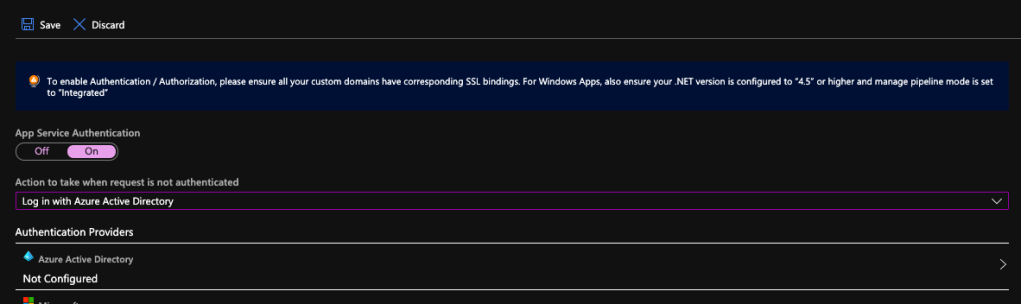
Next, please click on the Azure Active Directory which is listed as one of the Authentication Providers. It is currently labelled as “Not Configured”. Don’t worry, we will now proceed to configure it.
Firstly, we choose the Express mode as management mode. Then we can proceed to create a new Azure AD. The Portal then will help us to setup a new AD Application (or choose from existing AD Application). You can go to Advanced directly if you are experienced with Azure AD.
You should now see the page which looks like what is shown in the following screenshot.
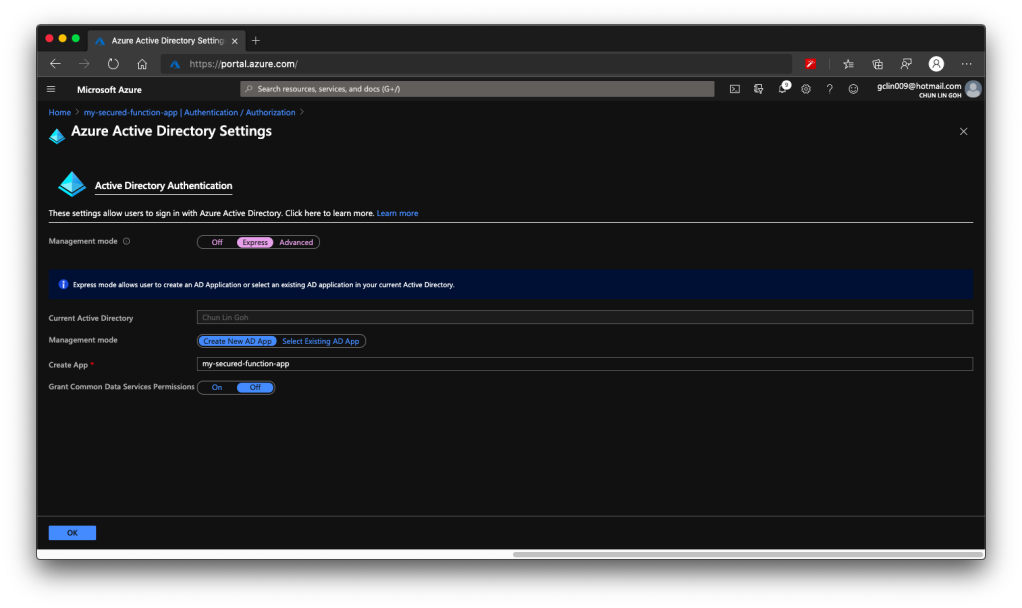
There is one thing that may catch your attention. It is the last item in the page called “Grant Common Data Service Permissions”. Common Data Service, or CDS, is Microsoft way of providing a secure and cloud-based storage option for our data. There is a one-hour Microsoft online course about CDS, you can take the course to understand more. Grace MacJones, Microsoft Azure Customer Engineer, also gave us a short-and-sweet explanation about this setting on GitHub.
We basically can leave everything as default in the page and proceed to click the “OK” button at the bottom of the page.
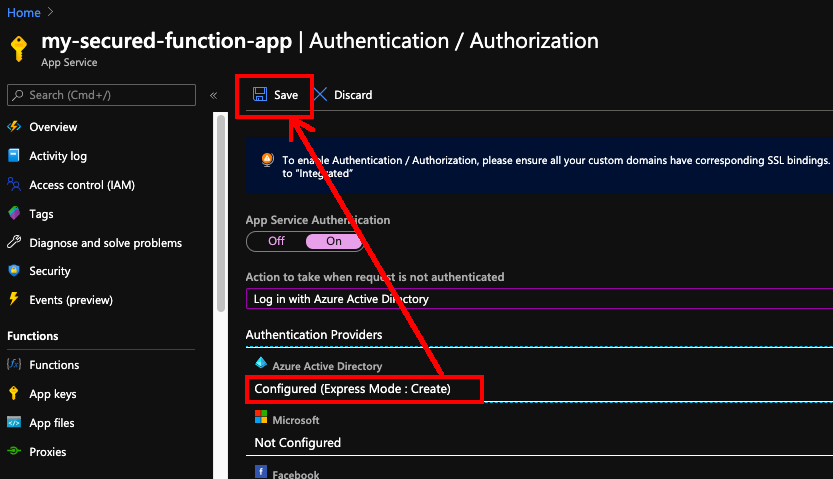
After this, the Azure AD will be labelled as “Configure (Express Mode: Create)”. We can then proceed to save the changes.
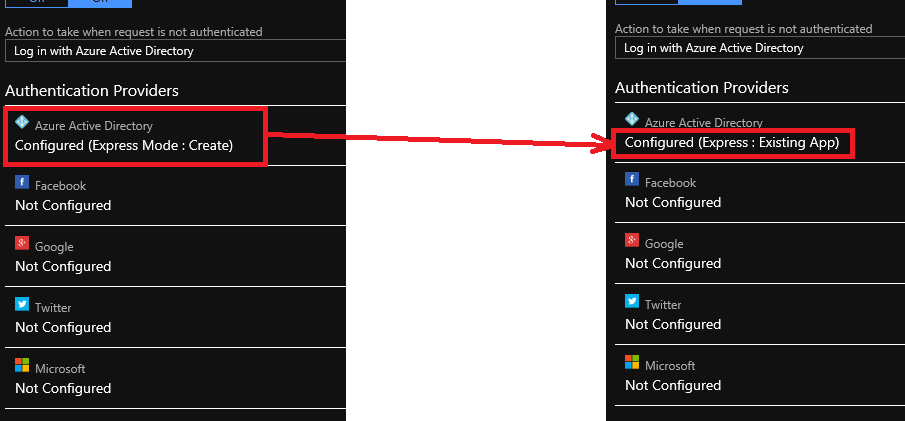
After the settings are saved, we can refresh the page and realising the Azure AD is now labelled as “Configure (Express: Existing App)”. That means the Azure AD app has been created successfully.
Now, click in to the Azure AD under the Authentication Providers list again. We will be brought to the section where we specified the management node earlier. Instead of choosing Express mode, now we can proceed to choose the Advanced mode.
We will then be shown with Client ID, Issuer Url, and Client Secret, as shown in the following screenshot. According to Ben Martens’ advise, we have to add one more record, which is the domain URL of the Function, to the “Allowed Token Audiences” list to make Azure AD work with this Function, as shown in the following screenshot. (This step is no longer needed with the new interface since October 2019 so I strikethrough it)
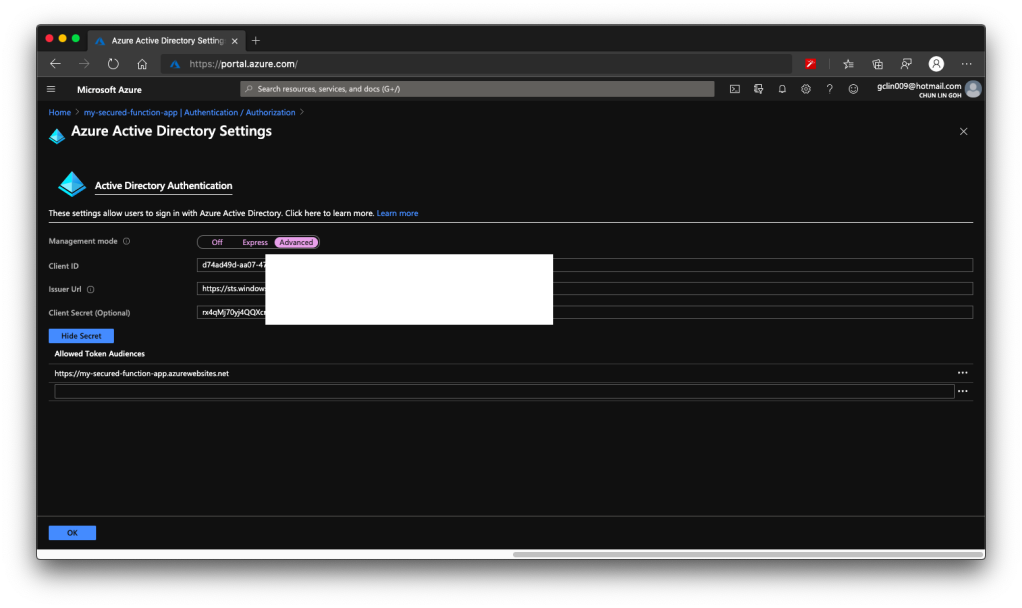
When you leave this page, the Azure Portal may prompt you to save it. You can choose not to save it. It is optional. If you save it, the Azure AD mode will be changed from Express to Advanced and this will not affect our setup.
Testing on Postman
Now, let’s test our setup above.
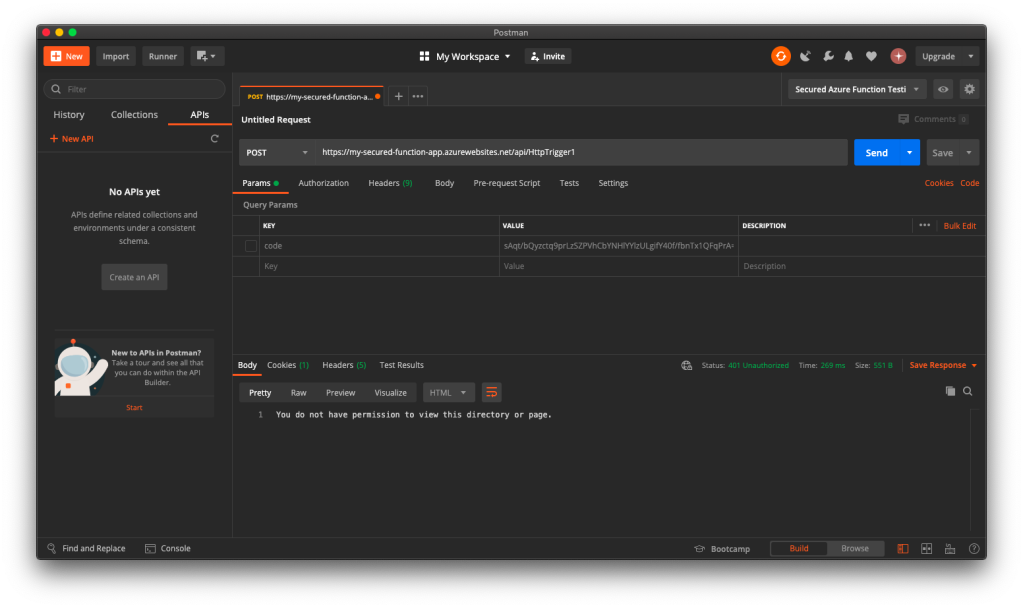
When we send the same POST request to the Function again (with the code query string removed since it’s no longer necessary), this time with the App Service Authorization enabled for the Function App, we will no longer be able to get the same message back. Instead, we are told to be 401 Unauthorised and “You do not have permission to view this directory or page”, as shown in the screenshot below.
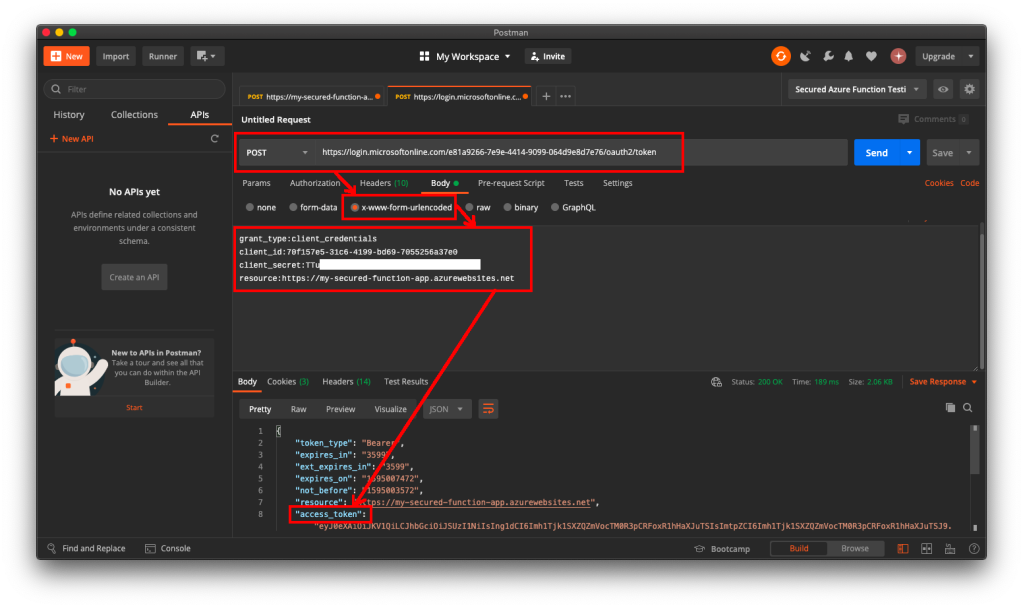
Now, let’s try to authenticate ourselves.
To do so, we will make a POST request with the body containing Grant Type, Client ID, Client Secret, and Resource to the following URL:
https://login.microsoftonline.com/<Tenant ID>/oauth2/token to retrieve the access token, as shown in the following screenshot.
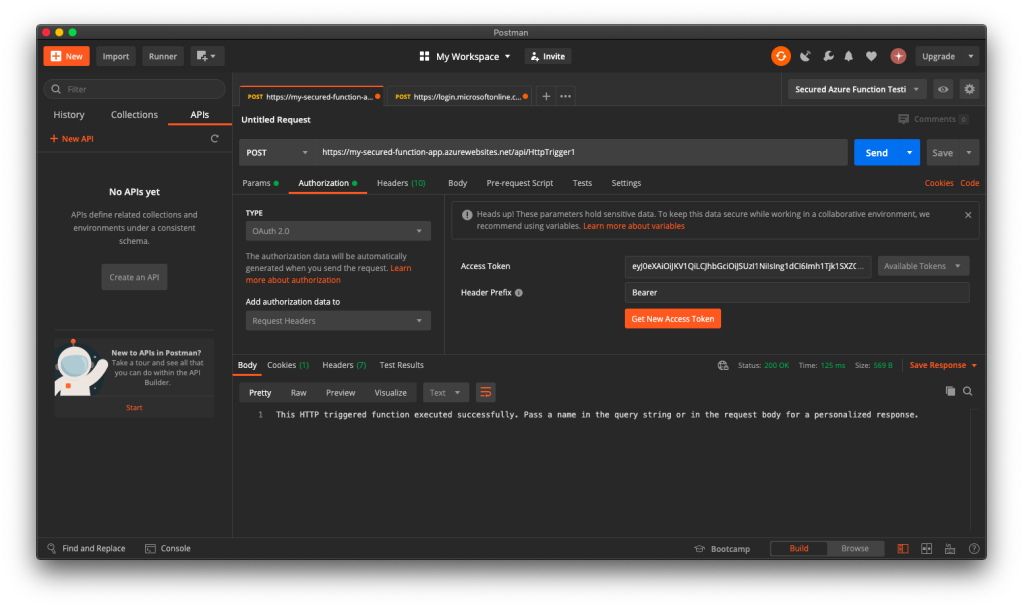
If we use the access token to send POST request to our Function, we will be told that we are now authorised and the message found in C# code is presented to us, as shown in the following screenshot.
Conclusion
If you would like to get the claims in the Azure Function, you can refer to the following code which loops through all the claims. If you would like to allow a certain client app to call the Azure Function, you can check for the value of the claim having “appid” as its type.
foreach(var claim in principal.Claims)
{
    log.LogInformation($"CLAIM TYPE: {claim.Type}; CLAIM VALUE: {claim.Value}");
}
That’s all it takes to setup a simple authentication for Azure Function with Azure AD. If you find anything wrong above, feel free to correct me by leaving a message in the comment section. Thanks!
References
- How to Use Azure Active Directory (AAD) Access Tokens in Postman;
- Client App Calling An Azure Function With AAD;
- [Stack Overflow] Azure Function authentication using Azure Active Directory;
- Add OAuth2 Implicit Flow to Azure Function;
- [Stack Overflow] Azure Function 2.x – Get Current User’s Claims;
- Azure Functions – Triggers Usage – Working with Identities;
- ClaimsPrincipal Class – .NET Core 2.2.

Hi Chun,
by the way, you don’t need to grant Access permissions to the client App to make it work. I’ve come across this knowledge by accident and now I’m a bit confused about how to really secure my Functions to let only a specific client App access it.
If you have any idea, I would be grateful if you share.
Thanks
Hi,
I’m not sure if my last post worked, so I’m posting it again 🙂
I have noticed that if I follow your blog step by step, but omit to grant the Access permissions to my client app, it still works! So this makes me wonder how we can specify which client app can call a particular Function.
Because right now, I can call my Function using any AppID.
Thanks
Thanks, Jonathan!
That’s quite surprising to me. Let me check it over the weekend and get back to you.
Regards,
Chun Lin
Hi Chun,
so did you came up with the same observations I did? Got any idea if it’s by design or we are missing something?
Thx
Jonathan
Dear Jonathan,
I have tried not giving the permission to the client app and I got the error saying “AADSTS500011: The resource principal named was not found in the tenant named . This can happen if the application has not been installed by the administrator of the tenant or consented to by any user in the tenant. You might have sent your authentication request to the wrong tenant…\r\nTimestamp: 2019-04-14 18:44:51Z”
Would you be able to retry? Would you able to share with me your steps so that I can try it out? If not, I try to create another post to share my steps with you to get the error above.
Sorry for not replying you early because recently I have been busy at work. >__<
Regards,
Chun Lin
Hi Chun,
did you try to grant the permissions afterwards and confirm you error was not caused by something else? I just tried your procedure again this morning and I still am able to call my function without any permissions. Next thing I will try (right away) is to create the client app registration with another account. In your error message above it says “This can happen if the application has not been installed by the administrator of the tenant”.
Thanks
For your information, I just created a new App Registration with a standard user and I’m still able to call my function without having granted any permission to my App Registration.
Ah, I finally get the same issue you said above. Setting the “Required Permission” is indeed not important here. However, the resource field (which is the same as the Function URL) used in the access_token retrieval step will still help to tell which client can access which Function.
Please correct me if I’m wrong.
Thanks!
Hi Chun,
since the resource field is set by the calling application, I don’t think it helps secure which client can access the function. No?
Hi Chun,
It’s 5/7/2019 and the Azure Portal has changed so the awesome screenshots you posted no longer match the current Portal.
Would you be able to create a second post with the updated screenshots and instructions?
I’ve been working for 3 days, trying to get this to work.
I’m getting this message returned each time I invoke my function, “You do not have permission to view this directory or page.”
I got as far as this screenshot, “Creating a never expired key.” I can’t figure out how to perform this step and the following steps.
Thank you for your help,
Karl
Hi Karl,
Sorry for the late reply because I got too occupied in my work and I only have time to come back to blogging.
I have updated the screenshots to the current UI.
Thank you for your feedback and once again, sorry for the delay!
Regards,
Chun Lin
Thank you, have a great day!
FYI, I confirmed that your technique only validates the audience and the issuer of the token. If you want to validate roles, you need to define them in the Function Manifest and then implement the role validation in the code of the function itself.
Hi Jonathan,
I’m extremely sorry for the super late reply because of my work lately and only got to take a short break now. Nevertheless, thank you for your findings!
Yes, you are right. I have updated my post to remove this part.
I see but at the same time, I also found a way to detect which app is calling it by referring to the claim called “appid”. With this method, I can restrict client apps from accessing the codes of the Azure Functions. I have added the way to easily get claims in the end of the post.
Thanks again for your feedback and guidance!
Regards,
Chun Lin
Hi,
I have nearly the same setup as you have in this post (WPF application should access an http trigger function which is secured with Azure AD) so I followed all the steps in this post but finally ending up in following error when trying to retrieve the bearer token from authentication endpoint: “AADSTS90014: The required field ‘scope’ is missing”. Any idea what could have went wrong? Did you have to add a scope to the bearer token request?
Thanks in advance & regards,
rekcul
Hi Rekcul,
Nope, I didn’t state any scope when request for the bearer token.
Do you manage to get it via Postman?
Regards,
Chun Lin
You are probably hitting V2 of the AAD endpoint () when you try to get your token. V2 require a scope, V1 only a Resource.
V1: https://login.microsoftonline.com/{tenant}/oauth2/token
V2: https://login.microsoftonline.com/{tenant}/oauth2/v2.0/token
Thanks Jonathan for pointing that out. =D
Hello Chun,
Awesome article about AAD integration with Azure function! It’s what exactly I’m looking for since I’ve tried so many useless/not-working sample code/tutorials for this answer. Thank you so much!
But a little bit confusion about one step in this workflow: Do we need to manually create an AAD registration app for this? The Express step in Function portal already created such an app. So I just added the changes of permission and creating client secret to this existing aad app. Then everything works!
Thanks again!
Thanks for your nice words, Harry.
Hmm… Now I look at the steps again, I think what you have suggested should be right.
Let me double check again and update the post later.
Thank you very much for pointing that out. =D
Thanks for the article. But I am confused. The point of securing Azure function with Azure AD was that user will get prompted for Azure AD account auth confirmation (organisational account or Microsoft outlook account). But in this post, all that is saving the Azure function is the client id/secret. That means I cannot use this in web app where client id/secret has to be passed to end user machine.
Should this post be updated to cover the more widely used case which is prompting user with Azure AD creds (oauth implicit flow).
Thanks, Kiran.
The use-case of this technique is to secure our Azure Function which is used as web API to be called by external party in their backend code. So when the external party is calling this API hosted on Azure Function, they need to provide also the secret.
Nevertheless, I will write an updated version soon to cover more use cases.
Thanks again for your feedback.
Regards,
Chun Lin
Hi
Thanks for the article! I have 2 questions:
1) the client which is consuming my APi is a stateless application, which means it cannot reuse the same token till its expiry. So for every call it will be a new token that will be requested. Is that ok? I could have millions of calls coming to the token api, will that cost something?
2) is there any other security that can be implemented apart from oauth? Example: basic authentication. Note that the client/consumer of the service is external to my organization and it is a backend server to azure function communication. So it is a browser less consumer.
Hi Sonam,
Thanks for the questions.
As far as I know, the is no official documentation from Microsoft about both the limit and cost of calling the Azure AD API. The cost of using Azure AD currently is only on user basis. However, there will be a problem on Throttling when there are too many requests, and our code needs to re-try. You can refer to the discussion here on Stack Overflow: https://stackoverflow.com/questions/56605992/limits-for-auth-access-token-request-in-azure-ad
Regarding the “browser-less” authentication, actually the one we use in this article is browser-less. There won’t be any popup or redirect to the browser because once we get the bearer token, we just simply use it in the subsequent API calls. There seems to be no plug-and-play basic authentication support for Azure Function. However, I do fine an open-source project about how they achieve it: https://github.com/securityvoid/azure-functions-basic-auth
Hope my answer helps and please correct me if I’m wrong.
Thanks again!
Regards,
Chun Lin
Hello Chun,
Thank you for posting your great article.
You’ve been very helpful.
Please let me ask a question.
Why do I need to register two Azure AD apps ?
(“azure-directory-app-secured-func” and “Secured Func” in your article)
When I tried to authenticate by using postman,
I could get an access token from an Azure AD app registered with Azure Functions (“azure-directory-app-secured-func” in your article),
but I couldn’t access Functions with it.
Why can’t I authenticate using client ID and secret only with AD application registered with Azure Functions?
I would appreciate it if you could give me a hint.
Hi Kojima,
Sorry for the late reply.
The first Azure AD app is created when we turned on the Active Directory Authentication. This will then give our Function App an Application (Client) ID. Then with the second Azure AD app, we then can input that Application (Client) ID that the logged in user who logs in through second Azure AD app can access. Doing this then indirectly allow the user to access the Azure Function.
If we only have the first Azure AD app, we have no way to specify the permission for that Azure AD app because Azure Function itself doesn’t have the Application (Client) ID.
This is why we did it that way. However, recently the Azure Functions have a new GUI again. Let me re-write another post for this again.
Once again, I’d like to apologise for the late reply. Please correct me if you found something incorrect in my reply. Thank you!
Regards,
Chun Lin
Hi Chiun,
Thank you for your kind instruction.
It was really easy to understand.
I’m looking forward to your another post.
Regards,
Kojima
Hi Kojima,
Thanks to your idea, I have updated the steps to use only the first Azure AD app in the new Azure Portal. It works and thus the steps are simpler now.
Thanks again for pointing that out. Please let me know if you find any issue in this updated post again.
Best regards,
Chun Lin
Thanks very much for all the time and effort you have spent on this! I followed your guidance and had my Azure Function working via application registration in less than an hour!
An excellent article!
Thanks, I’m glad that it helps! =D
Hi, in my Azure Function, i want to call a Azure API which requires Bearer Token, in this scenario, how could I let Azure Function login automatically? e.g. `az login` and `az account get-access-token`, thanks!
Hi, I haven’t personally tried that with Azure CLI, but the following article and discussion thread may help!
https://www.schaeflein.net/use-a-cli-to-get-an-access-token-for-your-aad-protected-web-api/
https://stackoverflow.com/questions/58972199/azure-active-directory-get-access-token-using-azure-cli